Unfortunately, this method has more disadvantages than advantages and they are quite significant. The disadvantages include the fact that insulation from the inside is, in fact, a violation of the requirements of heating engineering, according to which the heat insulator must be attached on the cold air side. In this case, the dew point (the place where condensation will accumulate) moves into the thickness of the walls, which can lead to their destruction. The following points can also be considered as disadvantages:
- complexity of interior decoration;
- reducing the usable area of rooms;
- insecurity of supporting structures from exposure to cold air from outside.
Accumulation of condensation inside the wall
If you choose the method of insulating walls from the inside with penoplex, then you need to be prepared for the negative consequences listed above. But there are cases when it is not possible to use other options. Such situations include the following.
Application in apartment buildings
Insulation of external walls from the inside with penoplex may be required for residents of the upper floors. Unfortunately, in the past there were rather lenient requirements for thermal protection of buildings. This has led to the creation of a huge amount of housing in the country, which is not comfortable for living in winter and requires enormous heating costs.
The only method of thermal insulation on the upper floors
Among such houses, it is worth highlighting panel houses, where the thickness of the concrete wall is 30-50 cm, although to comply with modern heating engineering requirements it would be necessary to build a concrete wall more than 4 meters thick. In this situation, only one option is possible - insulation from the inside.
Firstly, no one will give permission to make changes to the facade of a house on a small plot; it will be too conspicuous. Secondly, it is impossible to insulate the walls on the upper floors yourself; you will need to resort to the expensive services of industrial climbers.
Capital facade
If fairly expensive and durable materials were used in finishing the facade, it is irrational to dismantle them. It is better to insulate the walls from the inside. Only careful adherence to technology will allow you to get a fairly good result for a long time.
Disadvantages and advantages of insulating walls from the inside
Let's first consider what unpleasant moments await you:
- If the insulation is installed incorrectly on the inside of the room, there is a risk of condensation. This happens in the place where the insulation borders the wall, and nothing good can be expected from this neighborhood. In particular, the following happens: the humidity of the wall increases, which leads to a decrease in its thermal insulation properties and gradual destruction;
- the heat-storing properties of the room deteriorate, and even an open window will contribute to a sharp change in temperature, which is especially noticeable on hot days;
- sometimes the area of the insulated room is significantly reduced. This damage is especially noticeable in apartments that are small in size, and in the best case, these losses amount to 5% of the usable area of the room;
- insulation materials that are used to insulate walls are not always environmentally friendly, and this will be especially noticeable indoors.
However, not everything is so bad, and, as we have already said, there are also positive aspects, and, in this regard, insulating walls from the inside seems possible. In particular, it is worth noting that insulation from the inside is much cheaper, especially if the issue concerns the insulation of apartments located in multi-storey buildings.
In this case, industrial climbers are hired to carry out the work, whose services are expensive. This leads to another positive point - you can insulate the room from the inside yourself without the involvement of specialists. Thus, subject to basic precautions, insulating walls from the inside is acceptable; all that remains is to decide on the materials that can be used for this.
What is penoplex?
The material is used both in construction and when laying road/railway tracks. Penoplex, also known as expanded polystyrene and one of the varieties of light foam, allows not only to insulate a room, but also to prevent soil swelling, which makes it very attractive for many areas.
Penoplex can easily withstand low temperatures, which can be critical for other building materials. Therefore, it is used quite successfully in the Far North, both in construction and for insulating pipelines.
Pros and cons of the material
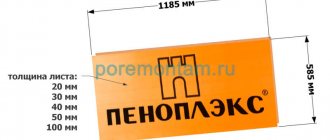
Penoplex is a synthetic material made from polystyrene. It is produced in 600×1200 mm slabs of various thicknesses. There are 5 types of penoplex: 31, 31C, 35, 45 and 45C. They have different densities and strengths, while thermal conductivity remains unchanged. The indicator is not affected by humidity level or temperature. This is the main advantage of insulation. In addition to excellent insulating properties, other advantages of EPS can be highlighted:
- The material is resistant to biological influences, freezing and temperature fluctuations.
- The slabs have high strength values and can withstand significant loads.
The disadvantages of insulation are:
- Low resistance to ultraviolet radiation. Even during storage, the slabs need protection. They are sold packaged in plastic film. When using penoplex for thermal insulation of buildings on the outside, finishing is required.
- Extruded polystyrene foam is damaged by solvents, petroleum products, and oil paints.
- Some brands of insulation have a flammability class of G4, which means low fire safety. You should not insulate ceilings with highly flammable penoplex foam; it is better to pay extra for material with the addition of fire retardants.
- The smooth surface of the plates has low adhesion, making installation on ceilings and walls difficult.
The cost of penoplex is higher than polystyrene foam and mineral wool. But the excellent performance characteristics of the material ensured its popularity as insulation.
Flammability of penoplex
The popularity of penoplex for insulation is increasing every year.
The main question remains: does penoplex burn? In production, polystyrene foam is used as the main raw material, which is resistant to fire. This was reflected in the characteristics of penoplex.
Where is it safe to use polystyrene foam?
- in places where there are no potential sources of fire;
- in non-residential premises;
- use for external insulation of the base, foundation, insulation of a frame house with polystyrene foam from the outside.
As you can see, insulation inside the house is unacceptable, and polystyrene foam installed under the slate will not cause harm only if it is installed in a non-residential attic with good ventilation.
Let us note once again, answering the question of whether polystyrene foam is harmful indoors, it is not the styrene itself that is harmful, but its concentration. Expanded polystyrene is a completely safe decor, but is not recommended as insulation for residential premises.
Conclusion
Sellers of expanded polystyrene have the right to refer to GOSTs and SNiPs when offering their goods, because these standards do not regulate the environmental aspect of the use of this heat-insulating material.
Let's talk about whether penoplex is harmful or not?
Despite the ongoing debate about the environmental safety of modern means of protecting objects under construction, not a single construction project can be completed without the use of various insulating materials. This trend does not mean that humanity is not concerned about its own environmental well-being.
New thermal protection products, such as extruded polystyrene foam, comply with existing standards, and their use is approved by the relevant standardization bodies and sanitary and epidemiological services. The periodic resumption of discussions in the media about whether penoplex is harmful or not is reminiscent of the elementary desire of competitors to create conditions for changing the market situation.
Basic schemes for performing work
It would seem that the internal wall is not an external one, you can simply cover it with insulation and that’s it. But, unfortunately, sometimes this is not enough, and additional manipulations are required during the work. Let's look at when this happens and why.
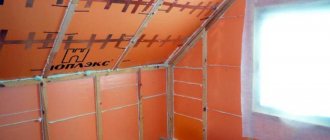
Construction of a frame for installation
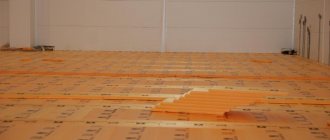
A partition 10–15 cm thick is mounted to the wall. Thermal insulation is strengthened in the gap between its guides. This method is used when insulating with mineral wool or ecowool. PENOPLEX does not require the construction of such structures - it can be glued directly to the wall.
Performing thermal insulation work
It is recommended to begin installation by examining the wall. If it is dry, start the process. If not, you will have to first dry it and “cure” it from fungi. Otherwise, all the work will go down the drain.
To work, you will need rigid insulation, adapted for vertical installation. PENOPLEX is suitable for these purposes, but it is better to avoid mineral wool so that over the years its fibers do not sag under the weight of heavy slabs.
The installation technology depends on the material you choose, its thickness, climate zone and room size. In each specific case, a different approach is implemented. You can understand the general principle of work using the example of using PENOPLEX.
We prepare the surface of the walls by first leveling it (not necessarily perfectly).
We cut the slabs. You don’t need a special tool for this: a jigsaw, hacksaw or stationery knife will do.
We glue them with PENOPLEX® FASTFIX® glue. We choose a chess order.
We secure each slab with dowels at the rate of 4 pieces per sheet.
We attach a vapor barrier film or foil polyethylene.
Then, using guides, we mount the frame for finishing and complete it.
This is just one possible solution. These may vary depending on your situation. For example, in a small room with brick walls, you can refuse frame installation.
Important! PENOPLEX can be plastered. But it is not advisable to glue wallpaper on it. If you choose this type of finish, use a frame made of plasterboard or plywood.
Material selection
A table of the pros and cons of each material will help you decide on thermal insulation depending on your needs. In any case, remember that good insulation should have low thermal conductivity, not absorb moisture, be durable, vapor-tight, inexpensive and as thin as possible. The best option, taking into account all the requirements, as we see, remains PENOPLEX.
Determining the thickness of the insulator
The size of the layer depends on the type of insulation, wall material and its thickness, climate zone, and heating quality. SNiP II-3-79, the text of which is freely available on the Internet, will help you not make mistakes in the calculation. The exact heat calculation formula is quite complex, so average values are most often used. They are found as follows: the heat transfer resistance coefficient is calculated according to SNiP, then multiplied by thermal conductivity. For regions where the thermometer drops below -30 °C, a layer of thermal insulation creates additional insulation.
Insulation of a brick wall
The thickness of the thermal insulation of this type of wall depends on what kind of brick was used during construction: hollow or solid. The first is closer to wood in thermal conductivity, the second to concrete. Accordingly, this should be taken into account when choosing a heat insulator.
Thermal insulation of reinforced concrete wall
Concrete is associated with cold for a reason. This material has a high level of heat absorption, but at the same time low heat capacity. As a result, it is able to accumulate heat very quickly and just as quickly release it to the outside. Therefore, the heat insulator for it must have minimal thermal conductivity. Extruded polystyrene foam (PENOPLEX), reinforced with a vapor barrier film or foamed foil polyethylene, is ideal for these purposes. But warm plaster does not adhere well to concrete and does not provide the necessary thermal protection.
As we can see, internal insulation cannot be called the optimal solution. But if there is no other option left, then you can find a way out. The main thing is to approach the issue thoughtfully, study all the nuances, and choose the right material. And then your home will always be cozy and warm.
Required thickness
In each climate zone, it is important to choose the right thickness of penoplex for insulating walls from the outside, since such positioning allows you to protect the masonry from freezing and extend the service life of wall structures. A final non-ventilated coating will need to be applied to the front side, which will protect the polymer from the effects of outside air.
It will be necessary to apply a finishing non-ventilated coating to the front side, which will protect the polymer from the effects of outside air.
The value of the thermal resistance of the wall is recommended by SNiPs for each region. In an abbreviated version, the SNiP table 02/23/2003 looks like this:
The specified resistance value is obtained by the sum of the indicators of all materials used, including finishing coatings.
Calculation
As an example, we can take a Moscow wall with a thickness of 1.5 bricks, which will be 0.38 m. The thermal resistance of such masonry is 0.76 m²×°C/W (the thermal conductivity coefficient of brick is 0.5 W/m²×°C, 0 .38:0.5=0.76). The remaining resistance value (3.14-0.76=2.38 m²×°C/W) is provided by insulation and finishing materials. If we multiply the thermal conductivity of penoplex by 0.028 W/m²×°C, we get the required thickness of 6.6 cm. Taking into account external plaster and interior decoration, it is permissible to choose slabs 5 cm thick.
The practice of performing work has shown that when using standard sheets of extruded polystyrene foam, the insulation layer on average is made of the following thickness:
- for internal insulation of premises, slabs with an end face of up to 4 cm are sufficient;
- for external arrangement in a temperate climate, set 5 cm;
- in cold zones 10 cm and conditions of the far north 15 - 20 cm. For more information on calculating the thickness of insulation for walls, see this video:
Before working with this material, we recommend that you familiarize yourself with the technology of wall insulation with penoplex.
Types of penoplex
Penoplex is produced in the form of 5 main varieties, differing in the purpose of the types of work.
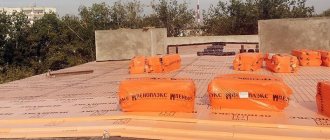
- Fundamental. They are mounted on the basement (underground) part of the building and used as permanent formwork. Protect the base of the building from freezing.
- Wall. Needed for external work on thermal and sound insulation.
- "Roof". Installed on attic floors and roof slopes, attic spaces. Blocks heat and sound from rain.
- "Comfort". Designed for interior work (walls, floors, ceilings, balconies).
- Road. The densest grade of this material is labeled “penoplex-45”.
Work on installation on the outer part of the wall is no different in composition from performing internal insulation.
Application for interior and exterior decoration
An expanded polystyrene sheet attached to the frame allows you to protect the room and the building as a whole from the penetration of cold. This idea is a practical option for ensuring a comfortable temperature in the living space. Internal and external finishing of surfaces with polystyrene foam has its own characteristics, which you need to become familiar with at the stage of planning the insulation of the room.
We advise you to look at: insulating a balcony with mineral wool and penoplex.
Installation work for exterior finishing
Insulation of the outside with penoplex should be performed in the following sequence:
- To fix penoplex sheets to the wall, the surface must first be leveled. This is not difficult to do; just remove the flaws and plaster the coating.
- When the plaster has dried, you can begin installing the penoplex. The process is carried out by gluing slabs of material onto a special adhesive solution on top of the plaster.
Useful tips
- In order for the penoplex to be securely fixed on the wall, the sheet coated with glue should be applied at a distance of 20 millimeters from its actual placement. Then, pressing on the plate, move it to the desired place.
Glue on penoplex is applied pointwise or using a construction gun along the perimeter of the sheet. Having attached the material with glue over the entire surface of the outer covering, you should proceed to the next step - attaching the polystyrene foam sheet using dowels to the frame. To securely fasten the sheets, you should prepare dowels at a rate of 4 pieces per square meter.
Fastening penoplex to concrete using “umbrellas” for greater strength In order for the gypsum board and expanded polystyrene to be securely fixed around the perimeter, at joints, corners, near doors and windows, more dowels should be screwed in. You need to calculate so that there are approximately 6-8 dowels per square meter.
The fastening of penoplex differs depending on the location of insulation. Finishing, in the case of exterior finishing, is carried out in several ways. In this case, you can level the plaster using sandpaper that was applied to a sheet of polystyrene foam. This technique also uses finishing using metal or wooden beams, as well as siding.
Finishing the facade of the house with penoplex and siding. A reinforcing mesh is applied on top of the plaster or other selected finishing material. It is overlapped so that there are no sections of coverage left without a mesh.
Reinforcing mesh applied to the wall and the process of filling it Having insulated the outer surface using penoplex, you can proceed to the final stage. Namely, to carry out cladding with the selected material. If these are plasterboard sheets, then they can simply be glued on top of polystyrene foam using a special fastening adhesive for installation work. If another material is preferable, such as wooden beams or siding, then it must be fixed on top of the foam with dowels or screws, passing the fastening element through the foam and the frame. To do this, you need to select fasteners of the required diameter and length.
Penoplex laid under the cladding of the facade of the house
- After completion of the work, if the cladding was carried out using a sheet of plasterboard, you need to apply a primer that will protect the surface from corrosion and fungal formations.
- When the primer has dried, the first layer of plaster is applied to the drywall sheets, and then sanded with sandpaper.
- After applying and leveling the second layer, you should begin decorative finishing.
By completing the process in the correct order, paying attention to every detail, you can obtain a reliable, cold-proof exterior finish.
Interior decoration
If you are gluing penoplex on the interior wall of a room, the process is similar to that for exterior decoration.
- Sheets of foam plastic are fixed on top of the plastered and leveled wall. How to secure the insulating sheets is up to the owners alone. You can mount foam boards onto frame profiles, or you can attach them with glue.
- Indoors, it is recommended to install a vapor barrier foil film on top of the polystyrene foam before sheathing with dowels or gluing drywall. This will extend the service life of both polystyrene foam and plasterboard construction.
Internal insulation of house walls using waterproofing, several types of insulation When drywall is glued to penoplex or fixed with dowels, it is necessary to plaster the recesses from the screws that hold the drywall to the surface. If the sheets were glued, then the gaps between the sheets should be sealed and the gypsum board surfaces should also be plastered.
The process of filling joints between plasterboard sheets
What is penoplex?
The material is used both in construction and when laying road/railway tracks. Penoplex, also known as expanded polystyrene and one of the varieties of light foam, allows not only to insulate a room, but also to prevent soil swelling, which makes it very attractive for many areas.
Penoplex can easily withstand low temperatures, which can be critical for other building materials. Therefore, it is used quite successfully in the Far North, both in construction and for insulating pipelines.
Sources
- Glushkov A.I. Ensuring the rights and legitimate interests of minor victims in criminal proceedings; Prometheus - M., 2012. - 168 p.
- Drobyazkina, I.V. International civil process / I.V. Drobyazkina. - M.: Legal Center, 2005. - 723 p.
- Kamzin Nikolay Mandatory offer as a restriction on external sources of share capital and a signal about the true intentions of the newly minted shareholder; AUTHOR - M., 2011. - 422 p.
- Elena Ananyevna Litvintseva Administration of public services: facing citizens; Prospect - M., 1986. - 470 p.
- Zhalinsky A.E. Selected works. Volume 3. Criminal political science. Comparative and International Law; RSUH - Moscow, 2015. - 929 p.
Preparing the wall surface
Before installing the insulation, surfaces should be prepared. The nature of the work is determined by the surface:
After the preparatory work, proceed with the installation of insulation.
Additional tips from the experts
It happens that after completing the process, the plaster may crack or fall off. This means that the technology was not followed during the work, or low-quality materials were chosen. There are some more tips from the experts that will help you avoid mistakes:
- When plastering walls near doors, it is better to install the mortar flush. And seal the adjacent parts of the doors with masking tape.
- Some people feel sorry for throwing away the remaining mortar, and they apply it to an already dry wall. There is no need to do this so that the new layer does not fall off from the old one over time. The reason for this is the layer thickness and temperature.
- You cannot work if there is a draft in the room. The optimal temperature inside is from 10 to 20 degrees.
Penoplex is an excellent option for insulation. And if you know how to plaster it correctly, the house will be reliably protected from negative influences. And thanks to the decorative layer, it will be transformed and will delight its owners for a long time. The main thing is to follow the technology, do the work slowly, carefully and efficiently. If possible, ask a friend or relative for help.
Insulation materials
Penoplex is in wide demand in the building materials market. Among its advantages are good thermal insulation characteristics, long service life and ease of installation. We’ll look further at how to insulate bathroom walls with penoplex.
Table of contents:
- Wall insulation with penoplex: advantages and features of the material
- Insulation of walls with penoplex - technology and types of material
- Insulation of walls from the inside with penoplex in the bathroom
- Insulation of walls with penoplex under siding: insulation installation technology
Wall insulation with penoplex: advantages and features of the material
Penoplex is classified as a material that performs the function of protecting a room from heat loss. Its installation can significantly reduce the thermal conductivity of the area of the building on which it is installed.
Penoplex is produced as slabs, which are extruded polystyrene foam. In appearance and structure, this material is often confused with polystyrene foam. However, penoplex has a higher level of rigidity and strength.
In addition, this material has the following advantages:
- low level of thermal conductivity, thanks to which the material is able to retain heat in the room;
- high level of strength both before bending and compression;
- resistance to moisture is ensured by the low moisture absorption of the material, this advantage reduces the level of development of mold and mildew on the insulation and increases its service life;
- low level of vapor permeability;
- duration of operation, which is more than 50 years;
- resistance to fire and high level of fire safety;
- environmental safety, absence of substances harmful to human health;
- Possibility of operation at temperatures from -40 to +70.
In addition, installing penoplex does not require special skills or special equipment. One day is enough to complete the work. The cost of the material, compared to other types of insulation, is average, therefore, by comparing the quality and price of penoplex, it is possible to obtain high-quality insulation for a moderate amount of money.
However, the use of penoplex for external insulation of a building, and in particular for facade systems, leads to its gradual delamination. This is due to the fact that the material has a high density, which does not allow it to absorb glue, therefore, some time after installing the penoplex, under the influence of moisture and other external factors, it peels off from the surface and the appearance of the facade deteriorates.
Therefore, to prevent this unpleasant factor, you should use special fasteners - fungi. It is also possible to replace penoplex with polystyrene foam, which is more practical for external insulation.
Insulation of walls with penoplex - technology and types of material
There are several types of penoplex, which differ in relation to density and scope of application. The slabs have a standard size, but if necessary they can be easily cut and installed on the surface. Depending on the thickness of the penoplex for wall insulation, penoplex from 2 to 10 cm is distinguished.
In addition, there are the following types of penoplex:
1. Used for wall insulation - allows you to insulate the walls of a building both inside and outside. In addition, it helps insulate the basement and interior partitions. The material is suitable for constructing walls using the well masonry method.
If the walls are insulated from the outside with penoplex, then siding is laid on top of the heat-insulating material, the tiles or the wall are plastered.
2. Penoplex for foundation insulation. Used in the process of building basements. This material has zero moisture absorption and increased density.
3. Roof insulation is also possible using penoplex. It is used to insulate roofs of both flat and pitched types. The material has excellent thermal insulation characteristics and, due to its lightness, does not load the structure.
4. Insulation of roads and runways - even in such cases, the use of penoplex is mandatory.
5. Another version of penoplex is intended for internal insulation of a house or apartment. With its help, it is possible to insulate the walls, floor and ceiling of any room.
To insulate walls using penoplex, follow these steps:
1. Preparing the base.
This stage involves preparing the surface for attaching insulation to it. The surface, regardless of its type, must be clean, dry, free of finishes and paint. Use plaster to level the walls. Next comes the process of treating the surface with a primer with an antiseptic effect.
2. Installation of slabs using glue.
In order to glue the slab, we recommend using a special glue that comes with the insulation or is recommended by its manufacturer. The glue is applied directly to the surface of the slab.
3. Mechanical installation method.
After gluing the slab to the surface, the process of its mechanical fixation follows. This is necessary so that the plate, when peeled off, will still stick to the surface. For one square meter of slab, the installation of four dowels will be required. If the slab is installed near a window, door or in a corner, then the number of fasteners must be increased.
4. Fixing the insulation with plaster mortar.
In order for the insulation to adhere better to the plaster, we recommend using a carriage brush, which will help make its texture more rough. On the first layer of reinforcement, a polymer mesh is embedded with a reinforcing effect. Then the plaster solution is applied a second time and further finishing of the walls is carried out.
5. Installation of insulation indoors.
It is possible to use penoplex to insulate external walls; it is also used indoors. We recommend, if possible, installing penoplex outside. However, when installing internal insulation, after installing the insulation, install a foil-coated polyethylene film on it. It will provide proper vapor barrier. Next, the drywall is installed and finishing work is carried out. To install the frame for installing drywall, use dowels, which, after passing through the foam, will reach the wall and fix the profile on it.
Insulation of walls from the inside with penoplex in the bathroom
The bathroom is a place with a high level of humidity, and proper insulation will prevent the formation of condensation, which has a detrimental effect on the finishing of the room. There are several options for insulation that are used in the bathroom, among them the following are noted:
- cork is a material in roll form, which is easy to use and can be easily installed on the surface of walls and in a heated floor system; among its advantages, it is noted that it is not susceptible to rotting, is resistant to moisture and has a long service life;
- mineral wool is more popular than the previous option, however, it is hygroscopic and unstable to moisture, therefore, during its use, proper waterproofing must be ensured;
- although polystyrene foam is cheap, it also absorbs moisture due to its porosity; after its installation, it is necessary to install plywood or drywall with moisture-repellent properties;
- penoplex has low thermal conductivity, but at the same time has a high density; it is used to insulate both screeds and bathroom walls.
The choice of one or another type of insulation primarily depends on the material abilities of the owners of the house or apartment. More inexpensive materials have low density, and therefore they “steal” the living space, since in order to obtain the proper insulation effect, they should be laid in several layers. If you use penoplex, then a maximum of 50 mm is lost.
We invite you to familiarize yourself with the process of insulating the floor in the bathroom:
1. At the initial stage, proper waterproofing is installed, which will prevent the insulation from coming into contact with moisture. If you have a concrete floor, the most optimal solution would be to use impregnating type waterproofing. It is able to penetrate 5-10 cm deep into the concrete and creates a crystallized surface that does not allow moisture to penetrate the insulation.
2. If there is a cold floor in the bathroom, you should lay penoplex and lay mats with which the warm electric floor system will function. Next, the system is connected to the electrical network, checked for functionality and filled with concrete. Further actions involve finishing the floor using tiles or other finishing materials. Installing a thermostat will help maintain the temperature at the desired level.
To insulate a wall in a bathroom, we recommend using slabs designed for further plastering. Penoplex, insulation of a brick wall in the bathroom - procedure:
- the use of slabs under plaster will save living space;
- in addition, the surface of the walls will be protected from mechanical damage by plaster;
- before starting the installation of penoplex, you should take care of preparing the walls, leveling them, cleaning them from paint or finishing, if any, and covering them with a primer with an antiseptic effect;
- the adhesive solution is applied to the slab using a toothed trowel, then the slabs are installed, starting from the bottom of the wall, gradually moving to the top;
- after the walls are insulated, they are covered with a painting mesh and then puttied; it is possible to install the frame under plasterboard or moisture-resistant plywood;
- further actions are associated with finishing work.
Insulation of walls with penoplex under siding: insulation installation technology
Preparing the surface for installation of insulation is as follows:
1. Cleaning the walls from dirt, dust, paint and other types of finishing, if any. Various structural elements that will interfere with the installation of penoplex are also dismantled.
2. The walls are checked for the presence of fungus and mold and treated with an antiseptic.
3. Using a level, check the evenness of the walls and note the deviations from the norm. If there are steel elements on the walls, they need anti-corrosion treatment.
4. In addition, markings are made according to which the installation of profiles on which the siding will be fixed will be carried out. We also install fasteners for fixing air conditioning, lighting or drainage systems.
Before starting work on installing the brackets, you should install a vapor barrier film on the surface of the walls. Next, markings are made for the installation of hangers. The profile system is installed vertically. If you plan to install vinyl siding, then the interval between the profiles is about 400 mm; if steel siding is installed, then the distance increases to 600 mm.
To perform the work you will need:
- tool for checking evenness;
- roulette;
- plumb lines;
- hammer;
- hammer drill for a building with brick walls;
- screwdriver;
- electric drills;
- hacksaws.
Installation work begins with the installation of a profile on the basement of the building. Before starting thermal insulation work, a starting profile is installed. Its installation location is located at the bottom of the building. Thus, the penoplex will be protected from rodents, moisture or mechanical damage.
Instructions on how to install the base profile:
- the profile is mounted at intervals of 30 cm; for these purposes, it is recommended to use wood screws when insulating a wooden wall with penoplex;
- if the wall of the building is made of bricks or concrete, then it is recommended to use dowel-nails, the size of which ranges from 4 to 10 cm;
- Please note that the profile must fit very tightly to the wall, but if there is little space left between the profile and the wall, then it is necessary to install special washers;
- to connect the profiles to each other, use special locks located on the end part;
- It is prohibited to install the profile overlapping.
Tip: To ensure reliable drainage of moisture through the façade system and to prevent the insulation from getting wet, we recommend purchasing a special profile that has a drip system.
To install penoplex, follow a number of steps:
1. Install the first row on the surface of the base profile.
2. Install the U-shaped suspension in the working position; at the junction of the penoplex with the suspension, it is necessary to cut a small section to string the material onto its surface.
3. After installing the first row of insulation, you should check the wall for evenness and quality of fit of the insulation to the wall.
4. To fix the insulation to the wall, special fastening mushrooms are used. They have large caps; to install penoplex on one square meter, you must use at least four fasteners. If the insulation is installed in a wooden house, then lining washers and self-tapping screws are used.
5. To install the second and subsequent rows of penoplex, use the brick laying method. That is, the material should not match each other at the seams. The seams should diverge at least 20 cm.
6. After installing the penoplex, a visual inspection of the wall is carried out; if there are large joints on its surface, pieces of penoplex should be installed in them.
Please note that filling joints with glue, polyurethane foam or sealant is unacceptable, since over time, when wet, these materials will lead to damage to the facade.
Insulation of walls with penoplex video:
Let's talk about whether penoplex is harmful or not?
Despite the ongoing debate about the environmental safety of modern means of protecting objects under construction, not a single construction project can be completed without the use of various insulating materials. This trend does not mean that humanity is not concerned about its own environmental well-being.
New thermal protection products, such as extruded polystyrene foam, comply with existing standards, and their use is approved by the relevant standardization bodies and sanitary and epidemiological services. The periodic resumption of discussions in the media about whether penoplex is harmful or not is reminiscent of the elementary desire of competitors to create conditions for changing the market situation.
Internal wall insulation technology
In order to effectively insulate walls from the inside with a material with low vapor permeability, it is necessary to consider a ventilation system. The ideal option is windows equipped with ventilation valves. The number and size of such valves must be calculated taking into account the size of the room to be insulated.
The process of thermal insulation of internal wall surfaces consists of the following stages.
Preparing the base
Before laying materials from the walls, you need to remove the old finish (paint, plaster, wallpaper). If there is damage, they are repaired using putty. Afterwards the walls are leveled and covered with primer.
It is advisable to choose an acrylic-based primer with antifungal properties.
Waterproofing
A waterproofing material is installed on the prepared base to protect the insulating structure from moisture. Plastic film is suitable for this.
They fasten it with a stapler and seal the joints with tape.
Installation of insulation
The gluing of polystyrene foam boards is done from bottom to top in a checkerboard pattern. They are attached to a special glue, which is applied directly to the wall surfaces.
After the adhesive composition has completely dried (after 1-2 days), holes are made in the insulation. There should be 5-6 of them on each sheet (in the corners and in the center). Dowels with plastic nails are driven into them for additional structural strength.
The seams between the plates are sealed with pieces of polystyrene foam and treated with polyurethane foam, the excess of which, after hardening, is cut off with a knife. Glue is applied to the sections to prevent the formation of mold.
Common Mistakes
At first glance, insulation work looks simple. However, inexperienced installers may make mistakes that will not allow them to achieve the required thermal insulation properties or may lead to delamination of the material. Most often, beginners make the following mistakes:
- The number of slabs is calculated incorrectly or the design stage is completely neglected. There is not enough material or there is a large residue.
- During installation, moisture is allowed to enter the work surface or the temperature regime is not observed.
- The place and tools are poorly prepared. This increases the risk of damage to the insulation or contamination of surfaces.
- They do not follow a checkerboard pattern when laying them. Because of this, cracks form and heat escapes from the room.
- Glue is applied unevenly or in insufficient quantities.
- Neglect grinding the material. The grip becomes less strong.
- Do not fill the seams with foam.
To insulate the joints, fill them with polyurethane foam.