What fittings are needed to connect a heating radiator made of cast iron or aluminum? Is it necessary to equip the heating device with any shut-off or control valves? In our article we will try to give the reader advice on choosing the optimal set of equipment and its installation.
One of the options for connecting a heating device.
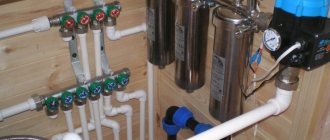
Categories of pipeline fittings
Safety valve blocks2 Steel valves104 Cast iron valves47 Stainless steel valves16 Steel valves - HL3 Steel valves77 Cast iron valves37 Hose valves1 Sewage fittings6 Check valves96 Safety valves50 Control valves72 Steel condensate drains3 Bronze valves23 Steel valves - HL45 Cranes stainless31 Steel taps79 Bronze valves18 Titanium taps1 Cast iron taps2 Hardware3 Pumps2 Bends20 Heating equipment36 Switching devices1 Transitions18 Control valves31 Fire fittings44 Water meters31 Tees14 Pipes46 Level indicators3 Sealing materials18 Filters, mud traps54 Fittings26 Flanges32 Elevators7 Electric drives1 Ball valves81 Other28 Pneumatic actuators2 Cast iron condensate drains2 Steel valves38 Chu valves gunny31 Energy valves1 Energy gate valves3 Energy valves1 Shut-off valves12 Bellows compensators40
Accessories for heating radiators. Installation and features
The principle of connecting different types of heating batteries is almost the same, but they differ in the equipment used for this. Accessories for radiators are offered for sale individually, as well as in sets, which contain all the products required to connect one battery.
Popular types of heating radiators
In the vast majority of apartments and houses you can find 4 types of heating batteries:
- Cast iron.
- Aluminum.
- Bimetallic.
- Steel.
There are also plastic and copper radiators, but they are practically not used. Each type of popular battery type has its own specific performance characteristics and connection method. The only exceptions are aluminum and bimetallic radiators, the connection principle of which is identical, as are the components used for this.
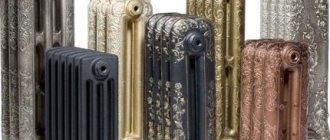
Cast iron batteries
Heating radiators of this type have been widely used in the past due to their high resistance to corrosion and oxidation. Despite their massiveness and high cost, they are still relevant today. The fact is that in central heating systems the circulating coolant is too contaminated, so batteries made of other materials wear out in just a couple of years.
Aluminum radiators
Such batteries have an attractive appearance. Aluminum has high thermal conductivity, which means it heats up the air in the room faster. A huge disadvantage of such batteries is their high sensitivity to the chemical composition of the coolant. In this regard, they are completely unsuitable when connected to a central water supply. They are chosen only when an autonomous heat supply is being installed, since it is possible to control the quality of the fluid circulating in the system.
Bimetallic radiators
Batteries of this type have high heat transfer because they contain aluminum. They are very durable and have a long service life. They have a higher cost, which significantly reduces the popularity of this type of radiator.
Steel radiators
Steel batteries, unlike all previous varieties, are not collapsible. They do not consist of sections that can be removed and added at will. Typically, such radiators are of a panel type. Outwardly they look like a rectangular box. They can often be found in office buildings, as well as in residential buildings and apartments. Since panel systems are not dismountable, manufacturers often install on them all the necessary components for radiators from the factory.
Which radiator is better
Before connecting a heating radiator to a polypropylene pipe, you need to decide which battery models will be used.
The currently common types of batteries differ in the type of connection, fastening and material of manufacture:
- Panel-type steel radiators are switched using the side or bottom method.
- Lightweight aluminum or bimetallic sectional devices can have a common or sectional connection type. In this case, the heating radiators are connected to the pipes from the side. It is most convenient to use polypropylene material for this.
Recommendations for selection:
- It is advisable to equip apartments with a centralized heating system with bimetallic radiators, replacing large and heavy cast iron batteries with them. The fact is that the coolant in such networks often contains alkali that is harmful to cast iron.
- For private households, the best option would be steel or aluminum appliances.
- In ordinary apartments with individual heating, it is advisable to use aluminum or bimetallic radiators.
Is it possible to make a squeegee yourself and how to do it?
When installing a pipeline with your own hands, sometimes a situation arises when you need to select the required length of pipes - factory products, according to standards, cover only a narrow range of sizes and diameters. In this case, a self-made pipe is used, and the clamping locknut and coupling of the required diameter are taken from another workpiece. For manufacturing, you need to use a piece of gas pipe of suitable length; to carry out the work, you will need a die with a holder or clamp, oil, a vice for clamping the workpiece, a hacksaw for metal or a grinder for cutting the pipe.
Rice. 7 Example of installation of a squeegee on a FUM tape for installing a gas meter
The work is carried out in the following sequence:
- Cut a piece of the required length from the pipe, clamp the part in a vice, protect the outer ends on both sides with sandpaper, a grinder or a file.
- Lubricate the pipe surface on the side of the short thread, insert a die into the holder or die and press it tightly against the end, trying to maintain a strictly perpendicular position relative to the axis of the workpiece.
- They begin to screw the die into the pipe, applying maximum force; after several turns and the teeth of the die grab the thread, no clamping force is required.
- Cutting is carried out in the forward and reverse directions, periodically removing the tool and cleaning it from chips with a clean rag along with the pipe surface.
- After passing 5 - 6 turns on the short side, the part is turned over and they begin cutting a long thread of 20 turns on the other end.
Rice. 8 The procedure for making a squeegee with your own hands
Squeegee is one of the most common options for connecting steel pipelines to plumbing and gas fittings and equipment. When installed correctly, the coupling provides a reliable, durable and tight connection; if necessary, it is easy to make a fitting of a suitable length with your own hands.
What fittings are needed to connect a heating radiator made of cast iron or aluminum? Is it necessary to equip the heating device with any shut-off or control valves? In our article we will try to give the reader advice on choosing the optimal set of equipment and its installation.
One of the options for connecting a heating device.
Types of seals
Previously, there was not such a variety of seals as there is today. Some plumbers use the entire range of materials in their work, while there are conservatives who still recognize only linen. Are they right? Let's figure it out. How to seal the threads on a heating pipe:
- tape-fum;
- flax with paste;
- anaerobic adhesive sealant;
- sealing thread.
Flax dries in systems with hot coolant, but rots in cold water. In the first and second cases, the result of the process will be the appearance of a leak. Thanks to the paste, the fitting can be loosened a little after twisting, turning back no more than 45 degrees. A universal material, suitable for connecting metal heating pipes and polymers.
Flax is suitable for all types of threads on heating pipes, regardless of diameter. It is the cheapest of the seals
It is important to wind it correctly:
- using a metal blade or a file, notches are made on the thread;
- a strand of flax is rolled into something like a thread;
- winding is carried out as the fitting is screwed in (usually clockwise);
- The protective paste is applied evenly.
Seal with flax
When winding flax, it is important not to overdo it. First you need to make the first turn, which will secure the seal to the thread
This leaves a tail. On the second turn, the remaining tail is picked up and wound together with the common fiber. Make sure there are no twists. The material should be distributed evenly along the threads from the end to the fitting body. When working with flax, when connecting heating pipes, you need to watch your hands, as they are constantly smeared with paste. If you grasp a polypropylene pipe with such hands, an imprint will remain.
Fum tape is used for thin-walled fittings and connectors with fine threads. The material is easy to work with and your hands are always clean. At the same time, fum tape is quite expensive and is mainly used for small diameters. A significant drawback of this seal is the impossibility of adjustment. That is, if the joint of the heating pipes is twisted and needs to be loosened a little to center it, then the connection loses its tightness.
The sealing thread, like the fum tape, does not require lubrication or the use of special paste. It can be wound onto dirty or wet threads and is suitable for plastic.
Sealants are applied to clean and grease-free threads (usually new ones). They are:
- dismantled;
- difficult to dismantle.
But in fact, they are all not dismantled. Before connecting heating pipes using sealant, you must be prepared for the fact that it will be possible to disassemble the connection only after heating. And only then, perhaps, will it be possible to unscrew it. But during installation, the connection points do not even need to be tightened with wrenches.
Place of radiators in the heating system
The use of radiators in heating residential premises plays a key role today. Not all residential properties, especially apartments in multi-storey buildings, can be converted to underfloor heating. Therefore, the main work of heating internal living spaces is performed by radiators or the good old batteries that are familiar to us.
Radiators transfer thermal energy from the coolant to the surrounding space. Heat transfer is carried out due to the large heating surface of the heating device. Modern models have a number of technical improvements, thanks to which it has become possible to connect in a variety of options and with any wiring diagram.
in old cast iron and steel batteries there was only one upper and one lower pipe, through which hot water is supplied and the return is released.
In modern models, in addition to the main supply and outlet pipes, there are built-in air vents. This design of batteries radically changed the quality of functionality of the heating system. If there are air pockets in heating devices, it is enough to open the drain valve and bleed the air.
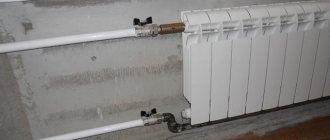
In many ways, thanks to modern models of heating batteries, it has become possible to choose the most convenient connection scheme and install heating devices in those areas of the living room in which they are most effective. The quality of operation of the heating water circuit depends on correctly installed piping. The process is necessary if you are using a pipeline made from polypropylene pipes.
Important! If there are metal risers, the piping is made from other consumables. These can be metal copper pipes or metal-plastic. The use of polypropylene pipes in this case is strictly prohibited
The use of polypropylene pipes in this case is strictly prohibited.
The reason for the incompatibility of metal pipes with polypropylene products is the presence of a threaded connection. Considering the fact that propylene pipes have a high coefficient of thermal expansion, when hot coolant is supplied, the threaded connection will lose its tightness and stability. Therefore, if you want to connect a heating radiator made of polypropylene pipes, try to use fittings, adapters and couplings made from similar materials.
the difference in diameters of pipes made of different materials should be taken into account
How to cut into a pipe without welding
How to cut into a pipe without welding is of interest to the owner of the house who has decided to remodel or expand the living space. Not every person knows the technology of welding. And the equipment is expensive enough to purchase as a property for one-time work. Therefore, the question always arises of how to carry out work without welding.
There are three methods of tapping into a pipe without welding:
- Using a pipe;
- Tapping under pressure using an adapter;
- Insertion without pressure with the help of a nurse.
Problems during work progress
All work is carried out with a water pipe. During this process the following problems may arise:
- The water pipe may be placed in the wall or run too close to it. This makes the work ahead very difficult.
- Some designs require a male-female connection. At the end of the pipe there is a socket with a seal. It is quite difficult to insert into another pipe.
- When replacing, usually one long pipe is replaced by two sections connected to each other by a pipe. This connection is not very easy to make.
Features of insertion using a pipe
This process is carried out without a cutting tool, because There is no need to disconnect anything. You just need to purchase a pipe at a hardware store. The main thing is that its size matches the diameter of the water pipe.
Stages of work:
- A hole is drilled on the surface of the pipe for the pipe. This is done using a special core drill.
- Fixing the branch pipe on the water pipe. The cut hole should completely coincide with the recess of the pipe. The work uses a wrench and a screwdriver.
- A rubber seal is taken and inserted into the pipe attached to the pipe.
- Insert the drainage hose into the pipe through the rubber seal.
Because Since the plumbing system is weak to leaks, all joints must be treated with sealants. It is sold in car cosmetics stores. The silicone substance is smeared around the hole, but this must be done at a distance of 1 cm.
If the pipe is made of steel, then you need to seal the created hole with a clamp. If the pipe is polyethylene, then regular electrical tape will do.
Plumbing connection
Features of tapping under pressure
If the water supply is under pressure, then tapping into such a pipe is done using a special device. It's called a nurse. It consists of two parts that cover the water supply on both sides. Among plumbers there is such a slang name for a nurse as a tie-in clamp.
The nurse helps to very quickly create the required number of branches from the pipe to organize drinking water supply systems for technical needs.
The pipe in this situation rotates 360 degrees
It is very important that the part is made of the same material as the pipe. Then the overall structure will be able to withstand the pressure under which the water supply operates
Feature of tapping without pressure
To implement this method you need to use an adapter. All work must be done in stages:
- First you need to turn off all the water in the house;
- Using a drill and a core bit, a round hole is made in the water pipe.
- The adapter is placed aligned with the hole on the pipe. It is then secured in place with bolts. If conventional fixation is used, the surface of the water supply must be cleaned and degreased. Only then apply the adapter and tighten the nut.
After each method of tapping into the water supply, you need to resume the water supply and test the new design.
The video below shows how to make a tie-in using a clamp bend:
What is needed for installation
It is also called one-sided. Wall-mounted models running on gas or electricity are equipped with pipes. Structurally, this device is a completely simple hydraulic circuit. It, like most modern batteries, is most often painted with white enamel and does not spoil the appearance at all. This harness is reliable, saves material, labor and financial costs. Everything would be fine if there were none - but... The disadvantage of this system is that it is not possible to regulate the temperature of heating devices, batteries and radiators without installing additional structural elements. Proper development of a heating scheme is the key to constant warmth in the house. With any scheme for connecting the heating device to the pipes, only two holes will work - for the inlet and outlet of hot antifreeze water. At the same time, the price of the device is significantly reduced.
The main condition is to install a jumper before connecting to the pipeline, called bypass, and taps, so that it is possible to remove the radiator without disturbing the entire system. Only in this case can it be achieved that the system will perfectly cope with the assigned tasks in a private house or apartment. Compared to a single-pipe heating system, in which the radiators are connected in series, in a two-pipe heating system, the heating radiators are connected in parallel, independently of each other. You will also need equipment for connecting pipes and fittings, but it depends on the type of pipes.
leave a comment
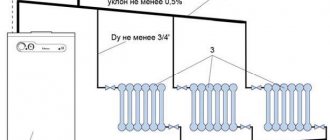
Two-pipe heating systems In this system, two lines of pipes are used, warm water is supplied through one, and cooled water is returned to heating through the other.
The most important advantage of such pipes is the ability to combat the bad influence of an aggressive environment and, ultimately, get rid of blockages and blockages. Natural or forced movement of water? Being in such a place, the devices create a good thermal curtain in the window area. Specifics of the bottom connection The scheme in which the bottom connection is used is most often used to solve design problems. This harness is reliable, saves material, labor and financial costs. Installation options for heating systems Heating requires a minimum length of pipes and the correct location of radiators. Then the device requires the installation of a plug, Mayevsky valve or other element to remove air. Increased coolant pressure is required. In this case, you will need a special device that stimulates the movement of water or antifreeze through the pipes.
There are several ways to route pipes and connect heating radiators, we will consider only the most common ones: One-sided connection of heating radiators Today, the most common is the one-sided lateral connection of heating radiators. Two-pipe system The design of a two-pipe system involves the use of two pipelines, one supplying the working medium, the other return. The circulation pressure increases, allowing the water to heat the room evenly. Heating radiator connection diagrams.
Features of the use of bottom connection units
Connecting to heating systems below is effective if supply pipes pass under the floor; sometimes, for convenience and aesthetics, they are inserted into the walls at a small height - corner fittings allow you to connect the pipes to the radiator housing.
In addition to shut-off and control valves, to improve operating efficiency, internal and external bypasses are often built into valve connecting units, and thermostats are used to set the temperature regime.
The main material for making devices is brass; when purchasing, you should pay attention to the wall thickness and thread length - manufacturers who produce budget products make them thin-walled with a short thread.
The main material for making devices is brass; when purchasing, you should pay attention to the wall thickness and thread length - manufacturers who produce budget products make them thin-walled with a short thread.
Fig.3 Bottom line - installation examples
Types of bottom connection nodes
In individual residential buildings, one-pipe and two-pipe heating systems are used; to connect a separate heat exchanger, a combined method is used, in which, in a distribution with two pipes, it is included only in the supply line according to the Leningradka scheme.
Accordingly, the units with bottom connections produced by the manufacturer are designed for the use of fittings in one-pipe, two-pipe or combined circuits, their features:
- In a single-pipe line, when the coolant fluid moves sequentially through all heating devices, its temperature drops, which accordingly leads to strong heating of the first batteries in the chain and the cold surface of the latter. To equalize the coolant temperatures at the inlet of all devices, thermal compensation is used, which is carried out by bypass wiring, dividing the incoming flow into two branches - one part is sent to the radiator and heats its body, the other freely follows to the next battery, mixing with the cooled flow leaving the first heat exchanger.
- In two-pipe systems, the heating temperature of all heaters is uniform and their temperature compensation is not required. For this wiring, the basic design of the “binoculars” is used - a fitting with shut-off or control valves, one pipe of which is connected to the supply line, the other is connected to the return line.
- A combined unit with an internal bypass channel is built into both a single-pipe and a two-pipe heating system; in the first case, the bypass channel is slightly opened, in the second it is completely closed.
Rice. 4 Fittings from leading foreign manufacturers
Based on the design of the housing, there are two main types of bottom connection fittings:
- Direct. Designed for connecting radiator modules to pipes extending vertically from the floor, since the outlet pipe of the unit has an external thread, the pipes must have outlet fittings with a union nut (American) or a compression coupling with a transition to an American one.
- Angular. Corner fitting systems are the best option from an aesthetic point of view, in this case the pipes come out of the wall at a small height from the floor, and the threaded elbow fittings are connected to them using a union nut installed on the pipe ends.
To connect the unit to the main line of steel pipes, an American connector is used; for cross-linked polyethylene (plastic metal), a special Eurocone compression connector is used. Its fitting is inserted into the pipe and pressed against it with an outer ring with a slot using a union nut rotating around its axis, which, together with a cone seal, connects the joined parts to each other.
Rice. 5 Units with built-in bypass
In addition to the standard design with built-in shut-off or control valves, which resembles binoculars in appearance, the construction market offers a fairly wide range of products that have a design different from the standard unit. The main modifications of units presented in the trading network:
- With shut-off or control valves. The fitting is designed for connection to a two-pipe system; ball or screw valves mounted in the body with a recessed head for a flat-head screwdriver allow you to separately regulate the supply and return flows if balancing is necessary, as well as disconnect the radiator from the heat-carrying main.
- With built-in bypass. The Hummel radiator fittings have this design - in its lower part there is a bypass channel, the diameter of the passage of which is regulated by a screw valve. This design is effective for single-pipe systems in which it is desirable to maintain the same coolant temperature at the inlet of all radiator heat exchangers. In addition, the Hummel radiator fitting kit includes eccentric nuts, which are needed to connect it to pipe bends with different axial distances - this allows you to avoid poor-quality installation in case of deviations in alignment.
Rice. 6 Vertical bypass design
- With remote bypass. The connection diagram for radiators with a bypass allows you to increase the temperature of the passing flow to increase the heating of the following batteries and, accordingly, equalize their heat transfer throughout the entire circuit. The bypass line is connected to the side of the radiator, the bypass tube is connected to its top point through a fitting in which the thermostatic head is built-in. Since the coolant enters through the bypass into the upper part of the heater and then flows down, returning to the circuit through the return, its heating efficiency is much higher than that of modifications of a purely bottom connection with heat losses of about 20%. Also in the model with a vertical bypass there is a screw for adjusting the return flow of coolant; sometimes an automatic air vent is built into the top.
Heating system connection options
In addition to choosing the radiator itself, during installation you will also need to decide how to connect it to the centralized network. There are several different options available to you, each of which has its own scope of use:
Diagonal connection. This scheme is the best choice for long multi-section heating batteries. It is distinguished by the fact that the water supply pipe is attached to the pipe from above on one edge of the radiator, and the outlet pipe is attached to the lower pipe on the other side. Among the disadvantages of such a system are difficult repairs in case of problems: the scheme does not imply removing the battery without completely turning off the heating.
Radiator connection options
Important! When supplying water from below, you will lose about 10% of the possible heat
Bottom connection
This wiring diagram looks the most inconspicuous. It is used if pipes are located inside the floor or hidden under baseboards. The supply and outlet pipes are directed perpendicular to the floor surface. The main disadvantage is that this system involves the greatest possible amount of heat loss. Lateral one-way connection. It is the most common and effective. Maximum heat transfer is ensured by connecting the inlet pipe from above, and the outlet pipe from below on the same side of the battery. When inverted, the heating power is significantly reduced, so it is not recommended to swap pipes.
- Bottom connection. This wiring diagram looks the most inconspicuous. It is used if pipes are located inside the floor or hidden under baseboards. The supply and outlet pipes are directed perpendicular to the floor surface. The main disadvantage is that this system involves the greatest possible amount of heat loss.
- Lateral one-way connection. It is the most common and effective. Maximum heat transfer is ensured by connecting the inlet pipe from above, and the outlet pipe from below on the same side of the battery. When inverted, the heating power is significantly reduced, so it is not recommended to swap pipes.
Important! If the distant sections of the battery are not warmed up enough, a water flow extension is used. Parallel connection. It occurs through a heat pipe built into the heating system
The withdrawal is implemented in the same way. This system allows you to replace batteries without turning off the central heating, but the main disadvantage is that if there is insufficient pressure in the system, the batteries do not warm up well
It occurs through a heat pipe built into the heating system. The withdrawal is implemented in the same way. This system allows you to replace batteries without turning off the central heating, but the main disadvantage is that if there is insufficient pressure in the system, the batteries do not warm up well
Parallel connection. It occurs through a heat pipe built into the heating system. The withdrawal is implemented in the same way. This system allows you to replace batteries without turning off the central heating, but the main disadvantage is that if there is insufficient pressure in the system, the batteries do not warm up well.
Important! Connecting a heating radiator with your own hands in this way is quite difficult; it would be better to entrust this work to experienced installers. Serial connection. In this case, heat transfer through the system occurs due to air pressure in it
Excess air is drained using a Mayevsky tap. The main disadvantage of such a system is also the impossibility of repairs without shutting down the entire heating system
In this case, heat transfer through the system occurs due to air pressure in it. Excess air is drained using a Mayevsky tap. The main disadvantage of such a system is also the impossibility of repairs without shutting down the entire heating system
Serial connection. In this case, heat transfer through the system occurs due to air pressure in it. Excess air is drained using a Mayevsky tap. The main disadvantage of such a system is also the impossibility of repairs without shutting down the entire heating system.
Connecting the circuit and batteries
Let's start understanding the methods of connecting heating pipes to a radiator by considering the materials from which heating systems can be made. They can be different:
- steel;
- copper;
- propylene;
- PVC;
- PEX;
- metal-plastic.
All of them perform one single function - this is the transportation of coolant from the boiler room (boiler) to the radiators, which, in turn, give off heat and thereby heat the room. All batteries are connected to the system with threads. To do this, fittings with a transition to thread are installed on the circuit. They are placed on polymer contours by soldering or pressing. Copper can only be soldered, while steel can be connected using press fittings and threads.
In any case, a threaded connection is supplied to the battery. How to connect a heating battery to
Diagrams for connecting batteries to heating
pipe, diagrams:
- bottom connection;
- side connection;
- diagonal connection.
The most effective option is the diagonal. In this case, the supply to the battery is carried out from above, and the return flow comes out from the bottom of the opposite end. The difference in radiator temperature for different connection methods is insignificant, so first of all you should start from the location of the battery. New batteries are always supplied with parts for connecting them:
- nuts marked “S” and “O”;
- stub;
- Mayevsky crane.
Before connecting the heating radiator to the pipe, nuts are screwed into the holes at the ends of the battery, and then, depending on the wiring, plugs, a Mayevsky tap and American ones are screwed into them.
An American is a nut that can rotate while the fitting is stationary. By the way, when connecting heating pipes to a heating boiler, it is also necessary to install taps with American type. In this case, it is necessary that the American one is screwed not onto the boiler pipe, but onto the circuit. Then you can safely remove the boiler and water will not spill out of it.
Some craftsmen do not install taps when tying batteries, which leads to difficulties in further operation. If you want to remove and clean the battery, you will have to drain all the water from the system and then refill it. And if a water hammer happens in winter and the radiator ruptures, what then? It turns out that you will need to stop the entire heating system to replace it. This is despite the fact that hardly anyone has a spare radiator on duty at home.
You will need to go to the store, buy it, find a master. This will take at least half a day; at sub-zero temperatures outside there is a risk of the system defrosting. And then it will be necessary not only to change the batteries, but also to repair the entire circuit. If you install taps, you can cut off radiators without stopping the entire system.
What is a squeegee in plumbing?
A squeegee is a connecting plumbing piece designed for joining individual sections of pipes during repairs or laying utilities
This important detail ensures a uniform piping system configuration
In plumbing, connecting fittings resemble the following parts in appearance:
- A short piece of pipe in the form of a pipe, which has a short thread of five turns cut on one end, and a long thread of 20 or more turns cut on the other end.
- Long threads cut on connections for plumbing fixtures and fittings.
Pipe bends make it possible to perform dismantling on a certain section of the pipeline, for example: at the junction of non-rotating elements.
To explain its purpose to a non-expert in plumbing, it is enough to visit the home bathroom or kitchen where the control valves are installed: a shut-off valve or a plug tap. At the junction of the pipeline and the tap, a connecting part is installed, which is called a “plumbing connection”. In the home heating network, for quick dismantling of heating radiators, an American plumbing part is installed - a type of threaded fitting.
Threaded connections
But what to do in cases where it is not possible to carry out welding work? There are quite a few ways to join pipeline elements without welding. The most popular option is threaded installation. Pipe threading is done using cutting machines or an ordinary die. If it is necessary to apply threads to a product with thin walls, use the rolling method.
If you follow all the rules for installing a threaded joint, you will get a durable and sealed structure. Let's consider the main advantages of using such a connection:
- ease of installation.
- the ability to repair or replace without damaging the pipeline;
- installation is carried out without the use of special equipment.
In addition, there are several thread parameters that determine its operation:
- cutting step;
- depth;
- direction.
The pitch determines the distance between the top of the coil and its base. Depth is a parameter that is determined as follows: the distance between the base of the coil and its top is measured. The direction of the thread is an important point; if you ignore it, you may encounter problems when installing the pipeline structure. The thread has two directions:
- right;
- left.
Many types of pipes are equipped with threads; they are used where it is necessary to create a reliable but detachable connection
Armature
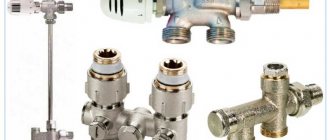
What fittings can be used in radiator piping?
| Fittings kit | Functions |
| Two ball valves | They make it possible to completely shut off the device for repair, replacement, or during a long thaw. |
| Ball valve and throttle | In addition to stopping, it is possible to manually adjust the heat output |
| Two chokes | Allows for basic balancing of two-pipe heating and subsequent adjustment of heat transfer |
| Throttle and thermal head | Makes room temperature adjustment fully automatic |
The jumper in the photo allows the coolant to circulate in the riser when the valves are closed.
What kind of piping can be made from polypropylene pipes
There are many schemes for piping radiators of a water heating system. From the existing methods, the consumer always chooses the one that, under the existing conditions, requires minimal material consumption with maximum efficiency in the location of radiators.
Examples of diagrams for one-pipe and two-pipe methods of piping water heating convectors
In fact, the situation is such that, unlike expensive metal pipes, polypropylene consumables are much cheaper and easier to install, so saving on the length of the pipeline at the expense of efficiency is not worth it. You should choose the type of strapping that will be most effective in a particular case.
Choosing a harness involves deciding on the following issues:
- what kind of heating system scheme will be used (one-pipe or two-pipe);
- what type of radiator connection will be used (diagonal, side or bottom).
As a rule, when using any heating scheme - single-pipe or two-pipe, you can use all types of battery connections.
Schematic illustration of methods for connecting (piping) water heating radiators
Installation of heating systems using polypropylene pipes, depending on the design, is carried out in compliance with certain rules.
- Typically, such a system uses a series connection of radiators;
- A bypass is always installed in front of the battery, connecting the supply pipe and the return pipe - during normal operation of the heating system, the bypass is not used, but during maintenance or in an emergency, the water supply to the radiator is stopped, and the coolant circulates freely through the bypass.
Scheme of serial connection of radiators with a single-pipe piping method
- Both parallel and serial connections of batteries are used;
- The radiator pipes are connected to different pipes - the upper one to the supply pipe, the lower one to the return pipe.
Typically, in two-pipe systems, radiators are connected in parallel, so installing bypasses is not required.
Schematic representation in plan of a two-pipe method for piping radiators of an autonomous heating system
Tying radiators with polypropylene pipes is done in two ways: soldering and using fittings. Depending on the chosen method, the batteries are connected using a special soldering iron or American plumbing wrenches.
Installation and replacement rules
Features:
- Draw up a wiring drawing, mark the locations of fittings, determine the number of crosses and tees. Make a list of all necessary fittings. Squares, for example, can be taken with a reserve.
- Installation of the system begins from the risers towards the already tied and hung radiators. Threaded connections are sealed with flax. Fum tapes do not react well to elevated temperatures.
- Features of welding polypropylene bends lie in their proper preparation. The ends are cut off at right angles, then cleaned of burrs and crumbs. The diameter of the nozzle in the soldering iron must be equal to the cross-section of the element being welded.
- When replacing the heating system, the management company is informed about the upcoming work, and the replacement of the riser is coordinated with the neighbors above and below. An employee of the management company closes the riser while it is being replaced.
Fittings are different
There are different types of heating fittings.
It is worth considering the types of connection elements depending on their purpose.
They are divided into the following types:
- coupling - a fitting that resembles a barrel with a hole inside. It refers to simple elements. They are necessary in order to connect pipes of the same diameter in a straight section;
- adapters are a type of fittings that have different diameters at the ends. This means that they are used to connect pipes of different sections. This also includes drives and nipples;
- corners, bends - connection elements necessary to create the desired angle of direction of the pipe.
- Tees and manifolds are designed to connect several pipelines at a distribution point. These elements have different diameters. It is possible to choose plastic fittings for heating - they are suitable for various pipelines, including for connecting dissimilar pipes;
- crosses are elements that are used to connect pipes of the same diameter at the joints where they branch.
- fittings - are connecting elements that are necessary to connect a flexible hose to a pump.
- plugs - fittings that are used to ensure a tight seal at the ends of the pipeline.
Copper fittings: installation features
The building materials market also offers a huge selection of copper pipelines and related parts. This frees up the hands of craftsmen, allowing them to carry out installation work of varying complexity.
Fittings for copper pipes have their advantages:
Copper and steel fittings
- weigh little;
- resistant to high temperatures;
- do not deform under the influence of sunlight.
Craftsmen use connecting elements to build up the highway, create the required number of branches, form the necessary bends, form new angles and turns.
Copper fittings for heating are presented in a fairly wide range, which makes it possible to select exactly what is required in each specific situation. For example, on display cases you can find a large selection of fittings for installing pipelines of different sizes. Particularly popular are simple elements - doubles, couplings, crosses, corners and others.
Tying polypropylene pipes instructions
Radiator piping can be done using a variety of pipes, but experts recommend using polypropylene pipes. Ball valves for piping are also purchased in polypropylene; they can be straight or angular; this option is the simplest and most inexpensive. Brass fittings are more expensive, and their installation is more difficult.
Polypropylene strapping is done as follows:
- the coupling with a union nut is inserted into the multiflex, which easily connects to any outlet;
- The pipes themselves are attached to the walls at a convenient height; they should not fit tightly to the surface; it is better to leave a gap of 2-3 cm. The pipes are secured using special brackets, which are fixed to the wall with nails or self-tapping screws.
Polypropylene piping to radiators can also be carried out when laying pipes in the wall, in which case they come to the surface only at the connection points.
Radiator piping can be done using a variety of pipes, but experts recommend using polypropylene pipes.
Battery fasteners can be very different, most often it is a pin connection that is fixed to the wall surface. Corner brackets can also be used, which also allow radiators to be suspended at the required height. For panel batteries, fasteners are supplied included; for sectional batteries, they must be purchased separately. Typically, two brackets or pins are sufficient for one section.
The taps are connected as follows:
- the tap is disassembled, the fitting and union nut are screwed into the radiator;
- Use a special wrench to tighten the nut tightly.
As you can see, this process is extremely simple. To perform such work, you only need to purchase a special plumbing wrench for American women, without which it is unlikely that you will be able to simply install a faucet.
To install batteries and tie them, the following materials and tools are required:
- a set of special keys;
- seals for threaded connections;
- tow and thread paste;
- threads for carving.
Features of connecting radiators
Heating installation has some features:
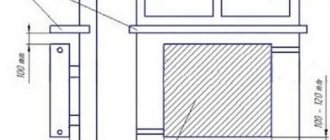
- It is necessary to maintain a distance of 100 mm from the radiator to the window sill. If the gap between the batteries and the bottom of the window sill is different, then the heat flow is disrupted and the effect of the heating system will be low.
- The distance from the floor surface to the battery should be 120-150 mm, otherwise a sharp temperature change will occur.
- In order for the heat transfer of the equipment to be correct, the distance from the wall must be at least 20 mm.
At the same time, we take into account that the installation and efficiency of heating radiators is greatly influenced by the installation method: under an open window sill the efficiency of the heating system is maximum - 96-97%, in an open niche - up to 93%, in a partially closed form - 88-93 %, completely closed - 75-80%.
The heating radiator can be installed using a variety of methods; its piping is done with metal, polyethylene, polypropylene pipes
During installation, it is important to correctly position not only the pipes, but also the batteries themselves, and make the connection in accordance with all recommendations and standards. In this case, the heating system will work very efficiently and will not require repair work. Share a useful article:
Share a useful article:
Connecting taps and subsequent connections
The taps are connected to the battery in this way:
- The tap needs to be disassembled, and then screwed onto the radiator with a fitting and a union nut.
- Tight tightening is ensured by using a special key for “American women”.
Connecting radiators with polypropylene, as well as their subsequent piping, will require the following materials:
- Threads for carving.
- Sealing connecting material.
- A set of keys.
- Tow and thread paste.
The quality and speed of connecting a radiator to polypropylene pipes will increase if you know the following details:
- The distance between the radiators and the window sill is chosen to be no less than 10 cm. If it is reduced, this will entail a change in the trajectory of the heated air flow, which reduces the heating effect.
- There should be 12-15 cm between the radiator and the floor to avoid sudden temperature fluctuations.
- The distance between the rear surface of the heating device and the wall is from 20 mm.
The most optimal location for installing a heating battery is the area under the window: this will ensure heating of cold currents penetrating from the street. If possible, radiators are left in an uncovered position, which, if other installation recommendations are followed, allows the efficiency of the device to approach 97%. If you place the device in a niche, its efficiency drops to 93%. Using a partially closed screen reduces this figure to 88%.
A completely closed decorative screen, used to decorate not very attractive cast iron radiators, can reduce the coefficient by up to 75%. As for the use of polypropylene pipes for connecting heating radiators, which are increasingly replacing traditional metal ones, this is completely justified. As a result, installation and maintenance work is greatly facilitated, which can be carried out independently.
In residential buildings of the old stock, both in the private sector and in apartment buildings, work is currently underway to re-equip heating systems. Physically and morally worn-out heating equipment (steel and cast iron radiators, pipelines, shut-off valves) are replaced with new heating systems. Outdated devices have been replaced by more advanced heating units, for example, bimetallic heating radiators with improved characteristics. Steel pipes, a familiar and durable material, are still in demand when installing heating circuits, but worn-out steel pipelines are increasingly being replaced with new materials, in particular, polypropylene, a polymer widely used in the production of pipe products.
Despite the fact that polymer pipes have been used in construction for decades, many homeowners who still use steel pipelines and are planning to modernize their heating circuits have questions about the technology for the upcoming installation - how to install polypropylene lines in their homes conditions, what does it look like to connect a heating system radiator to polypropylene reinforced pipes? To partially answer them, let’s take a closer look at how polypropylene pipe materials are connected to heating radiators.
Thermal valve - structure, purpose, types
The valve in the thermostat is very similar in structure to a regular valve. There is a seat and a shut-off cone that opens/closes the gap for coolant flow. The temperature of the heating radiator is regulated in this way: by the amount of coolant passing through the radiator.
Sectional view of thermostatic valve
The valves are installed differently for one-pipe and two-pipe wiring. The hydraulic resistance of a valve for a one-pipe system is much lower (at least two times) - this is the only way to balance it. You can't mix up the valves - it won't heat. For systems with natural circulation, valves for single-pipe systems are suitable. When installing them, the hydraulic resistance, of course, increases, but the system will be able to work.
Each valve has an arrow indicating the movement of the coolant. During installation, it is installed so that the flow direction coincides with the arrow.
What materials?
The valve body is made of corrosion-resistant metals and is often additionally coated with a protective layer (nickel or chrome plated). There are valves from:
- bronze (nickel and chrome plated);
- brass (coated with a layer of nickel);
- of stainless steel.
It is clear that stainless steel is the best option. It is chemically neutral, does not corrode, and does not react with other metals. But the cost of such valves is high and it is difficult to find them. Bronze and brass valves have approximately the same service life
What is important in this case is the quality of the alloy, and it is carefully monitored by well-known manufacturers. Whether or not to trust unknowns is a controversial issue, but there is one point that is better to keep track of. There must be an arrow on the body indicating the direction of flow
If it’s not there, this is a very cheap product that you’d better not buy.
There must be an arrow on the body indicating the direction of flow. If it is not there, then you have a very cheap product that is better not to buy.
By method of execution
Since radiators are installed in different ways, the valves are made straight (through) and angular. Choose the type that will work best for your system.
Straight (way through) valve and angle
| Name/Company | For which system | Du, mm | Housing material | Operating pressure | Price |
| Danfos, angular RA-G, adjustable | single-pipe | 15 mm, 20 mm | Nickel plated brass | 10 bar | 25-32 $ |
| Danfos, direct RA-G with customizability | single-pipe | 20 mm, 25 mm | Nickel plated brass | 10 bar | 32 — 45 $ |
| Danfos, angular RA-N, adjustable | two-pipe | 15 mm, 20 mm. 25 mm | Nickel plated brass | 10 bar | 30 — 40 $ |
| Danfos, direct RA-N with customizability | two-pipe | 15 mm, 20 mm. 25 mm | Nickel plated brass | 10 bar | 20 — 50 $ |
| BROEN, direct fixed tuning | two-pipe | 15 mm, 20 mm | Nickel plated brass | 10 bar | 8-15 $ |
| BROEN, direct fixed tuning | two-pipe | 15 mm, 20 mm | Nickel plated brass | 10 bar | 8-15 $ |
| BROEN, corner, adjustable | two-pipe | 15 mm, 20 mm | Nickel plated brass | 10 bar | 10-17 $ |
| BROEN, corner, adjustable | two-pipe | 15 mm, 20 mm | Nickel plated brass | 10 bar | 10-17 $ |
| BROEN, direct fixed tuning | single-pipe | 15 mm, 20 mm | Nickel plated brass | 10 bar | 19-23 $ |
| BROEN, fixed angle | single-pipe | 15 mm, 20 mm | Nickel plated brass | 10 bar | 19-22 $ |
| OVENTROP, axial | 1/2″ | Nickel plated brass, enamel plated | 10 bar | 140 $ |
How to install correctly?
There are 2 options for installing batteries: wall and floor placement. In the first case, you will need a bracket, in the second, legs included in the kit. The shape and design of the supports may be different, but the main criterion is that they should easily support the model of the device.
How to connect a heating radiator with your own hands. Two-pipe heating system.
Wall mount
Which elements to attach the radiator to the wall depends on the type of partition:
- concrete, brick, cinder block, foam block walls - anchor bolts;
- Another partition material is supports, which are both anchor bolts and brackets.
There are standards that determine the number of supports for sectional heating radiators. For cast iron radiators, brackets are mounted between every 6 sections.
Panel devices are provided with mounting to the wall from the rear side. This instruction is given by the manufacturer.
Radiators are mounted on the wall in strictly designated places in the home, these are:
- niches under the window;
- long distance between windows;
- partitions without windows in rooms in the corner of the building;
- premises of secondary purpose, the adjacent walls of which are external fences;
- platforms between floors and entrance to the entrance.
How to hang a radiator:
- Draw the markings.
- Using the marked marks, using a punch, make starting holes in the wall finishing and in the plaster layer. This is necessary so that the drill does not move during the drilling process.
- Take a hammer drill and the required drill. Drill holes for fasteners. The depth is slightly greater than the length of the dowel used.
- Clean the resulting nests and drive anchors into them. The latter can be either metal or plastic.
- If metal elements are selected, then screw them into the sleeves installed in the walls.
Fix the plate brackets using locking screws, having previously aligned them vertically and diagonally.
After all the fasteners are in place, put the safety linings on them and hang the heater. The fasteners should not be deformed.
How to install a radiator on a wall is presented in the video:
How to install a radiator on the wall correctly
Floor fixing
There are models of radiators on the market that do not need to be mounted on the wall, but can be placed on the floor. Usually these are tall batteries made of cast iron.
Although heating devices weigh relatively a lot, the possibility of shifting cannot be ruled out. Therefore, sometimes the legs included in the kit should be attached to the floor.
This happens as follows:
- Apply markings for fasteners through the holes in the legs.
- Using the outlines, drill holes for mounting anchors.
- Hammer plastic sleeves into the holes made. In this case, metal parts are used extremely rarely.
- Install the vertical supports and secure them to the floor with screws.
- If necessary, fix the hooks at the desired height and place the radiator on them.
After the procedure, screed the floor covering. It will not only hide the fastening site, but will serve as an additional reinforcing element.
The instructions are presented in the video:
Installation instructions. Steel panel radiators and floor mountings