Infrared heated floors laid under linoleum or other floor coverings are a common way to heat rooms for various purposes for those who follow the trend in the heating system.
This synthetic film material has long been used as flooring. Most often they cover the floors in kitchens and hallways. The main advantages are low cost and ease of work. Laying it on the floor does not require much experience. An additional advantage is that such a floor is easy to clean and does not allow water to pass through.
Previously, laminate or tiles were used as a finishing coating for heated floors. But the development of technology has made it possible to produce linoleum that copes with the task perfectly. It is important to know that not every linoleum is suitable for these purposes, and you will learn which one you need to choose from this article - there are special types of linoleum suitable specifically for heated floors.
It is also necessary to take into account which particular underfloor heating system interacts with linoleum. This has its own characteristics, if carefully observed, both the warm floor and linoleum will last a long time and without complaints.
Why IR film is the best heated floor for linoleum
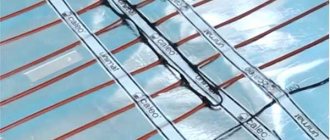
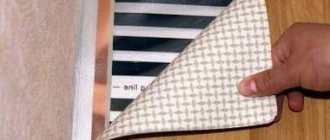
Warm floors are divided into 2 groups: water and electric, one of the varieties of which is infrared film. The material received the name “film” because of its appearance. This is a two-layer polymer film in which carbon heating elements with a unique nano-structure are mounted. They emit infrared radiation, heating the surrounding surfaces.
The heating elements look like black strips 15 mm wide, connected by copper and silver contact bars. The structure is additionally protected from damage by a layer of polymer. The system has a number of advantages:
- The film operates in a temperature range favorable for linoleum, which is why IR underfloor heating is considered an excellent choice for installation under this type of coating. The optimal power for linoleum is about 150 - 230 W per square. Infrared film provides these parameters. When installing other options, there is a risk of overheating. Even if its consequences are not immediately obvious, over time they will manifest themselves as deformation, softening, and swelling.
- The film can be laid in rooms with a non-standard layout, on balconies, loggias. Its small thickness makes it possible to use it in buildings with low ceilings.
- The installation process is simple, since “wet” work on pouring the screed is not necessary. The system ensures uniform heating of the room, is perfectly amenable to automatic adjustment and can be integrated into a “smart home” type system.
- IR heated floors have a long service life. Most manufacturers guarantee effective performance for 15 to 20 years.
A significant positive point is the easy dismantling of the system. If necessary, it is enough to remove the floor covering and lay the film on a new base or in another room. Electricity consumption when using film systems is 30% less than when using an electric heating cable over a similar area.
Disadvantages of IR heated floors
It’s difficult to connect the system with your own hands without basic skills.
The system has relatively few disadvantages:
- After laying the film, you cannot rearrange the room. Bulky furniture and household appliances should not be installed at the locations of the heating surfaces - this can lead to overheating of the film and its failure.
- It is difficult to install and connect the system with your own hands without basic skills. It is not always possible for a non-professional to connect the contact to the film. It has to be cut off and connected to another contact.
- Laying a heated floor under linoleum on a concrete floor with defects leads to its deformation. Therefore, sometimes a new screed is still necessary.
- The need to install thermostats in every room.
- If infrared heating is used as an auxiliary heating system, the air humidity level in the room may be too low.
Competent installation of electrical devices for STP
Careful preparation of all necessary materials for construction is an important point. When assembling a floor heating structure, it is necessary to purchase a high-quality film element. The product is laid at a distance of 50 cm from the walls.
It should be remembered that heavy objects such as large furniture and household appliances should not be placed above the film. The IR heater does not regulate temperature conditions
If large objects on top do not allow heat to pass through, then it gradually returns back to the source. As a result, the conductor may burn out or become partially deformed. The exact amount of film is determined based on the technology and installation features.
For continuous operation of the heaters, clips are required that secure the contacts (2 units per separate strip). But first you need to lay thermal insulation material with a high reflection coefficient, as well as install thermostats and prepare copper wires.
Laying thermal insulation
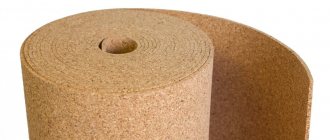
Laying the thermal insulation layer does not take much time, but it is a very important step. The event is mandatory, since heat without a protective barrier will go up and down. As a result, a large amount of energy is wasted irrationally.
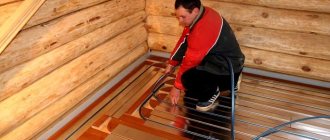
The work is usually carried out using a roll insulator. The product is rolled out on a wooden base, with its reflective surface facing up
Each strip is attached to the base using a stapler and double-sided tape. The strips are joined together without any gaps. The joints are carefully taped with tape.
Rules for forming a film floor
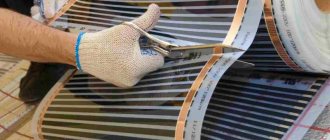
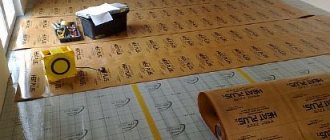
The process of rolling out the infrared film is carried out over the insulator at a distance of 50 cm from the wall. In this case, the placement of the copper strip should be clearly at the bottom. If necessary, cut the material into equal strips based on the markings of the film sections.
The peculiarity of cutting infrared film is its accuracy. The product is formed into strips of the required sizes along sectional lines. This way you will avoid damage to the heating elements
Carbon based heaters must not be damaged. If you find scratches or tears on the product, then such places should be treated with bitumen-based mastic. This option is also excellent for insulating copper electrodes. The joints of the materials are securely fastened with special clamps.
The parallel connection diagram has the following sequence:
- The placement of the first contact on the surface of the electrode is carried out inside a special film. The second contact is carefully applied on top;
- a strong and reliable connection is achieved by tightly pressing the electrode with the clamp using pliers.
After detailed laying of all strips of infrared film, a common web is formed by gluing with tape.
The bare ends of the electrical wires are insulated with pliers. The contacts of the thermal film are also subject to insulation, since they are made of silver along the edge and are capable of conducting current.
High-quality gluing of the fabric around the perimeter prevents slipping.
Criteria for choosing linoleum for film flooring
The issue of choosing linoleum for laying on a warm floor must be approached with all responsibility. Materials that do not meet the requirements react poorly to heat: they deform and release harmful substances.
The following types cannot be used in tandem with IR film flooring:
alkyd or glypthal
nitrocellulose(colloxylin)
rubber (relin)
To achieve optimal room heating results and not cause harm to health, choose vinyl (PVC) or natural (marmoleum) linoleum. These materials have important characteristics:
PVC linoleum.
Not dangerous, suitable for residential premises. When purchasing, read the labeling of the material: there should be a mark on the packaging that the coating is intended for installation on underfloor heating systems. Regular linoleum can be equipped with an additional layer of heat-insulating material, which is completely unnecessary over a heated floor. This option is not worth purchasing.
Marmoleum (natural linoleum).
The best option for installing heated floors. The material contains only natural ingredients. When heated, this linoleum releases harmful substances, does not change color over time, and effectively resists fire. Marmoleum has the only drawback - its high price. But its wear resistance and safety completely justify the costs.
Marmoleum is sensitive to strong heat, so the issue of choosing a temperature regime for such a coating must be approached very responsibly. However, this is also true for PVC materials.
Do I need waterproofing over the screed?
When installing floors in “wet” areas or rooms, people sometimes wonder: can double waterproofing be done? Place one under the screed, the other on top. If you don’t know whether there is waterproofing in the existing screed, it is quite flat and you are not going to redo it, but will be laying an expensive or non-removable coating, then this option seems logical.
Sometimes it is also necessary to lay waterproofing after the screed
The second option is if you are very tormented by the fear of flooding your neighbors below. For your own peace of mind, you can lay a second layer on top of the screed. There is no need for this, but there is nothing you can do for your own peace of mind.
In the apartment
If the floor is tiled, one (high-quality) layer of waterproofing under the screed is sufficient. Firstly, tile is a waterproofing material. Yes, seams sealed with cement-based grout allow water to pass through. But polymer grout is waterproof. If you are so afraid of a flood, it is better to use good grout. Here you will have double waterproofing.
When can waterproofing be laid on a screed? If you will be laying laminate flooring in the same kitchen or hallway. To calm your paranoia, spread the film over the screed, then the backing under the laminate, and then follow the technology. Such a thin additional layer will not affect anything.
Cracks in the screed can be repaired and covered with waterproofing
When else do you need waterproofing on a screed? If the screed is old, there are cracks. In general, in an amicable way, if there are a large number of cracks, you need to remove the old screed and pour a new one. But if there are only a few cracks and the screed pieces are at the same level, it is quite possible to try to restore the slab under the tiles. To do this, widen the cracks and fill them with a repair compound. Then, if you are laying tiles, you can coat it with coating or penetrating compounds. For other types of coatings, such more serious waterproofing is also desirable, but you can get by with film.
In a private house
The same approach - with laying a second layer of waterproofing on a screed under a laminate or carpet - can be justified in a private home. But here it is needed not in order to protect the “neighbors below”, but in order to cut off the flow of water from the ground. But if there is such a problem, then this is only a temporary solution. Dampness will accumulate under the film and you will still have to redo everything.
In a private house, concrete floors on the ground must be protected from capillary entry of moisture
What exactly needs to be done must be decided by examining the floor, foundation and surrounding area. But the first thing you can try is penetrating waterproofing. If the problem is that the bottom layer has torn and stopped working, this will work. If the problem is foundation settlement or cracks, then you need to look at the degree of damage and then make a decision. In general, in such cases you can’t get by with a little bloodshed.
Tools and materials
Set of infrared film heated floors
To install a warm infrared floor under linoleum you need to prepare:
- heating set: infrared sheet, insulator, contact clamps;
- temperature sensor and thermostat, hollow corrugated tube;
- wiring;
- double sided tape;
- polyethylene film;
- plywood sheets;
- heat-reflecting substrate;
- nails;
- knife, scissors;
- pliers, pliers;
- screwdriver;
- tools for wall chipping.
To fix the material, you can use a construction stapler or furniture nails. if you plan a large number of small pieces of film (up to 1 m), purchase additional terminals.
Marking the room and preparing the base
The film must be placed along the entire length of the room
Before installation begins, sketch out the floor plan of the room and mark the places where stationary pieces of furniture or large household appliances that fit tightly to the floor will be installed. It is not advisable to install infrared film in these areas. When planning, consider the following points:
- The film must be placed along the entire length of the room. This will avoid a large number of connection points for installation wires.
- If electrical wiring runs inside the floor, it should be at a distance of approximately 50 mm from the IR film and insulated from the floor or wiring with heat-insulating material.
- There must be a distance of at least 200 mm between heat sources (pipes, ovens, fireplace) and the film.
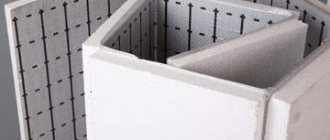
- The base for infrared heated floors must be clean and level. Often it is enough to make minor surface repairs. But if there are significant irregularities, pouring a fresh concrete screed is necessary.
- A layer of thermal insulation material is placed on the prepared base. If it is a rolled material, the strips are laid end-to-end and the joints are secured with tape. The insulation should lie very evenly.
Open the films
The film is cut along the lines along the heating strips every 250 mm
After drawing up a plan for laying the film, they begin to prepare it. The procedure is as follows:
- The film is cut along lines along the heating strips every 250 mm. Cutting along any other path is prohibited! Otherwise, the warm floor will not work.
- Contact clamps are installed on the finished heating elements. In places where current-carrying copper strips and a two-layer film pass, the tip of the wire is installed on the contact strip inside the thermal film. Then a grommet is inserted into the hole and riveted with a special stapler or hammer.
- The cutting lines of the contact strip are insulated on both sides with a waterproofing strip. Protected copper wires with a cross section of 1.5 square meters. mm is brought to the tip and clamped with pliers. After this, the junction of the copper busbar and the electrical wire with the tip is insulated on both sides with a waterproofing strip.
IR film can be laid lengthwise or across the room. Optimal placement of stripes longitudinally. In this case, the number of connection points will be minimal.
Laying and connecting the film
Parts of the heating film are connected in parallel to each other
After cutting the film, install thermal insulation with a reflective layer and secure it with tape. Heating elements are laid down on the thermal insulation with copper strips. They should be positioned so as to avoid the contact of adjacent strips touching! Rules and installation procedure:
- The heating elements are secured with tape, a stapler or furniture nails. This will minimize the likelihood of the strips moving during installation of the coating. The heating elements should be attached through the transparent rim located on the sides of the element.
- The heating element must be located 5 mm from any supply section of the element, which includes copper electrical bars. The wires are positioned so that the main ones are under the baseboard. In places where the contact strips are insulated and thickening of the system is observed, cutouts are made in the thermal insulation to level the surface for the final coating.
- Parts of the heating film are connected in parallel to each other. The highest total power of the heating elements that are connected to the thermostat should not exceed 3500 W. When connecting the heating system, you should definitely take into account the presence of other electrical appliances that will be connected to this network.
- If the total power of the heating system is more than 3500 W, it is advisable to make the connection using separate electrical wiring, protected by a separate circuit breaker. Heating devices should be connected using a magnetic starter.
- After installation, you need to inspect the system, check the reliability of the insulation and fastening of the wires. Then you need to measure the resistance of the heating strips. If there are sources of possible system short circuit, they should be eliminated and the performance test repeated.
- A temperature sensor is attached with tape under the cutting line, where there is no heated section of the film. It is placed under the film and connected to the thermostat with wires. Heating elements and a sensor are attached to the thermostat.
- The thermostat itself is hung on the wall in an easily accessible place. Its connection must be made in accordance with the diagram. Those inexperienced with electricity should consult a professional. Thermal sensors Then you need to turn on the thermostat and leave it for a few minutes.
- To hide the cable leading from the thermostat, you can make a groove in the wall. If the repair has already been completed, the cable is placed on top of the wall and covered with a decorative plastic box. Below, a plinth is used to disguise the cable. The edges of the cable providing power are connected using connectors and pressed with pliers.
- The final test is to check the degree of heating of the film. Place your hand against the heating element: the warm floor under the linoleum should generate heat at a pleasant temperature.
- Finally, the infrared film is covered with a vapor barrier material, and the joints are secured with tape.
Sheets of fiberboard or plywood are laid on the vapor barrier. They are fastened with screws through a transparent rim located along the cut lines of the IR film and the sides of the element. The element should not be attached closer than 5 mm from the supply areas of the elements. The finished heated floor is covered with linoleum.
Laying tiles on plywood. How to lay tiles on plywood
Preparing the base
The plywood needs to be sanded and cleaned. Any surface for tiles must be level. Two layers of primer are applied to a perfectly flat and smooth surface. After you apply a coat of primer, you should wait until it dries for five hours, then do the same for the second coat. If laying tiles is done in the bathroom, then before applying the primer, the plywood must be treated with a special solution for waterproofing.
You should choose an adhesive that is designed for problematic surfaces (plywood, drywall). Before purchasing it, read the instructions to make sure that this mixture is suitable for working with plywood surfaces and your type of tile. In addition to traditional tile adhesives, special two-component polyurethane adhesives can be used.
Laying tiles
Laying tiles should start from the second row, since the first row will be cut to the required size and it will be laid last. It is recommended to install the first tiles on the farthest wall of the room. The horizontality of the laid tiles must be constantly checked by a level.
For some time, until the glue has hardened, the tiles can be adjusted to achieve the desired result. To accurately align the seams, crosses are installed between the tiles. The size of the seams, as a rule, is 2-3 mm, but if the room has high humidity or constant temperature fluctuations, the seams can be increased to a size of 5 mm.
The adhesive mixture dries within 2-4 hours, so it is better to prepare small portions. To stir the glue, use a special mixer to achieve homogeneity of the glue mass. Laying tiles is also done on a small area at a time within 1 sq.m. The glue applied to the surface of plywood and tiles will begin to set within 20 minutes. Therefore, all manipulations for laying and adjusting the tiles must be done during this time.
The final stage is grouting, but in this case it is no different from the usual tile laying procedure.
Possible mistakes
The film floor should be heated evenly. If there is no heat or some areas are colder or hotter than others, it means the installation was done incorrectly. Possible errors should be found and eliminated. Problems usually arise with the following violations:
- Laying film strips overlapping. This position of the heating material is unacceptable.
- Cutting the film too close to the copper bar. This may cause insulation failure. Complete or partial lack of insulation is one of the most common causes of underfloor heating failure.
- Using mastics to fix linoleum. All these compounds are sources of harmful compounds. In addition, during uneven heating they will form swelling on the surface. Removing such defects is difficult and often impossible.
Questions
What happens if you install a more powerful IR heated floor than recommended (for example, 240 W sq./m)?
This will cause negative consequences. Due to more intense heating, linoleum can become vulnerable to tearing and soft, and begin to move away from the base and expand. The most dangerous thing is that in the places where the thermal film is laid, the release of harmful substances will begin in fairly large volumes.
Is it possible to connect two heated floors to one thermostat?
Can. But you need to take into account their total power: it should not exceed the power for which the regulator is designed (3-3.2 kW). It is also worth understanding that only one floor temperature sensor comes from the regulator. If the rooms differ greatly in heat loss from each other, then the same temperature will not be achieved. Therefore, this connection is recommended to be used exclusively for large areas in one room, or adjacent ones, without a door partition.
Is it possible to connect two heated floors, cable and film, to one thermostat?
It is forbidden. They have different performance characteristics that require individual adjustment.
I set the recommended temperature, but the floor is not warm enough, only +28 degrees. Maybe the film is not working properly?
The floor is working correctly. It is the temperature of + 28 degrees that guarantees the energy efficiency of the IR floor. If you select a higher temperature, the energy efficiency will become negligible. If you think that the floor is not warm enough, check its heating with your hand and you will make sure that it warms up as it should. The linoleum surface should not be hot. If you want to get hot air in your house, you should think about additional heating for the walls and ceiling. But in any case, it is the warm floor that will help you achieve the recommended indicators.
Heating system testing
To do this, set the heating indicator on the thermostat at 20 - 25 degrees and wait a few minutes. Check with your hand whether the mounted film heaters have warmed up. Then the power is turned off completely to see how the electrical connections heat up.
We recommend: Operating pressure in the heating system in a private house: what should it be, how to create it?
Their temperature should be the same as that of the film. In the case when it is much higher, this means that the contacts are unreliable. They must be checked, and the cause of excessive heating must be identified and eliminated.