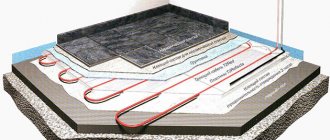
Home/Warm floor. Installation/Installation of heated floors under tiles. Laying technology./Warm electric floor under tiles: Selection of materials and installation
Most people prefer to use tiles as flooring in the kitchen, hallway, toilet or bathroom. Therefore, it is recommended to install a warm electric floor under the tiles in such rooms in order to make it comfortable and warm, allowing you to walk barefoot. The tile surface itself is cold, so walking without slippers is not comfortable. But you shouldn’t, therefore, give up this coating, because you can use electric heated floors under the tiles.
This technology can be used as an additional heating system. Will be needed by families with small children who like to crawl on the floor. Such technologies have many advantages, but how to install the system correctly? And is it possible to do the installation yourself? We propose to talk about this and much more in our article.
Main types of electric heated floors
- Use of cable or heating mats. Experts recommend using this technology if you are installing a heated floor yourself. Mats are somewhat more expensive, but they are somewhat easier to install.
- Cable design. A resistive cable is used as a heating element. The device is sold in a bay. You will need several sets of clamps and strips for mounting. You can install a heated floor under tiles yourself, but to do this you need to buy a ready-made set of equipment that will contain all the necessary elements and components. You can find kits that will include all the necessary tools. The cost of the configuration will depend on the power. You can save money if you select the components yourself and lay the heated floor under the tiles yourself. When choosing, you need to know that the cable can be two-core and single-core. The latter costs less, and the second is more reliable.
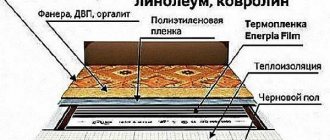
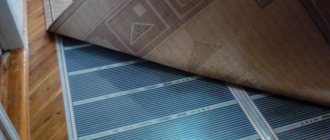
- Infrared or film. It is characterized as the safest, but its cost is very impressive. You can do the installation of an electric heated floor under tiles yourself, because it consists of mats that connect to each other.
The infrared system is preferable according to most experts. Electric infrared heated floors are better suited than others for self-installation, because to install it you just need to unroll and lay the mats correctly. Cable heating structures are not used so often. The installation technology requires a high-quality and, most importantly, even screed.
Its presence implies:
- long drying. The thicker the layer is poured, the longer it will take to dry;
- installation of a heated floor involves carrying out a wet type of work, which is not suitable for anyone;
- a significant reduction in the height of the room (you should pay special attention if the ceilings were not already high);
- a significant increase in the load on the existing floor slab. If you install an electric heated floor under the tiles, then in addition to the concrete layer you will need insulation and the heating elements themselves. All this can steal a significant part of the height of any room.
Filling the screed
To calculate how thick the tie will be, you should pay attention to the thickness of the cable. The following standards exist:
- when installing a heated floor system from a cable, a screed with a thickness of 50 mm should be used;
- For a floor that consists of heating mats, a screed of less than 30 mm should be installed.
Concrete mortar should be used to fill the screed. However, it takes quite a long time to dry. Another drawback is that the room becomes lower. An alternative option is to screed the floor with a special tile adhesive.
Many users noted that when constructing a heated floor system from mats, they laid the tiles directly on the mats. The glue layer should have a thickness of 20 mm.
Which technology is better
First of all, you need to figure out what is included in the heated electric floor kit. If you turn to specialized suppliers, they will offer a huge number of various variations of different configurations for electric heated floors under tiles. It is recommended to use such kits to install electric heated floors with your own hands. There will be no need to look for additional components, because everything you need will be included in the kit. You can also purchase a film floor design, but electric mats are more popular.
What is included:
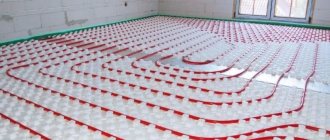
- Heating mats. They consist of a long cable that is located on a mesh. Its width reaches half a meter.
- Thermostat. It is installed on the wall and will help you set the desired temperature in the room.
- Wires. Laying the heating cable may require additional components, which can be purchased at a specialized store.
You should not try to save on heating elements and other components, because the low cost can affect the quality and service life of the installed cable heated floor. For small rooms you will need a small amount of material. But to buy large ones you will have to shell out a round sum. When choosing equipment, you should first calculate the total square footage of the room.
The choice should be based on personal experience and expert opinion. Buying just one set of heated floors for tiles will not be enough, because in addition to this you will need insulation, which will be penofol. It is an insulating substrate that is used to minimize heat loss. This will save on your energy bills. In this case, it must be installed so that the foil surface faces upward.
How to calculate an electric heating system?
The main parameter that needs to be calculated before installing an electric floor is the power parameters.
Recommended power options for heated bathroom floors under tiles:
- 130-150 W/sq. m, if the bathroom has a main heating source and the heated floor is considered an addition to the heater or radiator. This power is quite enough to evenly warm the room together with the battery and heater.
- 180-200 W/sq. m, if electric heating in the bathroom is the only source of heating.
For further installation, you need to divide the area of the bathroom by the length of the cable used. It is worth considering only that part of the room that is free from furniture and other interior elements - there is no need to warm the floor under them.
Advantages
Electric heated floors under tiles can be installed under any floor covering. There are no restrictions here. Such technologies can be used as the main heating, instead of the usual heating radiators. The advantage is that the technology of laying electric heated floors under the tiles is carried out below the level of the floor covering, so after installation it will not be visible. This will preserve the original style of the room and hide pipes and radiators from view.
If you operate the system correctly, it will last for decades. At the same time, repair work is extremely easy to carry out and, if necessary, it will take no more than an hour. Compared to radiator heating, a warm floor under the tiles will heat up evenly. This will eliminate the possibility of overheating the surface of some areas. The low surface temperature is an undeniable advantage when it comes to the level of safety. You can set the required temperature and set the switching schedule using a thermostat.
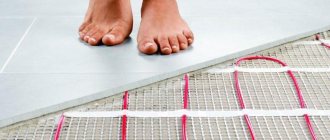
The floor covering will be warm, which will make it possible to walk on its surface barefoot. Additional equipment, such as electric or gas, will not be needed, as with other heating systems. Installation in residential and non-residential premises is possible. To install it, there is no need for expensive tools or experience working with such material.
Comparative analysis of two systems
A comparison of electric and water floors is presented in the table, which reflects the main points that are important during repairs.
| Criterion | Electric | Water |
| Cost price | It wins in terms of installation complexity, but the cost of materials is much higher. You will need to additionally purchase a temperature sensor and the cables themselves. | The main disadvantage is the complex installation (due to lack of experience). You only need to buy water pipes and installation mats |
| Safety | It is comfortable to walk on such a floor not only in shoes, but also barefoot. The risk of electric shock is extremely small and may occur in the event of a rare electrical short circuit. | Water pipes are absolutely safe for human health. Possible leaks |
| Reliability | High degree of strength, durability. The cables themselves cannot fail; over time, it may be necessary to replace the temperature sensor or power regulator | Durable and reliable water circuit. In case of leakage, you will have to completely remove the screed and replace it with a new one. |
| Power | Range from 15 to 30 degrees. | Temperature up to 50 degrees |
Flaws
Now it's time to talk about the disadvantages. To begin with, if you use electric floors, your energy consumption will increase slightly. Laying an electric heated floor under the tiles should be done only after measuring its power. If the wiring is old and will not support such a powerful heating system, then it is recommended to completely replace it. At the same time, do not forget about grounding with an automatic shutdown device, which will only increase the level of security of the system.
The electrical wiring must meet all the requirements based on the technology of laying a warm electric floor under the tiles, and it is worth making a small margin when making calculations. The infrared film used has a small magnetic field, which, although not capable of harming a person, many people do not like its presence. Wood flooring can warp when exposed to high temperatures.
Advantages and disadvantages
Warm floors in the bathroom under tiles, like any technology, have a number of disadvantages and advantages. Some believe that an electric floor can give a person an electric shock and that ceramic tiles will prevent the room from heating evenly because they do not conduct electricity well. If the warm floor is installed correctly, it will not cause any problems.
Consider each of them in detail in the table below.
| Pros of heated floors in the bathroom | Disadvantages of heated floors in the bathroom |
| The ability to evenly warm the room, and not just its upper layers, and reduce the level of air humidity | The need to install special equipment under the floor to be able to heat the room |
| Heating mats and infrared equipment do not pose a threat to the human body | To install a heated floor in the bathroom, you will have to disassemble the tiles, even if they were laid quite recently |
| The level of electromagnetic radiation is extremely low (for comparison, the EMI of heated floors is lower than that of a TV) | Difficult to install without special experience (this problem can be solved if you approach the task responsibly and strictly follow the instructions) |
| Reduces indoor humidity levels | |
| Full control over the heating level |
Also, do not forget the fact that heated floors in the bathroom under tiles prevent the appearance of mold and mildew, for which high humidity and heat are the most comfortable living conditions. A high-quality floor dries out the air and prevents the proliferation of harmful microorganisms, which is also an undoubted advantage.
Installation
It is necessary to understand that the heating cable must be laid in strict compliance with the existing technology. Materials must be laid in strict sequence. But before this, it is necessary to check electrical appliances for endurance, since the wiring must withstand the additional load in the form of heated floors.
Design work
One of the important components of installation work is the design stage. Carrying out calculations will prevent overheating of individual sections of the heated floor and reduce the cost of purchasing auxiliary elements and materials. When developing a project, it should be taken into account that electric floor heating is not carried out in places where furniture and various equipment are installed. Otherwise, this will lead to additional load on the system (air will not flow into the room, returning back). The laying scheme should take such points into account.
Click to enlarge the image.
If the bed is large, then it is better to choose a product with high legs. It is also recommended to lay the mat at a distance of 20 cm from the walls, and about 10 cm between the turns. Installation of the thermal regulator should also be done based on the diagram, at a distance of 90-95 cm from the floor. This will allow you to trench a small area and make the device accessible.
Thermal insulation layer
Laying an electric floor under tiles cannot be done without installing high-quality thermal insulation material. The sequence of use of thermal insulation depends on its type.
Material selection:
- Thin sheets of material are laid on a previously prepared surface. Experts recommend using foil-coated penofol (the reflective surface is placed on top);
- thick material is recommended to be installed in rooms located above basements, unheated rooms, or the ground. It is also necessary for loggias and balconies. Expanded polystyrene or polystyrene is used as such material. Used before installing electrical equipment or leveling surfaces. The thickness is 2-10 cm.
When laying tiles under an electric heated floor under the tiles, you should adhere to a certain technology. So, the material is installed at a certain distance from the wall, and the thicker the material, the greater the distance should be. All joints must be taped with damper tape when installing the floor yourself. This will prevent the material from spreading after heating.
Foundation and its preparation
Making a subfloor under tiles with your own hands is not an easy task, but it is quite possible. The heating cable is laid exclusively on a flat and clean surface in the same way as a heated mat. To do this, the surface must be cleaned of grease stains, dust and debris. In this case, all irregularities and bulges must be leveled under the screed. It is recommended to cover the surface with a soil mixture. If after this the surface remains uneven, you will need to install a screed.
Floor cleaning
If desired, it can be made of concrete, but it may take a long time to dry (from a week to a month). If you don’t have a lot of time and the surface has only a few irregularities, then you can resort to self-leveling floor technology. The cable should not be laid on plywood or wood, as this will lead to large heat losses and increased electricity bills. The gating is done at this stage.
Where to make grooves
Installing a temperature sensor and thermostat
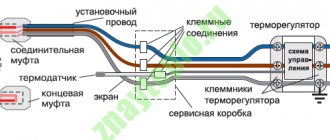
The temperature regulator is mounted on a previously prepared area. The connecting wire that is laid between the cable and the thermostat should be placed in a corrugation. Then it is placed in a pipe and stretched to sensors, which are installed at a distance of 35-40 cm from the wall. This will allow temperature measurements to be made more adequately. Warm floor technology for tiles implies the presence of evenly laid cables and corrugations (without kinks). The abutting edges are insulated with sealant. This will prevent the screed from getting inside the system. The sensor is also mounted in the corrugation. This will allow you to get to the broken device at any time and quickly replace it. In this case, there is no need to touch the screed.
Laying material under the tile covering
In order for the system to be considered reliable and safe, installation under the tiles must be carried out correctly.
Laying the cable under the tile
Before installing the cable, you need to check it for resistance. Afterwards, the tape is secured to the floor using fasteners. They are located frequently on the canvas, so installation work will go quickly. The main thing is to place the cable at a certain distance from each other. You can also use a metal mesh as a base and attach it directly to its surface. To do this, you will need a set of clamps (do not tighten them too much). Floor heating under tiles is installed once and for life, so the main thing here is to use only high-quality materials and fasteners. This technology is popular because it allows you to create an additional level of rigidity. The pitch between the cables should be 15-20 cm from the wall and at least 10 cm from each other. A snake laying pattern is often used.
Laying mats under the tiles
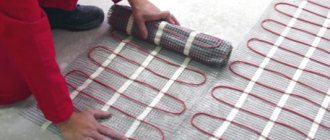
Laying tiles on a warm electric floor is not an easy task. But laying mats is much easier than laying cables. To install the thermal mat, you only need to roll it out and check the existing resistance level. During the work, minor trimming of the supporting mesh using turns is allowed. In this way, existing obstacles such as ledges and thresholds can be avoided. There should be small gaps of 5-10 cm between the mats, which are then sealed with tape. It is extremely necessary to install grounding; moreover, this is one of the main requirements when installing heated floors.
Test run of the system
Any electrical equipment must be checked, so before pouring the screed, the resistance of all wires in the system is checked. To do this, use a regular tester or a more expensive multimeter. A discrepancy of 10% is acceptable.
Screed and its arrangement
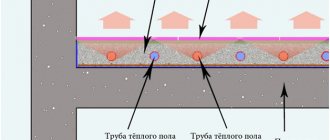
The thickness of the screed will directly depend on the dimensions of the cable used on the floor. The thicker the cable, the higher the tie level will be.
Screed height:
- if you equip the system with warm mats, the height will be 3 cm;
- if you use a cable, the height will be 3-5 cm.
Drying
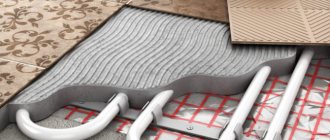
To make the screed, a concrete-based solution is used, but it will take a long time to dry and will significantly reduce the height of the room. An alternative is tile adhesive mortars. Most people advise not to screed and to lay the tile material directly on the surface of the mat. Such manipulations are possible, but in order for the warm floor to heat as it should, you will need an alternative and no less effective replacement - a layer of glue 1.5-2 cm thick.
Lays tiles on the surface of a warm floor
There is nothing new in the technology used, since the tiles are laid on a warm floor in the same way as any other floor covering. The main thing is that the foundation is prepared. Regular tile adhesive will not work, so you should stock up on a special solution in advance. Such products are always marked “warm floor” or the possible temperature range of their use. When applying the adhesive material, there should be no voids (unglued areas). Such an oversight can lead to overheating of certain areas. A spatula is used for application. It must be used extremely carefully so as not to cause mechanical damage to the surface of the system. Grouting is done only the next day, and it is recommended to turn on the equipment only after all layers have completely dried. This is the only way to avoid the appearance of cracks.
AdminAuthor of the article
Did you like the article?
Share with your friends:
Finishing work
The final stage of laying a heated floor in a bathroom under tiles is finishing work.
A few nuances that are worth paying attention to:
- Quality of tiles and official manufacturer. The tiles should not burst when the room heats up, and also not deteriorate from the release of harmful substances.
- Thermal insulator is not always used.
- Before laying, the tiles should be placed in a regular room for several days so that they warm up to the optimal temperature.
Installation work on laying heated floors in a bathroom under tiles can be carried out independently, without experience. Provides additional heating of the room, which is necessary in the warm season when radiators and heaters cannot cope. It is comfortable to walk on this floor barefoot and wearing slippers.
Detailed instructions for laying heated floors help you do it quickly and efficiently. Attention should be paid to the materials so that they last for many years.
