For most people, the garage is not only a parking space for a personal car, but also a place for gatherings, personal space, another home and, in the end, an area for storing tools and other valuables. Based on the above, the issue of increasing the level of comfort in the garage is very relevant. The existing heat loss in the room can be significantly reduced by insulating the ceiling in the garage from the attic side. This issue will be discussed in detail below.
Why does condensation appear in the garage?
During the cold season, the ceiling (walls, gates) of the garage are cooled, and the air in the garage is much warmer than these surfaces. When the temperature difference reaches a certain limit, the moisture contained in the air begins to condense.
Billy@BonesFORUMHOUSE Member
The principle of condensation formation is the same everywhere - the presence of a surface with a temperature below the dew point.
The air from the floor of the garage and the car is humid and warm, the ceiling is cold - which means condensation is inevitable.
To eliminate excess moisture in the garage, the first thing you need to do is:
- equip a high-quality ventilation system;
- make proper insulation.
Why insulate the ceiling in a garage?
We are, of course, not talking about metal garages, but about permanent buildings located near the place of residence. Often such buildings have a concrete ceiling, which has the ability to absorb significant amounts of moisture. For a car, high humidity from the inside is the worst enemy, as it provokes corrosion of metal parts. In addition to the humidity indicator, temperature values are also important. In winter, a garage without insulation will not be warm at all. Accordingly, if you place a car in it that is hot while driving, condensation may form inside as it cools. This will have a detrimental effect on both the condition of the body and the condition of the electrical system and all internal equipment.
Air exchange rates
According to SNiP 21-02-99 “Car Parking”, a warm garage must be equipped with supply and exhaust ventilation, and in such a room the air temperature must be maintained no higher than 5°C.
Ventilation in the garage is needed to:
- dry the room intensively;
- dilute and remove exhaust gases;
- dry the car.
ABOK standard “Residential and public buildings. Air exchange standards" requires at least 180 cubic meters of fresh air per hour per passenger car.
Foreign manufacturers of ventilation equipment (XPELAIR, UK) believe that a garage should provide 6-10-fold air exchange: for a garage with a volume of 60 m3 - from 360 to 600 m3/h.
MatildaFORUMHOUSE Consultant
No one in their home adheres to these standards, but it is necessary to ventilate at least 0.5 - 1 volume per hour, otherwise the machine will begin to rust.
PVC panels
These panels are easy to install, taking no more than 4 hours. At the same time, the service life is truly impressive, which, in tandem with ease of maintenance, makes this material a favorite in the eyes of supporters of practicality. Any household chemicals are suitable for cleaning. Regarding the external component, the modern assortment always allows you to choose something to suit your taste. The galaxy of advantages of PVC is completed by a very reasonable price.
PVC panels on the garage ceiling
The only drawback of PVC is its fragility. However, if you handle it carefully, there will be no problems; just refrain from hitting the panels.
Installing PVC plates on the ceiling involves the following sequence of actions.
Step 1. Prepare wall-to-wall panels. The panels will be located across the frame profiles. For your own convenience, you should cut the canvas with a construction knife, not forgetting to break off the dull end.
How to cut and bend PVC panels
Step 2. Cut a chamfer on the first board so that it is in closer contact with the guide. This will prevent a dust streak from appearing.
Step 3. Fix the panel with self-tapping screws and press washers. This will ensure the strength of the structure even when deformed under the influence of temperature.
PVC panels are attached to the metal frame with a self-tapping screw and a press washer.
Step 4. Shorten and trim the board. To calculate the appropriate width, you need to measure the distance from the deep edge of the profile to the near end of the penultimate panel, and then subtract 5 mm from the resulting value.
Installation of PVC panels on a wooden frame
Step 4. Insert the final element of the new ceiling first into the guide, and then push it into the end groove of the adjacent board (preferably with wet palms for better grip).
Video - Installation of PVC panels on the ceiling
This algorithm, with some differences, is also used when installing drywall and OSB boards.
How to make a ventilation system in the garage with your own hands
In an ordinary garage, natural ventilation is sufficient; this primitive scheme is chosen by most motorists - this is a pipe with an outlet at the highest point of the roof on one side and an inlet opening at the ground of the garage on the other side (at a level of 30-50 cm from the floor).
The supply and exhaust openings should be located diagonally in opposite walls of the garage.
The “supply” is usually done on the side of the gate, and the “exhaust” is on the opposite side of the garage.
This is what the ventilation diagram for a garage without a basement looks like.
sergey040FORUMHOUSE Member
The inlet opening is located near the garage floor at a height of at least 100 mm. Exhaust: the hole is located near the ceiling (100 mm below). The outlet pipe rises above the roof by at least 500 mm.
For effective ventilation, the height difference between the supply and exhaust ducts must be at least three meters.
Therefore, they try to raise the exhaust pipe on the roof of the garage as high as possible by 1–1.5 m.
To arrange ventilation for a garage with a basement, the following scheme is used
Under no circumstances should the vent from the basement communicate with the garage space, and the entrance to the basement should be sealed.
To enhance ventilation, city owners quite often make two exhaust pipes and two supply openings (or a gap under the garage door with the ability to close it).
If natural ventilation is not enough, you need to consider installing fans.
How to insulate the ceiling?
Work on insulating the ceiling is carried out in the same sequence as on the walls.
- Surface preparation, cleaning of dust and debris. Prime the ceiling with a roller or brushes.
- The slabs are glued to the ceiling end-to-end in the same way as the facade. Aligned by rule and level.
Gluing polystyrene foam boards to the ceiling
- After the glue has dried, the insulation is secured with additional dowels.
- In order for the plaster to stick, a sickle is glued on, which will additionally bind the slabs. The principle of operation remains the same as when insulating walls.
Aligning the ceiling with polystyrene foam boards
- A layer of plaster is applied to the primed mesh, which can be painted if desired.
Plastering the ceiling for painting
The garage with a cellar is insulated according to the above technology, but with waterproofing installed in the walls. Work begins from the lower level, i.e. the cellar.
Internal insulation of the garage
Ventilation may not cope with condensation - you may need to insulate the garage from the inside to change the location of the dew point. To do this, choose moisture-resistant materials with low thermal conductivity. Most garages in Russia are insulated with polystyrene foam, although its modern analogues, polystyrene foam or penoizol, are thicker and insulate better.
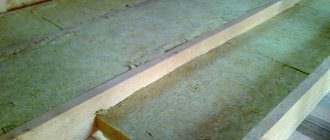
To insulate a garage, it is not recommended to use mineral wool and other fibrous materials, which get wet, lose their properties and inevitably lead to local disasters in the garage.
Alexb4FORUMHOUSE Member
I insulated the ceiling in the garage with mineral wool, which I don’t recommend. When the temperature changed, condensation accumulated on the floor slab, and as soon as the stove was heated, it all began to flow down. The mineral wool was getting damp and was of no use.
When insulating a garage, remember that:
- Polystyrene foam and its derivatives are mounted on the sheathing, and sheets of finishing sheathing are attached to it.
- There is no point in installing thermal insulation in a damp and cold room, so before starting work, the garage is heated with a heat gun or a hair dryer.
- Thermal insulation will not work properly without sealing the joints between the materials. One of the reasons for the appearance of condensation is poor sealing of seams.
- In brick garages and shell rock garages, the walls are insulated on both sides. There is no external insulation in a metal garage.
Outdoor installation
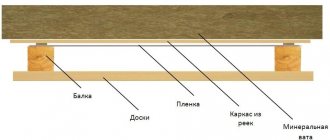
With this approach, all layers of insulation and waterproofing are located on the outside of the ceiling. Accordingly, it is necessary to create a heat-saving “pie” that can withstand all temperature and climate changes. There are two main types of flat roofs, insulated differently:
A classic roof is insulated according to a standard scheme and the layers are laid in the following order, counting from bottom to top:
- Floor slab
- Vapor barrier film
- Insulation
- Waterproofing
This scheme has a significant drawback - external waterproofing requires periodic maintenance and repair. It is produced every two to three years and this entails additional costs, although such a roofing device is slightly cheaper than the other option - the inversion one.
This type of roofing is considered more expensive to install, but it withstands temperature changes better and does not require such frequent repairs. Its fundamental difference from the classic version will be a different scheme for laying layers and arrangement:
- The first will be, as in the previous case, the floor slab
- Then - screed
- Next comes waterproofing
- Next is insulation
- A special film is placed on top - a filter.
- Cover the pie with expanded clay or gravel, at least 50 millimeters thick
This solution allows you to protect the waterproofing gasket and significantly increase its service life.
Solid garage floor
Another important measure for eliminating and preventing condensation in the garage is concreting the entire surface of the earthen floor and the inspection pit of the garage so that moisture from the soil does not enter the room. If for some reason this cannot be done right now, you need to find another way to completely cover the ground.
AfavaFORUMHOUSE Member
The most budget-friendly option is to lay roofing felt, linoleum, or whatever you find from this range under the garage.
The problem of condensation in the garage can be solved by installing a blind area (without it, rainwater may flow under the garage) and eliminating possible foundation defects.
Properties and differences between polystyrene foam and penoplex
Penoplex and foam plastic are made from polystyrene, but using different technologies.
Polystyrene foam is essentially foamed polystyrene, that is, slabs with sintered, gas-filled granules. They have micropores and voids between them. The more compressed the granules are, the lower the material’s moisture absorption and vapor permeability, and the higher the quality.
Penoplex is produced by extrusion using high pressure and temperature technologies. The result is a dense material with closed pores and a uniform structure.
Garage roof insulation
When they get tired of the drops falling from the garage ceiling every time the heater is turned on, car owners think about insulating the ceiling.
The easiest way to insulate a garage ceiling is to pour a thick layer of brick chips or expanded clay onto the roof. These materials:
- perfectly absorb moisture;
- dry well.
Typically, these bulk materials are covered on top with roofing felt, which is placed on a screed, or plywood (OSB). This design lasts for 10 years.
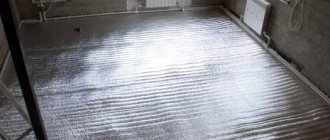
If you don’t want to spoil a good roof made of corrugated sheets, there is an option to glue sheets of 55mm EPP or other insulation onto the mounting foam from the inside.
What materials are used for cladding
After the ceiling is insulated, the surface is finished using various materials. For traditional cladding the following are used:
- Plaster. Most often, plaster mixtures are used, which not only level the surface, but also additionally protect it from high humidity. Also, when plastering, a finishing putty is used, which can be painted in the future .
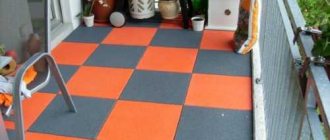
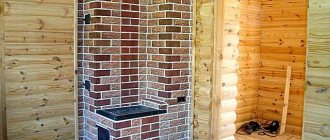
- Tree. Some people prefer wood, which will make the garage space more comfortable. Cladding boards, wood paneling and beams are used for finishing. The main advantages of such materials are their aesthetics, thermal insulation and environmental friendliness.
- PVC. Another common facing material is PVC panels. Their advantage is considered to be ease and speed of installation. Even a person who has never been involved in repair and construction work will be able to cover the ceiling with such panels.
Summarizing
Condensation in a garage is a serious problem that leads to corrosion of the car body and slow but steady destruction of the garage premises. Therefore, it should be eliminated immediately. To understand how to get rid of condensation in the garage, you first need to find out the reason for its occurrence. But, in any case, a garage always needs good supply and exhaust ventilation, and if it doesn’t work, you need to move on to insulating the walls, ceiling, gates and waterproofing the floor.
At FORUMHOUSE you can learn more about how to get rid of condensation on the garage floor, how to properly arrange ventilation in the garage, and how to better insulate the garage. Read our article about the interior arrangement of a garage, watch a video on how to build a garage-workshop with an attic.
Subscribe to our Telegram channelExclusive posts every week
Wet plastering
This method became widespread earlier than others and still remains relevant, since it shows very good results regarding the criteria of resistance and durability. The process itself consists of three steps.
Prices for OSB boards
OSB boards
Installation of fiberglass plaster mesh
First you need to lay the reinforcing mesh
Step 1. Spraying - applying the solution, brought to a creamy consistency, onto a previously wetted surface.
Spraying walls and ceiling
Step 2. Applying an even more thickened composition to the frozen spray and further leveling. This is the “foundation” of the coating, therefore this layer is the thickest.
Applying a second layer
Step 3. Covering. Here the thickest solution is used, which is applied locally and smoothed with a trowel. Such careful measures are necessary since the previous two stages cannot give a sufficiently smooth plane.
Grinding
The attractive properties of a wet-plastered ceiling are too good not to hide the catch, which is the labor-intensive process. Not everyone can invest so much effort and time into arranging a garage, and therefore many turn to alternative solutions.
Features of using insulation indoors
A sheathing is installed on the ceiling.
Penoplex is fixed to the ceilings using fasteners close to each other. A reinforcing fiberglass mesh is glued onto the insulation boards. The finishing of the ceiling is completed with any finishing material.
Advantages:
- Low thermal conductivity coefficient.
- Excellent, almost zero, water absorption.
- Strength and durability.
- Environmentally friendly.
- Resistant to mold and rot.
- Increases sound insulation.
Flaws:
- Easily destroyed by nitro paints.
- Practically does not allow air to pass through.
- Due to its high density, adhesives are not attached to it. You must first glue the synthetic reinforcing mesh.
- When smoldering, it releases harmful toxic substances that are hazardous to health.
- When used indoors, it reduces the height of the room.
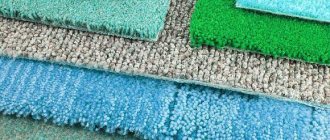
Mineral wool
Available in the form of slabs and rolls. It retains heat well and has sound insulation properties. But at the same time, it easily absorbs moisture - high humidity is the main enemy of cotton insulation. And when wet, it completely loses its ability to insulate heat. Therefore, its use requires high-quality hydro- and vapor barrier. It is almost impossible to dry this insulation; it becomes brittle and easily damaged. And when the glass wool gets wet during installation, it clumps and becomes unsuitable for further use (cavities appear inside it).
Considering that the external insulation pie can be damaged or depressurized, using this material is risky. In general, mineral wool is not the best choice for vertical installation. It has considerable weight and consists of fibers. Under their own weight, they can sag over the years, and voids will begin to form between them - the so-called cold bridges.
This heat insulator has two advantages: low price and equally low thermal conductivity. But that's all. Then only the shortcomings begin. Once in the lungs, glass particles are no longer excreted from the body. They leave itching and irritation on the skin. When installing them, a protective suit, a respirator and a mask are required, and after completion of work, a thorough cleaning of the room is required. Then you will have to wait a day or two until the glass dust, invisible to the eye, settles.
If during operation there is at least partial damage to the protective layer of films or foil material, you will again need to rent special clothing and resort to cleaning after completion of the repair.
And finally, the material shrinks and is not durable. Therefore, it does not matter what type of insulation you prefer: internal or external, it is better not to stop at this option.
Gate protection
Many people are faced with the problem of seasonal “walking” of the pillars (the base of the gate), which is why they do not close. The best solution is to protect the base (posts) from freezing when installing the gate. If you have already installed ordinary iron gates, then they must also be thermally insulated from the inside. If it is possible to attach the sheets with dowels to the material from which the gate is made, it is worth doing so. If not, the usual glue method will do. The already glued insulation is covered first with a vapor barrier film, then with outer skin. To enhance thermal protection, you can use foiled polyethylene.
Thus, the correct choice of thermal insulation material makes insulating a garage a fairly simple process that anyone can do.
15.06.2018
Return to list
Extruded polystyrene foam (EPS) or penoplex
The market for building materials produced on the basis of polymer compositions and used for thermal insulation of residential premises is replete with various options. The assortment presented in stores can confuse not only inexperienced builders, but also professionals in their field. Experienced builders recommend opting for penoplex rather than other types of insulation such as “XPS TECHNOPLEX”. The reason for this is the presence of special properties in this material related to its composition and structure. Thanks to them, extruded polystyrene foam is a material with a universal scope of application. Most often, this material is used specifically for thermal insulation in private homes, commercial and industrial buildings. It is mounted both in the area of the foundation and walls, and is used to insulate the roof space.
The use of extruded polystyrene foam allows you to take advantage of a number of its unique properties that other types of materials cannot boast of when insulating a ceiling with a cold roof. These include:
- Environmental safety of insulation.
- The presence of microscopic pores in the structure of penoplex causes a low level of moisture absorption without compromising acceptable vapor permeability values.
- Penoplex is not susceptible to fungal infections and mold, and is not destroyed by environmental factors. It is completely protected from rotting.
- The material is characterized by increased strength, thanks to which its slabs are able to withstand significant mechanical loads. This quality makes it possible to use penoplex for thermal insulation not only of ceilings, but also of walls and floors.
- The edge of the insulation looks like a protrusion in the shape of the letter “L”. This feature greatly facilitates the process of joining the slabs, and also guarantees that all the cracks will be filled with material.
- The surface of the penoplex is rough, which ensures good adhesion characteristics with finishing materials - putty, plaster.
It is difficult to disagree with the fact that not every finishing material made on a polymer basis has a set of such important qualities. In addition, penoplex slabs weigh little, which means they do not create additional load on the structural elements of the building. Since the pores of the material are very small, it can serve as an excellent means of thermal and sound insulation, while its thickness is small. Those who happened to use this material to insulate the ceiling space of the loggia noticed a number of other useful properties.
They are as follows:
- ease of installation;
- the ability to independently carry out work without difficulty;
- work on installing penoplex slabs can be done without regard to weather conditions, since it is not afraid of either frost or moisture.
Installation methods
When attaching the heat insulator externally, you can simply lay it on the surface of the ceiling, which will be the floor for the upper room. If you intend to walk on the created insulating layer, then it is necessary to create a special sheathing on which the finishing floor covering will be laid.
In this case, it is necessary to install the logs of the future floor. They are arranged in such a way as to form unique cells into which the penoplex will be laid. The dimensions of the cells can be arbitrary, but it is better that they coincide with the dimensions of the penoplex slabs.