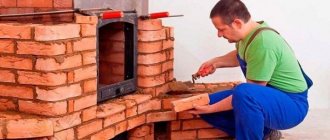
When it comes to the heating system of a private home, many owners first of all remember such a traditional heat source as a Russian stove. This is a universal structure that does not require an electrical connection and performs the function of heating the house.
The hob, coupled with the crucible, completely replaces the stove and oven, therefore, it is also an excellent alternative to kitchen equipment for cooking. Let us dwell in more detail on the features and types of Russian stoves.
Construction of a Russian stove
The Russian stove does not have a very complicated structure, but it has quite a lot of elements that perform different functions. The diagram below shows the components of a Russian stove:
- The over-pipe is the place where the flue gas is collected, and after this stage it is sent into the chimney.
- Shestok is a place located in front of the mouth of the Russian stove.
- Cutting is a place located at ceiling level, intended for fire safety.
- The valve is an iron sheet that closes the passage into the furnace.
- Epancha is a covering located on top of the stove mouth.
- The valve is a metal plate that regulates draft.
- The hog is the location that leads the pipe to the end area.
- A view is a steel plate with a hole that is closed with a lid and a blinker.
- The chimney is the path through which smoke can enter the street.
- The roof is the last brick layer.
- A bed is a place intended for sleeping and lying down.
- The crucible is a place in which fuel or firewood is first prepared in order to subsequently cook food.
- The vault, the palate, is a place located at the very top of the crucible region.
- Stoves are recesses in the stove that help improve heat transfer.
- The mirror is the wall of the stove, which helps keep the house warm.
- The chimney is the outer part of the stove.
- Furnaces are recesses that store coals.
- The bottom, the ridge, is the lowest layer of the “trough”, which ensures the strength of the installation, and is built from pre-hewn brick along a cylindrical surface.
- The hearth is the place located on top of the baking area on the inside of the hearth.
- The threshold is a place that traps gases escaping from the firebox.
- The cheek is the outer wall of the furnace.
- The mouth is the place that makes up the distance between the cheeks.
- The choke is an area where coals are collected for later use, helping to save firewood.
- Baking - the distance from the stove to the wall.
- Guardianship - the base of the stove.
- A stove is a recess designed for drying clothes.
- The understool is where kitchen tools are stored.
- Podpechek, podpechek - a room for storing firewood.
- The half-door is a door for cleaning out soot at any time.
- Hailo is a well through which the gas released after the smoke comes out into the chimney.
- The throat is a hole located on top of the hearth.
Related utensils [ edit | edit code]
Grab ( stag)
) is necessary for installing and removing cast iron from the oven, used instead of pans.
A chapelnik ( frying pan
) is used to move frying pans without handles (chapels), a wooden shovel (
gardener
) is used to move bread and pastries, a poker is used to move and rake out coals and firewood in a melted oven.
Cast iron - heat-resistant, usually cast iron, less often aluminum cookware. Frying pans - chapels were most often used - frying pans without a handle, held by chapels. Other utensils for cooking: pots, krinkas, ducklings, casserole dishes, baking sheets, etc.
A broom is an object for cleaning the hearth from coals and ash before planting bread or washing people. It is a long stalk with pine or juniper branches, straw, sponge or rag attached to the end [16].
Our culture has always had a special, reverent attitude towards the Russian stove. How does it differ from other stove designs, how to build a real Russian stove - let's try to figure it out.
The Russian stove is a multifunctional device. This includes heating the premises in the winter cold, and hot, very tasty and healthy food prepared according to ancient traditions, and the ability to preserve the harvest thanks to drying, and household amenities in the form of hot water.
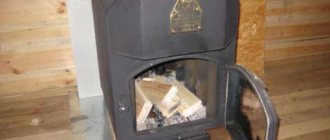
Of course, it cannot be said that the Russian stove is an ideal device that does not have its weaknesses. To successfully cook food in it, the housewife must have considerable dexterity - not every modern lady can handle the handle and pots. The stove needs to be lit every morning, which means someone needs to chop the wood. The disadvantage of a stove as a heating device is that the heat is released at a level above the hearth, that is, almost a meter from the floor. Modern types of stoves are designed in such a way that smoke circulation channels are located in the lower part, and such a stove is heated to its entire height. The design may include a cast iron stove for cooking.
Dimensions of different modifications
There are several types of Russian stoves, but the main ones can be divided into 3 types:
- With a bed;
- Without a stove bench;
- Mini.
Their sizes are:
- With a bed, example dimensions: 1220 x 2120 x 1510 mm;
- With hob without bench: 1585 x 1725 x 2463 mm;
- Mini Russian oven: 1500 x 1000 x1 990 mm.
Since the Russian stove has several types, it is worth examining the diagrams of each of them.
Scheme of a Russian stove with a stove bench
Since there are many types, their designs are different. One of them has a bed. This is one of the oldest types of Russian stoves. The bed is designed for sleeping and lying in this place during the cold season.
Russian stove with stove bench
Device
Scheme of a Russian stove without a stove bench
Without a bench - a stove with a hob. The cooking chamber is most often a cast iron stove with burners (standard - two). In such ovens, cooked food retains its heat for a long time.
Russian stove with hob without a stove bench
Scheme of a Russian mini-oven
Please note that there are two types of mini-furnaces: with and without a water-heating pipe. Therefore, it is advisable to choose in advance which one you want. After all, it is the first 10 rows that differ when laying. They are the ones who model the entire body. Changes cannot be made later unless you destroy it and start again. And after the 10th row in the building, the two types are the same. This type is also called the “Economy” stove, since it is small in size and requires a small amount of materials.
Mini Russian oven
How to mix clay mortar
To lay a Russian stove you will need approximately 3.5 m 3 of mortar. Accordingly, the required amount of ingredients is taken in the ratio specified above and diluted with water in an amount of 1/4 of the volume of clay taken. For example: 1.1 m 3 clay, 2.2 m 3 sand and 0.27 m 3 water.
An iron barrel or a tin-lined box is used as a container; the clay is soaked in water for a couple of days. After this, sand is added and the entire solution is mixed with feet (you will have to stock up on high boots) until the mixture becomes homogeneous.
Important: since the width of masonry joints is no more than 3 mm for fireclay bricks and 5 mm for regular bricks, all large lumps and pebbles must be removed from the mortar.
Present tense
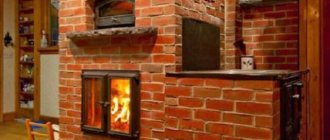
In the 20th century, a modern version of the stove was proposed. The movement of gases was already calculated in it, and uniform heating of the room was ensured. Well-assembled models can last for decades. Even after the installation of modern heating, residents of private houses do not refuse the Russian stove, although it is often used not only for its intended purpose. It is installed in houses and mansions to create the desired look and interior. The photo shows an interesting design of a room with a stove.
Varieties
Naturally, in the modern world, the Russian stove has ceased to be the same as before; its design, size, purpose, etc. are changing. There are several classifications of Russian stoves:
- by size: small (less than 1500×1750 mm), medium (1500×1750 mm) and large (1500×2300 mm and more);
- by position: autonomous (separate) or combined with another stove;
- by design: modern and traditional.
Modifications
Although some people prefer the traditional stove design, most prefer innovation.
Types of design improvements:
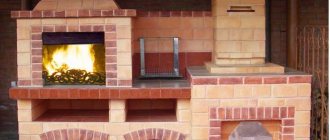
- With a fireplace. This addition allows you to install a stove in one room and a fireplace through the wall. This eliminates the need for separate chimneys and a foundation for the fireplace. The photo shows everything clearly.
- With stove and heating. In this modification, as can be seen in the photo, a cooking floor or stove is built into the oven array.
- With a trestle bed as a bed. The need for such an addition arose due to the reduction in the size of the furnace. If previously the bed could accommodate more than three people, now it can accommodate one or two. The trestle bed allows you to create additional space for relaxation. It is installed as shown in the photo.
Advantages and disadvantages
The Russian stove, like any other, has both ardent fans and those who do not like it. Naturally, everyone chooses for themselves, but knowing the main advantages and disadvantages will help make this choice easier.
Pros:
- long cooling time, resulting in good heat retention;
- high efficiency;
- service for more than 30 years;
- safety:
- with proper placement, heating of several rooms while saving space;
- therapeutic effect (warming).
It is worth considering that these advantages are possible only if the stove is assembled by an experienced specialist in accordance with all the rules.
Minuses:
- difficulty in preparing fuel, its high price;
- high consumption of firewood;
- in the traditional design, only the upper and middle parts are heated;
- may not fit into every interior.
Where to learn baking
There are not many places in Nizhny Novgorod where you can learn stove craftsmanship, but the experience of stove makers who have been working for many years is colossal.
Thus, the Rastrigin school of stove makers conducts courses in the construction of stoves of any complexity. For 24 years, craftsmen have been honing their skills in creating high-quality stoves. During its operation, the school has already graduated 3 sets of students. At the same time, those who wished to work in a wide variety of professions, from humanitarian to technical. Pupils of the Rastrigin school presented a red stone Russian stove to Nizhny Novgorod residents at the interactive festival of arts and crafts “Nizhny Novgorod Chernozem 2019” in July. During the event, the kiln not only performed decorative and aesthetic functions, but also helped and worked for its intended purpose - it fired clay products for potters at master classes.
Stove makers also show their skills at various competitions. The head of the school, Roman Rastrigin, took part in the annual WorldSkills Russia competition, where he won. In addition, Roman is a representative of the Nizhny Novgorod Stove Makers Guild.
Russian stove at the festival of arts and crafts “Nizhny Novgorod Chernozem 2019”
Talking about his activities and answering questions from those who would like to install a stove in their home themselves, Roman warns: “The fact is that building a stove and installing it is a rather expensive service, but it will be much cheaper if a person creates the design of his own oven and build it under the supervision of a master. Let's do the math: laying a stove costs an average of 40,000 - 50,000 rubles. And training on the course costs 30,000 rubles. Even if you make two stoves for yourself - in the house and in the bathhouse - you will pay for the course and remain in the black.”
The masters of the school publish the results of their activities on Instagram and "".
Stove making is one of the most difficult but interesting activities. With the development of furnace technology, many engineers, architects and professors improved this device, expanding the range of functions. Through trial and error, many centuries later, many modifications of stoves were invented, but the stone stove remains the standard among all existing ones. The history of the stove consisted not only of issues of its structure, but also of design.
Polina Bystrova12+
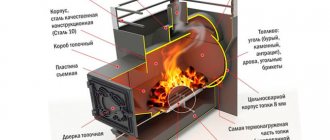
Homemade design
If you have no experience, you can choose a simplified design of several bricks and a bent pipe. If you have the skills to operate a welding machine, create a furnace from a square profile and sheet metal.
Furnace drawing and dimensions
The presented option can be adjusted taking into account the volume of the room, other personal requirements and preferences. The developers recommend setting the diameter of the riser channel in the range from 65 to 105 mm. The dimensions of the shell are changed accordingly.
Drawing with explanations for assembly
To accumulate thermal energy, adobe was chosen. This material is not heat resistant, so the temperature must be reduced to a safe level. Additional recommendations:
- the drum can be made from a standard 50-liter cylinder;
- provide perfect sealing of the smoke exhaust system to prevent soot from penetrating into the porous adobe;
- To remove residual mechanical impurities, a second ash pan is installed.
Step-by-step instruction
Homemade wood burning stove rocket
You can create a wood-burning jet stove with your own hands using the following algorithm:
- To produce a mixture of the main heat-insulating layer (5b), crushed stone from chamotte brand ShL is used.
- The support frame for the stove is assembled from wooden logs (100 x 100) with cells no more than 600 mm; the distance under the deck can be increased.
- Mineral cardboard and tongue and groove boards are used for cladding.
- Wooden blanks are pre-treated with impregnation with biocidal additives.
- The area under the main part of the structure is covered with a metal sheet.
- After placing the structure at the planned location, formwork is installed and adobe is poured.
- A drum is made from a gas cylinder of suitable size.
- To create reliable welded joints, electrodes with a diameter of 2 mm and a direct current of 60-70A are used.
- The sealing seal is made from asbestos cord and fixed with heat-resistant glue.
- A riser is assembled from prepared steel blanks.
- A bottom layer of insulation is installed; plywood (20 mm) or boards are used for formwork.
- Filling with construction mixture is carried out to level B according to the drawing. It takes 1-2 days for this part to dry completely at room temperature.
- Install the firebox, controlling the accuracy of the vertical position.
- Part of the blower will protrude outward, so at the final stage the wall is leveled with adobe.
- After filling with the mixture to level G, it is recommended to speed up drying with a regular incandescent light bulb with a power of 60-75 W (placed under the riser).
- An ash pan made from a steel sheet 0.8-1 mm thick is installed.
- The drum tube is mounted, forming a wedge-shaped slope towards the outlet in the inner part (with mixture 5b).
- A lining is created with layer-by-layer filling (5g), the plug is made of clay.
- Continue assembly according to the diagram, install the corrugation, drum covers and ash pan.
- After drying is complete (2-25 weeks), the formwork is removed, the surface is formed, and visible metal parts are painted.
Explanations for the composition of building mixtures (5):
- a – adobe made of clay and straw, the consistency of thick dough;
- b – medium-fat clay with chamotte crushed stone;
- c – fireclay sand with clay in proportions of one to one;
- d – river sand without washing with a fixed granule size (2.5-3 mm);
- e – oven clay of medium fat content.
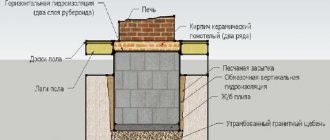
Preparatory work
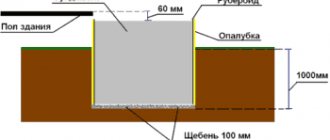
The weight of the stove is considerable, so they make a full-fledged concrete foundation using formwork:
- Mark the location of the furnace. It is necessary to ensure that the door and window are not on the same line and provide a chimney outlet. The size of the foundation will be 15-20 cm larger than the dimensions of the stove. Using a grinder, dismantle the wooden floor covering.
- Formwork is arranged and the foundation is poured with concrete (the upper level should not reach the floor surface by 2 bricks). Concrete is reinforced not only around the perimeter, but also in depth. To save on materials when constructing a foundation, it is sometimes made of rubble (broken stone, brick or any large construction waste is used).
- Next, they take a break from work for 20 to 25 days to allow the concrete to set.
- Lay a layer of roofing felt folded several times for waterproofing. The layers of roofing felt are connected with a stapler. This is a very important stage, since the Dutch oven is capable of transferring some of the heat to the floor. On a note. If climatic conditions are such that the soil freezes up to one and a half meters, it is recommended to use a layer of basalt cardboard for thermal insulation.
- Plumb lines are arranged to ensure that the oven is strictly vertical. To do this, strings or ropes are pulled, which will act as beacons. If this is not done, each row will need to be monitored not only horizontally, but also with a protractor with a vertical plumb line. If the design “goes to the side,” the performance characteristics of the stove will deteriorate.
- Bricks are selected for masonry and dry masonry is carried out. Mix the clay-based solution in an amount sufficient to use it at a time. On the second day, this solution will lose its quality. Clay is placed in a trough, filled with water and allowed to soak for about 2 days. The solution is stirred, breaking up lumps. The required plasticity is achieved using sand. To improve the quality, the mixture is kneaded with a construction mixer.
How to lay out a high-quality Dutch oven if you have no experience as a mason? There is one trick: before laying out the stove on the mortar, you should practice “dry”.
Order
1-6 rows
We do not use screed to waterproof the foundation; we lay it dry - sweating is excluded. We start from the left front corner (pos. a-1 in the figure). Place a 3/4 brick in the corner with the poke outward. From it there is a row of 12 full-lengths to corner a-2. Seam – widened to 13 mm; This will be everywhere in the first 3 rows, because... in the 4th row a masonry ledge will be formed.
In corner a-2 - two 3/4 pokes and a double row of full-lengths to corner a-3. We arrive at corner a-4 in the same way as a-1 – a-2. Row 1 is completed by two full-length frames, forming an opening of 540 mm. We check the masonry using the rule and diagonals.
In the second row (pos. b) on the sides the pokes of the 1st row are covered with spoons. In the corners there are 2 three-fours, laid in spoons. The full-length frames framing the opening are covered with 3/4 pins with bandaging of the seams. The third row (pos. c) is identical to the first.
4th row - according to pos. on the brace. The arrangement of bricks is the same as in row 2. We narrow the seam to 5 mm to get a ledge of 25 mm on the sides. We check the masonry with a level.
5 row - according to pos. d. In d-2 and d-3, two 3/4; between them there are two rows of spoons. The side walls are bonded. We squeeze the walls of the oven opening under the heel of the arch. We place the circles on the supports and lay out the 6th row identical to the 4th.
First arch
When laying out the arch, in addition to the above, you must observe the following; for subsequent arches/vaults too:
- There should not be a single untied seam across the arch from heel to toe (on the left in the figure below).
- The seams from the top to the heels gradually taper from 13 to 5 mm.
- The circles with formwork are removed only after the solution has dried.
7-10 rows
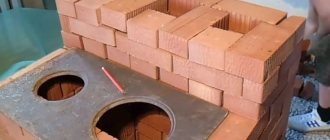
The 7th row is laid out as the 5th; 8 - like the 6th (on the left in the figure) In the sidewalls from the inside, the pokes are cut to fit the heel of the arch. On the 8th row, we begin to lay out the sub-height: three rows of full-length splice stitches, counting inward from the forehead. The middle poke from below needs to be tucked under the arch of the arch. We place the 9th row as the 7th, but we lay out the 2nd row of the sub-stitch with spoons. We lay out the roof of the baking area.
Row 10 is special, in Fig. on the right: corners from 3/4, sides from spoonfuls; the rear is made of full-length buttocks. From the forehead inwards - 3 rows of full-length buttocks. There are 7 pieces in a row, laid flat. This will be the hearth with the bending hearth.
Bedding
We make the furnace backing from broken bricks and clay mortar. We tamp and stretch as indicated by the arrow. It’s better to do it yourself with a break and not try - not every stove maker can do it.
Rows 11-17
We lay out even rows as the 10th. In the odd numbered ones there are rows of butts on the sides; behind - spoon. The 15th and 16th are tucked under the heels of the arches. Upon completion of the 17th row, the laying of the walls around the furnace is interrupted until the entire front of the furnace is laid out, up to a vertical plane passing along the rear wall of the mouth.
Zev, squeeze, mouth, crucible
Arches and vaults are erected along the circles of the arches with formwork. The side walls of the bend will go into brick; the forehead and mouth are half a brick. The heel of the pharynx arch will be on the 15th row; the heel of the mouth arch is on the 16th. It will be especially difficult for a beginner to smooth the inner walls of the heil: from above you cannot see what you are doing, and from the inside dust and crumbs fly into your eyes. Therefore, the hilo needs to be processed from above, checking with a template.
18 and above
We place odd rows as 1 or 11; even - like 2 or 10, see fig. If the floors are laid on clay, then starting from the 19th row, the bricks from the inside are pressed in place to the roof of the furnace. But this does not always save the clay floors from falling through, so the best craftsmen build a box around the crucible, make a backfill of brick chips on the clay, level it and compact it, and over it they put a continuous lining of spoons, framed with ends with three-quarters at the corners. In order for the flooring to last forever and not push through the vault, what happens next depends on the prosperity and generosity of the customer: either a wooden board-flooring, or a row of facing bricks on mortar with bandaging of the seams.
The last method is not as simple as it seems: the arch is tilted anteriorly. Therefore, a row of bricks are placed flat on its locks lengthwise and with the seams bandaged relative to the key ones. Then they cut it onto a wedge so that the crossbar is flush with the walls.
The backfill will be double-sided, and the floors will lie on the wedge and walls. What's the point here? Let us remember the mechanics of construction: it is much more difficult to crush a vault from above than to break through it from the side. The load from the floors will be transferred to the lock, and from it along the arch to the cheeks of the stove. The arch of the vault will only work in compression and, if the floors fail, they will remain intact, and the floors are not difficult to restore.
If you undercut the bricks of the upper rows, then the load from the floors will give a lateral shear load on the vault. Building materials do not hold up well to shear. If the floors fail, the roof will fail and the stove will need to be rebuilt.
DIY house layout
Watch another master class. From it you will learn how to make a house inside and outside, as well as a platform for it.
The model of the hut is made of cardboard. For the roof, cut out two rectangles and glue them at the top with a strip of the same length. You will get a gable roof. It can be painted to resemble tiles. Make the frame of the house from a wide strip of cardboard, from which you need to create a square. First, you will paint the outside of it so that it is clear that it is a log house.
Glue wallpaper inside so that it also resembles wood. Place your creation on the prepared platform, onto which a green leaf is glued. Make a canopy over the entrance from cardboard. We will also make a Christmas tree from this material. You can paint light cardboard green or take material that is already that color. Also make a tree and attach it here.
To make a well, use the same material. Make logs out of painted cardboard and assemble them. Take two sushi chopsticks. Saw off a piece from one. Connect these two sticks using a metal chain to form a crane well. You can also place fruit trees here.
Now look at what the layout of the hut looks like inside. It’s interesting to create it with your own hands. Cover the floors with wood-look film, make the stove out of cardboard. Make a mat out of brown cardboard that needs to be glued to a horizontal surface.
See what the layout of the house and yard looks like from above. You can paint the path so that it is brown or glue paper of that color. Glue several fruits cut out of colored paper onto the apple tree.
Make the house more comfortable. Glue curtains or tulle to the windows. You can also fence off the stove area in the living room. Make a bed out of cardboard and place bedding here. Examine the table. Place a samovar, and the child can mold plates and food from plasticine, like a chest, and small household items.
If you need the most reliable model of a hut, then make a canopy here, which was a kind of corridor at the entrance to the house. Make a wall out of cardboard, cover it with self-adhesive film, cut out doors that will open.
Here's how to make a mock-up of a hut. See how others do this kind of work.
You can make it out of paper, as the heroine of the next video does.
Related article: How to make a model of a village and city
Notes
- ↑ 1 2 Kovalevsky I.I.
Russian stoves // Furnace works. - M.: Higher School, 1983. - P. -56. — 208 p. - Shkolnik A.E.
Stove heating of low-rise buildings. - M.: Higher School, 1991. - P. 105-106. — 161 p. - Ryabinin E.A.
Finno-Ugric tribes within Ancient Rus': On the history of Slavic-Finnish ethnocultural relations: Historical and archaeological essays. - St. Petersburg: St. Petersburg University Publishing House, 1997. - 260 p. — ISBN 5-288-01635-6. - Smilenko, A. T.
To the study of local features of the culture of the unions of East Slavic tribes in the 8th-10th centuries. // Ancient Slavs and Kievan Rus. - Kyiv, 1989. - P. 106. - Sedov V.V.
Dwellings of the Slovenian-Krivichi region of the 8th-10th centuries.
// KSIA
. - 1986. - V. 183. - P. 11. - Sedov V.V.
Izborsk in the early Middle Ages. - M., 2007. - P. 62. - Rappoport, P. A.
Ancient Russian dwelling. - M., 1975. - Schoolboy, 1988.
- Shepelev, 1987, p. 139-140.
- Heating // Technical encyclopedia. Volume 15. - M.: Soviet Encyclopedia, 1931. - Stb. 379
- Shepelev, 1987.
- Pluzhnikov V.I.
Borov // Terms of Russian architectural heritage: Architectural Dictionary. - M.: Art-XXI century, 2011. - P. 47. - 424 p. - Russian hut, 2004.
- ↑ 12
Russian hut, 2004, p. 49. - Shangina, 2003.
- History and traditions of the Russian bath: a brief outline // Article on the “Russian Faith” website.
- Bath // Encyclopedic Dictionary of Brockhaus and Efron: in 86 volumes (82 volumes and 4 additional). - St. Petersburg, 1890-1907.
- A. Summer resident.
Bathhouse. Essays on ethnography and medicine / Part 1 // St. Petersburg, 2015. 234 p. (pp. 167-169) - Russian hut, 2004, Pomelo, p. 284.
Prison
This is the oldest Russian cold soup, which the poor ate in pagan times, and right up to the 20th century. - water, kvass or milk, bread crumbles, preferably in the form of crackers. If there was butter and onions, some spices, then they were added. To modern people, such food would seem like slop - it’s difficult for us to understand why people added bread to liquid, if you can just eat it and wash it down.
The recipe is extremely simple, but variable: Essentially, tyurya is salted cold water with pieces of bread and chopped onions. Finely chopped vegetables and roots (turnips, for example), herbs and herbs, and yogurt were added to it. Let us remember that it was prison that Tolstoy’s hero Konstantin Levin ate with pleasure in the middle of the summer mowing. We also hope that summer will soon return to normal, and in the midst of your dacha worries you will use the following recipe.
For a liter of water you will need two 2 tablespoons of small rye bread crackers, 1 finely chopped onion, 1 tablespoon of finely chopped plantain, the same amount of finely chopped quinoa, salt. Place plantain and quinoa in boiling salted water, quickly bring to a boil, immediately remove from heat and cool to room temperature. Add remaining ingredients before serving.
Classification by characteristics
Classification is carried out according to such criteria as dimensions, internal structure, position and even appearance. Some models are traditional, others combine classic and modern features, including stoves, cast iron grill grates, and fireplaces.
By size
Based on dimensions, it is customary to distinguish three types of construction:
- a large Russian stove, dimensions from 1.5 * 2.3 m, often has a stove bench, a large hob, and a place for heating a container of water;
- small, dimensions 1.5 * 1.75 m (used for a small kitchen, living quarters, may have a stove, built-in fireplace);
- non-standard (the advantage for the bathhouse is used).
Fact: the largest Russian stove is located in the Kaluga region. Its height reaches 11 meters and its width is 5 meters.
By device
Based on their design, all Russian stoves can be divided into two large groups: traditional and modern.
Traditional designs are distinguished by the presence of a lower unheated part, a hollow oven where utensils and a supply of firewood can be stored. A modern stove is more functional; the lower part is made of brick and is a channel stove; it heats up well. For the upper part, a cast iron hob and grill grates are usually installed, which makes the structure suitable for cooking various dishes.
By position
Depending on the position, there are separate and combined models. In the first case, this is a variant of a simple Russian stove, used for cooking, heating water and heating the room. In the second case, the design is more complex, it is combined with other stove elements, can be used to heat the entire house and requires more complex maintenance.
By appearance
Russian stove designs are also very different from others in appearance. There are several options - this is a simple geometric shape with a plastered, whitewashed surface, a decorative finishing layer, for which tiles or ordinary ceramic tiles are often used.
The second type is a decorative element of any interior; such stoves often represent a real work of art, especially when faced with painted tiles.
Literature about furnace business
The publication of books on stove design began in 1795, when the architect Nikolai Aleksandrovich Lvov wrote two brochures “Russian Pyrostatics”. As for air heaters, such engineers and architects as Derschau, Voinitsky, Lukashevich, Sviyazev took part in their improvement.
Ivan Ivanovich Sviyazev played an important role in the stove construction of the 19th century, writing a “Training Guide to Architecture” in 1839. In the book, for the first time in the history of Russian heating technology, the architect gives a calculation of the speed of movement of flue gases in the channels and determines the cross-section of the chimney. In 1867 he published the book “Theoretical Foundations of Kiln Art.” In it, the architect summarized all his knowledge and experience over 50 years of his practical activity. He also invents a sealed fire door and an ash pit (a place for ash under the firebox).
Silviusz Boleslavovich Lukashevich distinguished himself in improving stoves. In 1880, he published a “Course on Heating and Ventilation,” where in the section “Stove Heating” he outlined the theory of calculating all elements of heating stoves. This course has been introduced into all educational institutions.
Engineer Ivan Dmitrievich Flavitsky compared brick and metal stoves. His study “Healthy and harmful heating and improvement of residential premises: a popular scientific presentation of hygienic information for practical application to heating and ventilation of buildings” is still referred to by stove makers when analyzing heating devices.
Already in 1938, engineer Leonid Alekseevich Semenov made a calculation of the heat transfer of heating stoves and the heat resistance of residential premises, which was published in the journal Heating and Ventilation. Over the course of 20 years, starting in the 1930s, L. A. Semenov published about a dozen books about furnace business.