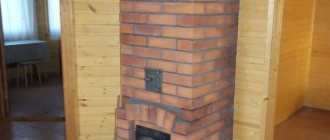
Despite the variety of modern heating devices, they have never been able to displace the old, time-tested Dutch oven. It does not require a complex system for circulating coolant and is much cheaper in cost than any modern boiler installation. The small-sized design of the Dutch oven can be used not only for heating your home, but also for cooking.
What is a Dutch oven
The first Dutch ovens appeared in the 15th century. The appearance and size have changed a little, but the concept remains the same: this is a compact heating and cooking device that can fit into a room of any size and will do its job perfectly.
The small dimensions of the structure are explained by the small size of houses in the Netherlands. Sometimes it was necessary to install a stove in rooms up to 10 square meters. m. Cities in northern Holland are densely populated, the local climate is cold and harsh. Therefore, the stoves here were of the highest quality.
High taxes on land plots forced local residents to build narrow and tall houses. Such projects require special furnace designs. This is exactly what Dutch women look like: stretched upward to a great height. One stove can heat two or three floors of a household. The main thing is to correctly draw up or choose a project for a house with a stove. The very first models did not yet have a grate and ash pan, and they did not install hobs either. All these attributes appeared over time. Thus, the efficiency has become significantly higher.
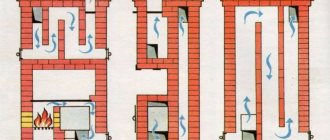
Hot gases in a Dutch oven flow through six lines: three up and three down. The bell system accumulates hot air and increases heat transfer.
A distinctive feature of the first designs was the arched vault, which was then replaced by the standard rectangular shape of the firebox.
There are many varieties of Dutch oven designs with a stove, which are equipped with chambers for baking bread, benches, a tank for heating water and other useful attributes.
But the most popular are Dutch ovens with a stove.
Principle of operation
The special feature of the Dutch oven is its six-channel chimney, inside which heated gas circulates. When smoke comes out of the firebox, it goes up, warming up the walls. It goes through all the channels in stages and goes out into the street through the chimney pipe. Heat is distributed evenly over the entire surface of the furnace walls.
The main design elements are as follows:
- combustion chamber;
- chimney pipe;
- six chimney channels.
Regardless of the dimensions of the furnace, the fuel chamber is always large and rectangular in shape. The appearance of the stove can be anything: semicircular, triangular, square.
Since the stove always has a large combustion chamber, it can be connected to a water heating circuit.
The chimney is connected on one side to the chimney; a steel pipe acts as a connecting link. The heating level of the oven is controlled using a conventional damper.
How to deal with condensation
When burning wood, resin condensate settles on the walls of the chimney, which flows down and forms peculiar stalactites in the stove. Of course, some of these stalactites burn, but some of them harden and create an obstacle to the flow of escaping gases. To avoid this you can do the following:
- pre-dry the wood;
- increase combustion temperature;
- From time to time, burn the structure to a “red heat”.
It is impossible to neutralize such negative factors, but they can be reduced.
- The chimney assembly must be carried out against the movement of gases - this way most of them will be burned.
- The chimney must be quickly dismantled if necessary. To do this, it is connected with self-tapping screws.
- You can experiment with different combustion modes and find the optimal temperature. To visually assess fuel combustion, you need to inspect the combustion chamber after cooling. If stalactites have formed, then the temperature needs to be increased.
Design features
The Dutch woman does not have a grate. Unlike many other stove models, it has several smoke channels. There is no blower. This feature prevents the fuel from burning intensely. Therefore, firewood burns slowly, evenly and releases heat energy to the room for a long time. That is, the design of the stove is suitable in its operational characteristics for long-burning stoves. Oxygen for combustion enters through the firebox door.
The shape of the Dutchman is elongated upward. The firebox has a rectangular shape. In the classic version, the function of the Dutch oven is heating. The hob, oven and benches were added by craftsmen later. Thus, over time, the standard look of the Dutch woman has changed.
The stove has very thin walls—half a brick. This feature allows the structure to quickly warm up. Combustion products, passing through a long chimney, give off heat to the walls and go out into the street. The design of the furnace can be changed, the main thing is to maintain the basic proportions and maintain the principle of operation.
The principle of operation of the Dutch oven is not to make the logs burn with a strong flame, they should smolder intensely. If the fire is strong, the flue gases will escape through the chimney ducts into the street very quickly and will not have time to transfer thermal energy to the walls. Therefore, small logs, shavings, sawdust and other types of fuel that burn through quickly should not be loaded into the combustion chamber. If the stove is fired correctly, it will warm up quickly and will transfer heat to the room for a long time. The temperature of the outer surface of the wall is usually about 60 degrees.
How to drown a Dutch oven correctly? First, make sure that there is no ash in the fuel chamber and ash pan. Fuel should be placed on the grate. The fuel must be dry. Before setting fire to the logs, cover the ash pit. The logs are laid out horizontally in even rows. Then the firebox door needs to be closed and the ash pan opened.
In order for the stove to distribute heat evenly and intensively over the entire surface, the combustion process should be adjusted. The air supply is regulated using the blower door, which must be opened or closed if necessary.
Design
To create it, solid ceramic bricks are used, among the main elements it is worth highlighting the following:
- Ash pit.
- Firebox.
- Cleaning compartment.
- Chimney.
- A valve with which you can adjust the draft.
The main differences between a Dutch oven with a hob, which distinguishes it from other types of agoregates, is that the design includes specially designed channels for smoke circulation, thanks to this technique the heating efficiency is maximized.
Most specimens have a round shape, but rectangular and curved designs are not excluded. Experts advise always creating a firebox in a rectangular shape so that the filling does not cause inconvenience.
Advantages and disadvantages
Any stove has advantages and disadvantages. The Dutch oven is no exception. The design is not complicated. Compared to a traditional Russian stove, the advantage of a Dutch stove is that it gets hot much faster, and its compact dimensions allow it to be built in any room. Dutch is more economical when it comes to calculating the costs of building materials. If a small Russian stove is made of 1200-1300 bricks, then a Dutch stove needs only 700 pieces. That is, if it is necessary to build an economical stove, the choice will be in favor of the Dutch oven.
For those who need a stove for a country house, where they need to warm up the room in a short time, the Dutch oven will be indispensable. In a Russian stove, the fuel must burn for several hours before the room becomes warm. A Dutch oven for a summer house can be lit in half an hour. You can load the firebox immediately “to the fullest extent” and get maximum efficiency.
The advantages of the Dutch woman are as follows:
- The stove can be modified by adding useful options - a water tank, an oven, a fireplace insert, a stove bench.
- Compactness, small dimensions. A normal good oven with high thermal characteristics occupies an area of 50x50 cm.
- Warms up the room very quickly. Heat is distributed evenly to the upper floors.
- The costs of constructing the structure are minimal. Expensive refractory bricks are used only for the combustion chamber. For the rest of the stove, you can use used building material.
The Dutch oven also has disadvantages:
- When compared with a Russian stove, the efficiency is not high - 40-45 percent, if operated correctly.
- There is a possibility that the chimney ducts will draw in cold from the street.
- Heat the oven frequently, at least twice a day.
- Fuel consumption is high. If you do not monitor the view and leave it open, the Dutch oven will quickly begin to cool down.
- If you heat a Dutch oven excessively, carbon monoxide can escape into the room.
Dutch models that are currently popular:
- with fireplace function;
- with baking oven and hob;
- with a tank for heating water;
- stoves with a stove bench.
The compactness of the Dutch oven outweighs all the disadvantages when you need a small oven. If the house has many windows, doors, rooms, and a large area, then other designs will benefit: a Russian stove, a bell stove or a Swedish one.
Types of Swedes
There are several popular types of Swedish oven.
- The stove in the form of a fireplace is designed in such a way that the hob opens into the kitchen, and the decorative part with the firebox and fireplace portal opens into the living room.
- Swedish, equipped with a sun lounger. This stove design is quite complex, but in winter it functions as a very cozy and warm bed.
- Swedish, equipped with a hob and oven. The back part of such a stove heats the room, and the functional front part is located in the kitchen.
The choice of stove design depends on the area of the room and the functional tasks that it must solve. If the stove is needed exclusively for cooking in the country and is not intended to heat the house in winter, then you can opt for a compact design.
Swede with one plate
If the stove is installed as the main heating device, then it is better to choose a model that can heat several rooms at once.
It should be said that the Swedish stove design is an ideal option for a small country house, in which the owners live not only in the summer.
Of course, it is also suitable for a small cottage. But the Swede gets damp quickly enough, which means it requires constant use. Otherwise, it will have to be dried for a long time each time before putting it into operation, and this significantly reduces its efficiency.
With regular use, such a stove, equipped with a comfortable hob and a functional oven, will become an indispensable household assistant and will give warmth and comfort to the house.
Rules for constructing a Dutch oven
Any modification of the Dutch woman requires compliance with certain rules:
- It is necessary to install a foundation separate from the house. Therefore, you need to think about the construction of a Dutch house at the stage of building a house. You need to find a specific place for the stove so that the chimney ducts do not fall under the beams or roofing. If you do not plan for the construction of the Dutch house in advance, you will need to dismantle the floors. The foundation must be done, since the stove has a lot of weight. If you connect the base to the foundation of the house, cracks will appear due to the difference in loads. The stove will shrink, become deformed, and the chimney will move. As a result of depressurization of the seams, the stove will become a fire hazard, and carbon monoxide smoke will penetrate into the house.
- The foundation must be covered with a waterproofing agent.
- At the stage of constructing the combustion chamber, high quality refractory bricks should be used. You can't tie it with a regular one. The mortar for masonry must be special - clay, fireproof. You can purchase a ready-made mixture or make it yourself.
- It is important to maintain the thickness of the seam - the combustion chamber, no more than 5 mm, the entire rest of the structure - from 5 to 8 mm.
On a note. To ensure that the seams are even, use a wooden strip between the masonry.
Fire safety measures
Dutch is considered a fire-resistant structure.
However, as with the construction of any furnace, certain rules must be followed:
- An asbestos sheet is placed in front of the stove to protect against accidental ignition of fallen coals or sparks from the firebox.
- Systematic cleaning of the chimney to remove soot accumulation is required.
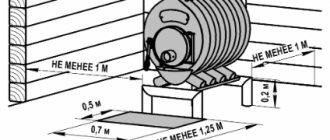
- There should be no furniture or household items within half a meter from the stove.
- The fewer metal elements used in the construction of the Dutch house, the safer it will be. However, when constructing an arch, the opening above the cooking zone must be blocked with a steel corner.
- At the junctions of metal elements with brick, a 0.5 cm layer of building mixture and an asbestos cord are laid.
- When laying a hob on a brick, you need to apply a clay layer to protect it from overheating.
View tab
After the smoke circulation is completed, several reinforcing rows are laid in which the view is laid. You can continue with a brick chimney, with an elbow and additional support on the ceiling. It is less preferable to continue with a steel sandwich, which will inevitably produce condensation and has different thermodynamic characteristics.
In any case, continuing the chimney at the intersection with the ceiling, you should increase its cross-section and the thickness of the heat-insulating layer. It is imperative to use fire-resistant insulation, and treat the wooden ceiling elements with a fire retardant. The inner surface of the channels should be smooth. During the process, it is mopped with a damp cloth in the same way as the chimney. A light test fire can be carried out no earlier than 10 days later to check the draft.
Materials and tools for construction
Before laying out the Dutch oven, you need to select a good clay solution. The mixture includes sand, red clay and plain water. The ratio is selected for the specific quality of the clay.
The fewer grains of sand natural clay contains, the less of it goes into the solution:
- 1:2.5 - clay to sand ratio for oily clay;
- 1:1.5 - ratio of components for clay of medium fat content;
- 1:1 - equal proportions for thin clay.
On a note. Cement should not be used for laying the furnace; such a solution will crack due to temperature changes, and cracks will appear along the walls of the furnace.
In order to lay out a Dutch oven for a brick cottage, you should stock up on the following materials:
- fireclay brick for firebox;
- ordinary ceramic brick;
- concrete mortar for the foundation made of cement, sand, gravel and water;
- mortar for laying the main part of the furnace;
- the required amount of roofing felt for waterproofing the foundation;
- boards (boards) for formwork;
- grate;
- blower;
- steel firebox door;
- gate;
- steel rods and reinforcing wire;
- steel wire for dressing;
- asbestos cord;
- hob.
You will need the following tools:
- construction trowel;
- level, corner, plumb line, tape measure);
- construction stapler;
- rule;
- Bulgarian;
- two shovels - scoop and bayonet;
- construction trough for mixing mortar;
- bucket;
- rubber hammer for bricklaying;
- an ordinary hammer and nails for constructing formwork.
Preparatory work
The weight of the stove is considerable, so they make a full-fledged concrete foundation using formwork:
- Mark the location of the furnace. It is necessary to ensure that the door and window are not on the same line and provide a chimney outlet. The size of the foundation will be 15-20 cm larger than the dimensions of the stove. Using a grinder, dismantle the wooden floor covering.
- Formwork is arranged and the foundation is poured with concrete (the upper level should not reach the floor surface by 2 bricks). Concrete is reinforced not only around the perimeter, but also in depth. To save on materials when constructing a foundation, it is sometimes made of rubble (broken stone, brick or any large construction waste is used).
- Next, they take a break from work for 20 to 25 days to allow the concrete to set.
- Lay a layer of roofing felt folded several times for waterproofing. The layers of roofing felt are connected with a stapler. This is a very important stage, since the Dutch oven is capable of transferring some of the heat to the floor. On a note. If climatic conditions are such that the soil freezes up to one and a half meters, it is recommended to use a layer of basalt cardboard for thermal insulation.
- Plumb lines are arranged to ensure that the oven is strictly vertical. To do this, strings or ropes are pulled, which will act as beacons. If this is not done, each row will need to be monitored not only horizontally, but also with a protractor with a vertical plumb line. If the design “goes to the side,” the performance characteristics of the stove will deteriorate.
- Bricks are selected for masonry and dry masonry is carried out. Mix the clay-based solution in an amount sufficient to use it at a time. On the second day, this solution will lose its quality. Clay is placed in a trough, filled with water and allowed to soak for about 2 days. The solution is stirred, breaking up lumps. The required plasticity is achieved using sand. To improve the quality, the mixture is kneaded with a construction mixer.
On a note. If the stove is being built in winter, the bricks must be brought from the street into the room in advance.
How to lay out a high-quality Dutch oven if you have no experience as a mason? There is one trick: before laying out the stove on the mortar, you should practice “dry”.
DIY Dutch oven construction
The construction of the stove is carried out in the following sequence:
- preparatory work (arrangement of the foundation and preparation of materials for masonry);
- furnace masonry;
- chimney masonry;
- cladding of the structure.
Now let's take a closer look at each item separately.
Preparation
At the preparatory stage, the foundation is constructed and the walls are protected from heat. Since the oven is heavy, formwork will be needed.
When cooking, it is important to maintain the proportion of ingredients
Foundation installation
Work at this stage is carried out according to step-by-step instructions:
- mark the floor taking into account the location of window and door openings;
- using a grinder, cut and dismantle the boards at the marked place;
- build a foundation and fill the mortar;
- lay roofing felt.
After this, a short break is taken until the solution completely hardens.
Substrate preparation and waterproofing
The height of the foundation is such that it is possible to lay two rows of bricks. At the same time, do not forget about bandaging. Waterproofing is laid on top, consisting of several layers, securely attached to the base.
Since most of the heat goes down, you need to approach waterproofing carefully. Experts additionally recommend laying a layer of thermal insulation. Basalt cardboard can be used together with roofing felt.
Before starting laying, you need to pull plumb lines from a strong thread. Thanks to the plumb lines, they prevent the rows from moving during laying. Otherwise, you need to periodically check the evenness of the structure. Any deviations will cause the stove to work ineffectively.
Several continuous rows of bricks are laid in the base
Detailed order diagram
Before starting laying, you need to immerse a batch of bricks in water. This measure will further prevent moisture from being drawn out of the solution and provide better adhesion. The first two rows, which are laid out to the level of the finished floor, are not included in the diagram.
Description of the arrangement of a Dutch oven with a stove:
- 1 row is laid in a continuous layer, at the level of the floor surface. You should fold it as carefully as possible so that the entire further structure comes out smooth.
- Rows 2 and 3 are also laid out in a continuous layer, and the masonry is checked horizontally.
- In the 4th row, a blower is laid, maintaining a gap of 0.5 cm, and an asbestos cord is placed in it. It is needed to ensure that the metal element does not split the bricks during thermal expansion. To strengthen the door between the bricks, rods are placed in the mortar. Laying is done from right to left. The suture dressing is performed in half a brick.
- In rows 5 and 6, part of the blower and ash pan should be covered. For this purpose, the brick is sawed lengthwise and a metal plate measuring 0.35 x 0.4 cm is passed under the masonry.
- In the 7th row, a firebox is formed from refractory bricks and a firebox door is installed. The grate is laid, the gap at the seam is left at 0.3-05 cm. The brick of the rear wall of the firebox is laid at an angle. The gap must be filled with sand.
- In the 8th row, the blower door is closed, forming an ash pit.
- From rows 9 to 14, the fuel chamber is lined with refractory bricks.
- In the 10th row, the combustion chamber is covered with bricks. The next step will be to lay the hob; to do this, prepare the bricks. 0.5 cm grooves are cut into them, which will allow the metal to expand and not destroy the oven. The edges of the hob are secured with a steel corner.
- Rows 11-13 - lay out the area above the stove.
- The 14th row is laid out like 13th, but grooves are cut in the bricks into which a steel corner is inserted. It will be necessary to place bricks of the next row on it.
- The 16th and 17th rows are laid out like the 15th, but a door is installed in it for cleaning the chimney. They also provide gaps and lay asbestos.
- Rows 18-22 - laying the smoke return channel and covering it.
- In row 23, a damper is installed in the chimney. The bricks are adjusted to size, and asbestos is laid between the metal and the brick.
- In rows 24 and 25, the lowering and lifting channels are combined.
- In row 26, the formation of the chimney begins. At this stage, it is important that the surface inside the chimney is as smooth as possible. The solution is immediately cleaned off so that it does not worsen traction in the future.
- In rows 27 and 28, the chimney is being laid; the brick is moved by 40 mm to narrow the structure.
- Rows 29-30 continue laying the chimney and install a slide damper to adjust the draft. A gap of 0.5 cm leaves room for metal expansion. Laying asbestos.
- In row 31, the size of the chimney is reduced to the original size.
- From the 32nd row the chimney is being laid. Not reaching the 3rd row to the roof, the pipes are “fluffed” to protect the wooden structure from fire. The thickness of the pipe is one and a half bricks.
Pipe arrangement
If you think about the chimney design in advance when building a house, then laying the pipe will not be a problem. But it often happens that a stove is built in an already built house.
When the place for the chimney is not prepared in advance, additional preparatory work must be carried out. Remove the roofing and install lintels at a short distance from the ventilation ducts. If it is impossible to partially dismantle the roof, use a grinder or jigsaw. Asbestos sheets are laid between the pipe and the wooden roof elements. They are attached to the rafters using self-tapping screws or construction staples. Carrying out fire prevention measures at this stage is a very important point in the construction of the furnace.
When erecting a pipe on the roof, the craftsman should be careful. This is especially true for installing a chimney in old houses.
To enhance traction, the corners of the bricks are rounded. If this is not done, the draft will be weakened by turbulence, and the efficiency of the furnace will significantly decrease.
The pipe should rise 0.6 m above the roof. The penultimate 2 or 3 rows slightly expand the pipe. This is necessary to protect the roof from water. In the last row, the chimney is narrowed to its original size. Be sure to install a protective metal cap against rain and snow.
To correctly calculate the height of the pipes, they are guided by the height of the ridge. When the pipe passes through the hole in a well-insulated attic, you can do without additional thermal insulation.
The opening between the pipe and the roof should be carefully closed. All cracks are clogged with heat insulation. The best material for this is stone wool or foam glass.
Finish stage
Finishing work is the creative stage in the construction of the Dutchman. If the stove is laid using new red ceramic bricks, then cladding is not required.
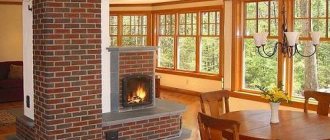
For Dutch cladding, clinker or tile tiles and decorative plaster are used. The Dutch woman looks great in the interior. In color it can either merge with the interior or contrast. A stove lined with mosaics or decorative stone looks very good.
In past centuries, the outer parts of the first Dutch ovens were decorated with tiles. The ordinary stove looked like a work of art.
The classic rectangular stove, lined with ceramic bricks, is widely used. Round-shaped Dutch women have a number of disadvantages during operation, so they are less common.
On a note. The stove can be whitewashed or painted using heat-resistant decorative coatings.
After veneering, take a break for two weeks. The structure must dry. The firebox door is left open during this time.
After the Dutch oven has dried, you can light the stove for the first time. There is no need to rush things. If the first firebox is made with a damp stove, the structure will crack and all the work will be lost.
For the first burning, take a fifth of the full portion of fuel. It is good to use wood chips or shavings for firing in test mode. You need to take the smallest logs.
Open all valves and dampers. In gentle mode, the oven is operated for approximately 7 days. The oven temperature should not exceed 600 degrees.
When burning low-quality, high-ash fuel, a large amount of soot quickly appears in the chimney of a Dutch oven. Therefore, it will have to be cleaned often, but it is better to select good fuel. The most suitable logs for heating a stove are made from wood from not very old oak, alder, linden, and fruit trees.
On a note. If you use aspen logs as fuel from time to time, the chimney will clean naturally.
After laying
Drying
Drying a brick heating device is one of the mandatory measures that is carried out before the active operation of the device begins. Dry the oven in two stages:
- in natural conditions. The period for this type of oven drying after completion of masonry work is approximately 6 - 8 days. At this time, all doors and valves must be open to ensure natural circulation of air flow, which, passing through the channels of the device, removes moist vapor through the chimney to the street. This ensures only drying of the surface of the masonry layers;
- forced drying. It is carried out using dry small firewood every day for a week during the warm season. In the autumn-winter season, the time for forced drying should be extended by 1 - 2 weeks.
The end of drying can be signaled by the absence of condensation products on the doors and valves of a closed device.
Finishing and cladding
The finishing of a Dutch oven can be done in different ways: covered with a layer of decorative plaster and whitewashed, faced with tiles, tiles or flat stones.
First test firebox
When all parts of the stove and the chimney are completely dry, you need to test fire the stove.
Basic moments:
- It is better to carry out short-term ignition in the late evening, when the temperature outside is lower than inside the room. The fuel load during the first fire should be minimal. If the ignition was successful, you need to add some damp wood, which smokes more.
- If the chimney is of sufficient height and well insulated, then smoke will not penetrate into the room. If the opposite situation occurs, then you need to check the channels for inaccurate installation and damage.
- The last stage of the first combustion is the maximum heating of the unit for several hours. During this period, check whether cracks have appeared in the seams on the front surface of the device.
Results
It is quite possible to build a compact and effective Dutch oven with your own hands. You need to strictly follow the order, take your time, and take the necessary technical breaks. Comfort and warmth in a house with such a stove are guaranteed.
Dutch ovens are almost the only heating devices that can be used by home craftsmen who do not have the skill to build ovens.
Large material costs for the construction of a Dutch house are not required. It can be built from a small number of bricks, and this will not affect its heating function.
When constructing a furnace, you can use hollow bricks or its halves. Fireclay brick is needed only for the firebox.
The main thing in this work is to make a clay solution of good quality and not make mistakes in the order. Such a stove will immediately begin to release thermal energy and will not create problems in the future.
In order not to doubt the quality of the solution, you can use ready-made oven mixtures. The cost of such building material is small and will hardly increase the cost of constructing a furnace.