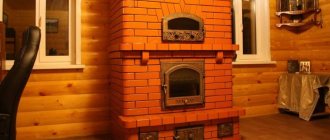
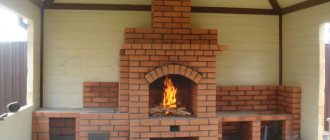
An ideally built stove is a high-quality heating device that also serves for cooking.
How to build a brick stove with your own hands will not cause any difficulties for an experienced craftsman. However, a person who is encountering this matter for the first time may need clear instructions.
This article will talk about what building materials to choose, mortar, and how to lay the foundation.
In the modern world, you can easily find detailed photos of the construction of a brick oven made by yourself. Therefore, understanding this issue and bringing the idea to life will not be difficult even for a mason doing this kind of work for the first time.
You need to decide on a suitable option for the furnace itself and a detailed description of the operating algorithm. And then, accordingly, make the laying of the brick stove for the house with your own hands carefully and carefully.
Consider in detail all stages of the work.
Characteristics of stove heating
Ceramic brick has the ability to accumulate heat, as a result of which the room remains heated for a long time.
In addition, with stove heating, the house will always be dry and the risk of mold formation is minimal. This is a very important factor for private homes, since mold often appears in them, which is very harmful to health, especially for allergy sufferers and children.
There is no need to worry about dry air, which often has a low percentage of humidity during central heating, since ventilation is generated in a brick oven due to oven draft.
A variety of photographs of a DIY brick stove prove that the stove is not a relic of the past, and it can fit perfectly into a modern interior.Surprisingly, during the hot season, a stove can also save you from excess heat: it evaporates through the chimney.
Even if you make it yourself, a brick stove will be a cozy addition.
One of the disadvantages of stove heating is the inability to heat large areas. To keep the rooms warm, you need to install the stove so that its walls are present in each room.
Advantages and disadvantages
The rough stove design is perfect for installation in the country: seasonal use, heating in cool weather or rain. There is also no need to search or drag a stove - everything can be cooked on the stove.
A small building does not take up much space either in width or height. A neat appearance will not spoil the decor of the premises, and to enhance the decorative qualities, you can use ceramic tile cladding.
Pros of the stove
There are several options for how to direct smoke exhaust, which directly affects the heating power of the structure, allowing you to choose the optimal option.
The stove is not at all demanding in operation. The simplicity of the design helps you build a stove with your own hands without specific knowledge.
Small dimensions imply low consumption of building materials and saving physical effort.
Cons of being rude
The disadvantages are the inability to heat large spaces, as well as only seasonal use. In extreme cases, year-round use is allowed, but only inside small houses.
Types of furnaces
Based on the principle of operation, there are several types of brick kilns:
Russian – Large and multifunctional. It has an open firebox, which is closed with a damper; the chimney runs along all the walls of the stove. In addition to heating, you can cook any food in a Russian stove.
Note!
- Do-it-yourself vegetable garden: new interesting garden crafts for the street at your summer cottage (photo/video review)
- DIY ceiling installation: step-by-step description of how to make a ceiling. Review of modern structures and ideas for their design (105 photos)
Do-it-yourself garage doors - a detailed description of the construction of various types of garage doors (120 photos)
The disadvantage of the Russian stove is that it needs to be constantly heated, since when cooling, condensation forms in the stove, which remains on the bricks and the bricks crack the next time they are used.
Also, a Russian stove requires constant cleaning of the chimney.
Dutch - a stove with a vertical chimney. It has small dimensions and a fairly low price.
It warms up quickly and can heat a large area. The disadvantage is the complex combustion technology and the need for regular cleaning.
Bell-type - have wide straight channels. The smoke rises and lingers until it cools completely. Then it goes down, heating the walls of the furnace. The advantage of such furnaces is their low cost, simple design, and fast heating.
Special requirements
We repeat: the advantages are simple - compactness and the ability to build in an existing house without major construction work. But it is not so easy to place a more powerful firebox in a furnace structure of generally the same dimensions; from excessive heat load it will quickly become unusable. If special requirements are not met:
- Furnace foundation.
- Masonry mortars.
- Methods of laying the structure of the furnace.
- The choice and methods of installing stove fittings.
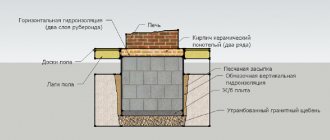
Foundation
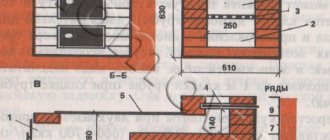
The design of the foundation for the rough is shown in Fig. The crushed stone cushion without sand bedding is leveled to the horizon before pouring. Pouring mortar M150 – cement M300 and sand 1:2. The gap between the rubble foundation and the flooring is 30-40 mm. Don't forget to support the cut joists! Leaving their ends hanging is a common but serious mistake. The dimensions of the foundation in plan should protrude onto the contour of the furnace by at least 100-150 mm.
Construction of the furnace foundation - rough
Note: the brick bed on the foundation under the furnace is laid out with bandaging in the rows and between the rows in the same way as the first 2 rows of masonry for the furnace structure, see below.
Solutions
To fold the rough, 3 types of solutions are used, see fig. below. The bed on the foundation and the chimney are laid out on lime mortar as it combines sufficient heat and moisture resistance, but the rubble must be laid only on a completely moisture-resistant cement-sand mortar. It is highly advisable to use mountain or ravine sand with rough grains for clay mortar. Ordinary clay - purchased from the oven, guaranteed fat content and, most importantly, purity. Self-excavated clay, brought to the required fat content with sand, is of little use for coarse masonry.
Compositions of masonry mortars for coarse stoves
Masonry
For rough masonry, stove bricks and, if the order (see below) is provided for, fireclay bricks are used; red worker is of the highest quality - light red in color (fully annealed), without burn marks, distortion and swelling. Dry molded brick is absolutely unsuitable. The masonry of the structure is roughly carried out following the trail. rules:
- If you are an inexperienced stove maker, each row of masonry is first laid out dry; detected defects in cutting/chipping bricks are eliminated.
- Before laying on the mortar, each brick is soaked until the release of air bubbles stops. You can’t dump all the bricks into a barrel indiscriminately!
- A 5 mm layer of mortar is applied to the bed and the base of the brick being laid.
- The brick being laid is laid with a smooth movement, slightly tilted, and moved towards the previous one so that there are no air bubbles left in the seam.
- The brick is pressed until the seam comes together to 3 mm; You can't knock!
- Between fireclay and ordinary masonry, the initial seam is 8-10 mm; after pressing – 6 mm.
- The seam between bricks and metal embedded parts (see below) is 10 mm.
- Excess mortar squeezed out of the seam is removed with a trowel (trowel).
- The recesses in the seams found after removing excess mortar are filled with mortar by pressing without transverse movements, but not by rubbing!
Those who prefer to learn visually can watch a video tutorial on laying heating and cooking stoves below:
Video: laying a heating and cooking stove
Accessories
Incorrect oven door installation
Fittings and grates for roughing require cast iron; doors and latches - with an installation skirt and holes in it for diagonal wire whiskers. Welded steel or cast iron fittings with eyes for straight lugs (laid along the corresponding furnace wall) are unsuitable in this case. However, install the doors/latches as in Fig. on the right, in the rough it is impossible; This is not according to stove rules at all. For a Dutch country house with 2.5 bricks in plan, which is heated once or twice a season, it may be fine, but not for a rough one.
It is necessary, firstly, to crimp the mustache (galvanized wire 2-3 mm) with a twist so that it does not move. Press not too tightly at first, place it at the desired angle (at least 12 mm should remain from the far end of the mustache to the inside of the masonry). Then tighten carefully and shake the door/latch slightly. Didn't leave? Good. Then, secondly, you need to tightly wrap the skirt with asbestos cord (or basalt fiber), and only now put it in place. You can also watch the following videos about installing accessories into the oven.
Video: installing the oven door
Video: grates and stove
Basic concepts for making your own brick kiln
To lay the furnace, you can contact specialists. But to save money, you can make a brick oven with your own hands. This will not be difficult even for a beginner, as it does not require special knowledge.
Note!
Insulate the foundation with your own hands - a step-by-step description of the use of the best materials and technologies (90 photos)
- Do-it-yourself pergola on a summer cottage: step-by-step instructions with photos and descriptions
- Laying laminate flooring with your own hands: a detailed description of how to lay laminate flooring. Laminate calculation, step-by-step description and installation secrets (105 photos and videos)
First you need to choose the type of stove, then find a masonry diagram. There are many DIY brick oven designs on the Internet for every taste.
After the scheme has been found, it is necessary to make a foundation. It should be slightly larger than the oven itself on each side.
The chimney is also made of brick. After completing the laying of the stove, you can line it with finishing materials to give it a beautiful look.It is also very important to choose the correct installation location. If the stove has a cooking function, it is better to install it so that the cooking part is in the kitchen and the heating part in the living room.
Useful tips
Before you begin installation, you should consult with experienced professionals who can help with various tips.
In particular, they point out the following factors that are important when building a furnace:
It is necessary to place the oven in such a way that you can freely reach any wall. This is important from an operational and safety point of view.
During construction, you need to make a foundation that will not be connected to the foundation of the house itself.
The chimney must pass inside the attic ceiling beams (during the design of the house, this option must be taken into account). If the stove is being built in a house that has already been built, then this issue is worked out before laying the foundation.
To avoid fire, a durable flooring made of heat-resistant materials is made near the fire door.
Using these tips, a person will be able to competently and, most importantly, correctly build a structure that will warm him on the coldest days of the year.
Brick stove for a bath
You can make a brick stove for a bathhouse with your own hands.
Before you start laying a sauna stove with your own hands, you need to take measurements: the area of the sauna, the number of rooms, the location and dimensions of the future stove. Then it will be easier to calculate the cost, and installation will not be difficult.
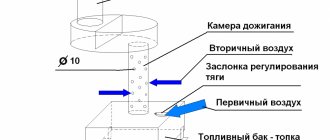
How to make a tandoor
The most important part for making a stove is the cauldron. You should choose the largest and deepest. It needs to be placed upside down, greased with sunflower or olive oil and wrapped in paper sheets. Then a special mixture is prepared: clay is mixed with sand in proportions 1:2, a small amount of wool is added. This solution is coated with the outer surface of the boiler. A hole with a diameter of 40 cm is left in the upper part. The layer of the mixture should be quite thick - about 8 cm, and closer to the base - 10 cm. Be sure to let the product dry for 7-10 days.
There is another way to make a casing: a thick solution is rolled out onto rollers (5 cm in diameter), and then tier by tier is wrapped around the cauldron. For the strength of the structure, it is necessary to tightly connect the resulting turns to each other - press them with your fingers and make tucks. After drying, the cone is removed from the cauldron and placed on a brick or stone foundation. A blower is made at the bottom of the furnace. In Asian countries, adobe is used for the foundation - a building material consisting of clay, straw and various additives.
You can decorate your creation with figures and patterns sculpted from mortar. Next, the tandoor should be fired - close the lid, heat it with dry wood and leave to cool slowly. Such a product will become the pride of the owner of the dacha, because he created it with his own hands.
Main types of sauna stoves
The old-fashioned way is to put wood in the oven and wait for it to burn out completely. After all the smoke has evaporated through the steam room, you can enter the bathhouse. The advantage of this type is the rapid heating of the bath.
Mixed - with this type of installation there is a chimney, but the stones are not isolated from the firebox and therefore smoke still enters the room.
Clean - the stones are heated by the stove, so there is no smoke. But this type takes a long time to warm up and is considered expensive.
Double - has two plates above the chimney. More economical than the Clean type and at the same time with a minimum amount of smoke.
Beginning of furnace installation
Before starting work, in addition to all measurements, you must have drawings of the stove, which will be installed by yourself.
The basis for the stove should be the wall of the room in which the stove will be located. Each row of bricks must be leveled with a building level.Two doors are installed: one small one is for removing ash, and the other large one is for putting firewood.
The wall of the stove that will be in contact with the wall of the room should be thicker or made of fire-resistant bricks to avoid fire.
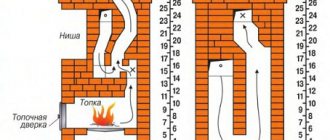
Three options for laying a stove with orders
Building a brick stove is quite expensive. The most modest option for a small dacha can cost on average 150 thousand rubles. Therefore, there are many who want to build a simple stove in a private house without stove makers, that is, with their own hands. We are happy to help independent craftsmen realize this idea.
Let us immediately make a reservation that in the procedures proposed for consideration, only the procedure for constructing the furnace mass is discussed - the main part of the structure with functional chambers and channels.
We do not consider the construction of a foundation, since its main postulates are given in another article on our website. We do not dismantle the chimney masonry within the attic or attic and above the roof. We do not offer designs and arrangements for complex two-story heating structures, but rather present the simplest schemes.
Option #1: Russian stove with a high stove bench
This universal stove structure is being built in the middle and northern latitudes of our country. It can be heated once or twice depending on weather conditions. If fuel is loaded only once a day, then the heat output of the unit will be 2100 kcal/hour. When running two fireboxes, the efficiency will increase to 3000 kcal/hour.
One of the simplest options for a brick oven is equipped with a minimum of appliances. All you need is a damper and a smoke damper
When performing the only firebox per day, the side and rear surfaces of the array emit a total of 1200 kcal/hour, the ceiling will emit 500 kcal/hour, and the front wall 400 kcal/hour. Two fireboxes will increase these figures to 1750, 700 and 550 kcal/hour, respectively.
As in most Russian ovens, there is a recess under the hearth, the outer edge of the hearth, on which dishes with food are placed before being sent to the mouth or before being removed. It is called a storage unit and is intended for storing equipment for maintaining the structure.
Its performance allows you to flawlessly process an area of up to 30 m². The peculiarity of the described design is the presence of vaulted ceilings above the technological openings. If you have doubts that they will be executed perfectly, you can fold them without arches, just rectangles.
A waterproofing layer is laid on the stove foundation, built separately from the base of the house, before the construction of the mass. During the construction process, part of the massif is covered with sand and gravel, broken glass and brick to increase heat transfer
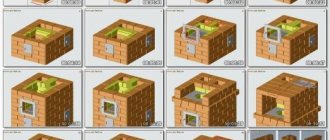
The starting 1st row is laid out solid; for its construction it is generally recommended to use cement or lime mortar. The next three rows from the 2nd to the 4th are built in the form of a well, but with a hole for the oven located on the front side. In each row, the brick is laid with a bandage, i.e. with seam spacing.
In the 5th row, the laying of the vault begins, which is placed on a shaped formwork made from boards or plywood scraps. To support the elements, the heels of the bricks are pulled off. Then two rows 6 and 7 are placed with dressing, at the same time the vault is erected. During the construction of the 8th row, the vault is closed.
The construction of the furnace in rows 8, 9, 10 is carried out in one brick. In the 11th row the cold stove is covered. Sand is poured on top so that a slope is formed towards the back wall of the stove.
In the 12th row, a hearth is installed - a solid brick surface. Place it directly on the poured sand. Since this part of the furnace will be in contact with direct fire, it is better to use refractory bricks in construction. If the floor does not come out perfectly smooth, then it is leveled by adding sand on top and grinding the surface.
From the 13th to the 16th row the crucible is laid. The construction is made in ¾ bricks. The elements are placed with dressing, but no solution is used. The brick is cut at 45º to make it possible to build locks.
In the 17th row, the next arch is laid, the mouth and back wall of the stove are formed. As a result, at the same time a foundation is laid for the construction of the cooking chamber. It is erected with bricks placed on edge. The heels are tight.
In the 18th row they begin to build the walls of the stove. The space between the cooking chamber and the heating part is filled with sand and broken bricks. In the 19th, a vaulted opening is made again, this one is located above the hearth, and behind it is the mouth of the stove.
The process of laying the stove presented for consideration is schematically represented by the procedures that must be followed to obtain an impeccable result.
In the 20th row, the masonry is made so that the walls are leveled and the hole above the pole is reduced. The construction of the over-pipe begins from this row. In the 21st row, the construction is carried out in the same way as in the 19th.
The vault closes in the 22nd row. To the right of the over-pipe there is a base for a chamber designed to collect soot. On the same side, bricks are cut to create a view that blocks the chimney to preserve heat in frosty times.
From the 22nd to the 32nd row, a re-pipe is built, view valves are installed, and a chimney channel with a cross-section of 26x26 cm is constructed.
Then the chimney is constructed and an additional damper is installed. The frame for the damper is made of a metal corner or strip 3 mm thick.
Option #2: improved Teplushka stove
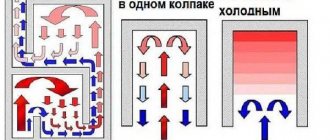
In order to get rid of the main drawback of brick kilns - uneven heating, standard designs are being modernized. Such an example would be a stove called “Teplushka”, in which part of the flue gases from the cooking chamber is discharged directly into the chimney, and the majority of it circulates through smoke circulation to generate heat for the rooms.
Despite its rather small size, the Teplushka stove has increased productivity. Due to changes to the design, heat transfer has been increased by 2.5 times
This structure belongs to the class of bell-shaped ones. Structurally, it consists of one large-sized hood, which is divided into two chambers: a cooking chamber located at the top and a heating chamber located at the bottom. To secure the hearth inside the virtually hollow structure, several posts are installed.
The chambers are connected to each other through four holes located on the sides of the hearth. Through them, flue gases from the firebox are directed to the cooking compartment, then redirected down to the heating zone, and from there released into the atmosphere. The height of the chimney pipe must be at least 5 m, and it is counted from the bottom of the firebox.
Thanks to the non-standard design, the stove’s performance has been increased by approximately 2.5 times. It warms up faster and more readily transfers heat to the premises, which means that less firewood is required to obtain and maintain the desired temperature. But the construction will take the same amount of brick, binding and insulating material as it takes to build a Russian stove.
During two fires, the stove produces 3200 kcal/hour. The unit is suitable for servicing an area of 35 m².
The presented drawings of the design of the heater stove are accompanied by an accurate calculation of the material consumption that will be required in the construction of the unit
The chimney is shifted to the side of the firebox. At the bottom of the smoke channel there are two holes through which cooled smoke is discharged outside the house. A valve is provided that allows gases to be removed from the cooking chamber in the summer without using the heating part.
Cooking in such an oven is carried out with the damper closed, and the process is monitored through a peephole installed in it.
We will not dwell on the analysis of the orders; the diagrams demonstrate the masonry in detail. Just note that in the 21st row the floor is covered with sand and crushed bricks in order to increase the heat transfer of the structure.
You can build a Teplushka stove in a purely heating version or in a cooking-heating version. The masonry for these structures in rows 19 to 35 varies
Option #3: simple stove with a shield
We want to please fans of simple heating and cooking units with an extremely simple design. This stove is designed to heat a small area of 15-20 m².
When using coal to operate a stove, it is not necessary to line the firebox with fireclay refractory bricks. It is acceptable to use full-bodied red
The operating principle of this stove is also extremely simple. Gases from the firebox enter the cooking chamber. From there they flow to the side, then move into the smoke circuits built in the rear wall.
The sections will familiarize you with the structure of a brick heating and cooking stove in detail. For heating purposes, the design provides 3 smoke circulation channels of equal size
In order to better warm up the bottom of the stove, a horizontal channel is installed, within which the smoke lingers for a long time.
Having warmed up the bottom of the brick structure, the smoke under the pressure of the next portion passes into three vertical channels located above, from which it further flies into the atmosphere.
In building a stove for a small country house or dacha, procedures developed to help independent craftsmen will help
Chimney installation
The main task when laying a chimney is to comply with fire safety.
The walls of the chimney should be made of two bricks, and the distance between the chimney and the roof should be about 70-80 cm. All cracks must be carefully sealed to avoid leaks.
Photo of a brick oven with your own hands
Please repost
0