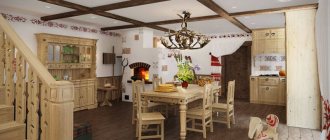
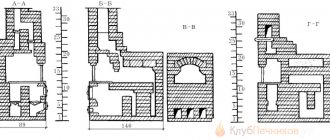
Modern private houses rarely resemble old village huts; more often, another name is more suitable for them - a cottage. However, even now many owners of estates, especially country ones, follow traditions and consider Russian stoves with a stove bench as useful and functional heating and cooking structures.
We will tell you what a stove with a trestle bed or bed is like. Let's consider the technical side of the issue, together with you we will understand the design features. Independent home craftsmen will find in the article we presented a detailed description of the structure with diagrams and procedures.
Laying a Russian stove with your own hands
For masonry of the combustion chamber, fire-resistant bricks made of fireclay clay are used. The remaining part of the structure is made of ceramic bricks.
Almost every oven has metal or cast iron parts, for example, doors and dampers. They can also be prepared in specific quantities.
You will need the following items:
- Doors: firebox and blower, as well as a cleaning door, ventilation door for the chimney.
- Grate;
- Metal valves;
- View;
- Furnace damper;
- Water box;
- Plate;
- Steel strips.
To lay out certain parts - arches and vaults - you need easily disassembled templates. They are made from wooden and plywood elements and parts.
Preparation of masonry mortar
Masonry mortar, unlike ordinary mortar, is much more difficult to prepare for furnace work. You can also buy a ready-made mixture in the store. But, if you decide to build a Russian stove with your own hands, then you can prepare the solution yourself.
Mortars for laying stoves are selected depending on the type of brick used:
- If solid brick of grade M150 is used for masonry, then clay-sand mortar is used. It is also used for lining the stove with special ceramic tiles;
- For laying refractory bricks, solutions based on special refractory clay with the addition of sand are used;
- When using fireclay bricks, solutions made from refractory clay are used;
- In the space between the attic space, brick pipes are laid using cement-sand mortar;
Clay is a soft, non-metallic rock that can be used to make sculptures, various dishes, produce tiles, etc. To test the clay solution, a method is used in which the clay dough is rolled out with a thin flagellum and tried to bend it. The smaller the bend radius, the better your solution.
The second method: from the same dough you need to roll a ball and carefully squeeze it between two special boards. If you squeeze the ball by a third, the clay will begin to become covered with small cracks.
But if the ball crumbles, then the solution is bad.
Preparation of clay solution
To build and paint a Russian stove at your dacha with your own hands, you will need 3.5 m3 of mortar. To do this, take a certain amount of components and dilute them with water.
You can use an iron barrel as a container. Soak the clay in water and leave it for a couple of days. Next, add sand, and thoroughly mix the entire solution with your feet (after putting on rubber boots) until the mixture is homogeneous. Since the width of masonry joints is no more than 3 mm for fireclay bricks, all large pebbles must be removed from the mortar.
Preparation of the solution
For masonry, a normal type of clay mortar is required, which has good ductility and does not crack. A thin solution is not suitable, as it crumbles a lot, while a fat solution cracks when it dries.
The composition of the masonry clay mortar will be as follows:
- fatty clay, very carefully sifted - 3 parts;
- river sand, also sifted, pre-calcined, - 3-5 parts;
- clean water for mixing - 1 part.
After mixing, you need to get a thick, viscous, greasy solution, but it should not be soft and flowing.
Various methods are used for preparation, the most optimal is soaking the clay and then adding water. When calculating the volume of mortar, it must be taken into account that when laying 50 bricks with a joint thickness of no more than 3-5 mm, approximately 20 liters of mortar are used, but experts recommend increasing this amount by 15%. The proportions of the clay mixture are 1 part sand to 2 parts clay.
When, when kneading, the consistency of the solution becomes similar to sour cream, it can be used for work. If traces of water appear on the surface of the mixture, a small amount of sand must be added. To increase strength, you can use regular salt at the rate of 100-250 grams of salt per bucket of the mixture. When laying a chimney, cement must be added to the solution at the rate of 750 grams per bucket of mixture.
We make the foundation
Before you start building a heavy structure, you need to pour its foundation. But if you make a stove in an already finished house, then you will create the foundation for it right in it
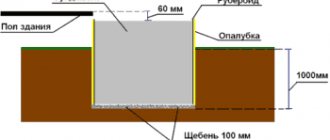
It is important to ensure that the base of the house does not come into contact with the stove. The depth of its foundation depends on how large the stove is: the larger the structure, the deeper the foundation needs to be made
Foundation
Creating a pillow
Before pouring the foundation, it is important to carry out preparatory work. First of all, you need to set the markings
Afterwards, you can proceed to digging a pit of the required depth. When you have thoroughly compacted its bottom, add slightly damp sand there and compact it again. The thickness of the compacted sand ball should be 10-20 centimeters. Now fill everything with crushed stone to a height of 15 centimeters. It also needs to be compacted.
We create formwork
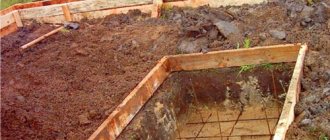
Before pouring the solution, you need to build and install the formwork. Any wooden slats are suitable for creating side walls. If there are any gaps, cover them with plastic and secure them with a stapler. The formwork must be higher than the soil and reach the foundation. It can be done right along the edge of the pit.
Fill the solution
When the formwork is installed, fill the foundation with mortar. For it you will need coarse gravel, cement and sand.
Coarse gravel
The minimum fill height is 15 centimeters. When the first layer has been poured, place reinforcing bars vertically in it - this will connect this layer to the concrete mixture.
Fill in the lightweight solution
Fill the reinforcement sheets with lighter concrete, the layer of which should reach the ground. When everything is done, level this mixture and wait until it hardens a little. After this, cover it with steel reinforcing mesh and fill it with concrete to the thickness of the formwork. Level the poured screed and leave to dry for 27-30 days.
Creating a waterproofing surface
When the screed has dried, remove the formwork. Cover the base with a layer of waterproofing made from glued roofing felt balls. When everything is ready, start laying the stove walls.
We lay out the structure for cooking
The walls of the structure necessary for cooking are lined up in the 13th row. The brick lies at ¾. In other words, the outer part of the wall is constructed of bricks laid flat, and the inner part is made of bricks. placed on edge. A shield and the front wall of the hob with space for firewood or coal are also mounted. The 14th row is laid according to the order and formwork is formed on the floor, which must be covered with paper. Row 15 - beginning of the arch. To do this, the brick is placed edgewise and wrapped step by step, thereby thickening the outer seam. The next two rows must be built according to the order scheme.
Masonry - basic scheme and stages
Today, there are quite a few options for the design of a Russian stove with a stove bench and a hob.
But further we will consider an option, the construction of which is possible even for a novice stove maker with his own hands. So, the first row forms the outline of the stove, and behind it, using halves and quarters, lies the inside of the stove. The second row has different thicknesses with a built-in well. The third and fourth involve the installation of the ash door and the construction of an ash pit. having a channel. The fifth row rearranges the mounted instruments. Bricks laid on their side should be hewn on the side facing the well to ensure the rounding of the arch. The sixth row is the beginning of the arch, reaching the eighth. The seventh covers the horizontal outlet and is the beginning for laying the walls.
In this row, two holes are left for the installation of vertical channels coming from the heating panel. The third hole is necessary for heating water. The eighth row is located above the ash pit and consists of bricks with hewn edges. The 9th row, thanks to the left-side installation of the firebox door, creates a firebox for the stove and shield. The 10th row consists of bricks hewn on all sides and serves as a ceiling for the water box. This place is cleared and 3 outlets are left.
Another outlet is located in the 11th row. above which 3 outlets are subsequently installed, which go from the shield. The 12th has the appearance of a continuous masonry ceiling of the furnace. At the same moment, upon completion of the construction of the walls of the do-it-yourself oven, cast iron slabs equipped with burners are laid. To avoid destruction of this surface, a metal angle is used to strengthen the front part.
Types of Swedes
There are several popular types of Swedish oven.
- The stove in the form of a fireplace is designed in such a way that the hob opens into the kitchen, and the decorative part with the firebox and fireplace portal opens into the living room.
- Swedish, equipped with a sun lounger. This stove design is quite complex, but in winter it functions as a very cozy and warm bed.
- Swedish, equipped with a hob and oven. The back part of such a stove heats the room, and the functional front part is located in the kitchen.
The choice of stove design depends on the area of the room and the functional tasks that it must solve. If the stove is needed exclusively for cooking in the country and is not intended to heat the house in winter, then you can opt for a compact design.
Swede with one plate
If the stove is installed as the main heating device, then it is better to choose a model that can heat several rooms at once.
It should be said that the Swedish stove design is an ideal option for a small country house, in which the owners live not only in the summer.
Of course, it is also suitable for a small cottage. But the Swede gets damp quickly enough, which means it requires constant use. Otherwise, it will have to be dried for a long time each time before putting it into operation, and this significantly reduces its efficiency.
With regular use, such a stove, equipped with a comfortable hob and a functional oven, will become an indispensable household assistant and will give warmth and comfort to the house.
Final works
You have built an excellent and multifunctional fireplace for your home with a stove bench on your own. Not only is it pleasant to admire, but the fireplace can heat a room and retain heat for a long time even after the combustion process has ended. The credit for this goes entirely to the material. Brick has a high heat capacity and is able to accumulate heat.
The very presence of a stove in the house requires the design of the room to be designed accordingly. A brick stove without finishing looks good against the background of wooden or wood-trimmed structures. In this case, it is necessary to comply with all fire safety rules. When lifting the chimney through the ceiling, you will have to install a heat-protective belt. This will save not only from a possible fire, but also from deformation of the ceiling material.
Modern styles of room decoration will require the same from the fireplace. Here you can use different materials to suit the owner’s taste. The exception is those that are unstable to elevated temperatures. But if one of the main functions of the stove is heating, which is most likely, then it is better not to cover the brick, but to give it the opportunity to fully transfer heat to the room.
By removing the remaining mortar from the surface of the bricks and treating the seam gaps, you can achieve an excellent appearance of the masonry, which once again proves the importance of observing the dressing at the construction stage.
Construction
First, find the location of the future device. Usually the structure is erected in the largest room, located at a distance of one and a half to two meters from the external walls.
To build a stove you need a strong foundation; the presence of a stove bench and the ability to cook food do not affect its thickness. The foundation is poured below the soil freezing level in the given region.
Attention! The stove foundation is not connected to the main foundation of the house
Choosing a project from which to build a stove
You can find many diagrams of a Russian stove on the Internet, but in matters of construction it is better to trust an invited master.
The stove with a stove bench consists of the following elements:
- Body. It is made of brick and includes a system of smoke ducts.
- The main firebox or chamber where firewood and its substitutes are burned.
- Crucible.
- Chamber for collecting settling ash.
- A place to store dishes and other things.
- Bed.
- Chimney.
There are several types of bricks that can be used during the construction of the device:
- ordinary clay brick;
- clay solid brick;
- refractory brick made of fireclay clay.
A brick is placed on the body of the furnace using a clay-sand mortar; for cladding and pipes, ordinary cement mortar with the addition of lime can be used.
The total number of bricks for standard oven sizes is 650-800 pieces. The solution consumption is approximately 20-25 buckets.
After construction is completed, the stove is dried, then the device is heated for 2-3 days. After the first small batch of firewood is burned, the doors are opened, then the amount of combustion material is increased until the firebox is fully loaded. At this time, it is necessary to monitor the integrity of the walls; the appearance of the smallest cracks on the body of the structure is a sign of poor quality work.
Return of traditions
It cannot be said that the Russian stove in the house is a museum exhibit that has unexpectedly returned from the past. In fact, it never disappeared; moreover, it is part of some Russian outbacks that are unfamiliar with main gas.
The massive return of the Russian wet nurse to homes spoiled by civilization is not a tribute to fashion. Most likely, what plays a role here is the desire of people to feel comfortable and cozy in the house, to fill it with the pleasant aroma of baking and to meet with the family in front of an open fire for a delicious dinner cooked in a real Russian oven. After all, not a single miracle of technology will give the sensations and emotions that people experience when they see a flame.
Will help you feel comfortable and cozy in your home
A Russian stove, finished with high-quality materials, does not look like an alien in the house. Today it has become more compact, practical and wear-resistant. A wood-burning stove, depending on its design features, is placed not only in the kitchen, but also in the living room and dining room. For the convenience of housewives, craftsmen integrate everything they need into them, right down to hoods.
A Russian stove without built-in hobs can easily take a central place in a library or bedroom. A lounger can easily replace even the most comfortable chair or even a sofa.
To choose the most suitable project for your home, you need to consider several options in detail. They differ in size, functionality, and of course cost.
Installing a Russian stove in a country house is a job only for professionals. Regardless of construction skills, the construction of such a structure requires not only skills, but also knowledge of its features and technologies.
Interesting design solution
"Alya-Rus" - a designer hit
This model has quite compact dimensions. It does not have additional equipment, such as a hob, a large sun lounger or the ability to observe the flame effect. This option is suitable for a small kitchen. Such a stove is decorated with decorative elements that are associated with Russia. It looks light and charming in a wooden house. Peculiarities:
- Despite the primary simplicity of the decor, such a stove should not be overloaded with accessories. A few decorations will be enough;
- it can be installed not only under the wall. Due to its compactness, it will look good in the center of the kitchen, if space allows.
This option is budget friendly. And if you want a Russian stove in your home, but your budget does not allow for luxury, you can choose this option.
Suitable for rustic style homes
Russian hut - classic style
This design is better suited for rustic-style houses. These can be buildings made of logs, wood, or have a corresponding interior. The classic style is a stove made of brick, decorated with decorative elements.
An excellent option would be to use tiles. They are able to decorate the stove and give it a truly Russian flavor. Such stoves are functional - there is a hob, a large and comfortable sunbed. You can install it in such a way that the functional part is in the kitchen, and the decorative firebox is in the living room. This will give you the opportunity to enjoy the effect of an open flame and the slight crackling of firewood.
Terem - wealth and luxury
A large Russian stove, reminiscent of illustrations from old Russian fairy tales. A design made in this style is a bright accent in any room. It will look beautiful both in a classic and modern interior.
Country style
Characteristics:
- Decoration with a huge number of tiles is allowed. They will only add fabulousness to the design;
- the design is quite large, so it is only suitable for large rooms;
- Many other decorative decorations can be used; they will not overload the structure.
This model can be equipped with a hob, a large lounger, which can be decorated with light fabrics. Often designers suggest installing it near the wall and moving the combustion part into the next room. This will make it possible to simultaneously get a multifunctional Russian stove in the kitchen and a beautiful fireplace in the living room.
Definition of Russian stove
Before delving into the topic, you should understand the definition.
- There is still such a term in use as ordering - this is:
- and the masonry itself (the brick is laid out layer by layer horizontally, with a detailed list of the locations of the equipment elements);
- and the type of stove structure (stove-stove, in which each layer is associated with the placement of an element).
In general terms, Russian means a stove endowed with the following features:
- massiveness and scope (as a rule, the structure occupies at least ¼ of the hut, and sometimes half);
- the presence of beds (they are also called a couch - a place where people lay down while sleeping or when feeling unwell, in order to warm up);
- combination of a heating base with a stove for cooking;
- Wood is mainly used for heating.
In ancient models, it was customary to use the firebox itself for cooking food, surrounded by hot wood firebrands (fireproof food containers with porridge or stew were placed with a “horned” grip inside the firebox, where they simmered for several hours).
Today, there are modifications in which it is possible to use coke coal in the firebox. It provides more heat than regular wood, but coal dust is a big problem. At the same time, a horizontal stove is used for cooking, and the “simmering” effect has to be abandoned.
Such heating structures are relevant for Russia, the eastern regions of Ukraine, as well as the northern regions of Belarus. If you are interested in the layout or masonry, there is practically no information in Western European sources.
History of the furnace
Russian stove with stove bench
The traditional home life of a peasant in any country in the world was literally built around the stove. Considering the level of development of technology during the Middle Ages, this structure was the only available means for heating the building, cooking food, and drying things. And given the cramped conditions, it was also a place for several people to sleep. Over the centuries-old history of operation, many designs for the hearth have been developed, but they all have a common fundamental structure - a large vaulted combustion chamber, thick walls, and a brick chimney.
A Swedish stove with a stove bench and hob fits perfectly into the modern interior of a country house.
Device elements, drawings
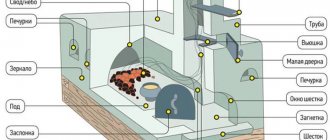
- Orifice is an opening in front of the combustion chamber.
- The crucible is a chamber where fuel (wood) burns.
- Underneath is the base of the furnace, fuel is placed there, and some dishes are prepared there.
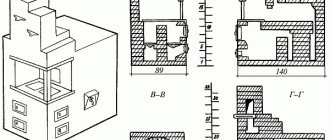
Photo 1. Drawing of a Russian stove with a stove bench and hob. The structure of the stove is clearly shown from different sides.
- The damper is a mandatory element that tightly closes the entrance to the furnace, blocking the flow of air.
- The pole is a platform in front of the mouth, convenient for placing heavy hot pots removed from the oven.
- Lounger - beds traditionally located at the height of human growth.
- A chimney is a vertical pipe that carries smoke and hot air outside.
- Valve - partially blocks the chimney if necessary, increasing draft.
- The shield is a smoke collector leading to the pipe. It is also used to further increase the heat capacity of the furnace.
Photo 2. Drawing of a Russian stove with a brick stove bench. The device is presented from the side and front, its dimensions are indicated.
To build a traditional version of the stove in compliance with all the rules, you will need the help of a professional stove maker. Modern models are often built according to simplified designs and are made in smaller sizes to make work easier - this option is available for DIY construction.
Home heating options
The choice of heating method depends on the layout of the building - side or bottom. The first option is the best solution for houses with several rooms, since the adjacent room is heated using a side heating panel. The second method is used to supply heat to one room, but having a larger area.
The walls of the sub-floor space are heated from below. Currently, in order to increase efficiency, designs are equipped with a bell-type combustion, which makes it possible to ensure uniform heating and stable draft. In such units, fuel burns completely and less soot accumulates in them.
A small Swede for a summer residence, equipped with a trestle bed
A stove with a stove bench can be constructed with your own hands according to the Swedish principle. For this, appropriate drawings, orders, and videos are selected. This unit is also complemented by a hob and oven.
Swedish brick stoves are complemented by many stove makers with a stove bench. They are installed between two rooms (bedroom and kitchen) and are capable of uniformly heating rooms with a total area of up to 30 square meters.
The unit, assembled with your own hands from brick, operates in summer and winter mode. To operate in summer, it is necessary to open two existing dampers at once. In the winter season, only one opens, due to which the entire oven begins to warm up, and the heated air masses begin to pass through a long chimney system.
The lining of the Russian stove with a sunbed is made with one of the most expensive materials - tiles
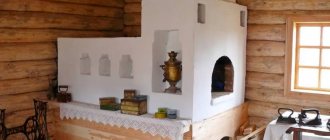
All traditional Russian stoves installed decades ago were additionally plastered
For construction we will need:
- Red brick 900 units;
- fireclay brick 200 units;
- Blower, door for the combustion compartment, fire doors, grate, hob, steel corners (purchased separately or made to order).
Tips to help you at work
If you decide to do the assembly yourself, we recommend taking the following useful tips as a basis to help you organize and carry out the work:
- Brick fireplace stoves for summer cottages must have the same thickness of seams in all areas (4-6 millimeters);
- The evenness of the first row is checked both using a standard level and in a diagonal direction;
- Before you start laying the next row, additionally check the evenness of the previous one. To do this, use a protractor. The horizontal is checked using a building level, and the vertical is checked using a plumb line;
- If you plan to install a hob, to better fix it and protect the brick from constant overheating, apply a large layer of fresh clay mixture (about 5-7 millimeters) to it;
- In order for the heating unit to have good draft, the device is equipped with a summer operation. Thus, the removal of gases and all decomposition products will be carried out in a short way;
- A stove with a fireplace for a brick cottage should be laid out starting from the corner in each row;
- The joints of the previous row must be covered with bricks of the next one;
- The cross-section of the chimney and smoke collector always have the same diameter and shape.
Small shelves are suitable for drying berries
Small shelves are suitable for drying berries, fruits, plants, and also have a decorative function
Brick kilns can be equipped with
Brick stoves can be equipped with a purchased metal or cast iron hearth
In order to increase efficiency and heating speed
In order to increase efficiency and heating speed, the design can be equipped with several hearths
For a detailed visual acquaintance with the preparatory stage of work and useful recommendations for the construction and selection of a brick fireplace for your summer cottage, you can also watch the video in this article.
https://youtube.com/watch?v=_VU5gnzsNUE
Disadvantages of stoves
In addition to its advantages, a Russian stove with a stove bench and a stove also has disadvantages, like all solid fuel units:
- To store firewood you need to equip a special place.
- During operation, debris from coal or logs is collected.
- Heating the house turns out to be uneconomical. Even with the improved changes, fuel consumption is high.
- Laying a Russian stove with a stove bench and stove is possible only if the contractor has the appropriate knowledge and skills. It is advisable to entrust this work to an experienced stove-maker, whose services are expensive, which means that there will be additional costs.
Features of devices with flooding
The design of a Russian stove with a flood includes a cast iron stove where you can cook various foods, as well as a crucible designed for cooking traditional Russian dishes and drying mushrooms or berries. The base of the device is a niche-furnace, heating of which occurs from above and from the sides. On the sides there is a firewood rack where the material that will later be used to light the stove should be stored.
Photo 1. Ready-made Russian brick stove with firebox and stove bench. If the device is installed near wooden structures, they must be treated with special fire-resistant materials.
Diagram of a Russian stove with a firebox and a stove bench
- foundation;
- woodshed - a place for stacking firewood;
- a trough, which is used for spilling material;
- under;
- crucible.
Photo 2. Diagram of a Russian brick stove indicating the dimensions of the device. Additionally equipped with a hob.
The dimensions of the device are 2x1.5x2.5 m.
Advantages of the heating device:
- long-term use (more than 25 years);
- simultaneous heating of several rooms;
- an unusual solution for the interior.
Photo 3. Sectional diagram of a Russian brick stove with a firebox and a stove bench. View from three angles.
Flaws:
- the need to hire a master for masonry;
- high consumption of firewood.
A little history
The Swede stove with a stove bench was invented by G. Reznik, who lives near Ryazan in the village of Noviki. The magazine "Dom", in the 8th issue of 2010, talked about its development. And for the first time I published its order. The author used the “Dutch woman” scheme as the basis for his design.
This article instantly attracted the attention of professional stove builders and DIYers who were searching for a suitable design. Since not all regions and villages have the opportunity to supply gas to the house, and electricity is expensive, new heating and cooking developments have always been in demand
Over the years, the design has proven itself well and has become very popular among the people. Excerpt from the same publication:
Step-by-step manufacturing instructions
A stove with a fireplace should be placed in the house so that its hob and firebox are directed towards the kitchen, and the fireplace faces the living space. It fits well between separate rooms.
In principle, it can be installed anywhere; if you do not plan to cook on the stove, then you can use it as a design element and decorate it with decorative material. It is better if the stove is planned during the construction of the house, it is easier to create a reliable foundation, because the mass of the entire structure is approximately 3 tons.
The Swedish stove with fireplace is shown in the diagrams:
Front view Rear view
In section #1 In section #2
Materials and tools
The required materials are presented below:
The materials used to prepare the masonry mortar are of great importance. Simple clay is not able to withstand high temperatures, you need to find fireclay clay. Anyone who wants to prepare it themselves needs to look for it in hollows near rivers or on their steep banks.
You need to prepare the tools in advance, of which you will need:
- Master OK;
- Rubber mallet and hammer-pick;
- Twine and plumb line;
- Rule;
- Tape measure, pencil.
Lay out the oven
If you wish, you can download the project of a Swede with a fireplace by A.I. Ryazankina.
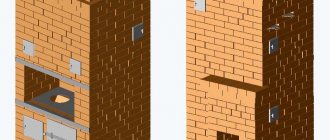
The order of the Swedish stove with a fireplace is presented below:
1-6 row 7-12 row
13-24 row 25-33 row
First of all, it is necessary to make a foundation for the stove. After this, the laying begins in order (images above).
The first row of masonry must be placed on a waterproofing layer. In order for the masonry to be level, this affects the placement of the entire structure; markings must be made on a sheet of material for waterproofing - for this purpose, you will need a long ruler, a corner and white chalk. With the exact outlines of the future oven, it will be much easier to complete the work; according to the resulting markings, they begin to lay out the first row.
It is necessary to bandage the bricks. Check that the corners are laid out correctly and the structure is horizontal. These rows are necessary as the basis for the entire structure; you cannot make mistakes when laying them out. The rods on which the fireplace grate will rest must be walled into the masonry in the 2nd row.
Reasons for the popularity of modern Russian stoves with a stove bench
Russian stoves with a stove bench have many advantages, including:
- High efficiency. The bricks from which structures are built are capable of accumulating heat and gradually releasing it. Thanks to this property, the room remains warm for a long time even when the stove is not heated.
- If the heating structure is laid out correctly, it is completely fireproof and can be used for 30 years or more.
- When the location of the unit is calculated accurately, it is possible to provide high-quality heating of a house consisting of several living rooms with minimal fuel consumption.
- When installing a multifunctional stove, it will not only be a source of heat, but will also become a place for preparing hot food, drying wet laundry, and heating water. This type of heating structure is believed to have a therapeutic effect.
Design Features
The Russian stove has come a long way, changing and improving over the centuries. A huge contribution to the development was made by I. S. Podgorodnikov, who developed the “Housekeeper” and “Teplushka” series, on the basis of which all Russian stoves are now made. The design was further improved by I.V. Kuznetsov, who separated the firebox and cooking chamber, sealed the pre-furnace and thereby increased the safety of the structure and efficiency.
Modernized versions are now in use. The design of a Russian stove with a fireplace is very popular in private houses made in classic and country style.
The main elements of a standard Russian stove:
- Pipe.
- Valve.
- Door.
- View.
- Hilo.
- Six with a window.
- Sub-bake.
- Mouth.
- Podina.
- Backfill.
- Crucible.
- Arch.
- Ochelok.
To make a Russian stove with a fireplace, an additional fire chamber is installed on the side inside the brickwork (it can be open or closed). They also make special channels through which heated air passes, convective pipes and panels, an ash box, and a sealed combustion door with fire-resistant glass.
General form
As a result of such an improved design, the house becomes warm, as if a classic Russian stove was operating. But the device turns out to be clean (the emission of combustion products into the living space is reduced), the level of safety and ease of use increases.
Drying the oven
Drying a Russian stove lasts approximately 30 days. This requirement cannot be waived. If you decide to flood the stove without waiting for the allotted time to dry, then, most likely, cracks will appear in the seams, and no amount of putty will be able to repair the damage - you will have to redo everything.
Recommendations for properly drying the oven:
- After laying out the furnace, during the first 14 days, all valves and hatches must be opened for cleaning so that the entire structure can dry naturally. Alternatively, you can put a 200-watt incandescent lamp in the firebox and turn it on constantly so that the air in it can circulate freely.
- This is followed by 14 days of forced drying, during which the firebox door and cleanout hatches will need to be closed, only the dampers should remain open. During active drying, on the first and second days you need to burn 3-4 kg of wood. After this, every day you need to add another 1-1.5 kg of firewood.
- At the drying stage, before moving on to heating, keep an eye on the metal elements of the stove - if moisture stops condensing on them, this will indicate that the stove is almost completely dry.
- After another two weeks, you can try to heat the stove at full power. After a full day of heating, the next day all seams should be carefully checked for damage, especially near the firebox. The slightest cracks are not covered immediately, but at the end of the season.
- If the stove has not been heated for a long time, its startup should continue for 3-4 days.
- Sometimes a cooled stove at the beginning of the heating season does not want to flare up, or smokes. In this case, you need to open all the lower hatches for cleaning and put a lump of crumpled newspaper in each of them. A few minutes after setting the newspapers on fire, a draft should appear; the main thing is not to forget to close the cleaning hatches after that.
In conclusion
In this article we learned in detail how to make a Russian stove with your own hands. It turns out that this is not a difficult process, and anyone can handle it.
Installation process
If you nevertheless decide to lay the furnace with your own hands, then familiarize yourself with the features and technology of carrying out the main work. This will help you complete the process correctly and avoid mistakes during installation. According to experts, many are able to complete all stages of construction without outside help.
Foundation and foundation
It is very important to take care of constructing a reliable foundation for a brick structure. It must withstand heavy loads and not sag under them
The lower part of the oven is reserved for baking and remains free. It is convenient to store household supplies and kitchen utensils there. Concrete slabs or steel beams in combination with brick are chosen as the floor for the oven.
Due to the high fire danger, the use of wooden supports is not recommended, but is not prohibited. If you still cannot replace such material with anything, do not forget about antiseptic wood treatment. Otherwise, the ceiling may be damaged by insects.
It is also necessary to pay attention to the seams and their correct processing. They should look neat after applying the cement mortar.
External walls are plastered with conventional mixtures intended for interior decoration.
Brick walls are laid parallel to each other in two rows on top of the foundation, observing the alignment. In the third row, a door for the blower is installed. Next, the masonry continues, and doors for cleaning the firebox are installed in the fifth row, and lining is also performed (internal lining made of refractory bricks). The next row will require installation of a grate.
In the seventh row we form blind channels, thanks to which we will get a warm place for the bed. Here we install the furnace door. Then you need to create channels (lowering and rising). Up to the eleventh row, the whole process is repeated, and only in this row the combustion door is closed and suction channels are formed (from the heil to the side channel, from the firebox to the riser and two transitions between the blind chambers).
Next, the suction channels are blocked and the formation of the caps (blind channels) is completed. In the thirteenth row, it is necessary to complete the lining and shut off the fuel chamber. The next layer of masonry consists of floors.
Starting from the sixteenth row, it is necessary to form a vertical channel (smoke) and a partition for protection from fire. This process lasts until the twenty-second row, in which the chimney valve is installed. Now all that remains is to lay out the chimney and you can move on to the decorative finishing, thanks to which the Russian stove with a warm stove bench, created by yourself, will organically fit into your interior.
Preparatory work and laying the foundation
The construction of a Russian stove begins with laying the foundation. The most reliable option for its construction is reinforced concrete.
The work is carried out in several stages:
- The foundation pit for the furnace is dug to a depth corresponding to the level of soil freezing. The width of the pit must be at least 100 mm larger than the dimensions of the first row of brickwork.
- The bottom of the pit is covered with a cushion of crushed stone at least 10 cm high, which is carefully compacted.
- Formwork is installed around the perimeter of the pit, after which the bottom of the pit is laid with a waterproofing film overlapping the walls of the latter.
- The next step is tying with reinforcing mesh with a cell size of 150*150 mm.
- Concrete mortar prepared in proportions 1:3:7 (M400 cement: sand: crushed stone) is poured into the pit at floor level.
- The dried foundation is covered with a layer of heat and waterproofing, after which you can begin bricklaying.
How we are working
- You contact us by phone or send a request by mail. We expect the following information from you:
- the type and purpose of the stove or stove complex, the desired size and appearance of the stove, whether the stove will be operated continuously or only on weekends (dacha option);
- the area of heated premises, the height of the ceilings of all floors, the thickness of interfloor ceilings, the height to the ridge and the degree of slope of the roof, what material the house / gazebo is built from, what material the roof is made of;
- information about the foundation, dimensions, thickness, height to the finished floor level. The foundation must bear the load of the furnace with an average weight of 7-11 tons. The weight of the barbecue complex, depending on the configuration, is up to 15 tons.
detailed plan of the house / gazebo where the stove or stove complex will be located;
