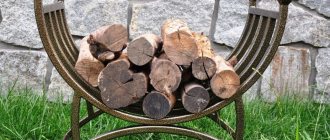
A cauldron is a massive cauldron made of cast iron and having a semicircular bottom. This shape of the bottom ensures uniform heating of all the walls of the cauldron, and in this case the food will not get stuck in the corners. Thanks to the thick walls, food does not burn, as stewing occurs evenly.
Do-it-yourself stove for a cauldron
- 1 Instructions for building a brick kiln
- 2 Laying a brick stove for a cauldron 2.1 We build a stove for a cauldron. Order
- 3.1 Video - Brick stove under a cauldron
- 4.1 Video - Stove for a cauldron from a gas cylinder
Note! Today, a cauldron is mistakenly called a dish that has nothing in common with it at all - a pot, for example, or a cast iron pot. Despite the fact that they are similar in their parameters, their shape is completely different.
Cauldrons are installed both on tagans - tripods (a fire is lit under them) - and on the stove. Today we will find out how to build a stove for a cauldron with our own hands.
Instructions for building a brick kiln
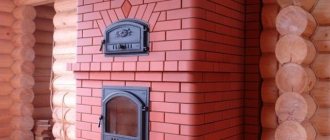
Such a stove is not only a place for cooking, but also a decorative element. For this reason, the choice of location, as well as the shape or decoration of the structure, should be taken with full responsibility. Buy in advance a beautiful stove equipped with rings of different diameters so that you can use different cauldrons, doors for the ash pit and firebox, and various decorative accessories for subsequent cleaning (poker, spatula, etc.).
Required tools and materials
For work you will need:
- fireclay brick;
- floor slab (its thickness should be approximately 2 centimeters);
- Bulgarian;
- steel corners;
- sand;
- grate;
- fireproof powder;
- doors;
- buckets;
- shovel.
The external parameters of the design can be very diverse, but from the inside it must definitely resemble an egg cup. For more convenient operation, it rises by about 80-90 centimeters.
Furnace diagram
Preparing the base
Let us immediately make a reservation that in this case there is no need for a full-fledged foundation, since the mass of the structure will be insignificant. But to prevent the brickwork from warping in the future, it will require pouring concrete and strengthening it with reinforcement. The algorithm of actions should be as follows.
Step 1. First, select a place for construction, clean it of all excess and thoroughly moisten it with water. Level the soil and then compact it.
Step 2. Make formwork from ordinary boards.
Step 3. Mix fireclay powder with sand in a ratio of 1:3, continue mixing until the solution becomes plastic.
Step 4. Fill the formwork with mortar in a layer of 50-100 millimeters. Level the surface, be sure to check it using a mounting level.
Step 5. Place reinforcement bars on the solution - lengthwise and crosswise, in increments of 10 centimeters.
Do not wait for the mortar to dry, but start laying the stove for the cauldron with your own hands immediately after reinforcement.
How to make a foundation
A brick oven is a heavy structure, and the masonry will not tolerate distortions at the base. This means we need a foundation.
The stove foundation cannot be connected to the general foundation of the house.
Laying the foundation is a preparatory work. Keep in mind in your plans that concrete needs time to gain strength. The foundation must be ready 25-30 days before the start of laying the furnace.
Sequence of foundation work:
- Marking the foundation. Usually done with a cord stretched on pegs. The foundation itself should protrude 5-7 cm beyond the dimensions of the stove.
- The pit is dug below the freezing level by 40 cm. For the convenience of working in the pit, its size needs to be made 0.5 meters larger around the perimeter.
- A compacted sand cushion 20 cm thick is made at the bottom of the pit.
- Roofing material is laid on a cushion to suit the size of the foundation, with a margin (glue the seams and joints with hot bitumen or mastic).
- A panel formwork is built on top of the waterproofing, with a height slightly greater than the planned height of the concrete part of the foundation (minimum height above the ground 40 cm).
- Reinforcement piping is being done. Not necessary for light stoves.
- Filled with concrete.
- On top of the concrete after drying (5-8 days) you need to put waterproofing (roofing material with taped seams).
- If the height of the foundation is not enough (for example, up to the floor), then use brickwork. Waterproofing is also applied over the brickwork.
Laying a stove for a brick cauldron
Note! To obtain the most even seams, place thin wooden slats between the bricks. You can pull out the slats after the masonry has set a little. In addition, this technique will allow you to easily unstitch the seams in the future if necessary.
When laying, bandage the seams, that is, start laying one row with 1/2 brick, another with a whole brick, the third with 1/2 again, and so on. Here are other recommendations.
- All iron structural elements must be installed directly during the laying process.
- If cutting bricks is done with a grinder, then a lot of dust will be generated during the work. Therefore, it is recommended to use protective equipment - glasses and a respirator.
- If you did not purchase a special factory stove for the cauldron, then in a regular stove you can cut out a circle of the appropriate diameter and clean the edges with a file (this way, ash will not get into the food, and smoke will not leak out of the firebox).
- When installing pipes, join them at an angle of more than 90 C for better traction.
- After finishing the masonry, you can unstitch the seams or finish the structure with tiles. Then the oven is dried, for which you should light a small fire in it.
How to build a barbecue oven yourself?!
You can see a detailed review, instructions for laying and ordering a barbecue oven here
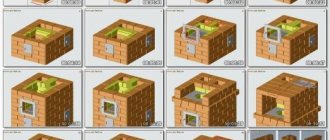
We are building a stove for a cauldron. Order
Row No. 1,2. These rows will serve as the bottom of the future structure. When laying them out, leave a small space that will allow you to clean the ash pan (it will be covered with a lid) and the stove itself. Use wire to secure the door. Clamp the wire with adjacent bricks, then secure with mortar.
Row No. 3. Here you close the ash pan doors and continue forming the walls. Also at this stage it is necessary to install the grate.
Row No. 4. When laying this row, leave a hole through which smoky gases will escape.
Row No. 5. Continue building the walls and install doors for the combustion chamber. The size of the doors depends mainly on what type of fuel will be used. If it is firewood, then it should be about 40 centimeters wide, and if it is coal, then less.
Row No. 6-8. Continue building walls and cover the combustion chamber.
Row No. 9-11. Lay the brick according to the diagram, leaving a small hole for smoke to circulate.
Row No. 12. Cover all the outer walls of the combustion chamber from above by laying a plate with a hole on the steel corners. The hole itself must be located directly above the cylindrical combustion chamber.
That’s it, our do-it-yourself cauldron stove is almost ready, all that remains is to install the chimney pipe.
How to properly make a chimney for a potbelly stove?!
Previously, we talked about how to properly build a chimney; you can see more about this here
Tools
What you can't do without:
- Welding machine and accessories for it;
- Grinder (angle grinder);
- Drill.
It is better to buy all the iron not at a metal warehouse, but to find scraps or used ones. You will definitely not find a piece of large diameter pipe at a metal warehouse. You can search at scrap metal collection points or on online sites.
We will need:
- 0.45-0.5 m of pipe with a diameter of 300 mm and a wall of at least 4 mm;
- 0.7-0.8 m of pipe (profile or regular) for each leg, for all – 2.1-2.4 m;
- Sheet 4 mm 300*300 mm, for the grate (you can weld the grate from 6-8 mm reinforcement, but this will take longer).
Chimney pipe installation
The chimney is one of the most important elements of the stove. To install it you will need:
- grinder with cutting discs;
- fittings, elbows with the required rotation angles;
- welding with electrodes;
- steel pipe with a diameter of approximately 100-120 millimeters;
- hammer.
The installation algorithm should look like this.
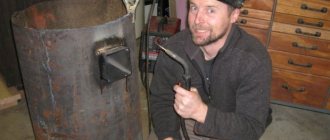
Step 1. Lay out the fittings with the pipe on a flat surface in the desired sequence, then connect them together by welding. Don’t forget about personal protective equipment – welding mask, gloves and overalls!
Step 2. Remove all bulges and scale using a grinder.
Step 3. Install the finished chimney in the required place - the hole of the appropriate diameter that was made during laying. Coat the joints with oven clay.
Step 4. Check the pipe to see if there are cracks on it - light a small flame in the combustion chamber and watch how the smoke moves.
Note! If the structure was built correctly, the cauldron will heat up evenly. To test this, pour water into it. With uniform heating, air bubbles will completely cover the inside of the vessel.
There are several possible options for further finishing:
- jointing;
- painting surfaces with special heat-resistant paint;
- plaster.
We also note that the stove for the cauldron is multifunctional, because you can not only cook various dishes in it, but even boil water or fry shish kebab. For the latter, by the way, an iron rod is laid across the slab on which skewers are hung. As a result, the hot coals will cook the meat as evenly as possible.
Note! The construction of a chimney is, at first glance, a simple procedure, but in reality it is not so. Therefore, it is advisable to entrust this matter to specialists.
Video - Brick stove under a cauldron
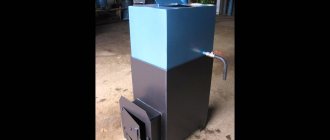
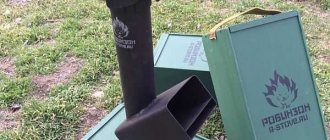
Making a metal stove from a cylinder
As noted earlier, the easiest option for creating a stove is a tripod. We will not consider it, since in this case everything is extremely clear.
And we’ll talk about a portable metal stove, which is advisable in cases where people do not live at the dacha permanently, but, for example, only on weekends. An excellent option for this is an unused, but still usable gas cylinder with a volume of 50 liters. At one time, such cylinders were extremely popular in the village, but not so long ago they were replaced by electric stoves and natural gas. In addition to the cylinder itself, prepare a grinder for work.
The sequence of actions is as follows.
Step 1. Empty the gas cylinder - open the tap and wait at least a week.
Step 2. Mark the cut line. For our design we will need the part of the cylinder with the bottom. Step back about 25 centimeters from the bottom and draw a straight line.
Step 3. Make a neat cut with a grinder, then try on the cauldron. As noted, it should go in about two-thirds of the way. If the cauldron is too large, then make several 5-centimeter cuts on top in increments of about 15 centimeters.
Step 4. Cut a window 20 centimeters from the bottom for loading fuel. The width of the window should be large so that no difficulties arise in the future.
Step 5. Try it on again to make sure that the cauldron fits tightly enough.
Step 6. Next, you should calcine the stove for the cauldron with your own hands. To this end, remove the cauldron, load the firewood and heat until the odors completely disappear.
That's it, the design is ready, and you spent a minimum of materials and tools to make it!
Video - Stove for a cauldron from a gas cylinder
Other options
- It is not very difficult to make a stove for a cauldron from an old gas cylinder.
- One of the best options for large cauldrons is a stove for a cauldron made from old rims. In this case, a large cauldron is immersed a certain distance from the inside of the disk. 1 design may require 3-4 discs.
There are many options, you can look at and make any design. It all depends on the capabilities and skills of the home craftsman.
Do-it-yourself oven for a cauldron made from car rims
This is probably one of the simplest, fastest and most original ways to make a stove for a cauldron. Let's look at it in more detail
Photo of the finished structure
First of all, we saw off the partition on one of the disks with a grinder; we won’t need it anymore
We install one disk on another, so that the remaining partition of the second disk is at the bottom, it will act as the bottom of our oven. We weld the disks together
Next, you just need to cut out the door of our improvised stove, weld the handles and stand.
Complex barbecue with a stove for a cauldron
A brazier with a stove is a complex system that combines a separate stove for a cauldron along with a classic brazier. The advantages of this solution are the efficiency of cooking in a cauldron. The separate stove fits much more firewood, giving more energy to the cauldron.
There is a lot of free space above the fryer, which allows you to fry meat on skewers, grill, or spit. They are highly resistant, durable, using thick metal and a one-piece body.
The structures have a stationary installation type. In some models, the stove option is a barbecue with a roof and a stove for a cauldron. In another type of execution, we get a barbecue oven with our own hands. If you make the roof large enough, you will get a version of a gazebo for a summer house with a stove and barbecue.
Making a stove for a cauldron from sheet steel
This is also one of the simplest options for making a stove, which will require:
- the cauldron itself to measure the diameter of the combustion chamber;
- welding, electrodes for it;
- steel sheets - the thicker they are, the better for the structure;
- hammer;
- corners for making handles and supports;
- electric drill;
- Bulgarian.
Note! Work should be done outdoors, near a source of electricity. At the same time, safety rules must also be followed.
Step 1. Measure the circumference of the cauldron - according to the obtained size, further work will be carried out.
Step 2. Using a grinder, cut a rectangle from a sheet of steel, the length of which would be equal to the circumference of the cauldron. Make a hole in the rectangle.
Step 3. In the upper part of the future structure, mark and make several vertical slits so that the smoke can subsequently escape freely. Next, cut a rectangular hole at the bottom for loading firewood.
Step 4. Roll the sheet into a cylinder. To do this, use the appropriate form, wrap the steel around it and achieve extreme precision with a hammer, or (if possible) use special sheet bending equipment.
Step 5. Cut out supports and handles for the structure from the corners.
Step 6. Using welding, connect the sheet into a cylinder, then weld the bottom, handles and support elements to the structure. Although the latter can be screwed using ordinary bolts, having previously made holes in the steel.
Note! To protect the stove from corrosion, paint it with heat-resistant paint in several layers. That's it, you can put the cauldron in, load the fuel and start the fire!
Let's improve the design
For this purpose, we equip the stove with a chimney pipe, grate, ash pan and doors. The manufacturing procedure is the same as described above, but you will have to add a few points.
Step 1. Cut not only the firebox hole, but also another, smaller one located below, for the blower. At the top, cut a third hole for the chimney.
Step 2. Install a grate between the combustion and blower cutouts by welding supports - pieces of corners - inside the housing. To make a simple grate, you can use steel wire - fold the pieces of the required length and connect them together by welding. There is no need to attach the grate to the supports.
Step 3. Weld the chimney to the corresponding hole in the housing. It is important that the height of the chimney exceeds human height, otherwise smoke will get into the eyes.
Step 4. Equip the chimney with a spark arrester - a tin can with numerous holes made in it.
Step 5. You can cut the doors from the same sheet steel, although you can purchase ready-made ones.
As a result, you will get this kind of stove for a cauldron with your own hands, which is convenient to clean from soot and where it is convenient to load fuel. Smoky gases will be discharged into the chimney, and draft adjustment will be carried out by the blower door. Although it is not so convenient to transport such a structure, since it is larger.
Sequence of work
We make a step-by-step oven for a cauldron with our own hands. Using a grinder, a partition is cut out in one disk, with holes made for mounting bolts. It is better to cut along the border of the holes, this will reduce the labor intensity of the work.
We find places for spot welding that holds the partition and rim. At this point the metal is cut straight to the rim. The operation must be done carefully so as not to damage it.
Cutting the partition should be done at a distance of 1.5–2 cm from the location of the weld spot. The cut off partition can be easily removed. Just pry it out with a flat screwdriver.
It is very important to preserve the remaining part of the partition directly at the welding point. It forms a gap between the stove and the cauldron
As a result, strong draft occurs and the cauldron is evenly heated.
Then welding work is carried out. The prepared disks are placed on top of each other, and the disk with the partition cut out should be at the top.
The entire fastening partition of the lower disk will play the role of the bottom of the stove. Welding of evenly installed disks is performed along the entire circumference. Then the door is made. In well-welded discs, a vertical cut is made corresponding to the dimensions of the door. You need to leave a small metal strip at the bottom. You will get a kind of threshold that does not allow the coals to fall out of the oven.
1cfa14b5944e00aa051822d85c852f1f.jpe
1170eb1a7b51aacfb0d989ec3b7ecea0.jpe
Bolts and nuts are inserted into the cut made. These parts will become loops. Bolts are welded to one side of the cut and nuts to the other. Then a hole is cut for the door. A long bolt is welded. It will act as a strong handle. The ends of the opening and the sharp edges of the door are cleaned of burrs. To do this, you can use an ordinary file or an electric grinding disc.
The next step is to make handles for transporting the stove. The wire is taken, inserted into a vice, where it is bent into the desired shape. To work with such wire you will not need much effort. Right angles can be easily made with a regular hammer.
Nuts are placed on the handles. They are welded to the walls on opposite sides. To make it easier to work with such handles, you need to bend the small tails at a right angle. You will get a reliable stop that prevents the handle from touching the stove body.
The legs are welded to the bottom. The length of such supports should not exceed 30 centimeters. A hole is welded into the disk through which the wheel hub passed. To do this, you can use any piece of metal of a suitable configuration. The stove is loaded with wood. It needs to be well calcined. During this time, the paint will all burn out. Then it will need to be repainted with good heat-resistant paint.
To create such a design, an experienced craftsman will need 2-3 hours. The appearance will have a compact appearance. Thanks to its light weight, it is easy to transport in a car. Such dimensions fit freely in the trunk.
Doors are used to adjust the draft. Its strength changes when opening or, conversely, closing the door. It is better to use wood briquettes as fuel.
Based on materials: https://topkvadrat.ru/interior/article/kak-sdelat-pech-dlya-kazana-iz-kolesnyh-diskov-svo-38043
Distinctive design features
The design of a stove for a cauldron is almost the same as a regular one, and the main difference is the hole located in the stove - it is in this hole that the cauldron itself will be installed. According to the requirements, the hole must be of such a diameter that 2/3 of the cauldron is located below the cast iron stove. If it is smaller, then the heating will not be uniform, and if it is large, then you can forget about conveniently removing the cauldron.
Note! Nowadays, plates with rings of such diameters are produced so that any utensil can be installed.
The oven itself can be:
- clay;
- brick;
- converted from another metal device.
Construction of a clay oven requires appropriate skills, but options No. 2 and No. 3 can be done with your own hands.
Fire safety requirements
Brick stoves do not use open fire.
A brick brazier is considered a fire-safe object, since it does not use an open flame.
However, during its construction and operation the following rules must be observed:
- do not place near flammable objects;
- not located above underground utilities, which may subsequently complicate their repair;
- Do not use volatile compounds for ignition.
Do not leave objects on the stove that could catch fire due to heat.