Modern bath heating devices are designed to maintain optimal air temperature and create a favorable indoor microclimate.
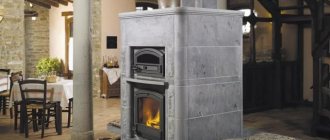
An increasingly popular option for a heating device is a fireplace stove for a bath. It has wide functionality and also has an attractive appearance. Reliable and durable materials are used as cladding - glass, tiles, artificial stone and tiles.
Design and construction
The design of a sauna stove-fireplace is not relevant for purchased fireplaces, which mostly already have cladding; the portals are presented in the form of a cast iron or steel structure. If you assembled a brick sauna stove with your own hands, it can be lined and decorated with any materials that need to be renewed as they wear out.
Finishing can be done in one of the following ways:
- Traditional and ancient fireplace cladding using the peasant method involves applying a mortar containing whitewash, lime and clay to the brickwork and surface. After the solution has completely dried, such a surface can be painted, but this option requires artistic skills, which is why it is used quite rarely;
- Another option is to cover the fireplace with decorative bricks, which are affordable and allow you to imitate any surface;
- To finish the brick surface of the fireplace stove, you can use such heat-resistant ceramics as: porcelain stoneware, majolica or terracotta;
- Tiled fireplaces are very popular, on the surface of which such voluminous, massive and quite heavy tiles are fixed, having a unique color and style.
Kuznetsov furnaces have the following advantages:
- The oven heats up completely and gradually, starting from the bottom and slowly moving to the top;
- Due to their design features, the masonry of such stoves is not prone to destruction, deformation and cracks;
- Such units are capable of operating both the stove and fireplace separately, and together;
- Gases escaping from the firebox additionally heat the side walls of the fireplace stove;
- Soot and soot are formed in minimal quantities during equipment operation, which greatly facilitates cleaning and maintenance.
You can install a sauna stove with light weight and dimensions not only on the first, but also on the second floor of the house, however, during any construction with your own hands, you need to carry out a thorough and detailed design, draw up a project order, calculate and select the right materials, learn how to use a trowel , masonry mortar, level, grater, determine the most suitable place and method of placing the stove in the room.
Since brick sauna stoves have a lot of weight, more than 400 kilograms, before construction, it is necessary to pour a high-quality base or, in other words, a foundation under them. The depth of the pit will be about half a meter, after which crushed stone is laid on the bottom, which, if necessary, can be replaced with construction waste, filled with cement and supplemented with reinforcement - this will create a strong and solid foundation.
After the foundation has completely dried, two sheets of roofing material are laid on it and pressed with a layer of cement. Further, if you are going to install a purchased fireplace, you can decorate this area with stone or tiles, but if you are building a brick unit, you will not need decor and you can immediately begin installation.
For masonry, you need to choose a stove-fired refractory brick, and also observe the thickness of the seams between the bricks and rows, which ideally will be 3-4 millimeters. Each row is first laid out dry, and after laying on the mortar, the evenness is checked with a building level and plumb line, which will allow you to build a brick sauna stove with your own hands and in a short time.
Modern solutions
A good 4 by 4 bathhouse whose interior may look like:
- Separate, autonomous building;
- Small extension to a country house.
Such baths should be equipped in different ways.
For example, it is stupid to occupy the already “modest” space of the bathhouse extension with a dressing room and a rest room, if all this can be organized directly in the house.
A half-empty, lonely chalet-style bathhouse, whose functionality is, at best, half used, also looks ill-conceived.
Among other things, the stylistic design of the interior of a bathhouse is also directly dependent on its size.
After all, if the bathhouse is entrusted with one task - assistance in carrying out hygienic procedures, then there is no need to think too much about its design.
If an entire chalet bath complex is responsible for the purity of body and soul, then it’s definitely worth thinking about creating a stylish, interesting and memorable interior.
Functional zoning, stylistic overlap between different rooms and unification of the entire complex with a common design idea - this is what such a building should have.
High tech
High-tech style is quite young in the field of interior design. Its main task is to create a laconic and functional room, where there is no room for unnecessary details (cute figurines, a large number of pieces of furniture, etc.).
To recreate a high-tech style bathhouse in the interior, you need to use strict rectangular shapes, devoid of any pretentiousness, as well as metal, stones and wood. But since the scope of use of metal elements directly in the steam room is limited, they can be used to decorate the bathroom and dressing room. The design of a 3 by 3 bathhouse, the interior design of which will be made in high-tech style, will be functional and spacious.
Large panoramic windows are another attribute of such a modern interior. It is noteworthy that to create a private atmosphere in the relaxation room, the windows need to be covered with a special mirror film. She will successfully hide from prying eyes everything that happens in the bathhouse.
Important! Initially, high-tech design was actively used only for the decoration of office premises. After all, the designers were sure that nothing should distract a working person.
Chalet
Chalets are the favorite style of Alpine shepherds, who value simplicity and naturalness most of all.
Their buildings, slightly rough in appearance, have a stone base, wooden walls and a sloping roof, and are equipped with everything necessary as standard.
When choosing a “chalet” style for decorating a bathhouse, you should not forget about the simple rules for the exterior design of such a building:
- The base of the bathhouse should be built from natural stone;
- Wooden logs are used to build walls;
- The inside of the building is lined with wooden beams or clapboards.
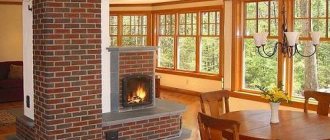
The steam room and relaxation room, decorated in a chalet style, look cozy, expensive and romantic. Attention to detail allows every person to feel maximum comfort in such a bathhouse, and the completely eco-friendly interior literally fills both adults and children with health.
It is worth noting that the original design of a bathhouse, decorated in this style, is standardly a full-fledged complex, albeit of a “modest” size. And if you choose a fireplace stove for it, you can significantly save on the maintenance of the bathhouse.
Loft
The loft style is usually chosen by strong, advanced people who are not at all afraid of experiments.
After all, who else can calmly steam in a bathhouse, where a brick, seemingly “unfinished” wall is adjacent to rough and wooden walls, and a strict stove, without unnecessary details, easily coexists with soft furnishings.
Of course, such an ultra-modern style of interior design has its fans, but most often, owners of home baths choose a more traditional design.
Information. Today, loft-style bathhouses are usually built from wood, most often from laminated veneer lumber.
Provence
In European design, the Provence style, also known as country, is very popular. The reason is simple and clear - this approach guarantees a harmonious and cozy space. It will naturally be in demand among adherents of everything French, as well as among those inspired by the romance of the Mediterranean. Typical features:
- antique (or imitating antique) wooden furniture in discreet white shades;
- decorating walls with white and other light wallpapers;
- hanging single-color curtains made of linen or chintz (the predominant texture is flowers or small checks).
It is necessary to remember about other nuances:
- mandatory light floor;
- floral designs;
- local use of lace, embroidery and ruffles;
- decorating space with forged elements.
Russian
Features of the dressing room design:
Scandinavian
The style stands out with cool, light tones. Characteristics:
It is unacceptable to use bright colors.
Modern
This style is distinguished by soft shades and smooth lines. Design features:
For modern, installation of electrical equipment is allowed.
Nautical
Additionally, you can install a large aquarium with fish.
Retro
The style is similar to classic and modern. The room should be dominated by neutral, cool colors.
Preparatory work
Selecting a water tank
One of the main components of a heating device is a tank or container for water. The volume of the tank should be selected before all construction work begins.
It depends on the number of people and the visit to the bathhouse: the more people who want to take a steam bath, the larger the volume of the tank needs to be used. One liter of water is usually consumed per person.
It is best to use an open tank as a tank. It will be more convenient to fill such a container with water. During operation, scale may appear on the tank. It is easier to eliminate it if the container is open.
If you do not use the sauna in winter, it is better to remove all liquid from the container. This way you prevent the water from freezing and damaging or deforming the tank itself.
Foundation of the future furnace
One of the most important components of any furnace is its foundation. A brick stove with a closed heater for a Russian bath made by yourself must be on a high-quality foundation.
The foundation depth should be below the soil freezing level by an average of half a meter. The area of the foundation should be larger than the furnace by a few centimeters around the perimeter.
Stages of building a foundation:
you need to dig a hole to install the formwork. Cover the bottom with sand (about 15 cm) and fill it with water to compact it. Small stones are placed on the surface, after which they are compacted. The formwork is made from boards. The internal size of the formwork must be identical to the size of the foundation
It is important to use a level to build. The formwork is fixed in the pit, and strong reinforcement is inserted inside. After this, all that remains is to concrete the area and leave it for several days. The wooden frame is removed, and the gaps between the ground and concrete are filled with sand or gravel
The structure is covered with film and left for about seven days.
What brick should I use?
It is appropriate to use ceramic refractory bricks in the bathhouse. It is red in color and is durable and resistant to high temperatures.
How to choose quality brick? Before purchasing a whole batch of bricks, check its quality. To do this, purchase several bricks and break them. If you have a few large pieces left over, this is a great material.
If it crumbles into small parts, it is a bad material. It is not the size of the brick itself that is important, but the identical parameters of each individual rectangle.
There is another type of brick that is used only in the fuel zone of the furnace. It is called fireclay. This material is resistant to heat. Fireclay has a larger size compared to others. But it can be easily filed and made to the desired size.
Preparation of the solution
A do-it-yourself sauna stove is made using two types of solution:
- for external masonry
- for the firebox and chimney.
The first one is easy enough
The main attention in this process should be paid to the components: sand and clay. Before preparation, the sand is sifted
It should be small and uniform. And it is best to choose clay that has overwintered in open areas. It should also be ground through a sieve, after wetting it with water.
The proportions of the components may vary. It depends on how high quality clay is used. But usually this ratio is 1 to 2 (1 part clay and 2 sand), water should be approximately 1/4 of the amount of clay.
To strengthen the fireclay brick (for laying the firebox), use a solution of heat-resistant clay (it is white). When exposed to high temperatures, it compresses tightly and forms reliable protection against heat. All solutions must be mixed gradually until the consistency of liquid sour cream.
Tools
No special tools are required to build a heater. All you need is a level, a trowel, and a container for mixing the solution. Every owner has them, so you don’t have to spend money on work equipment. If the masonry you choose requires cutting the brick, use a grinder and a hammer.
Zoning
The room can be divided into several zones:
- dining room;
- a place to relax with upholstered furniture;
- games room with billiard table;
- kitchen with bar counter;
- free area for dancing.
After visiting the steam room, a person needs to cool down. It is important to properly arrange the rest room. To zone the room you can use:
- plastic, glass partitions;
- large cabinets;
- folding or sliding doors;
- thick curtains.
If the dressing room is small, 1 table, 2 benches, and a wardrobe will be enough.
Masonry
The masonry process is very painstaking and complex. There are a large number of subtleties and nuances here, understanding some of which comes only with experience. Therefore, to make this work easier for you, this section contains several videos that tell you step by step and show how to lay row by row.
As an example, consider the manufacture of an open small stove-heater. The size of such a stove is 102x62 cm. It is capable of heating a steam room with a tank, while the tank itself is located separately. It uses an interesting water heating system - an open siphon. So, a pipe is welded into the tank at a slight angle, which is sealed at the end. It should be under an open fire in the firebox. As soon as the water in the pipe boils, it rises into the tank, and cold water comes in its place.
The diagram below shows an example of a stove with an open heater:
Diagram of an open heater
And also a diagram of the arrangement of the firebox of an open heater:
Firebox order
Below in the diagram is the order of laying bricks for the stove:
Brick laying order
If you want to make a closed stove, keep in mind that this is much more difficult to implement. There are many nuances that must be taken into account when laying it. It is quite difficult to describe the entire technological process, so we suggest you watch an introductory video. The peculiarity of such a furnace is that the reservoir for stones is lined with fireclay bricks:
Video about making a closed stove:
What to consider?
When building a bathhouse, you need to take into account many nuances. The building must be located on the site at a distance from other structures. You cannot install a bathhouse close to a fence, and you also need to take into account that it is located without disturbing the neighbors. Otherwise, problems are possible that will entail fines and dismantling of the bathhouse.
If possible, it is better to install such a structure in a quiet place, away from the road, surrounded by greenery. It's great if there is a body of water nearby. It is worth considering in advance the installation of all communications. The area should be level, clean, with dense soil. If there are no such conditions, then the surface needs to be prepared: cleared, leveled.
There are many options: wood (logs, timber), various blocks (foam concrete, aerated concrete), brick. When choosing a material, you need to focus on its price, durability, aesthetic and performance qualities. And, of course, the structure must correspond to the general style of the entire site. It is advisable to build a bathhouse from the same material as the main house.
Do-it-yourself brick lining of the stove: materials and technologies
Particular attention should be paid to the choice of building materials. They must be able to withstand heat and temperature changes well.
What kind of brick to line an iron stove with? It must be fireproof, solid, without voids in the structure. This is not a case where you can skimp on quality, so choose the best materials. The costs will definitely pay off: you won’t have to repair the stove for a long time, it will last for many years. As for the outer surface, you can choose smooth or corrugated - to suit your taste.
How to calculate the amount of bricks for cladding
Opt for red fired solid brick. The amount of material is calculated based on the volume of the metal furnace plus the distance by which you plan to increase the structure. In your calculations, make a reserve for arranging the base for the stove - this is 1-2 rows of masonry, a chimney, if you plan to make it brick. To determine the amount of material in pieces, divide the area of the masonry by the side area of the brick. Add 5-10% to the result obtained. The reserve is needed in case additional material is needed, as well as to compensate for losses (waste) of material during transportation.
Red solid brick for oven cladding
Heat-resistant mortar for masonry
Cement-sand mortar is not suitable for laying bricks around a sauna stove, because... it does not tolerate high temperatures. Stove makers use clay-sand compositions. Clay can be found independently on river cliffs or in quarries, but it is much more convenient to use dry mixtures offered by industry. The dry mixture can be purchased at the store. It is mixed with water in accordance with the manufacturer's recommendations and is immediately ready for use. If you have experience and skills in determining the fat content of clay and preparing a high-quality solution, you can spend time and effort on this and prepare the clay mixture with your own hands.
Heat-resistant masonry mixture of industrial production
Additional materials and tools
A waterproofing material is placed under the base of the stove, which is resistant to high temperatures. As a rule, roofing felt is used as waterproofing; it is laid on the foundation in two layers. To ensure fire safety, the space near the stove is covered with a metal sheet or tile. If the stove is completely lined, then metal profiles will be needed to build a brick vault.
Tools you will need:
- Master OK;
- hammer;
- jointing;
- mooring cord;
- order;
- plumb line;
- building level;
- rule;
- shovel;
- solution container.
Finishing a sauna stove with bricks: work order
First you need to arrange the base, along the edges of which the masonry will be carried out. The base is a 1-2-row masonry. When it is built, you need to give the solution time to dry (usually indicated on the packaging of the dry mix). The stove is mounted on the finished base; you can immediately connect it to the chimney. In the corners, bars are installed to level the masonry, and a cord is pulled between them. Before laying, the brick is prepared by soaking it in cold water for half an hour.
The first row of bricks is decisive; the laying of the entire wall will be laid out along it, so you need to pay special attention to it. When the row is completed, remove excess solution
When laying the remaining rows, you need to be careful about the lining of the holes for the ash pan and firebox. During operation, you should check whether the doors open well.
Scheme of brick lining the furnace
Often, stove owners veneer only individual structural elements. This saves materials, time, labor and effort. Consider which option will be most convenient for you and arrange the stove so that it fully meets your needs.
Recommendations
To like the result and have more pleasure from visiting the bathhouse, you need to listen to the advice of experienced finishers and bathhouse attendants:
- If the floors are concrete and you don’t want to wear shoes, you can install a heated floor system. The temperature regulator is located in any convenient place.
- If the oven has an external channel, it is better to buy a model with a transparent glass door. It will look like a fireplace, and you can control the load on the firebox.
- It is better to decorate all rooms under the same style.
- It is not recommended to use bright lamps.
- To make the interior cozy, you don’t need to clutter it with a large number of decorative elements.
- It is better to avoid experiments with mixing different colors, especially bright and provocative ones.
- Sockets and switches should be at a convenient height.
- Before operation, the wiring must be checked and completely insulated.
- Communications need to be hidden in the walls and floor so that they do not interfere with bathhouse visitors.
- The dressing room should have large windows.
- It is advisable to make a small vestibule near the entrance so that visitors can leave their outerwear and shoes. You can fence it off with wooden panels or two wardrobe cabinets.
- To provide more natural light, you can install display windows.
- Walls look beautiful when decorated with tree cuts.
- Color transitions should be smooth so that a person does not get hung up on them.
- For finishing you need to choose materials that are resistant to humidity and temperature changes. In the dressing room, cold air coming from the street and hot air from the stove are mixed.
When visiting a bathhouse, a person wants to get maximum pleasure from bathing procedures and relax. Since visitors spend most of their time in the dressing room, the layout and decoration of the room needs to be carefully thought out - choose the design style, furniture, colors, etc.
Cleaning the oven manually
If you don't want to clean the stove, call a chimney sweep. A specialist will not only evaluate the draft and remove soot deposits, but also check the design. Of course, you can take care of the fireplace and chimney yourself. Pipe cleaning work should be performed as follows:
- Start with preparation. Close all stove openings leading into the room (including the firebox door) so that soot will not enter the room. If the firebox is open, hang a damp cloth over it.
- Chimneys can only be cleaned in dry and windless weather. Be sure to use elements of insurance when working on the roof of a house.
If the stove is not being used for a long time, you will need to ensure that birds have not built nests in the chimney. If you cannot remove accumulated debris, simply push it down. Use available means for this purpose.
The chimney must be cleaned if the soot layer is more than 2 mm. If it is smaller, then complete cleaning will not be required. You can get by with alternative methods. If the soot lies in a dense layer, it can be easily removed with a scraper. After this, you can additionally clean the chimney walls with a brush or run a brush over them.
While working on the chimney, you may find that the tool does not go any further. This means that you have encountered a blockage in the structure. Most often this is garbage, but across the pipe there may also be a brick that fell out of the collapsed masonry. If you haven't cleaned the pipe for a very long time, you may notice this phenomenon. It can be removed using a heavy core. The device is made of steel.
The cannonball is suspended on a rope and secured with a carabiner. The tool should cover about 70% of the pipe diameter. It must be carefully thrown into the chimney. Be careful not to touch the pipe walls with the tool.
Using the core you will quickly remove the blockage, after which the cleaned chimney can be brushed again. The devices you plan to use should be connected with carabiners. Remember that the core cannot be replaced with sports weights. Their center of gravity is shifted, and products can get stuck in the pipe. To remove such objects, the structure will have to be dismantled.
You can clean fireplaces that have a straight chimney not from the roof, but from the room. To do this, you need to buy a brush made of metal. The best product will be one that has a long handle.
After the work is completed, the firebox should be opened. Clean the holes thoroughly, sweep away soot and dirt with a brush. Don’t forget to treat the ash pit and remove the ash from it. Remove any remaining carbon deposits from the pipe walls. You can use a vacuum cleaner for this.
How to choose the right gas stove for a bath
The stove is the most important element of the steam room. It determines how comfortable and useful a visit to the bathhouse will be, and how much it will cost.
The design of a gas stove is not the last selection criterion. The volume of stones is also important; by splashing water on which you can adjust the steam hardness and other vaping characteristics.
As for technical parameters, the main ones are:
- area of the steam room;
- rated power;
- firebox type;
- material of manufacture;
- control method;
- installation features;
- design.
If the power of the stove is too large for the volume of the steam room, the air will heat up quickly, and the stones will not have time to warm up. This means that getting decent steam will be problematic.
At low power, the oven will operate at the limit of its capabilities, which will lead to rapid wear and deformation. As a result, you will have to spend money on expensive repairs or even buy a new unit.
Therefore, it is necessary to determine the volume of the steam room and add to it the volume of adjacent rooms if they are also planned to be heated using the same stove. You can add 20-25% to the obtained value and, based on this data, select a model based on other criteria.
Facing a gas stove with bricks or slabs of natural stone significantly increases the heat transfer of the unit and protects bathhouse lovers from direct exposure to high and ultra-high temperatures
It is important to pay attention to the firebox, which must be made of steel grades that can withstand high temperatures and their significant differences. It is desirable that the stove has thermal inertia, that is, it can retain heat after being turned off. This will not only save fuel while bathing, but also dry the bathhouse after completing all procedures
This will not only save fuel while bathing, but also dry the bathhouse after completing all procedures
It is desirable that the stove has thermal inertia, that is, it can retain heat after being turned off. This will not only save fuel during bathing, but also dry the bathhouse after completing all procedures.
If the stove will also heat water for the shower room, which is located outside the steam room, you should choose a model with a remote tank. Those who like wet steam need to buy a stove with an open heater. For connoisseurs of dry heat, you will need a unit with a closed heater, in which the heating of the stones reaches 500°C.
Multi-mode models will help you not to limit yourself to one thing and, depending on your mood, steam in either a Russian steam room or a Finnish sauna. Some stoves are capable of providing the conditions of an oriental hammam and an infrared sauna.
Additional equipment will allow you to control the unit from a distance and prepare the bathhouse for your arrival, being hundreds of kilometers away. All that remains is to wish you a successful purchase and easy steaming!
Lighting
The level of comfort depends on the lighting in the dressing room. Peculiarities:
It is better to install a row of lamps around the perimeter of the room than one large one in the center.
It is not recommended to use neon or high-power bulbs. The first ones give off an unpleasant cold light, the second ones make you strain your eyesight.
You can place an LED strip around the perimeter of the room, and install 4 separate lamps inside.
The dressing room should have large windows that will provide natural light throughout the day. Lamps along the contour can be decorated with fabric.
Expert advice
You can insulate the walls not only with brick, but also with some other materials: asbestos-cement slabs, mineralite (fiber cement slabs) and cover them on top with decorative metal sheets, stainless steel, and special ceramic tiles.
You can install ready-made purchased doors as doors. By placing a glass door on the firebox, you will get a beautiful visual effect of a live fire, like in a fireplace.
It is advisable to protect the iron body with a decorative grille to protect visitors from burns. Sometimes stones are placed behind these grates and used as an open heater.
Features of operation
There are a number of conditions that are very important to observe when installing the stove. Neglecting these rules will make further operation of the fireplace stove difficult.
- The structure cannot be installed close to the wall. The required distance should be indicated in the instructions that come with the fireplace.
- There must be cladding on the surfaces of nearby walls. A ceramic stove is perfect for this.
- Do not install the structure on a bare floor. It is advisable to lay ceramic tiles or make a podium from bricks.
- The stoves weigh quite a lot, so additional racks should be installed to prevent the floor from sagging.
Advantages and disadvantages of a brick stove
This design has many advantages:
- couples gathering in a sauna have a beneficial effect on health;
- a homemade brick sauna stove will fit perfectly into any interior of a given room;
- there is no need for additional brick finishing;
- long service life;
- the presence of harmful and dangerous substances in the materials is excluded;
- brick retains heat for a long time and warms the room;
- no condensation;
- publicly available raw materials are used as fuel;
- There is no need for regular chimney cleaning.
The disadvantages of such buildings include the following points:
Famous manufacturers
Termofor is one of the most popular stove manufacturers. To create products, the company uses components made in Switzerland. The assortment is represented by a wide selection of models, which allows each buyer to find a suitable option. There are open and closed heaters, devices with a heat exchanger or water heating tank. Almost every sauna stove-fireplace holds about 100 kg of stones.
brand units are quite common
. The stoves of this manufacturer have a characteristic feature: the steam room reaches a comfortable temperature in a short time due to the presence of several independent channels for fuel combustion. Moreover, this stove has a long service life, and it can be serviced even while in the dressing room.
Options for a homemade sauna stove
A homemade metal stove made of sheet metal has a lower firebox and a tank for heating water. Part of the oven is lined with bricks. The lower firebox and wall are also brick. The stove works in this way: water pours through the side door, from which steam is released.
A sheet iron stove works the same as in the previous version: water and steam enter through the side door. The internal walls are brick. For the construction of such a sauna stove, sheets of iron more than 5 mm thick may be suitable.
A brick stove for a bath is one of the most popular options. It looks like this: the firebox is lined with refractory bricks, below the firebox there is an ash pit, and a cast iron or steel grate, which is designed for laying stones. A brick oven has a chimney and doors. Hot water is supplied using a coil. The furnace is built on a foundation. For this design, a solution made of sand and clay is used. It is unacceptable to use a mortar for laying bricks that contains cement, which is not resistant to high temperatures. The brick oven is fireproof. Laying such a stove is a rather labor-intensive and complex process.
Beautiful examples
This photo shows an elegant bathhouse in the half-timbered style. Modern notes are harmoniously woven into its appearance. The roof protruding forward (like a canopy) looks very original.
Fans of Russian traditional style can take this example as an example. The use of unfinished logs and other emphatically natural materials makes a favorable impression.
And this is an example of the implementation of high-tech style in a bathhouse using:
- rough stone wall;
- spotlights placed on the same level;
- thoughtfully placed lining;
- lack of other finishing.
To sum it up. A few words about IR radiation
Iron stoves have many advantages, but they all have one drawback - during operation they produce hard IR radiation, which leads to uneven heating of the air in the room. But this problem can be eliminated by making brickwork around the heater. The brick should be placed approximately 10-15 cm from the stove, so that air will circulate freely along the walls. In addition, the masonry also performs a protective function - accidentally touching a heated brick will not lead to a burn, which cannot be said about hot metal.
Installed vertical oven and brick screen around it
Brick screen around the stove
Two or three holes are left in one of the bottom rows to allow cold air to penetrate inside.
Warm air will rise, driven by convection. You may also be interested in learning about the operation of a gas stove in a bathhouse. Date: September 25, 2022
Room color
To get more pleasure from visiting the bathhouse and to completely relax, you need to choose a color scheme.
It is better to choose warm, calm tones. Bright, variegated colors strain the eyesight. Based on the developments of scientists, we can distinguish several colors that are better perceived by the subconscious:
- peach, pink - calm;
- yellow - optimism, solar warmth;
- gray is a neutral shade;
- white - cleanliness (suitable for decorating different rooms in the bath; this color cannot be used in large quantities).
If you want to add bright colors, you can make a few separate touches on the walls. Of the cool tones, the best options are pale green, blue, and lilac.