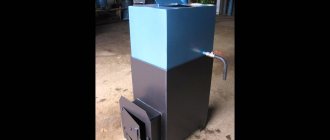
In the process of manufacturing a biofireplace, it is necessary to make its most important element - the burner. The burner is the heart of the fireplace, since it responds to the presence of fire in the device. There should be no difficulties with the rest of the device. Let's look at how to make a burner for a bio-fireplace with your own hands.
Simple homemade bio fireplace
Making biofireplaces with your own hands
How to make a bio-fireplace with your own hands? It’s easy just if your hands grow from the right place. For manufacturing we will need the following tools and materials:
- Glass. The pieces are available at glass cutting stations. You can take an old aquarium.
- Glass cutter.
- Silicone sealant (glue glass).
- Stainless steel mesh.
- Metal box.
- Small stones.
- Fuel for a biofireplace.
- Wick (piece of cord).
- Metal glass for fuel.
Variety #1 tabletop
First, figure out on paper how to make a bio-fireplace. Sketch out a simple drawing with dimensions. When designing a tabletop fireplace, keep in mind that the distance from the burner to the nearest glass should be 16 cm or more. If there are 2 or more burners, then the distance between the burners is also more than 16 cm. As a result, on paper we get a tabletop fireplace.
The manufacturing process will look like this:
As a basis, we took a metal box of a certain size (according to the drawing). We will adjust all other components to it.
Often fuel is sold in plastic containers. She doesn't suit us. Take an iron glass. We pour fuel into it.
We take an iron mesh. We cut it to the size of the metal box. It is better to take 2 layers of mesh. Place the stones on a grid over the entire area. Stones are not only a beautiful accessory for our heat generator. They perfectly accumulate and release thermal energy. They do this evenly over the entire covered area.
We take a regular cord. Cut a piece to the required length. We immerse the cord in a glass of fuel and light it. With the help of simple manipulations, the installation of a bio-fireplace was done quickly. Above we received the answer to the question “How to make a burner for a bio-fireplace with your own hands”?
Variety #2 wall-mounted
This type of heat units has a flat, elongated shape. This shape makes it easier to attach the structure to the wall. The front part of the device is covered with glass for safety reasons. The side walls of the device can also be made of glass. The back wall is made of non-combustible material. This is usually hardware decoded in various designs. Hanging such a fireplace is easy. Special fasteners are screwed to the wall, then the fireplace is secured. The device does not pose a fire hazard because the body and walls heat up slightly. Due to low heating, a person will not get burned by touching the body.
The manufacturing principle is the same as for a desktop device. You make a drawing, indicating dimensions and materials. Next, you make the product itself and hang it on the wall. Producing bio-fireplaces at home is a simple matter, not a troublesome one.
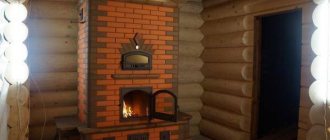
Variety #3 floor
We place this type on the floor, on its own legs. In fact, this is a tabletop fireplace, only on a larger scale. You can put it on the podium. The bottom will not get very hot. Based on this, the device can be placed on any straight, flat surface. The size and shape of different rooms vary. The big advantage of this device is its mobility.
Moving it to a new place is a matter of 1 minute. You can quickly heat any room by simply moving the unit to a new location. We see that it is easy and simple to make a bio-fireplace with your own hands.
Decorating the fuel device
The fireplace burner can be decorated with additional elements. This will not only improve the design, but will also help disguise the wick.
You can effectively decorate a biofireplace using various materials. In this picture, the decor is made using metal rods
Among the most popular decorations are:
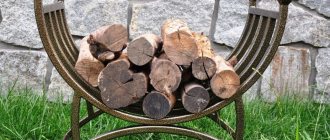
- Ceramic logs , the size of which must match the dimensions of the hearth. Such elements will imitate a fire.
- Various types of natural and artificial stones , which can be the same or different sizes, transparent or colored, smooth or with a textured surface. Pebbles can be laid out not only on the grate, but also outside it.
- Stylized surrounding objects : poker, tongs, tools for lighting and extinguishing. Here you can also put fuel in decorative packaging.
Also good are decorative cladding made of heat-resistant ceramics, and clay and faience figurines that can be placed on the fireplace lid or next to it.
It is advisable to use removable decorative components, which will allow you to periodically change the appearance of the device.
DIY bio-fireplace burner
Burner options for biofireplaces
There are many types of schemes for the production of thermal blocks. We will offer you a couple of options.
The simplest model of a fuel cell
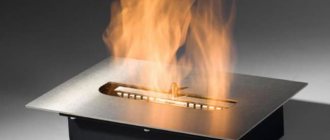
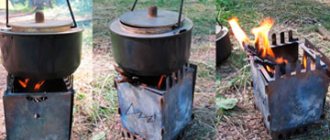
A simple DIY burner for a bio-fireplace will be made like this. We take a stainless steel container. The wall should be from 2 mm. The depth of the container is 5 cm. The dimensions are arbitrary, according to your drawings. Appearance is not important. This element is hidden from prying eyes. But it must be a good, strong element. Biofuel is poured into a tank or glass. Insert the wick. They are taken out through the mesh. A cord soaked in a flammable liquid ignites, emitting light and heat.
Two-chamber burner with perforations (slits)
This design option is usually made in the factory. It is fuel efficient. This occurs due to a decrease in the combustion area. Fuel consumption decreases.
We take a bath, a stainless steel box. The sizes are arbitrary. It is possible as in the previous version. We cut the plate along the length of the body (along the inside). The plate should be the same thickness as the body material. We calculate the width using the formula: SH = Vs - 1.5 + 2xRs (where Vs is the width inside the bath, and Rs is the depth of the bath). The plates bend at right angles from the long edges. This is done to get legs equal in depth to Rs. We ended up with an element that, along the length of the bathtub, is 1cm narrower than its width in profile, resembling the letter P.
On one of the legs of this letter P, we make cuts, like on a comb. We install a U-shaped structure so that the gap between the slots and the wall is 1.5 cm. We fill the tank with fuel. Let's light it up. The flame will only be located in a narrow strip of 1.5 cm. The fuel below will not ignite. Oxygen access is limited. No fuel shortage is expected. It will seep through the slits. To quickly put out the fire, make another plate to cover the fire.
To ensure that the fuel burns out completely, tilt the tank towards the working surface. This can be done by mixing fuel with gypsum. Next, tilt the resulting mixture in the direction of the workplace. The mixture hardens. We get excellent results. In this case, the leg of the U-structure needs to be shortened. This is necessary to make the structure completely horizontal. You can make a tank with a double bottom. The finished burner is placed in an additional, larger tank. The edges of the top tank will cover the tank elements below.
The simplest device with a filler
The container with the U-profile must be filled with filler. Usually this is mineral wool. Basalt fibers must be replaced with cotton wool with an acrylic component based on the following factors:
- Hygroscopicity. Absorbs moisture well.
- Fiber filler has better vapor permeability. Alcohol vapor will circulate inside the filler without any problems.
- Soft cotton wool burns long and evenly.
- During the production process of such cotton wool, various chemicals are not abused.
- If there are difficulties with the supply of acrylic wool, find a similar one, only softer. Soaked cotton wool will burn more slowly, increasing the overall burning time.
- We understand that a biofireplace can be assembled with your own hands without worries or hassle.
An even simpler design for you. An iron mug will do. You can pick up a jar. Place the absorbent in the container. There is no need to tamp. We impregnate the filler with fuel. We put an iron mesh and a lid with holes on top. Next we set it on fire.
Classification, pros and cons
Tabletop biofireplace - a small composition whose flame is hidden behind a protective glass screen
Classically, biofireplaces are divided into 3 types depending on their location in the room:
- tabletop - compact compositions of various shapes and designs, the flame of which is hidden behind a protective glass screen;
- wall - made of metal and glass. Can reach 1 m in length. When constructing them, you need to worry about specialized fasteners;
- floor-standing - in appearance they resemble ordinary wood fireplaces. Placed in niches or corners. If desired, they can be installed or equipped with support legs with height adjustment or wheels for transportation around the house.
Tabletop options are considered the most common and easiest to assemble, but they only serve an artistic function. Wall-mounted and floor-mounted biofireplaces require more time to build, but they can additionally warm up the room, especially if several heating pads were used during their manufacture.
Moreover, any of these types can be installed in an apartment. The only exceptions are overly large devices that impede the movement of its inhabitants.
All biofireplaces have the following good qualities:
- structural simplicity, which does not require smoke exhaust equipment, laying channels for ventilation and coordination of their installation with the residents of the house;
- mobility - the weight of such devices usually does not exceed 100 kg;
- fire safety under conditions of following simple rules;
- absence of soot, smoke, toxic substances in the air during combustion;
- ease of maintenance;
- additional air humidification due to the release of steam from water and carbon dioxide.
The disadvantages include:
- minimum heat that is released during the operation of the biofireplace;
- the need to equip the correct ventilation system or ensure frequent ventilation in the room where it is located;
- relatively expensive price of fuel for biofireplaces.
Step-by-step instructions for a DIY bio-fireplace
We assemble a biofuel fireplace using step-by-step manufacturing instructions. It's simple. Even a high school student can do it. Let's get started.
- We glue pre-prepared pieces of glass of the required sizes together. Silicone sealant works best for this purpose. For a day we forget about our product. It must dry thoroughly.
- The base of the structure is usually made with a rectangular or square base.
- We pour fuel from plastic containers into metal vessels (tin can, iron glass).
- Dip the wick from the cord into the burner.
- We put a metal mesh on top.
- Place stones on the mesh.
- The biofuel fireplace is ready to start.
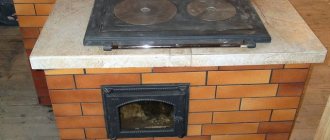
How to make a floor structure
The floor design fits into any interior, as it imitates wood-burning fireplaces.
The advantage of floor-mounted bio-fireplaces is their variety of shapes and sizes. They can resemble a geometric figure, a bowl or a cabinet, and remain stationary or mobile. But the heating block for them must be made of metal. The body itself can be made of stone, wood, plastic, ceramics or plasterboard. The main thing is to ensure that the fire does not affect flammable elements.
Required materials and tools
- heating unit;
- non-flammable drywall (1 sheet);
- metal profile with guides and rack elements (8 - 9 m);
- dowel-nails, screws for metal and with a countersunk head;
- heat-resistant tile adhesive, putty;
- metal scissors, screwdriver, knife for cutting drywall;
- insulating materials (2 sq.m);
- ceramic tile;
- grout (about 2 kg);
- building level, tape measure;
- wood or other material for the mantel;
- decor for decorating a finished bio-fireplace.
All calculations must be made taking into account the size of the space for the future bio-fireplace. One of the options is shown in the drawing.
Preparatory work
The drawing must be created taking into account fire safety
This option provides for the arrangement of a firebox.
At this stage, you need to decide on the size and design of the biofireplace: large or small, wall-mounted, corner or located in the center of the room. After this, a drawing or sketch is created taking into account the fire safety of the object. When calculating its dimensions, you need to ensure that the distance from the hearth to the walls of the structure and the mantelpiece is at least 15 - 20 cm. After this, based on the drawing, markings are applied to the wall and floor.
Step-by-step manufacturing instructions
The process involves several stages: from fastening the profile to decorating the sheathed drywall
- Frame assembly. According to the finished markings, pre-prepared guide profiles are attached. Then rack elements are inserted into them, which are subsequently secured with self-tapping screws. Verticality is controlled using a plumb line.
- Fastening profiles to the wall using dowels and nails. In this case, the racks are additionally secured with jumpers.
- Laying insulating material into the walls of a structure. They can use compressed basalt wool.
- Plasterboard sheathing. To do this, you need to mark the sheets of drywall and cut off unnecessary elements using a special knife. The main thing is to make an incision on one side, breaking the material on the other. When covering the future structure, you need to screw in the screws at a distance of 10 - 15 cm from each other. Upon completion of this work, gypsum plaster should be applied.
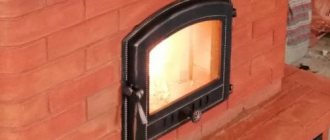
- Bio fireplace finishing. To do this, the walls and bottom of the housing are covered with ceramic tiles, with the exception of the recess for installing the burner.
- Grouting joints. After it, the mantelpiece is installed, and the structure itself is decorated with prepared decorative elements - stucco molding, mosaics, facing bricks.
- Burner installation. You can purchase it or make it yourself from a metal glass in which the wick is lowered. In the latter case, you won’t be able to adjust the flame height, but you won’t have to pay for a factory design.
The final stage may be the installation of a forged or fireplace grille made of heat-resistant glass, which will provide an additional level of safety for household members.
Due to the bulkiness of floor-mounted biofireplaces, they are often designed in the form of corner structures. The latter can be symmetrical or asymmetrical, when a column is installed instead of one of the back walls near the fireplace. Their installation is practically no different from the installation of standard floor biofireplaces, with the exception of the drawing.
Choosing fuel for biofireplaces
At first glance, choosing a fuel seems like an easy task. But that's not true. You assembled the fireplace once, forever. You will buy fuel regularly. This issue must be taken responsibly. Important point. The fuel must have the prefix “bio” in its description on the packaging. There are liquids made from wood chips, beets, and potatoes. Such a liquid does not form toxic combustion products after combustion. This device is completely safe for humans. The flame sways smoothly and beautifully.
This effect is completely absent with other types of fireplaces.
Types of heating blocks
As already mentioned, there are two main types of heating units: the fuel tank and the burner. Let's look at the main characteristics of each variety:
- fuel tank. It has the advantage of the absence of any unpleasant odors. This is possible due to the presence of a special damper that prevents bioethanol fumes from entering the room. Also, these designs allow you to extinguish the flame in a matter of seconds without unnecessary devices and accessories for a bio-fireplace. In order for the flame to go out, you need to turn the handle - the damper closes and the fire is already extinguished. The fuel tank is completely sealed. Even if you do not plan to turn on the biofireplace in the near future, dust or foreign objects will not get inside it. And, of course, the most important advantage is the ability to control the power of the bio-fireplace flame. This is especially important if the installation is wall-mounted, and there are some interior items above it (shelves, paintings, etc.). The main disadvantage of such a device is its fairly high cost. You cannot make such a block yourself;
- burner. Burners have both advantages and disadvantages. The obvious advantage of this type of heating unit is its low cost, as well as the ability to place a whole series of burners in a biofireplace. However, there are also significant disadvantages - for example, the absence of a protective shield, screen or lid, which means that the fire is always open. It is impossible to regulate the power of the flame, and in order to extinguish the device, you either need to wait until the fuel is completely burned (and this is extremely wasteful), or use a special accessory for extinguishing. This process is often accompanied by the appearance of an unpleasant odor due to intense evaporation of fuel. But the burner is inexpensive, and if necessary, you can make it yourself.
(See also: Types of fireplaces)
When the need arises to make a homemade bio-fireplace, a burner is most often used as a heating unit. It looks like a small container into which fuel liquid (usually bioethanol) is poured.
Rules for the safe operation of a biofireplace
- Rules for the safe operation of a biofireplace
- Do not leave open fire unattended.
- Only adults should light the fireplace. Children are not allowed.
- You cannot place the fireplace near a fan or in a draft.
- The fireplace must not be moved while it is burning. Relocation is possible after the fire is completely extinguished.
- It is prohibited to install a fireplace where flammable substances are stored. Gasolines, varnishes, paints, other liquids.
- Fill the container with fuel only through a funnel.
- It is prohibited to place any objects on the device body.
- It is prohibited to burn any type of fuel other than the specifically designated type.
- You cannot make changes to the design of the system without understanding what and how to do it.
- It is strictly forbidden to add fuel during combustion. A fire will happen instantly.
- Do not smoke while refueling.
- Spilled fuel must be wiped up. Otherwise, a fire may occur.
- Do not lean over the fireplace. Do not keep your hands near the fire.
- Do not cover the structure with anything. This will cause a fire.
- You need to extinguish the fireplace flame with a special metal plate.
- To refuel again, you need to wait 15 minutes after extinguishing the fire. The device must cool down.
- It is forbidden to remove the tank while the fire is burning.
- It is prohibited to use ordinary matches and lighters. You need to use special accessories for these purposes.
- If the fuel does not burn, it is at a low temperature. Let it warm up to room temperature.
- Nothing should be located closer than 1 meter from the fireplace.
- As you can see, the construction of a biofireplace is a simple device. Operating instructions are also easy to follow.
General information
Making a biofireplace is a rather difficult undertaking that requires a significant investment of time and money. In addition, you need to possess the skills of such work or at least have a general understanding of it.
Biofireplace device
Before you make a biofireplace with your own hands, you need to study in detail how it works. Regardless of the type, it consists of the same elements. These include the following:
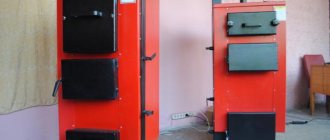
- Heating block. This element can be a fuel tank with a valve or an ordinary burner. Typically, the block is made of stainless steel or metal. The material chosen is quite thick, which helps protect the device from the effects of high temperatures and increase its operating life. The volume of the fuel tank can vary from 60 ml to 5 liters.
- Frame. Its shape and size directly depend on the interior design. Among the many models, open and closed cases stand out. In both cases, you can choose an original design that will fit perfectly into the room and help create comfort and warmth in it.
- Decorative elements. These small parts are made of fireproof materials and are intended to decorate the product. Most often, they can be various stones for burners, forged grates, ceramic logs and other attributes of fireplaces.
Types of products
Before you make a biofireplace for your apartment with your own hands, you need to decide on its location in the room. The type of product chosen will depend on this factor. There are three main options:
Tabletop. These are small structures that can be made in various shapes and decorated with miniature elements. The flame in them is located behind a special protective screen, which eliminates the possibility of accidental burns and the formation of a fire. Tabletop products perform only a decorative function and do not heat the room at all.
Decorative tabletop biofireplaces are safe to use
Wall-mounted. These bio-fireplaces are made of glass or metal. Their length can reach 1 meter, which will make the device quite heavy. Because of this, it is necessary to provide special fasteners to support the weighty structure.
Wall-mounted biofireplaces are suitable for any rich and status room
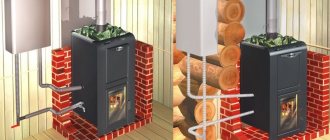
Floor-standing. This is the most beautiful and frequently used type of bio-fireplace. It gained its popularity due to its similarity to real wooden products. Floor-standing devices can be mounted in a wall or niche, or located in the corner of the room.
Floor-standing - the most common type of biofireplace
Design options
Looking at photos of biofireplaces on the Internet, it seems that there are countless possibilities for its artistic design. However, if we approach the question in a utilitarian way: which burner should be made for which fireplace, then the number of types of technical design of a biofireplace is reduced to less than a dozen, but each of them has the same innumerable variety of decorative design options.
Biofireplace options
A bio-fireplace for an apartment or private residential building can technically be implemented as follows. way (see fig.):
- Tabletop mini, so-called. fireplace night light, pos. 1 in Fig., the burner is only round.
- Tabletop interior with a round (item 2 and 3) or linear burner (item 4).
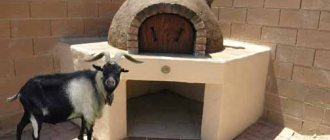
- Floor-standing indoor (item 5) or outdoor (item 6); the burner is predominantly round.
- Wall-mounted with a linear (item 7) or round burner (item 8).
- Built into the decorative wall cladding, pos. 9, the burner is linear only.
- Wall-mounted false fireplace; possibly with an imitation of a wood firebox and chimney, pos. 10. The burner is also linear.
Note: round burner is a conditional name. In fact, it can be square (item 3), polygonal or complex in shape. The main difference between a round burner and a linear one is that the overall dimensions of the fire part of the first in plan differ by no more than 50%, which imposes certain restrictions on the possibilities of its technical implementation.
Varieties
With all the apparent diversity of biofireplaces, they differ, by and large, only in appearance. Inside, they are arranged according to almost the same principle. Still, the burner for biofireplaces can be of two types.
- First: a regular container, which can be used to fit a simple tin can. The unpresentable appearance can then be decorated. There is practically no financial cost required, but this option has its own some inconveniences. The flame will be uncontrollable. In the sense that it can be extinguished only by covering it with something on top, which will lead to the appearance of a sharp unpleasant odor, and it is generally impossible to reduce or increase it. The only way to avoid the smell is to wait until the fuel burns completely.
- The second burner option is a fuel tank equipped with a special damper. You will have to spend a lot, but there will be no smells or problems with adjusting the flame. You can make such a burner yourself only if you have high-precision tools and high-quality materials.
Considering all of the above, it is better to sit down, think carefully and try to put together the first and second options, depending on your capabilities. The scheme should not be too complicated, but should take into account all safety measures.
The necessary conditions
A burner drawing for a biofireplace of varying complexity can be easily found on the Internet. And it won’t be difficult to draw it yourself either. However, before you start working, you need to understand that there are some requirements for the device that must be met in order for the craft to turn out not only beautiful and stylish, but also safe.
- You shouldn't save money by using cheap material - this is not an option. Fire is a very insidious element, capable of getting out of control even with the slightest inaccuracy.
- The ideal, and practically the only solution would be to use a thick-walled sheet of stainless steel, from which to cut out the necessary parts, and then hermetically connect them.
- Do not rush and wait the required time for the fastening components to harden or dry.
- After completion of work and before first use, carefully check for any unevenness, scratches or chips.
Let's understand the principle of operation
The biofireplace owes its existence to devices invented long ago - an ordinary alcohol burner and an oil lamp. The principle of operation is as follows: an element made of finely porous material - a wick - is immersed in a container with liquid fuel. Fuel, obeying the physical law of capillary rise of liquid, saturates it to the very top and evaporates through the open opening. If these vapors are ignited, we get an even, stable flame, as shown in the photo.
The heart of a biofireplace, made from modern materials, is a round or oblong fuel block. It includes the following basic elements (shown in the diagram below):
- a stainless steel container with a filling neck, equipped with an open opening on top - a burner;
- a damper or lid that blocks air access and is intended for extinguishing a fireplace;
- fireproof ceramic filler with many small pores;
- a side system that prevents fuel from splashing out;
- small portable structures are equipped with protection against ignition when tipping over.