Despite the huge number of modern heating devices, stoves in the house do not lose their position. However, brick buildings of the 21st century differ in many ways from their predecessors - bulky classic Russian stoves with a large stove bench and very limited heat transfer.
One of the most effective solutions is the Russian stove with a stove - more compact and suitable for heating both a country house and a building for permanent residence. We suggest considering the diagrams and arrangements of the model with a slab, which you may need if you decide to start building it yourself.
Problems when building a mini-oven with your own hands
Amateur stove makers, due to inexperience, make mistakes, which then lead to problems. Let's look at the most common cases:
- Laying stoves with deviations from the design. As a result, there is no normal draft in the smoke ducts, and the walls heat up unevenly. The solution to the problem will be to disassemble the stove and lay it according to proven schemes.
- Laying stoves “by eye”, without using a level, frame, plumb lines, or rules. The device warps, the center of gravity shifts, and during operation the device collapses faster.
- Incorrect preparation of the solution. The masonry is cracking and crumbling. A temporary solution to the problem is to purchase a factory-made mixture and seal the cracks with a new solution. If the masonry cracks constantly and deeply, the stove will have to be moved.
- Firebox of a freshly built and wet device. This will lead to cracking of the masonry, which will need to be covered with mortar.
The most common sizes of cast iron slabs
Please note: a high-quality stove plate must be made of high-strength cast iron. This material is characterized by increased resistance to high temperatures and especially fire. It does not crack or swell.
What needs to be done to prevent the cast iron stove from becoming unusable:
You need to pay attention to the quality of installation of the cast iron stove. It must be mounted on liquid cement mortar. During installation, you must use a level to ensure the installation is successful. Otherwise, some areas of the slab will be subject to additional load, which will ultimately lead to damage.
The outermost part of the laid slab must be secured with a special corner, which is made in such a way as to give additional strength to the slab.
When mounting cast iron plates in a brick box, you need to leave a small gap, since the metal expands during heating. If you miss this nuance, the slabs will eventually crack or bend, and the brickwork may also become unusable.
When using for the first time, you do not need to put too much load on the cast iron plates, as cracks may appear from the first heating. Heating should be gradual. It is best to fire the fire using small fuel material, for example, shavings or small chips. This will help prevent it from getting too hot.
It is unacceptable to install a cast iron stove yourself, even taking into account the above recommendations. To install, you will have to turn to professionals who will do the job efficiently. Moreover, the work of masters is not expensive.
Types of furnaces
Based on the principle of operation, there are several types of brick kilns:
Russian – Large and multifunctional. It has an open firebox, which is closed with a damper; the chimney runs along all the walls of the stove. In addition to heating, you can cook any food in a Russian stove.
The disadvantage of the Russian stove is that it needs to be constantly heated, since when cooling, condensation forms in the stove, which remains on the bricks and the bricks crack the next time they are used.
Also, a Russian stove requires constant cleaning of the chimney.
Dutch - a stove with a vertical chimney. It has small dimensions and a fairly low price.
Bell-type - have wide straight channels. The smoke rises and lingers until it cools completely. Then it goes down, heating the walls of the furnace. The advantage of such furnaces is their low cost, simple design, and fast heating.
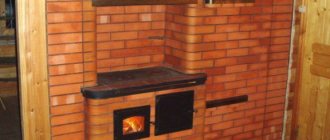
Fireplace stove design
A fireplace stove combines a combustion chamber, covered with glass ceramics, with an oven or hob, often with both together. At the bottom of the stove there is most often an open or closed firewood box, which greatly simplifies the task of storing fuel wood. Burners usually have removable rings in case of cooking over an open fire. The oven of a fireplace stove is usually located at the top - in the firebox area, and in stoves with a hob - next to the combustion chamber.
The firebox of the fireplace slab can be made of cast iron or high-temperature steel, and furred from the inside with chamon bricks or cast iron tiles to improve the performance of the device. The same purpose is served by the “double afterburning” technology, which allows you to lengthen the combustion process by re-igniting unburned wood residues.
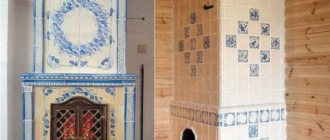
The cladding of a kitchen wood-burning stove can be very different: from expensive majolica to polished steel or artificial/natural stone.
Possible difficulties and problems
When building stove walls, inexperienced craftsmen do not use a frame made of wooden beams and a plumb line, which leads to the walls deviating from the vertical.
If during the construction process a distortion of the walls is discovered, the masonry should be dismantled and repositioned.
After finishing the work and natural drying, the mini-oven begins to be heated with small portions of firewood.
In this case, the stove walls become covered with cracks due to the fact that shrinkage processes are taking place in the heating structure. To eliminate cracks, dilute the solution and cover the seams.
a07ff0f2bc47417ca4e38dc4d992141a.jpe
Improper sealing of the door fasteners can cause the door to move. To avoid skewing the door, do not leave it open until the fasteners are completely sealed into the seams. If displacement is discovered during construction, the rows are dismantled and the fasteners are sealed again.
Operating principle and design of the Swedish oven
The compact dimensions of the stove (1020x885x2030mm) allow it to be placed in a small country house or dacha. But despite its small size, these dimensions of a Swedish stove are enough to effectively heat a room of 30-35 square meters.
Depending on the type and type of Swede, the designs will vary. So, for example, to equip a Swede with a sunbed, it is necessary to equip horizontal channels with a winter/summer mode. Thanks to a special valve, which is installed in a straight vertical channel, it is possible to block the latter.
In winter, such a valve closes, and the heat moves in a large circle, warming up the entire stove along with the sunbed. And in the summer, the damper opens a direct outlet for warm air into a vertical pipe through which the gases escape outside. This makes it possible to use only the hob and oven without heating the room.
Swedish stove
The “Dutch” design was taken as the basis for the Swedish stove. This model was already very popular, but it did not allow for effective heating of the room, and the fuel consumption was too high.
Taking into account the harsh climate of Scandinavia, the developers improved the “Dutch” model and added a hob with an oven. Thus, elements were added not only for cooking, but also for heating water and drying clothes.
Whatever the design of the stove - with a sunbed, with an oven or just a stove - the principle of its operation will be the same: channel, like the “Dutch”.
Swedish: scheme
The metal oven is located on the side of the firebox and is designed to directly transfer heat into the room. But cooking and baking is not the main function of the oven.
After lighting the wood, it warms up in literally 5 minutes. The figure shows why the oven heats up so quickly.
Swedish design
Before going down, combustion products heat the oven in the top and sides. On the other hand, the stove is heated by the firebox. The stove warms up from the firebox, heating the room itself.
The upper part was originally designed for the purpose of drying clothes; it is heated by the stove and the ducts running behind it. The channels, going around the entire oven, go into vertical channels and transfer heat to things that are hung out to dry.
How the Swedish oven works
The design of the Swedish stove is the result of improved engineering. Unlike Russian and Dutch stoves, it has a more complex device with high efficiency. It has significantly greater thermal power and heat transfer.
If we take the same amount of material and fold the “Dutch”, we will get a power of 2500 kcal/hour, while the Swede will produce all 3500 kcal/hour. In this case, it will be enough to lay only 2 portions of firewood per day to keep the house warm.
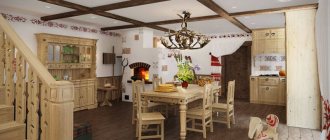
Swedish woman in a modern interior
If in Scandinavia the Swedes were traditionally installed between the kitchen and the bedroom so that on a cold winter night it would warm the room, today in stylish and modern houses you can increasingly find a stone structure that stands between the living room and the kitchen.
At the same time, it performs a double function: it serves for cooking and is the main decorative decoration of the living room. On one side it can be equipped with an oven, and on the other with an open fireplace, decorated with an openwork forged damper.
Swede with fireplace
The high efficiency and efficiency of the stove is due to a complex smoke exhaust system, which allows rational use of the heat generated by burning wood. One of the undeniable advantages of the design is the ability to create winter and summer versions of the stove.
The fact is that each type has its own smoke path. This makes it possible to cook food in summer without heating the room.
Many summer residents are familiar with the situation when, at the beginning of the heating season, when lighting the stove, the room begins to smoke. There is also a separate smoke exhaust system, which allows you to effectively use the stove with different functions in both winter and summer.
Preparation of the solution
To prepare the solution, you need to stock up on a suitable container, as well as a sieve with 3x3 mm cells. To work with the mixture you will need a shovel, a drill mixer and a small board. The solution will include water, sand and clay. The harvested water must be clean, without the smell of mold and with a minimum amount of mineral additives.
If the tap water in your area is contaminated, try to bring it in advance in the right quantity. Its volume depends on the number of bricks that the masonry will contain: for example, for every hundred there are from 15 to 20 liters of liquid. The solution requires fine sand. It is sifted through a sieve to remove pieces of crushed stone and gravel. In addition, you need to purchase high quality clay: the strength of the solution depends on it.
Preparation of the mixture begins by mixing water and clay in such proportions that the mass is not too liquid, but not too thick, homogeneous mass.
After it becomes plastic, add sifted sand in a ratio of 1 liter per bucket of water. You can check the readiness of the solution by lowering a board into it: the thickness of the mixture adhering to it should be at least 2 cm. When the desired result is achieved, stop adding sand.
Overview of cast iron decking
The most popular are Finnish models. But domestic production also produces decent and high-quality goods.
- Pilsa (HTT) Plate 3A. Material: cast iron. Black color. Size: 985 x 650. Diameter of burners: Ø 32, 393 mm. Weight: 51 kg. Price – from 49 thousand rubles.
- 2-burner stove “Russian casting”. Cast iron stove 710x410. Weight: 25.08 kg. Price – from 3000 rub.
- 2-burner stove "R". "Furnace casting Russia". Cast iron stove for oven 700 cm by 400 cm. Weight: 25 kg. Price from 3 thousand rubles.
- Cast iron stove for cauldron H2521 “HALMAT stove casting”. Dimensions: 505×455. Weight: 21 kg. Price from 15,000 rub.
- PLATE 5A SVT 301. Manufacturer: SVT. Dimensions: 460 x 700. Price 0t 17,000 rub.
Buslaevskaya stove: projects
projects of houses with a stove For installation you will need the following materials:
- doors - firebox (0.2x0.25 meters), VK (0.39x0.5 meters), blower (0.14x0.14 meters);
- refractory - 43 pieces;
- solid brick – 382 pieces;
- oven-cabinet 28x33x50 centimeters;
- cast iron stove 0.7x0.4 meters with burners (removable rings of different diameters);
- valves - steam exhaust (12x13 centimeters) and smoke (12x25 centimeters);
- grate - grate 30x20 centimeters;
- corner - three equal-flange blanks 1 meter long and 45x45 millimeters in size;
- steel - piece 0.3x0.28 meters;
- strip - 4 pieces of meter (4 graph paper), 0.25 meters (2 graph paper), 0.35 meters (3 graph paper);
- cast iron plate – 0.4 x 0.25 meters; 40x15 centimeters.
Projects for brick stoves of this type look like this:
- Full row.
- Blower door.
- Window opening for cleaning.
- The bottom of the oven is lined with refractory, three sides are lined with iron.
- Installation of the combustion door, grate, refractory under the firebox, cleaning cover, ash door.
- Installation of DS.
- Laying refractory on the edge around the door.
- Laying according to the scheme.
- The oven is top coated with clay (1 centimeter), the heater is covered, and a stove with burners is attached.
- Installation of smoke circulation with cleaning windows, the stove is not laid. Subsequently, the brick is placed on its edge.
- The cleaning is overlapped, channels are created, and 25-centimeter strips are laid.
- The cleaning is completed and the fastening wire is installed.
- The cap is installed.
- Installation of the VK ceiling, while the hoods remain.
- The stoves are laid out according to the diagram.
- The small stove ends in sheet iron, the masonry is done in the same order as a brick stove.
- The cleaning hole of a large stove is laid out, the edges of the side walls of the channels are cramped.
- Laying protrusions.
- The projections are duplicated and the corner is installed.
- The BP chimney is closed in the same way as row 19.
- A three-row neck is made, the size of the chimney is reduced to a section of 26x13 centimeters for the top valve.
- A chimney is created with grooves on this and subsequent rows.
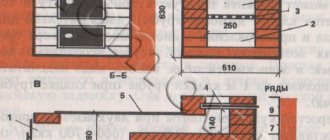
Kitchen stove with oven and hot water box
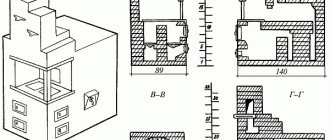
To lay a kitchen stove with an oven and a hot water box measuring 1290x640 mm, the same materials are required as for the previous stove. Additionally, you should purchase a water heating box measuring 510x280x120 mm.
The figure below shows a general view, a horizontal section along A-A and a vertical section along B-B of the slab.
Kitchen stove with oven and hot water box: a - general view; b - cuts. Definitions: 1 - firebox; 2 - cast iron plate; 3 - oven; 4 - water heating box; 5 - smoke valve; 6 - ash chamber; 7 - angle steel trim
A kitchen stove with an oven and a hot water box is placed in the same order as a kitchen stove with an oven. The only difference is that after laying the third row, instead of a brick partition, a water-heating box in a case is installed on the edge between the oven and the vertical channel. The height of the hot water box should correspond to the height of four rows of flat brickwork. The rest of the masonry is completely similar to the masonry of a kitchen stove with an oven.
Where is it more efficient and safe to place a small-sized stove?
In order for the heating stove to efficiently release heat, it is placed in the middle of a one-room dwelling or built into interior partitions. Small heating and cooking stoves are placed in the center of the kitchen or against the wall.
The heating structure will be safe if the ceiling is properly cut. A spark arrestor is placed on the chimney.
The combustion chamber is a source of increased danger. The stove is placed so that coals and sparks do not fall on walls, doorways, or furniture. If necessary, walls are protected with non-combustible materials (flat slate, ceramic tiles).
How can you paint a stove?
It is clear that a newly minted master will not be able to build a beautiful stove the first time due to lack of experience. But this is a fixable matter, because the outside of a brick wall can be covered with paint. Previously, they were plastered and covered with two layers of chalk or lime whitewash, but now there are simpler and more convenient means. In addition, lime is easily transferred to clothing by accidental touch and constantly needs to be renewed.
If we talk about how to paint a brick stove, here are the following options:
- organosilicon heat-resistant enamel of the KO brand, designed for high temperatures;
- silicate or acrylic paints;
- heat-resistant varnish (for example, PF-238) mixed with dye.
In any case, the coating is applied 2 times, the second layer is applied after the first has dried. The tools used are a brush and a roller. It is advisable to pre-treat the surface with a special primer intended specifically for such purposes.
Schemes of small brick stoves
Compact stoves do not take up much space, which is especially important for small spaces. Heaters have a rectangular cross-section at the base
The height of the stoves depends on the height of the building and the chosen model. A brick chimney is often replaced with a factory-made steel pipe.
Heating and cooking mini-oven
In small stoves designed for heating the home and cooking, a niche for the stove is built in.
An oven or water heating container can be built into another niche located above the firebox. Niche space is often used for drying things.
bbf7fb962a830ba83a9417eeb9ffbf86.jpe b906bdd2e27548d30c2db6edec3f39da.jpe
Let's consider a specific diagram of a compact stove with a base size of 0.64 x 0.51 meters (2 x 3.5 bricks) and a height of 2.15 meters (32 layers of masonry).
This heater model is designed to heat small and medium-sized houses with an area of 25 to 40 square meters. Ceramic solid (ordinary) brick is suitable for masonry.
The oven is built in the kitchen (in the middle of the room or against the wall). The furnace of this model contains the following structural elements:
- combustion chamber;
- blower;
- smoke ducts;
- hole for cleaning smoke ducts;
- hole for building a chimney;
- niche with cooking floor;
- niche for installing an oven or hot water tank.
Metal elements for the heater are purchased at a hardware store. The list of factory parts includes:
fire door measuring 20 x 20 cm (solid cast iron or with fireproof glass in a metal frame);
Photo 1. Fire door measuring 30 by 30, made of polished cast iron and fire-resistant glass. It is possible to regulate traction.
- door for the blower (14 x 14 cm);
- 2 doors for cleaning smoke ducts (20 x 14 cm);
- grate (45 x 25 cm);
- cooking floor measuring 20 x 35 cm (with or without hole);
- 2 valves;
- steel corner profile 50 cm long (attached between the firebox sheet and the stove wall);
- pre-furnace metal sheet measuring 50 x 60-70 cm.
The oven and hot water tank are welded from steel sheet. Asbestos cardboard of the same size is placed under the firebox sheet. For furnace work you will need:
- 222 units of solid red brick;
- ready-made masonry mixture for fireplaces and stoves (or a solution of sand and ordinary clay taken locally in a quarry).
Small heating device
Let's consider a specific heater circuit. The base of this model has the shape of a rectangle measuring 0.89 x 0.51 meters (2.5 by 2 bricks). The height of the stove is 2 meters 38 cm.
Compact dimensions allow the heater to be installed in a corner or in the center of the room. If the dacha has a kitchen and a couple of living rooms with a total area of up to 40 square meters, the heater is built into the wall openings (interior partitions).
The main elements of this model:
- firebox;
- blower;
- smoke channels;
- outlet to the chimney.
A door with heat-resistant glass in a metal frame or a solid cast-iron door is built into the firebox portal. The furnace is built on a solid foundation buried in the ground. The foundation is made solid or columnar.
Important! The stove is made of ceramic and fireclay bricks. The firebox is made of fireclay bricks, and the lower and upper parts of the heater are made of ceramic bricks.
The masonry is done using sand-clay and fireclay-clay mortars.
How to choose?
Choosing a cast iron deck for your stove is not difficult. To buy a quality product, the installation of which will not require much effort, it is enough to take into account several nuances.
What are the sizes of cast iron sheets?
Cast iron sheets can be square or rectangular. The most popular are rectangular slabs. The surface dimensions directly depend on the size of the oven.
The standard dimensions of a cast iron stove for a stove are:
- 34 by 41 cm,
- 71 by 41 cm,
- 66 by 41 cm,
- 51 by 34 cm.
For a non-standard stove, you can order the service of manufacturing a cast iron sheet with individual parameters in a specialized store. But it will cost significantly more than standard products.
Number of burners in different models
Typically ovens have two burners. But their number can vary from one to six (it all depends on the surface area). Solid cast iron sheets may have no holes at all. But the cooking time on this type of stove can be long due to the slow heating of the cookware.
Other criteria for choosing a quality product
You should pay attention to the quality and composition of the material from which the stove is made. If you find chips, scratches and other various defects on the surface, then it is better to refuse the purchase. A high-quality product has a smooth surface and its weight is quite large. There are no lightweight cast iron stoves.
It is worth taking the time to study the composition of cast iron. Cast iron, which is used for smelting, is a combination of 2% carbon with iron. But if it contains any components unknown to you, be sure to ask the seller about them. After all, some chemical elements are not environmentally friendly and can harm your health.
Types of stoves
In the past, houses were built “from the stove”, that is, it was installed first, and then the walls and ceilings were erected. Nowadays, it is not necessary to do this, but it is advisable, especially when you plan to position the stove in such a way that it heats several rooms at once.
454581eb825c7405a99754f8687d5b66.jpe 9c05dcdd6e25fb34fe8fcae867d33ffb.jpe
72d6731b9b342a72d16bb6ae4cf3b6f7.jpe e1cf46657f7d139dbcb2f33aebb6bdc3.jpe
The most common types of stoves are Russian, Swedish and Dutch. At the same time, the Russian one must be erected before the construction of the house begins, and besides, it requires a separate foundation. In general, any kiln consisting of 500 bricks or more needs a foundation that is separate from the base of the building. It's easier with Dutch and Swedish ovens. They are compact, can be installed in an already constructed building and do not require an additional foundation.
There is another wood-burning stove - a bell-type stove. Its advantage is its efficiency, reaching 70% compared to 50% for other types of furnaces. The disadvantage of such a stove is its complex design, which makes it almost impossible to assemble it with your own hands. Also, the stove cannot be equipped with a hob - the design is intended exclusively for heating premises.
Main manufacturers of cooking floors
Cast iron slabs are produced by both foreign and domestic companies. Among foreign slabs, the most popular and in demand slabs are brands of Finnish origin - Pisla and HTT .
We can proudly note that domestic manufacturers are not lagging behind and produce products no worse.
Among the range of stove surfaces produced in Russia, NMK, Litkom, and SibStalShar slabs stand out. In addition to the quality characteristics, along with strength and temperature resistance, one can note the aesthetic appearance of the cooking floors. Thanks to the desire to surprise and win over the buyer, manufacturers have done a great job of creating a competitive product of the highest level.
Basic concepts for making your own brick kiln
To lay the furnace, you can contact specialists. But to save money, you can make a brick oven with your own hands. This will not be difficult even for a beginner, as it does not require special knowledge.
First you need to choose the type of stove, then find a masonry diagram. There are many DIY brick oven designs on the Internet for every taste.
After the scheme has been found, it is necessary to make a foundation. It should be slightly larger than the oven itself on each side.
The chimney is also made of brick. After completing the laying of the stove, you can line it with finishing materials to give it a beautiful look.
It is also very important to choose the correct installation location. If the stove has a cooking function, it is better to install it so that the cooking part is in the kitchen and the heating part in the living room.
Conclusion
A cast iron stove stove is an excellent option for cooking and heating the room. A large selection of these products will satisfy even the most fastidious buyer.
Cast iron material is characterized by heat resistance, durability, and ease of use. A high-quality cast iron stove will serve you reliably for several decades.
But its purchase should be made in a specialized store. Experienced consultants will help you choose between a prefabricated or solid slab, and will also select the right size at an affordable price.
Attention must be paid to the quality, absence of defects and weight of the product. You can even install this flooring yourself. To do this, it is worth considering only a few nuances.
When melted and used, cast iron decking will remain in its original condition throughout its entire use. It will become not only a functional item, but also a decoration for your interior.
Russian stove: drawings of brick stoves
Russian brick stoves To lay the stove you will need the following materials:
- solid red brick – 1610 pieces;
- view for a valve measuring 0.3x0.3 meters - 2 pieces;
- dry clay solution in dissolved form;
- samovar 14x14 centimeters - 1 piece;
Heating stoves for a brick house - we do it ourselves. To work, you will need the following tools:
- trowel – for laying and leveling the mortar;
- pick - a multifunctional hammer with a blade located perpendicular to the axis of the handle. At its other end there is a square windshield;
- bubble level for masonry and hydraulic for the first row;
- rule - serves to align the bricks of each row;
- plumb lines - one of them must be permanently attached to the axis of the chimney (floor), and with the help of the second the verticality of the corners is checked;
- brush – needed for grouting joints;
- cord - it is pulled over each row of masonry.
Drawings of brick stoves for any type of home look like this:
- Cooking chamber. For masonry, 3/4 ground corner bricks with locks are used.
- Under. There is a slope from the back, for the purpose of which the space is filled with sand, on which the brick is laid.
- Covering the bottom. The structure is covered with bricks along rods, corners or sheet blanks.
- Vault with a castle. In some cases a central lock is used, in others the last two symmetrical bricks are used.
- Rows to the lower arch. The bricklaying of the stove is carried out in the usual way, then a vault template assembled from chipboard or springs cut from wood are installed on top of it.
- Wells. They are tied rows in which a hole is left leading to the underside.
- Sub-bake. Bricks are laid on a foundation mortar; hollow stones are not allowed.
- VK code. For convenience, the bricks are cut into a wedge-shaped shape.
- Covering the channel above the samovar. It is solid, only solid stones are used.
- The holes above the pole become smaller. The brick is cut in accordance with the drawing.
- Alignment of walls. At the same time, the over-pipe is reduced and the samovar channel is laid.
- Installation of a samovar. The structure is closed with a separate lid.
- Installing a view. To embed the structure, two rows are laid.
- Chimney. The height of the pipe from the bottom to the top must be at least 5 meters. The upper rows form a canopy that prevents precipitation from entering the chimney.
Types of cast iron stove surfaces
Regardless of the configuration, all cast iron surfaces perform heat transfer functions well and are suitable for cooking. The difference between a solid and prefabricated slab is the presence of thermal gaps between the elements, which compensate for the expansion of the metal when heated. You can understand the structure of hob surfaces in more detail by reading about each of them separately.
Prefabricated slabs
The prefabricated cooking deck is a structure made of a cast iron surface and several rings that differ in diameter. They are inserted into each other and assembled into a single plane like a puzzle.
All prefabricated stoves can include from one to several burners, and thanks to the ability to remove and put on rings, you can choose the most suitable burner size for each specific cookware.
This type of flooring is more durable and resistant to temperature changes. Due to the presence of gaps between the rings, the metal can expand during heating without deformation or other damage. To provide extra strength, some slabs are produced with additional stiffening ribs on the inside. A significant advantage of this addition is an increase in the temperature of the hob, and thus an increase in the efficiency of the oven in cooking.
Solid slabs
A solid cooktop comes in the form of a single sheet of metal, usually with
one or two burners with a constant diameter. There are also blind stoves that do not have burners.
This design of the stove plate has virtually no thermal gaps, which makes it not as reliable and practical as the previous model. Due to the lack of free space, deformation of the cast iron may occur during heating.
However, an important advantage of solid slabs is ease of installation and reasonable cost compared to prefabricated ones.
The main nuances when installing a cast iron stove:
- When making a furnace, it will be appropriate to compare the difference in the behavior of different materials under the influence of temperature. Metal and brick have different expansions, and during the heating process the oven may collapse. To prevent this from happening, it is necessary to provide gaps between the cast iron slab and the brick surface of up to 5 mm around the entire perimeter. This way you can significantly increase the service life of the furnace.
- The metal plate on the surface of the furnace is fixed with a liquid clay-asbestos solution. To prepare it, clay is mixed with crushed asbestos and by adding water the solution is brought to the correct consistency (liquid sour cream).
- When installing a cast iron stove, be sure to control the process using a level. The largest burner is always located above the firebox.
- To strengthen the structure of the stove, the top row of brickwork should be fixed with a steel angle around the perimeter.
Laying the furnace in order
During masonry, special attention will have to be paid to the strength and evenness of the surface. So, there should be no excess mortar or voids in the seams, and all channels from the inside should be perfectly smooth
In this case, they bandage it into half a brick.
Swedish stove stove When laying a Swedish stove with your own hands, special attention is paid to the cross-section of the smoke channel. It must remain unchanged throughout the entire laying of the furnace.
Otherwise, even with minimal narrowing, flue gases may escape into the room.
Once the first row is ready, you can install the blower door. Further work will be carried out based on the chosen order. To form the internal space of the main elements of the furnace, including the blower, the bricks used for them are somewhat cramped. Already on the next row the doors can be closed.
50e706ce2b402c827a19ce0e27a05ae1.jpe
Advantages of cast iron
Cast iron provides the product with inertial heat transfer, which means that slow cooling of the surface contributes to uniform heating of the room. Cooking decks are cast from SCh 15-20 cast iron (carbon combined with iron), which is famous for its strength and fire resistance.
Phosphorus, sulfur, silicon and manganese added to the composition enhance the chemical and physical properties. That is why cast iron structures are not subject to temperature changes and remain intact for quite a long time of operation. In addition, any cast iron structures will not be subject to corrosion due to the rusty layer covering them.
Selection of bricks and heating elements
For the construction of passages and heated elements of the furnace, refractory bricks are used. Ordinary brick is used to furnish parts that are not exposed to high temperatures. The dimensions of any type of brick are 250 mm in length, 120 in width and 65 in height. If necessary, brick blocks are broken.
Thus, a distinction is made between a three-quarter brick, the length of which is 3/4 of the whole, and a half-brick - with a length cut in half. Very small pieces of brick, equal to 1/4 of the whole, are called quarter bricks. The cutting of the material is carried out using a sharp steel knife and a squeegee - cutting a metal pipe. To build a furnace, you will also need metal elements, including:
- a door for the firebox, a door for the blower and a door for cleaning passages;
- view valve;
- grate
All listed details must be comparable to the dimensions of the brick blocks. The stove is waterproofed using roofing felt. The length of the sheets of this material depends on the dimensions of the structure. This factor determines the number of bricks. Typically, the amount of building materials needed is indicated in the project documentation or calculated individually. Knowing the number of rows, the size of the brick and the dimensions of the oven, this is done simply.
Important nuances and tips
Experienced stove makers sometimes ignore the dry masonry stage, but for novice craftsmen it is mandatory. This will help you understand the internal structure of the stove, all its channels and cavities, in order to prevent possible errors.
For the firebox, fire-resistant fireclay brick is used, the pipe and the stove mass are made of solid red brick. It is prohibited to use sand-lime brick in the construction of furnaces. Each element must be cleaned of any contamination before laying.
In almost every row, some bricks are adjusted to size. Experienced stove makers advise that when dismantling dry masonry, separately fold the elements of each row. You can also take a marker and put the row number and the number of the element’s place in the masonry on each brick.
Instead of mortar for dry masonry, it is most convenient to use wooden slats of the same thickness. They will also be useful in the future to control the amount of mortar between the bricks.
The work is carried out as follows:
- During “wet” masonry, each row is first laid out dry to once again check the position of all elements.
- On the bottom row, narrow slats that were used previously are placed on the sides.
- A layer of solution approximately 10-12 mm thick is applied on top.
- Lay the brick and hammer it with a rubber hammer until it settles on the mortar to the level of the slats.
- The laying continues in the same way.
- After removing the slats, the resulting cavities are filled with solution.
- The resulting fresh seam must be immediately embroidered to give the masonry an aesthetic appearance.
The slats are removed only when the row is third or fourth from the top. Now they can be reused. To carry out the work you will need about four sets of such slats.
Each row that is laid on the mortar must be checked by level and plumb for its position relative to the horizontal and vertical.
Crushed bricks cannot be used in laying parts of the furnace that are subject to constant temperature loads. In general, it is undesirable to use elements with cracks and chips in the construction of solid wood and chimneys. Crushed bricks may only be used to fill the base for the foundation of the stove.
Old brick obtained from dismantling destroyed structures is suitable for laying a foundation if it is not severely damaged.
The quality of the masonry largely depends on the adhesion strength of the brick and mortar.
To improve this point, experienced professionals recommend:
- Before laying, red brick is soaked for 7-10 minutes. Fireclay only needs to be dipped in water and shake off the drops.
- Place the brick in place in one clear movement, without moving or tapping it.
- Apply only the required amount of mortar to the masonry site. The seams in the solid wood should not be more than 5 mm, in the firebox - no more than 3 mm.
- During the laying process you need to “mop”, i.e. use a stiff brush to rub the inside surface of the smoke ducts and oven chambers to create the smoothest possible surface along the flow path of the flue gases.
If it was not possible to immediately put the brick in place, you should completely clear the mortar from both the element itself and the place where it is installed, and lay the brickwork on a fresh layer of mortar.
When laying pipes, it is allowed to use only red solid bricks, which are well resistant to acid deposits and temperature changes. The smoother the internal surface of the chimney, the better the draft and the less blockages. You can treat the insides of the pipe with liquid glass.
On our website there are articles with a detailed description of the technologies for constructing different types of brick kilns, we recommend that you read:
- DIY mini Russian stove: specifics and procedures for building a compact stove
- Do-it-yourself Russian stoves with a stove bench: construction manuals with diagrams and procedures
Progress of laying rows
The construction of the furnace begins with the installation of guide posts. The formwork is attached to them - a wooden box without a bottom. It is needed to ensure that the masonry is even. The formwork is designed for several rows: when they are completed, it is raised to the top. It is also used to create vaults and arches, although for this purpose semicircular formwork is used, and not in the form of a box. When the masonry is higher than the chest, you will have to work on platforms.
When everything is ready, you need to choose the ordering method for laying heating stoves and construction technology. There are two popular options for installing blocks - splice and spoon. They got their name depending on which part of the brick faces outward. There is another method - bed, when the bricks are installed on a spoon or a poke, but it is unreliable. To avoid problems, it is recommended to monitor the thickness of the seam: it should be at least 5 mm.
Laying stages
Let's take a closer look at the stages of laying a stove in a house using a Swede as an example. The first layer of brick is the most important; it is laid strictly in compliance with the level. Bricks are not placed in the place where the ash pit chamber is located. There will be a blower between the chamber and the front side of the furnace; the blocks behind it are cut at an angle to make it easier to remove the ash. A three-quarter brick is placed in front of the ash pit.
The second and third rows are placed after the ash pan is secured. Otherwise they are similar to the first
It is important that the height of the third row coincides with the height of the blower door. In the fourth row, a door is installed for cleaning the passages with your own hands, and the passages themselves are laid out directly behind it
A row of bricks from above blocks the door of the blower.
With each subsequent row, the opening of the ash pan is narrowed. A grate is installed on the fifth row of bricks. The combustion chamber door is mounted on top of the sixth row above the ash pit. It is necessary that its height coincides with the height of the ninth row.
The first ten rows are made of refractory bricks, the next superstructure is made of ordinary building material. A hob is placed on top of the bricks of the tenth row. In the next rows, the passages for the movement of heated air smoothly transform into a smoke outlet. A more detailed arrangement of the furnace is determined by the configuration and purpose of the structure.
Calculation of basic parameters
Before starting construction work, it is necessary to calculate what power stove is needed for installation in a particular house. Dimensions are determined based on the heat transfer capabilities of the furnace. For well-insulated buildings, the calculation algorithm of I.V. Kuznetsov is suitable. It involves the use of average thermal power, which can be obtained from 1 m2 of oven surface.
For most fireboxes, the typical indicator is 0.5 kW/m2, and for intensive operation during a significant cold snap - 0.76 kW/m2.
When determining the thermal power of a brick kiln, only those surfaces that participate in the heat exchange process are taken into account.
It is not recommended to choose massive rough bars for small rooms. This is due to the fact that they will take too long to warm up, and half of the heat will escape through the chimney. It is recommended to place it at the intersection of living rooms so that they warm up evenly.
Drawings and diagrams of brick kilns
Based on the proposed drawings, you can design and make a brick stove with your own hands.
- Russian stove
- "Swede"
- "Dutch"
- Bath stove
The given diagrams are some of the most popular design solutions. You can construct such rough bricks with your own hands in a private home without outside help.
Firebox
The optimal dimensions of the firebox can be determined based on the maximum volume of the fuel fill. The amount of combustible materials is calculated taking into account the calorific value and their specific gravity. In order for the stove to operate at the required power, the volume of the firebox must be 2-3 times greater than the obtained value.
With the correct volume of the combustion chamber, you can fire the stove at extremely low temperatures outside the window. The size of the combustion chamber must correspond to the parameters of the bricks from which the stove will be built.
The maximum volume of solid fuel should not exceed 2/3 of the furnace.
Ash pan
The height of the ash pan is calculated taking into account the type of fuel that will be used to heat the room.
Low-ash varieties - coal, peat briquette. For this type of fuel, the height of the ash pan should be about 1/3 of the height of the firebox. Solid wood fuel – pallets, firewood. In this case, the height of the ash pan is reduced to 1/5.
Arrangement of an ash pit in the furnace is mandatory. Combustion products will enter this chamber and will not spread over the entire internal surface. Cleaning your oven before the cold season will be easy.
Chimney
The chimney is an essential part of the heating system, since fuel combustion products exit through it. Gas boilers require good draft, so the pipe is installed in a round shape. For a stove operating with solid fuel, a rectangular version will be sufficient.
When calculating the dimensions of the chimney, it is taken into account that the cross-section of the blower should be smaller than the area of the flue. The parameters of standard brick used as the main building material are also taken into account.
It is not recommended to significantly increase the cross-sectional indicators: cold air will penetrate through the wide pipe. This will degrade performance and lead to dangerous situations.
Chimneys that are too narrow can produce a lot of smoke. This leads to carbon monoxide poisoning and the possibility of fire. The problem can be prevented by building up an asbestos cement pipe or laying another row of bricks.
The chimney should not touch the wooden parts of the ceiling. During construction, you need to ensure that the distance from the chimney cut to the nearby ceiling beams is the same. The chimney should be 1.5 m from the roof ridge and rise above it by 0.5 m.
Furnace structure
The Dutch oven is a classic wood-burning channel stove. Its operating principle is based on the circulation of hot air along passages laid in the body of the furnace.
But installing a tank for heating water will not work: this will lead to a decrease in efficiency due to the accumulation of soot in the channels. In addition, even without a tank, the efficiency of the furnace barely reaches 40%.
In turn, the “Swedish” has an efficiency of 60%. It is considered the most advanced heating and cooking oven, where the oven serves as an air chamber. In the chamber part, the combustion gases burn out, and they go into the convector heated to 800°C. The convector itself is narrow, but has a large height, due to which the house is heated evenly.
The Swede can be equipped with a heat exchanger for the hot water supply system. The storage tank is placed on the roof or in a drying niche. As a result, the efficiency does not decrease: there is no feedback energy connection between the oven and convector on the one hand and the combustion part on the other.
f81d8331c0cbcabbffbacb2c82230306.jpe
f33d6b7f2ad72e47625b790336eb38f8.jpe
Tips for choosing building materials
The construction process is not complicated. The Swedish stove is a simple design that requires strict adherence to the drawings and order. You need to mix the solution correctly and have minimal knowledge of how to do it.
Required tools:
- Master OK;
- rubber mallet;
- level;
- rail;
- roulette;
- hydraulics;
- pencil;
- shoulder blade;
- bucket.
When making the solution, take a small metal strainer. It must have a cell for sifting sand and clay. Ordinary clay is not suitable because it is not heat-resistant. For the construction of such a heating device, exclusively fireclay clay is chosen.
The solution must be soaked for several nights in a trough. Continue this process until the lumps disappear and excess water appears on the surface. After draining, the remaining mixture should have a thick texture. This can be checked using a trowel. A small amount of solution is applied to a dry vertical surface. If it does not drain, but hardens, then it can be used.
Advice from experts in choosing clay: the mixture should not have any foreign odor. Any aroma is a sign of organic impurities that will evaporate during combustion. This will lead to a decrease in the strength of the masonry. Choose your clay carefully.
List of materials that will be needed during construction:
- red solid brick;
- fireclay brick;
- fireclay clay;
- door for the combustion chamber and ash chamber;
- grate (ideally cast iron);
- iron angles and sheets;
- asbestos gasket in the form of a cord;
- asbestos sheet.
Must be of high quality, without manufacturing defects. You can weld the doors yourself.
Preliminary steps before assembling the oven
One of the main points in preparation is determining where the stove will be installed. After all, it should heat the entire room evenly. If the device is being built in a finished house, the chimney outlet must be taken into account. During the installation of the pipe, it is important not to damage the rigidity of the frame.
Preparatory work is best done in summer or autumn. It will take at least 30 days to dry the foundation. But experts recommend keeping it for up to six months. Holes in the ceilings are made before laying. The roof is assembled last.
Determining the place where the Swede will be located.
The main function of the device is heating. Therefore, it is optimal to build the stove in the center of the room. The house must have a very good and strong foundation that is firmly established. The structure weighs approximately 3 tons. It is important that the foundation of the house can support its weight. In a residential building, it is usually installed near the interior partitions near the exit door.
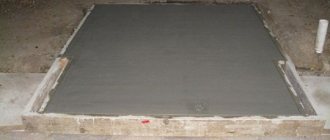
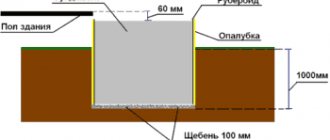
Pouring the foundation: recommendations + video
The lifespan of this device, its performance and heat dissipation depend on the foundation.
The depth is determined taking into account the region and groundwater. It is important to calculate the depth of frost resistance in winter. If the top is installed above this level, horizontal extensions will appear. It is recommended to choose a depth of 0.8-1 m.
Linear values are determined by the dimensions of the furnace. The foundation is poured approximately 15 cm wider from these indicators. These are the main standards in the structure.
In the space between the ground and concrete it is necessary to create a gap from sand. Height - 20 cm. In the future, it will perform the function of separating water that comes from the ground.
After the sand cushion, you can use crushed stone, crumbs of brick or other materials. Craftsmen give preference to natural stone because it is highly durable.
The reinforcement is installed closer to the bottom layer. It is needed to strengthen and evenly distribute temperature effects. The metal mesh is placed horizontally.
The top surface must be flat. Use a wide spatula to help. After drying, apply roofing felt in several layers. It is used for waterproofing.
A hole is made in the floor, which must have the correct design. This is necessary for convenient laying. Then they install the flooring under the body of the structure and make skirting boards.
The advantage of a Swedish stove with a hob and oven is a strong flow of heat. Before masonry is carried out, the thermal insulation material is laid out. There should be several layers of it. A good material is basalt cardboard. It is inexpensive, has sufficient thickness - 5mm. An option is fireclay brick, used to build a furnace. The material is more expensive and has low thermal conductivity. It doesn't warm up the foundation.
Video that will be useful:
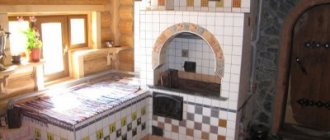
Creating a waterproofing layer
The picture below shows how to apply roofing felt layers. Craftsmen also choose materials for sheathing, for example, sheathing with foil on all sides. Waterproofing is a certain part of the stove design. For waterproofing, use a dense, stable material. An economical option is a substrate. It comes in different thicknesses.