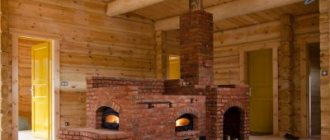
The Podgorodnikov stove is an effective and reliable option for heating a country house. This is an improved model that does not have the disadvantages of the traditional Russian stove
The Podgorodnikov stove is an effective and reliable option for heating a country house. This is an improved model that does not have the disadvantages of the traditional Russian stove.
Podgorodnikov's two-bell furnaces have a convenient design and are easy to operate. They can be heated with either coal or wood, and if the rules and sequence of masonry are followed, they will work with maximum heat transfer.
The best publications in the Econet.ru Telegram channel. Subscribe!
Interior of a village house with a stove
The method of designing the stove structure depends on the chosen design trend. Finishing materials will determine its appearance.
Tile
If you want to create a luxurious atmosphere in a rustic kitchen, the stove can be refined using tiles - special ceramic or clay heat-resistant tiles created specifically for finishing stoves. The unique shape of the tiles makes them easy to install, and the unique pattern will allow you to create a delightful design, unlike others. In the 19th century in Rus', tiled stoves were in fashion among the upper strata of society and were considered an indicator of prosperity and luxury.
Ceramic tiles heat up quickly and retain heat for a long time
A more affordable option for designing a stove structure is to use tiles. It can be of any shape, rectangular, square or imitate various natural fibers.
Tiles will help create a unique stove design
Design of a stove in a private house, decorated with tiles
When choosing tiles, you need to choose fire-resistant samples that can easily withstand high temperatures and have a dense structure. Thanks to these properties, they will last a long time and will not require cosmetic repairs.
Very often, tiling is carried out only in the part where the fire is ignited and maintained.
Stone
Upgrading the surface of a Russian stove with stone allows you to get a unique rustic interior with an antique accent. This option is quite labor-intensive and requires significant financial investments. But by spending time and money, you will get a unique design that will delight more than one generation of your family.
A stone stove will become the main highlight in the house
Plaster
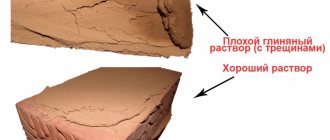
When designing the kitchen of a private house in rustic, Provence, country or Russian styles, plastering with clay mortar is an excellent way to finish the stove. After it hardens, heat-resistant paint is applied to the surface. With its help, the stove can be decorated with an original ornament, ideas for which are suggested in the following photos.
Decorative plaster gives a Russian stove a special charm. It will help you recreate any pattern you like on its surface. The following selection of photos will convince you of this and inspire you to create an extraordinary design.
The rustic style almost never completely went out of style. Even having their own huge dacha, stuffed with ultra-modern equipment and perfect, economical heating devices, people strive to build something on their site in the old style - a small gazebo or sauna. But many, having acquired a country house, want to completely transform it, turning it into something like an old Russian hut with a real stove.
Classic stove and water heating
Standard wood-burning stoves for the home can be combined with a water heating circuit, significantly increasing the performance properties of such buildings.
This option helps to reduce the disadvantages of stove heating, which is possible thanks to the use of modern technologies, and is associated with additional benefits:
- significant increase in useful heating area;
- ensuring uniform heat distribution;
- all elements of the furnace are involved in heating;
- after the combustion process is stopped, the heat is retained.
The design of a water-heated furnace is complemented by a heat exchanger, which ensures heating of the coolant and its effective circulation.
DIY Russian stove
We must pay tribute to the courage of some enterprising people, but making arrangements for the bed and cooking surface with your own hands is quite a bold decision. The fact is that no matter how intelligible the design diagram may look on paper, it is quite difficult to translate it into reality. Still, there are recommendations for determined people.
Tools for work
What tools will you need: a container for mixing the solution; measuring strip to determine the width of the masonry joints; construction level is a must! Without it, it is guaranteed that the structure will have a tilt, and it will be impossible to eliminate it after finishing the masonry; rule (with its help the surface of the foundation is leveled - a one-time operation); a plumb line (also an extremely important device, used to clarify the vertical curvature in any desired place); ordering - a special device for multi-level stove masonry; Master OK; A pick-nose hammer is a hand tool that allows you to chop solid brick into pieces instead of cutting with a grinder.
Materials and equipment elements
When creating a Russian stove with a stove bench and stove, you will need additional elements, thanks to which you will achieve the desired functionality:
- hardened brick (recommended M-200) in the amount of 1850-1900 pcs.;
- fatty pure clay 245-250 kg;
- purified sand 295-310 kg;
The number of bricks, sand and clay are given in quantities calculated for a model 2.3 long, 2.0 m high, 1.6 m wide.
- grate;
- combustion, cleaning and blower doors;
- firebox damper;
- smoke valve;
- hob;
- steel sheet, steel angle, water heating tank - depending on the situation and depending on the project.
The number of doors and grates is determined based on the nuances of the project.
Layer order
In competently compiled working drawings, the Russian arrangement with a stove bench and stove is represented by each level separately. Otherwise, it will be impossible to fold the stove due to the complexity of its internal (not visible from the outside) structure.
- Typical example:
- Row 1. The layer is laid without screed directly on the floor waterproofing. Heated brick is suitable, since there will be no exposure to high temperatures;
- Row 2. Along the edges of the future hearth, bricks are placed on edge, and if non-solid bricks are used, in the next row they must be covered with solid ones;
- row 3. Similar to the previous one. It is also recommended to install a blower door here;
- row 4. Placed in the same way as the 2nd;
In this row, be sure to leave room for a cleaning channel.
- row 5. Channel cleaning continues. Make a base for future arched vaults;
- Row 6. The cleaning channel begins to narrow. The grate is installed;
Grate bars are cast iron or steel grates through which air flows with improved draft. They allow oxygen to pass through and retain the ash residue from burning fuel.
- rows 7th, 8th. A steel sheet is placed here. It is also necessary to secure the wire to secure the fire door. The hearth laying is complete;
- Row 9. Sand bedding is made. Bricks along the entire row of the future hearth are installed on the edge.
- rows 10, 11. Same as the previous one. A hob is installed on top. It is best to lay halved bricks on the edge of the hearth;
- rows 12th, 14th, 16th. Just like the previous ones.
It is recommended to start raising the arch on the 15th row.
- rows 17th, 18th. A knitting metal wire is laid between them. On these rows the vault narrows;
- rows from 19 to 21. Work on the bed is being completed;
- row 22. At this level the rise of the high begins. At this stage, the stove masonry is very complex and responsible;
- rows from 23 to 31. A pipe channel is formed. Blowers and valves are placed in the right places.
To summarize, we note the availability of masonry stoves with a stove bench and a cooking panel. It is possible to carry out your plans with your own hands, although it will require a high concentration of attention, thoroughness and repeated clarifications in the calculations. Be sure to enlist the support of an experienced specialist - if not with practical actions, then at least with useful advice from him.
LiveInternetLiveInternet
Thursday, January 21, 2016 17:35 + to quote book
By design, this is a Russian stove with bottom heating; you can find its description and test results on Stovemaster, in the “Russian stove” section on the branch of the same name “Russian stove with bottom heating.” The point is that the flue gases from the furnace fall down behind the rear wall of the fuel chamber, go below and along the sides of the hearth - into the pipe. I already tried to apply the same scheme in Ukhtypechka, why not - to heat the bottom of the stove without installing a separate firebox? But Ukhtypechka’s test showed that the bottom doesn’t warm up very much... but it doesn’t actually stay cold either. Appearance. Having decided on the structure and functionality, you need to at least have an approximate idea of how what will be built will look from the outside in terms of design. “We would like a diagram, or a drawing, we would start a spin…” There are many options, any one that your abilities and capabilities allow will do. Start of construction. Any oven begins by marking the first row in order to mark the position of the corner bricks, from which the laying begins. Cornice bricks with an internal radius have already been sawn into the first row, the corners have been marked, and according to the ancient tradition, we place a silver coin under the first brick. At first it was planned, as in the prototype, to blow smoke on both sides, then I thought that there was no point in heating the wall behind which was Vyazemsky Street, and the lower left channel was drowned out, leaving a path for smoke only to the right. On the fifth – seventh rows there are brackets, on which the bench will then lie. On the fifth row we arrange a tuck into the ascending channel, and on the eighth row we block the lower smoke channel, which is more like a cap in height. Sub-bake. Some, and even many, call the oven a woodcutter or woodshed, and there are even those who mistake it for a lower fireplace insert and wonder why there is no way out for smoke. No, this is a Russian stove, and the oven plays the role of the oven, that is, the place where the stove utensils were kept, and according to legend, the brownie, the same Kuzma, lived. It also happened in villages during cold winters that young birds or small cattle lived there and were freezing in the barn. But that was a long time ago and in rural areas, we are civilized people, we won’t store anything there except grab handles with stalks. Well, maybe some other stash, the baking is long... But nothing else! Masonry. The most attentive may have already noticed that the masonry is not being done in an orderly manner. If the stove is in a corner, as it is here, it is impossible to approach it from all sides. Therefore, first the far, hard-to-reach corner is raised, so as not to have to make your way to it later through the arch, then the arch and the adjacent to it are laid out. Therefore, a corner brick laid on a bed of mortar (here a clay mixture) is fired with a level first of all at the bricks of the same row laid out earlier, and then its horizontality, verticality on both sides of the corner and the plane of the side wall are checked. Next, the adjacent bricks are laid. Along the eighth row. The ninth ones have already begun to block the baking area in the corners. Hearth height. The tenth row is the first cornice with an internal radius, in other words, convex, in contrast to the convex cornice brick, that is, with an external radius. And this is exactly what the next, eleventh row will be like, which will be our hearth row. That is, the height of the cooking chamber, or crucible, here was 11 rows, taking into account that the first row is on edge, this turns out to be approximately 820 mm minus the floor covering (here the floor is still rough, I dare say). The determination of a convenient hearth height is carried out with the help of the housewife, who will use this stove. We put it near the stove, bend it... or her... however, this is a separate topic! Under. We lay out the first row of the vault to mark the boundaries of the hearth, and let’s slow down with the masonry for now. We pick up a grinder with some kind of grinding wheel or cutter and grind it under. So that it is as even as possible, without ledges. For what? Well, of course! This is the future hob; hearth bread will lie on it and pots will stand. Imagine that you are lifting a pot full of porridge or borscht with a grip, and it clings to the corner of a brick sticking out from the bottom and turns over... Creepy! Therefore, we grind, grind, without fear of dust! Previously, they used a piece of brick for this purpose, but we are already civilized people! We have a tool. After the grinding wheel, polish it with a flap wheel, or just sandpaper, so that it looks like a mirror! Now that the floor is completely ready, we cover it with film so that later there is less cleaning from the fallen solution. And we lay out the back wall through which the smoke will fall down into the lower hood. That’s what it’s called – the pass. It will also support the rear part of the arch on its sides, like permanent formwork. Formwork. Next, we proceed to the manufacture of formwork - circles. Circles can be different, both in structure, design, and in complexity, just like the arches themselves. We will not consider all the varieties now, because the video is about a specific stove, and for this specific stove we are making this specific circle. Our formwork will be without flooring, the bricks of the vault will rest only on individual circles, and in order for these bricks to stand confidently, the distance between the circles should not exceed half a brick. Therefore, the circle will require 9 pieces. To install the circle, we will assemble the following structure. I see, right? Then let's go cut. The dimensions of the circle will be 800 mm wide, 400 mm high, respectively, this is the diameter and radius, the arch will be circular. (this is when the width of the opening is equal to the diameter of the arc). First, we cut out a semicircle from a sheet of chipboard (it is better to use thick plywood for these purposes, but I usually use improvised materials) using a jigsaw. Then, for those with crooked hands like me, you will need to smooth the edge with a grinder. Here it has a diamond segment cup on it. The slope of the arch. We install the circles in place, and the formwork is ready. The back should be higher, both on the floor and on the arch. Who can tell me why? Who says that for better traction. Why is traction better if the rear arch is raised? Others say, “It’s just necessary.” But I suspect that this is done so that the vault is heated along its entire length. The smoke will first wash the upper part, then go down to the mouth, and the draft has nothing to do with it, the draft is created by the smoke collector and the pipe. Arch. Well, with God's help we started the vault. It is advisable to lay out the vault from wedge brick; if there is no ready-made one, you need to carve it from straight brick. It's simple. And the masonry is simple, with the same chain ligation, only brick on edge. I take the circle out right away, and you can immediately clean it and wash it. And leave to dry. To make it faster, you can install a warm fan. Vault cover. Cover the top of the finished vault with fiberglass so that it sticks, and moisten it with liquid clay. The fabric is needed so that the backfill sand does not get into the cracks when the arch expands when heated, as if taking a deep breath. Otherwise, the sand will so tear apart the vault, and the vault, in turn, the stove and the bed, that mother will not worry. The vault is insulated from the stoves with cardboard basalt for the same purposes. To have room to expand. Although it will still crack a little, but still! The walls behind the stove are covered with foil basalt, so as not to transfer heat from the stoves to the walls, which are external, that is, behind them is the street. A so-called convection chamber has been formed between the walls and the stove, warm air from which will be directed into the room through special openings. Pechurki. An interesting word - stove, until I was a stove maker, I would have thought that it was a small stove. But no, this is a niche in the stove for quick heat release. And to dry socks. And all sorts of mittens. Backfilling of the vault. We prepare the backfill from sand with broken bricks, or with scraps of brick that can be broken into small pieces. They also added broken glass, preferably bottled glass, which supposedly accumulates heat better, but now is the time for plastic, we don’t consume much glass, and collecting it from trash heaps is a no-brainer! Reroof. We lay out the first row of the bed, and there will be two of them, in the corners, without resting on the backfill. If I were smarter, I would put some kind of basalt under it, because, as Ukhtypechka’s test showed, the chamotte of the stove can reach more than 100 degrees Celsius. You can cook! But you can put thermal insulation on top; no one will sleep on bare brick anyway. The first row of the roof is cornice, with an internal radius. We started laying it from the back wall forward. But there is not even a mouth ahead yet to finish laying the side walls and the bed. Therefore, we urgently need to lay out the forehead, the arch of the mouth, then design the pole with another arch... The mouth. The mouth is the combustion window, the entrance to the cooking chamber is the crucible. It will be arched, circular, about half a meter wide and 35 centimeters high. The height of the opening is determined depending on the height of the arch. If the arch at the withers is 48 cm, we subtract the height of the gas threshold by half a brick, that’s basically all. We get 36 cm. Gas threshold. I would like to dwell on the gas threshold in more detail. What it is is already clear, namely the distance from the top point of the vault to the top of the combustion window, which we call the mouth. I’ll explain why it’s needed now. If it were not there, the flue gases would fly into the chimney without stopping. And taking with it the heat that would be so useful for heating the vault. To retain this heat, they make this threshold in the path of the smoke. From physics course we know that warm gases rise up and cold gases fall down. That is, in order to descend, the gas needs to cool a little, in other words, give up heat, which in our case goes to the arch. And if the bottom of the threshold is bent inward, making it like a threshold on a threshold, then an additional obstacle is formed in the path of the smoke, forcing it to leave even more heat. Squeezing. Before we start building the outer arch, I’ll tell you about one more feature. This is a squeeze. One of the meanings of this word is the hearth itself, that is, the platform in front of the mouth of the furnace. But a hearth is a hearth, not a hearth, and a hearth is part of the hearth, a place where hot coals from the furnace are raked if they are no longer needed there, but may be useful later. This place should be fenced on three sides, and the smoke from there can go into the hailo along with the smoke from the furnace. But if the entrance to this nook is blocked and a separate chimney is built for it, then you get a small additional firebox, which we’ll call a firebox. Next we build the arch of the pole window, there is no point in dwelling on it in detail, and we move on. Smoke tooth. Having leveled the front part of the stove along the stoves, we complete the backfill, compacting it (but not wetting it!) and leveling it with the rule, we cover it completely with the first row of the ceiling in the corners. We release a smoke tooth in several rows above the mouth. Please do not confuse it with the gas threshold. The smoke tooth here will play the same role as the smoke tooth in the fireplace. You don’t have to do it, the stove will work great, but there have been cases before when, when the wind or atmospheric pressure outside changed, the draft overturned and the smoke splashed inside the room. You can combat this with the height of the pipe, but extra protection won't hurt. If it works in a fireplace, why shouldn’t it also work in a Russian stove? Kuzya. We begin to lay out the pediment above the outer arch. This pediment has nothing to do with the design of the Russian stove; you will not see it on classical diagrams; here it performs purely decorative functions. Along the third row we pass a cornice with an internal radius, it will serve as a bench for Kuzya, and we place Kuzya himself on it. There is a separate video on how Kuzya was made. Samovarnik. Next in line is the samovar. To connect a samovar, or rather a pipe from it to the stove, you need a special hole called a samovar, or sometimes a choke, which will be closed with a decorative plug. Through the samovar we get into the furnace's hailo, and through it into the pipe. But it is better to arrange a separate chimney for the samovar, which will go into a common pipe above the valve of the Russian stove. We complete the pediment with a convex cornice. Above Kuzka’s head there is just enough space left for the ZV-6 valve. The pipe from the samovar is slightly interfered with by the cornice; then you will have to lengthen it so that it stands level. Valves. On the row below the stove valve we install the shutter valves, also known as the samovar, and the lower hood. If the latter is closed, the bottom of the oven will not warm up, because in the summer there is no need for this. Chimney. Next, we collect all the channels into a pile, that is, into one pipe with a “six-shaped” cross-section, which will stand on the right front corner of the stove. Why on the right? In this case, it will be closer to the ridge of the roof, and most of it will remain in the attic, in relative warmth. And we lay out the pipe itself, not forgetting about the fireproof fluff when passing through the ceiling, since ours is wooden. Fluff. We probably need to retreat here again. The fact is that, according to all the rules, the distance from the smoke to the combustible materials of the ceiling should be at least 380 mm, that is, the thickness of the walls of the fluff should be one and a half bricks, but for me, as you may have noticed, it is only a brick. Are we violating? But... Spit at me, throw stones at me, but I don’t see the point in such a pile-up. What can cause a ceiling to catch fire? Firstly, from a spark in the event of ignition of soot accumulated on the walls. But if the vertical seams are blocked, even if cracks appear in them, which is difficult to imagine, and even if soot accumulates in the amount necessary for ignition, the spark simply will not reach the tree. It will go out. Secondly, self-ignition from high temperature. As a rule, the self-ignition temperature of wood is about 200ºС, but it is generally accepted that 100ºС is the maximum temperature to which wood can be exposed for a long time without the threat of fire. Please note that this is not the temperature of the surrounding air, but the temperature of the wood itself. The ignition temperature depends on the condition of the wood, humidity and degree of grinding. Our wood is dried, but usually impregnated with fire and bioprotection. The temperature of the flue gases in the pipe, in the area of the attic (or interfloor, if the house has more than one floor) ceiling, given that we tried our best to keep the heat in the furnace, is 120-140ºС, it cannot be lower - the draft will worsen and there will be a threat of condensation formation. It would be necessary to carry out practical measurements, but it seems to me that the outer side of a brick wall, as thick as a brick, is unlikely to heat up more than 100º C during the heating of the furnace. If a stove bench is made of fireclay brick, which, as is known, warms up faster than red brick, with a packed (heated and closed damper and valve) oven, it warms up to this temperature overnight. Drying the oven. When the pipe is ready, you can heat the stove a little to check the draft and dry the walls. Unless, of course, you built quickly enough so that the stove did not have time to dry out on its own. In my case, when the pipe is ready, the bottom usually dries on its own. Plastering. Let's start plastering. To begin with, we will glue metal corners to the corners of the stove under plaster or putty. They will make the corners even and will serve as beacons for the plaster. By the way, we will be plastering with a ready-made plaster mixture intended for plastering stoves and fireplaces, so I will not dwell on the composition of the plaster mixture. You just need to pay attention to the fraction of the filler; it should correspond to the layer of plaster, which will be no more than 10 mm. The finished plaster mixture should be liquid enough so as not to dehydrate immediately upon contact with the brick wall, which, let me remind you, has already been dried. That is, it is the consistency of city sour cream. We plaster in two layers. We apply the first one either with a wide spatula, or directly by hand, if you are not a white-handed person. We glue the plaster mesh onto the first layer, smoothing it again with your hand or a spatula. And with the second layer we level the surface. We can stop here. The surface will be rough, but quite in a rustic style. Then it will only need to be whitened or painted with water-based paint. But to achieve a smoother surface, the stove will also need to be puttied, and the putty sanded with sandpaper. This is done after the plaster has dried. Then you can start painting and other decorations of the stove. Damper. All! The stove is ready. We will equip it with the necessary accessories, the most necessary of which is the stove damper. It closes the mouth of the stove when the stove is heated and pots of cooking food or other dishes are placed in it. Or even if the furnace is empty, it is closed so that the heat does not erode, but continues to be absorbed by the brick of the vault. Kindling. We have our first kindling. The firewood is stacked in a cage or well. From below there are very small ones, a splinter, from above there are larger ones, inside the well - paper or better birch bark, which we set on fire. Gradually the entire stack of firewood flares up. Then we add very large logs on top, and you can use a mop to push the well deep into the oven. But we have an entrance to the lower hood at the back, flames and smoke are drawn in there anyway, so we won’t push burning wood into the depths. And we will admire the flames near the very mouth. When the stove is heated, you can cook something in it. But that's a completely different story. In the meantime, I say goodbye to you. See you again! Victor Sychkov
Series of messages “Construction of the Russian Stove”:
Part 1 - A short course on the construction of the Russian Stove
Tags:
Russian Stove
Cited 1 time
Like share
0
Like
- I liked the post
- Quoted
- 0
Saved
- Add to quote book
- 0
Save to links
Liked
0
What materials will be needed for construction?
- red brick – 750 pcs.;
- fireclay clay;
- sand;
- felt or asbestos fiber for insulation;
- roofing felt on the bottom layer also for heat and waterproofing;
- fasteners;
- metal corner, sheet and steel wire;
- grate – 2 pcs.;
- doors for the combustion chamber and ash pan – 2 pcs.;
- damper – 1 pc.;
- valve – 1 pc.
... and tools:
- building level;
- spatulas;
- Master OK;
- drill with a mixer attachment for mixing the solution;
- buckets;
- sieve for sifting clay and sand.
Don’t forget about the tools: spatula, trowel, drill with mixer. Additionally, have buckets or tanks and a sieve on hand. To ensure the oven is level, use a level.
Masonry of a Russian stove
Before work, it is important to study the designs of Russian stoves. There are different options, so the masonry scheme may differ
The drawings cannot be changed - the specified order must be strictly followed.
Complete tightness is important for the safety of the structure. This is ensured by the following points:
- Use quality stone. There shouldn't be any cracks.
- The seams between the rows are 0.5-0.8 cm thick.
- Do not coat the inner walls with clay - soot will be deposited on them, and therefore thermal conductivity will decrease.
- Different departments differ in the thickness of the masonry from ¼ of the thickness of the brick to its full length.
- If the brick is ceramic, then it needs to be soaked to prevent moisture from being absorbed from the mortar.
Foundation
Taking into account the fact that the structure being erected has a large mass, when constructing the foundation with your own hands, it is deepened by at least 80 cm. However, when carrying out foundation work, the climatic features of the area of residence, as well as the depth of freezing, should be taken into account.
You can find out about this from local builders. Taking into account all these points, a stove built with your own hands according to the chosen scheme will last a long time. The pit for the foundation being constructed must have a square shape. As for its dimensions, they should be 1.2 × 1.2 m. You can easily dig it with your own hands, using a hand tool - a shovel.
After completion of the excavation work, the bottom of the pit is compacted. a sand cushion is placed at its bottom , for which it is important to maintain an optimal layer thickness of 10-15 cm. Next, crushed stone is poured in a layer of 15 cm, which, after laying it, must be compacted, and then the formwork must be installed. This must be done with the expectation that it will pass through the entire thickness of the foundation.
Pouring the foundation for the future furnace is carried out in several stages. The first layers may consist of mortar, which is made from cement and pebbles. The top layer must be filled with concrete made from sand and cement. Taking into account the weight of the structure, hardening of the foundation should take a long time, at least three weeks. This is important, because otherwise a stove built with your own hands, even in accordance with the chosen scheme , will not last long. A crack in the foundation will require repairs.
When the base of the stove and stove has gained sufficient strength, the formwork is removed, and the upper part of the foundation is covered with waterproofing material - three layers of roofing felt. The first brick laying with your own hands will be done further on it.
Smoke circulation - advantages and disadvantages of different systems
The smoke circulation system increases efficiency - gases, when moving from the firebox through channels and chambers, give off heat to the walls
It is important to maintain the ratio between the volume of the firebox and the internal surface of the smoke circulation. If there is an excess area of gas channels, the temperature drops so much that condensation appears
A small internal area reduces efficiency - hot gases fly into the pipe.
The cross-section, number and location of smoke circulations determine their internal area. It is better to fold the channels in multiples of the size of the brick; they should ensure the free passage of gases. The cross-section must correspond to the thermal performance of the furnace: it smokes when the cross-section is insufficient and does not heat up well when it is excessive. A cross section of 170–250 cm2 is used when the heat transfer of furnaces is 3 thousand kcal or less, from 3 to 5 thousand kcal – up to 300 cm2.
Smoke circulation systems can have channels (one or more) or be channelless.
Various types of smoke circulation: a – multi-turn vertical; b – multi-turn horizontal; c – single-turn vertical; d – multi-channel single-turn; d – channelless.
As part of a single-turn system, there is one lift channel and the same or several parallel down channels. Parallel channels have low resistance to gases, the furnace array heats up more evenly. The single-turn system has a disadvantage, which manifests itself in significantly greater heating of the upper part than the lower one. In small stoves it is compensated by significant heating of the firebox walls. For large furnaces, a scheme is used in which hot gases flow through channels from below, thus ensuring normal heating of the room.
A multi-turn system consists of vertical or horizontal channels arranged in series. The first drawback of such a system is that the gases have to experience considerable resistance in numerous turns. The second drawback is the strikingly unequal heating of the walls of the first and last channel, which often causes cracking of the masonry. Vertical channels provide good heat transfer, horizontal channels provide draft, which helps with pipes of insufficient height.
Fire safety requires that the top of the furnace floor be 40 cm from the ceiling of combustible materials. The section of the chimney from the furnace to the cutting in the ceiling is called a neck; its smallest height is three rows of bricks. The neck is a place for installing valves or views, which are closed at the end of combustion. If such devices are installed lower, a lot of heat is lost. Gases are released outside through a chimney, the design of which will be discussed below.
obustroen.ru
Why are Russian stoves so popular?
The incredible “survivability” of the Russian stove lies in its functionality - it is used both as a cooking unit and as a heating unit, and the latter, contrary to popular belief, is by no means a primary function. In its simplest form, the design is a very deep fireplace, essentially a large firebox with a chimney.
Russian stove of traditional design
Thanks to the thick walls and massive roof, the heat-storing ability of the Russian stove can be the envy of any other solid fuel unit. The same factor also plays into the benefits of efficiency. The structure can remain warm throughout the day, so it does not require a lot of firewood to maintain the temperature within a comfortable range. Here it is impossible not to mention the extremely convenient design with a bed or bed.
The design of the Russian stove is also unique in terms of creating culinary masterpieces. The wide temperature gradient of the firebox is very convenient to use during cooking. If it is necessary to obtain rapid heating, the cast iron with its contents is moved closer to the hearth. If it is necessary to reduce the intensity of boiling, then it is moved to the periphery, closer to the sides. By the way, the Russian stove has a unique ability that no other heating and cooking unit has. The walls and roof of the furnace, heated to a high temperature, are able to maintain a very high temperature even after the fuel has completely burned out. The infrared rays emitted by the surface allow you to bake or simmer foods for a long time, obtaining an incomparable taste and a golden, appetizing crust. The advantage of this method of cooking also lies in the fact that it does not come into contact with either fire or a gaseous environment, so there can be no talk of any carcinogens.
Today, the Russian stove is an extremely functional heating device with a hob, water heater and a place to relax
Modern heating devices can be classified according to the presence of one of the following characteristics:
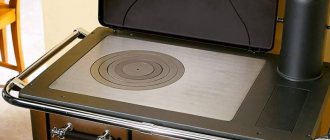
- The presence of a slab and a flood. The hob is built directly into the body of the stove, creating a so-called hearth, which was made blind in the canonical model.
- Placement of a fireplace on the back side of the stove, which opens into the adjacent room. The practicality of this method is extremely high, since with two heating devices there is no need to construct separate chimneys and foundation slabs.
- Attached to the stove is a coarse or trestle bed. They still, as before, increase the comfort and convenience of the heating device, although the dimensions of modern stove beds cannot be compared with the dimensions of traditional stoves, which were designed for 3-4 people.
The integration of the stove into the array of the Russian stove not only expanded its cooking capabilities, but also made it possible to heat the side heating shield and the lower part of the structure. Based on this factor, units with side heating are distinguished, which are used to heat the next room, as well as heat generators with bottom heating. The presence of a flood in the latter makes it possible to warm up the walls that are below the level of the hearth. Due to increased heat transfer, it becomes possible to heat a room of increased area without the need to expand the dimensions of the device.
Bottom heating significantly increases thermal performance
Advantages and disadvantages (table)
| pros | Minuses |
| High efficiency - from 50 to 70%. | The ability to operate only on fuels that do not require increased air flow. It will not be possible to convert it to gas or fuel oil. |
| Safe design. | Cumbersome design. Additional load on the floor - it can only be installed on the first floor. |
| Undemanding to materials - when building a furnace, you can only get by with brick, sand and clay. | After cooling, the unit requires a long warm-up. |
| Uniform heat transfer. | Ineffective smoke circulation - due to miscalculations in construction, the heating device may smoke. |
| Durability. | Inconvenience when cleaning the firebox from ash. |
| Possibility of heating the adjacent room. | |
| Convenience and comfort of a bed. | |
| The surface of the bed can emit infrared energy for a long time, which has an excellent therapeutic effect. |
In addition, a Russian stove will require the owner to be able to handle a grip, a frying pan, pots and cast iron, and not every modern woman will like this. If you are ready to put up with minor inconveniences, then this literally fabulous unit will be able to thank the owner not only with warmth and delicious food, but also with healthy sleep, as well as wonderful healing procedures.
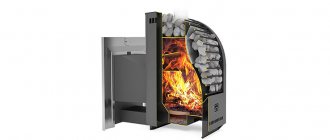
Podgorodnikov two-bell furnaces: Design features
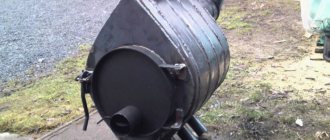
This device, also known as the Russian teplushka stove, has advantages over other heating devices. The main idea of its author was to make the cold lower chamber part of the chimney. Smoke enters it through holes located in the hearth.
This design is more compact than a traditional Russian stove. Thanks to its technical features, it is able to heat the entire room evenly, while the air in the lower part of the room with a conventional stove remains cold.
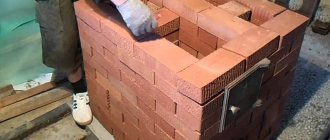
Laying 1-4 rows of Russian stove order
Laying should begin from the left front corner. First, place a 3/4 brick with the butt facing out. 12 full-size bricks with a seam of approximately 13 millimeters are added to it. In order to create a wall ledge in the fourth row, the widened seam must be maintained in the previous three. The left side of the stove is completed by laying two quadruple bricks, thus creating a second corner. The back side of the structure is laid out in two rows with brick spoons. The third corner is laid, as in the previous case, from two quadruple bricks. The right side is laid in the same way as the left.
On the second row, spoons cover the pokes on the left and right sides of the first row. On the back side there remains a row of stitches. In each corner there are two not full-size bricks laid out in spoons. On full-length products of the front part of the initial row, three-quadruple stitches are laid, bandaging the seams. After this, the masonry is checked using the rule. The third row is laid out similarly to the first.
To obtain the fourth row, the brace is pulled along the edge. The masonry is laid along it, starting from the first corner, while the position of the bricks is similar to the second row. To check horizontality, use a level.
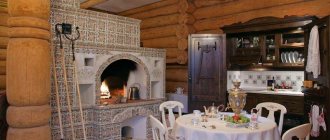
Stove with a stove bench - Russian classic
Today, large and comfortable structures on which you can “warm your bones” are varied in both shape and design. Here are a few samples that you can make yourself if you wish:
This variety of design is dictated by the desire of the owners to decorate the interior and make it unique.
Brief description of the design
Many people do not know how to properly build a Russian stove with a stove bench, because they do not know either the basic elements or the details of the masonry.
The main elements that must be present in every design. In different regions, the names of parts may differ (for example, podpechka - podpechek)
The furnace is the main, large chamber, which serves both for stacking firewood and for baking pies. The upper part of the furnace - the arch - heats up and transfers heat to the stove bench.
In front of the furnace there is a hearth - a small compartment where it is convenient to place baking sheets and pots. Here they also carry out manipulations to place firewood on the blade. Sometimes a small niche is placed under the pole - a sub-pole.
The mouth is a hole leading into the furnace.
The under is an important part of the furnace, its lower plane, slightly inclined towards the mouth. The smoothest polished oven surface.
The oven is a niche under the stove, which is used for drying logs, storing large utensils, grips, shovels, and brooms.
Overpipe - a chamber between the furnace and the pipe, located above the hearth.
View - a damper that blocks the chimney after the wood burns out.
A bed is a large horizontal surface for resting or drying.
A samovar is a hole into which the samovar pipe was previously inserted.
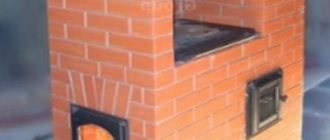
Often a smaller structure with a cast iron hob is attached to a large stove. It can be heated in the summer to cook dinner
If additional heating of the house or outbuildings (veranda) is required, a hot water boiler is built into the furnace body and the wiring is made to the required rooms.
Pros and cons of the structure
The Russian stove has many advantages over modern heating devices, which is why it is still popular, especially in country houses and dachas.
Advantages of the structure:
- efficiency - if you build a complex furnace, the efficiency reaches 70-80%;
- low cost of materials and work of stove makers;
- some models are heated not only with wood, but also with other types of solid fuel;
- multifunctionality - heating, cooking, relaxation included;
- requires attention once a day;
- Dry heat from bricks has a beneficial effect on health.
If construction rules are followed, safety is guaranteed.
A brick structure usually lasts at least 30 years. Structures built by craftsmen live much longer - 100 years or more without major repairs
But there are also disadvantages due to which building owners refuse to install a stove. Fuel must be prepared in advance, dried and selected. Modern electric and solid fuel boilers operate more efficiently, take up less space and do not require constant attention.
A Russian stove can only be installed in a separate private house; it is not suitable for heating apartment buildings, much less multi-storey buildings.
Before you calculate and assemble a Russian stove with a stove bench, you must determine its dimensions and installation location. Be prepared for the design to take up a lot of space.
Disadvantages include regular cleaning of the stove from ash and soot.
The design of Podgorodnikov's heated vehicle
This design consists of two tiers. The lower one provides 80% of the heat, the upper one absorbs about twenty. The combustion of an improved Russian stove is possible in one of two ways:
- The first, traditional option, consists of lighting a fire in a crucible, that is, a large firebox. Furnaces have been heated this way for many centuries. Before cooking, you need to heat the stove, collect the coals, and then place it on the dish with food.
- The second method can be implemented in closed fireboxes with a grate. A hob is placed on top of the firebox. This model differs in that the stove acts as a shelf located in front of the furnace.
Scheme of gas movement in the Teplushka furnace
a: Stove firebox. b: Hailo from the firebox to the crucible (cooking chamber). c: Channels from the cooking chamber to the heating chamber. d: Columns supporting the stoves. e: Under the stove. f: Furnace mouth. g: Smoke trap valve. h: Gas path valve from the lower chamber. i: Blower door and ash pan. J: Furnace pipe. Red arrows - gas flow during combustion through the firebox. Orange arrows - gas flow during Russian combustion. Blue arrow – incoming air.
The gas outlet of the device is designed in such a way that warm air always enters the lower part of the furnace, heating its body. If the structure is heated from a large firebox, the stove will also heat up. This model allows you to increase heat transfer and save fuel. The view after the fire should not be closed very tightly - it is necessary to leave a draft so that cooled gases do not begin to flow into the room.
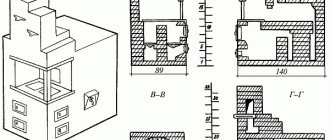
Design and diagram of a classic Russian stove
If you look at the drawing of a Russian stove, you can see that it has the following main elements:
- oven - in this place firewood is stored and dried;
- cooking chamber - it is used for preparing food;
- hearth - has the shape of a niche where you can put hot pans and pots that have been removed from the oven;
- cold stove - a place to store dishes;
- choke - a hole leading into the chimney;
- view - is a door that completely covers the chimney;
- a bed - its size allows household members to rest, sleep, and warm up on it (for more details: “Bake a bed with your own hands - how to do it right”).
On average, the size of a Russian stove is as follows:
- width – 142 centimeters;
- height – 213 centimeters;
- the distance between the floor covering and the bed is about 180 centimeters.
Building a stove with your own hands, taking into account all the nuances
Combination of functions
When solving such a not very complicated task of thermal processing of products, a significant amount of heat remains unused and simply escapes in the form of smoke into the atmosphere. This leads to irrational use of fuel. To increase the efficiency, the masonry of heating and cooking furnaces , which allows the use of furnace gases removed from the combustion zone to heat the room.
This combination of cooking and heating tasks allows for more efficient use of space. One oven takes up significantly less space than two. Caring for and maintaining one stove is much easier than taking care of two fire sources.
All the features of a simple hob are also available in this type of oven. As for the heating part, different smoke exhaust systems are used here or mixed ones are used. There are many options for using these two functions together, but ultimately the choice is up to the customer. Placement possibilities, as well as specific wishes, determine the arrangement of the heating and cooking furnace .
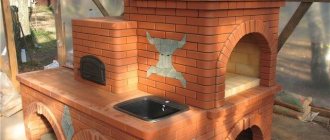
How to decorate a Russian stove in the house
To ensure that the Russian stove not only serves as a functional element, but also decorates the interior, a caring owner will pay attention to its appearance
Methods for whitewashing a stove
Whitewashing is the easiest and cheapest way to maintain a stove. In peasant houses, the hearth was usually whitened annually. Now, in addition to recipes inherited from ancestors based on chalk or slaked lime, many specialized compositions of a new generation are available. To prevent the chalk coating from staining your hands and clothes, the solution is made with skim milk containing casein. You can add ready-made wood glue or liquid glass.
Plastering and painting
The stove is plastered with a solution based on fireclay clay, which is not afraid of heating. Now special dry mixtures with a pre-selected composition are available for sale. After the finished layer has naturally dried for 3-5 days, the oven is lit and the coating is checked for defects.
First, the plaster is completely painted white. Then, using colored tints, designs are applied, the choice of which is limited only by the taste of the master. If you don’t have the ability to draw, printed stencils or a template printed on a printer will help.
Decorating the stove with tiles
Tiles are ceramic parts specially designed for decorating the surface of stoves. The tiles have a special box-shaped projection (rumpa) on the inside. An artistic layer of heat-resistant glaze is applied on the outside. Their installation must be provided for at the masonry stage in order to mount them to each other and to the surface.
Decorating the stove with tiles
Finishing with such elements belongs to the realm of art rather than construction.
Finishing a Russian stove with tiles
Ceramic tiles are quite suitable for external cladding of oven walls, because they are resistant to heat. To lay tiles on a vertical plane of the wall, nails are inserted into the masonry joints, each part is glued onto the mortar separately, leaving a wide joint to compensate for thermal expansion. The seams are rubbed with elastic mastic.
How does a heating stove work on two floors?
To fully understand how a stove works in a two-story house, you can pay attention to the photo. If the house is made of brickwork, then the stove can be installed on steel beams, which were initially built into the walls of the building. When installing beams, you need to use spacers that will soften the effect of weight on the walls and thereby prevent their deformation
The space between the beams is filled with ordinary mortar, but clay mortar is used to reliably cement the furnaces
When installing beams, you need to use spacers that will soften the effect of weight on the walls and thereby prevent their deformation. The space between the beams is filled with ordinary mortar, but clay mortar is used to reliably cement the furnaces.
When installing stoves for heating a cottage, it is necessary to maintain the independence of the systems: each stove in a two-story cottage must be able to operate separately from the other. If desired, a fireplace can be installed into the erected structure, which will add an additional dose of comfort. If you choose a heating and cooking option as the main stove, located on the lower floor, then this design will provide the house with everything necessary.
The benefits of stove heating and its disadvantages
When choosing a stove for heating your home or cooking, you must be sure to familiarize yourself with the advantages of such functional designs:
- a classic wood-burning stove can be assembled quickly enough without the need for large financial outlays, provided the project is properly prepared;
- the universal design can be easily combined with a fireplace, bringing special notes of comfort and coziness to the interior design of the living room;
- the possibility of installing an autonomous heating system that operates without access to centralized and public communications;
- choosing an inexpensive and most economical type of fuel when selecting a program to reduce energy costs (additional insulation);
- a practical possibility of combining stove and water heating to distribute the coolant throughout the entire area of the room.