Hello! On this page I have collected the names of the elements of the Russian stove . If you have anything to add, write by email or in the comments.
I recommend reading something interesting on my blog, KaminTeplo: Project of a Russian stove with a stove bench, stove and firebox. Project of a budget stove “Finka Stove”. Project of a stove for a black sauna. Project of a sauna stove “Russian Steam” with drawings and procedures for a Russian steam bath.
Look at my work on the topic Russian oven, Ukrainian oven, oven for cooking by following the link to my old website: Russian oven in the restaurant Khutor Vodograj, Zbiten
Construction of a Russian stove
Even a couple of centuries ago it was difficult to find two identical stoves. This happened because each owner made small changes to both the internal structure and the external decoration. The design of a traditional stove has constantly undergone changes and become more complex. The entire structure is placed on a foundation, which must be located at a certain interval from the wall (usually about 17 cm).
The names of the main elements of the structure - you can clearly see them in the diagram:
- An oven is a place used for drying logs.
- Guardianship is the foundation of the structure.
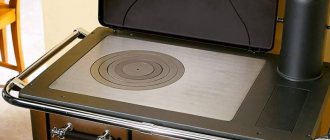
- The stove is a recess in front and at the top that improves heat transfer. It is used for drying things.
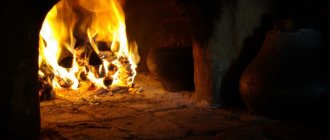
- The crucible is a so-called cooking chamber in which various fuels are burned and then food is prepared. The chamber arch is made at an angle towards the entrance. Thanks to this, the heated air stays at the top, heats the stove bench and the side walls of the stove.
- Damper - closes the furnace.
- The six is a special compartment in front of the mouth, which is located in front of the crucible. The lateral walls of the mouth are called cheeks.
- Hailo - located in front of the mouth above the pole. It is a socket into which smoke escapes during the operation of the stove. From this area, the smoke enters the smoke exit pipe.
- Below is the bottom of the furnace. It is built at a certain slope towards the camera. This is done to ensure unhindered passage of kitchen appliances inside. The surface of the hearth should be smooth.
- The overpipe is a separate recess where smoke collects. A pipe runs above it to allow the smoke to escape.
- A view is a cast iron plate with a hole that is closed with a lid. Located in the chimney. Thanks to it and the valve, you can control the draft.
- A lounger is an area where you can sit down to relax. It is located on the back side of the chimney. During the process of lighting the stove, this place begins to heat up quickly.
Main materials of construction
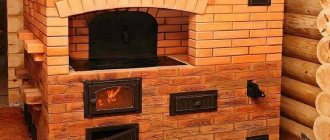
The main material for a Russian stove in a country house or in a hut is, of course, refractory brick, which is made from fireclay clay. It is used for laying the combustion chamber, where the temperature reaches its maximum. Ceramic bricks are used to implement the rest of the structure.
Each housekeeper - a Russian stove or a Russian fireplace, is equipped with metal or cast iron parts - all kinds of dampers and doors. They must be prepared in a certain quantity, namely:
- combustion door (250x205 mm), ash door 2 pcs. (250x140 mm), cleaning door 2 pcs. (130x140 mm.) and ventilation (size depends on the diameter of the chimney pipe);
- grate 380x250 mm;
- valve 3 pcs. (140x140, 260x260 and 180x140 mm.);
- view (diameter 230 mm);
- flap for the furnace (450x380 mm);
- water heating box (500x280x120 mm);
- two-burner stove (400x700 mm);
- strips of steel (1430x25x2, 1000x50x12 mm.).
For the correct laying of a number of elements - vaults and housekeeper arches - templates are needed, which must be disassembled without much effort and time. For their manufacture, parts made of plywood and wood are used.
Operating principle of the furnace
The mechanism of action of such a device is quite simple. The air moves not only under the influence of natural draft created by the chimney, but also due to the peculiarities of the fuel combustion process. Cold air from outside passes into the mouth and meets a mass of smoke coming towards it. When they meet, they do not touch or mix - the air goes above, the smoke - below. Having met at the outlet and mouth, air masses exchange heat with each other, and natural gas-air heat exchange occurs.
REFERENCE! Those who want to build a stove need to know how it functions. Heated air penetrates the combustion zone, and flue gases leave it from above through the firebox. They exit through the mouth and hilo, and then into the chimney pipe. This does not happen instantly, of course. The combustion elements make a couple of circles inside the firebox and finally burn out. At the same time, they give off heat to the surface of the stove. This happens because the chamber is built at an angle and there is a threshold in it.
Description [edit | edit code ]
A distinctive feature is the combustion chamber (crucible) deepened in the furnace body with a solid hearth and a vaulted ceiling.
The air temperature in the crucible prepared for baking bread reaches 200 °C [8]. After finishing the fire, the oven maintains a high temperature for a long time, which makes it possible to cook products such as baked milk and oatmeal.
The Russian stove is designed in such a way that it only heats the space of the room located above the hearth (80-90 cm from the floor level) [1] [9]. The overall efficiency, as previously thought, “by eye” efficiency is 25-30%, of which 7% is spent on cooking and baking bread, and 18-23% is spent on heating the room [10]. Studies of the thermal efficiency of Russian stoves in the 1940s gave a result of 68%. Improved designs of I.S. were created. Podgorodnikov, the efficiency of which reached 80%, which is unattainable for other types of furnaces.
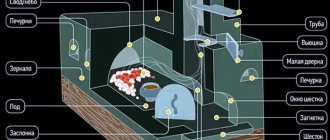
- The structure of a Russian stove
1. Podpeche
- the space in the lower part of the stove where firewood for the next fire and various items were stacked.
Pets could also be kept there. 2. Wooden flooring
.
3. Podshestok
- a cold stove under a pole, most often some of the dishes were stored there.
4. Pole
- a working platform in front of the mouth, on which dishes with food that have been removed or prepared for installation in the crucible are placed.
In place of the hearth, there may be a cast-iron stove, heated from below by an additional combustion chamber, called a flood chamber
.
5. Pole window
.
6. The mouth
or forehead is the entrance to the crucible.
7. Threshold
- the upper part of the mouth, holding hot gases under the arch for more complete absorption of heat and combustion of combustion products.
8. Overpipe
, which turns into
a hailo
and then into
a chimney
.
9. View
.
10. Gate valve
.
11. Pipe
.
12. Sand filling over the vault
.
13. The vault
is the upper arched part of the furnace.
14. Crucible
- combustion chamber of the furnace.
15. Roof
- the topmost layer of brick, located above the massif or backfill;
A couch was usually placed on the roof. 16. Under
- the bottom layer of the furnace (fuel tank) of the furnace.
17. Backfilling under the floor
.
18. Ash pan
or frame.
19. Cheeks
or cheekbones - the front wall of the furnace [11].
Other parts: Opeche
- a wooden frame on which the stove was installed.
Stoves
(gornushki, garnushki) are shallow niches in the stove body that serve to increase the heat-transfer surface.
They also place various items for drying: clothes, shoes, dishes, mushrooms, herbs and others. Hog
is a horizontal (or inclined [12]) part of the chimney (about a meter or more long), located in the attic in front of the chimney.
Protects against atmospheric precipitation entering the furnace through the pipe, ensures better heat retention by weakening draft, and prevents the release of sparks onto the roof [13]. The chimney
is the final vertical part of the chimney.
Smoke
stoves (fired black) did not have pipes.
Types of Russian stoves
There are main types of buildings:
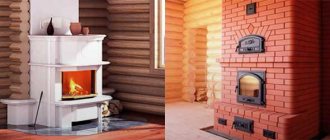
- Classic stove with a stove bench. This is a common version of such a structure.
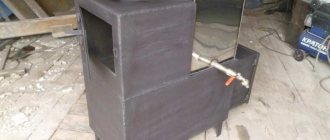
- The stove with stove is a more modern and convenient design. It does not include a bed. In summer, the main purpose is the process of cooking, and in winter, the main use is to warm up the house.
- Mini oven. This type of mechanism is very small in size and is used only for cooking.
- Heating device with fireplace.
History [edit | edit code]
In the 8th-13th centuries, several types of stoves were common in East Slavic and Finno-Ugric [3] territories [4]. In Northern Rus', stone stoves predominated, built dry from stones without a fastening mortar. In Staraya Ladoga, the bases of stone ovens reached 1.5 m in diameter [5]. Clay ovens built on a stone foundation are also known in Izborsk - a hollow clay dome about 1 m high was built on a stone platform about 1 × 1 m in size [6]. Ovens made of stone and clay are known. They were most common on the Upper Don, in Poochie and in the Middle Dnieper region. The bases of such ovens reached 1.5×2 m. Clay ovens were more widespread in the Upper and Middle Dnieper regions. Their dimensions reached 1.5 m in diameter and up to 1.2 m in height [7].
During this period, the huts did not have devices for removing smoke, and it came out through the doors and small windows in the walls (heating “in black”, smoking hut). At the turn of the 15th and 16th centuries, a device for removing smoke appeared. Initially it was a wooden box. With the advent of refractory brick, stoves acquired pipes, and by the beginning of the 18th century they themselves gradually acquired the appearance that is now known as the “Russian stove.”
How and how to heat a Russian stove
Coal or wood are usually used as fuel. In this case, it is better to use logs made of pine or birch. They are distinguished by longer burnout and heat retention. Nowadays coal can be bought in various stores, but you can make it yourself. To obtain good charcoal, you need to select firewood of a similar size and cut off as many branches and branches as possible. They are laid in the shape of a well, and sprinkled with splinters on top. This is done to ensure they tan quickly. To obtain uniform coal, you should heat it so that the heat remains for a long time. To do this, the device is heated with a large batch of firewood.
IMPORTANT! Daily heating of such a unit has its own individual characteristics. For example, the ignition site should be located as close to the mouth as possible. Then, when it burns well enough, it is advanced into the furnace. This requires special dexterity, as in the process of tossing logs.
Usually the logs are simply thrown into the firebox, and then driven into the furnace with a poker. Firewood should be heated slowly and gradually, in several passes, without loading a large amount of firewood at the same time. Before putting it in the oven, wet wood should be thoroughly dried by placing it in the oven.
Usage [ edit | edit code ]
Cooking [edit | edit code ]
They boiled, steamed, fried, baked, heated and “simmered” in the oven. They fried at the mouth (before the burning fuel), boiled and steamed directly in the crucible with a melted or dying stove, heated it on a stove, baked and simmered in the crucible after heating.
Bread and other baked goods were baked on the hearth of the oven. To do this, the stove was thoroughly cleaned of coals and ash. There should be “hot heat” in the oven - the most optimal temperature to start baking; it is determined by throwing a handful of flour onto the floor - the flour should brown fairly quickly, but not char. Thanks to the large heat capacity of the Russian oven, the temperature in it decreases gradually over a long period of time, which is conducive to obtaining good pastries and breads - first, a crispy crust quickly forms, and then the inner layer “reaches.”
For cooking, they used cast iron pots moved by grips (horns), and frying pans with frying pans (tsapelniks, chapelniks). The dishes were mostly made of cast iron, but clay pans and pots were also used; Aluminum pots and pans became widespread in the 20th century. In clay jugs, fatty baked milk with brown foam turned out to be especially tasty. At the stove, in addition to three grips and a frying pan, there were two more pokers for mixing coals and ripping out ash.
The design of the furnace could have a separate entrance for connecting a coal samovar pipe to the chimney of the furnace.
Heating [edit | edit code ]
Usually the stove began to be heated in mid-October (from the Intercession) and was heated until April (before the Annunciation) or May. The Russian stove was located almost in the center of the room and heated it evenly. A sun lounger (bed) was placed on the stove - the warmest place in the house. A golbets (stuffed cabbage) was traditionally built next to the stove, in which household utensils were stored, and the top of it could be an extension of the lounger. The size of the sun lounger varied, the largest allowed up to 5-6 people to sit on the stove, but usually it was double. The height of such a lounger most often allowed a person to sit. In winter, with regular heating on the stove, the temperature is stably maintained at +25...+27 °C. The stove was whitewashed or decorated with tiles.
Washing [edit | edit code ]
In ovens with a wide (up to 1.5 m [14]) and high (up to 1.2-1.4 m [14]) crucible, one could wash and steam [15].
Subtleties of preparing masonry mortar
Unlike regular mortar, masonry mortar for furnace work is much more difficult to prepare. Of course, you can buy a ready-made mixture at a hardware store - you can find one if you look hard enough. But, if the goal is to make the stove yourself, we will also prepare the solution with our own hands.
Masonry mortars for stoves are selected depending on the brick used:
- If solid brick of grade M150 or more is used for masonry, a clay-sand mortar is used in a clay-to-sand ratio of approximately 1:2. It is also used for lining the stove with ceramic tiles.
- For laying refractory bricks, mortars based on refractory clay with the addition of sand are used.
- When using fireclay bricks, solutions of refractory (kaolin, bentonite) clay and fireclay powder are used in a ratio of approximately 1:3–4.
- Brick pipes in the attic space are laid using cement-sand mortar.
Clay is a soft, non-metallic rock, and, as everyone knows, it can be used to sculpt sculptures, dishes, produce tiles, etc. The difficulty lies in the optimal selection of raw materials - in nature, clay occurs in different forms, and can be “lean”, normal or “oily”. The skill of the stove maker lies in selecting the optimal ratio of clay and sand in order to obtain the ideal masonry mortar.
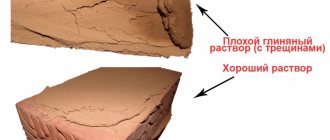
To check the quality of a clay solution, many methods have been used for a long time. The simplest of them is to “knead” clay dough, roll out a thin flagellum and try to bend it. The smaller the bending radius at which the flagellum begins to crack, the better the solution.
Another, very accurate way: roll the prepared “dough” into a ball and carefully squeeze it between two boards. When compressed by a third of its diameter, normal clay will begin to develop fine cracks. If the ball crumbled even earlier, the solution is too “thin”. If cracks appear when a lump of clay is compressed by half its diameter, the solution is greasy. In any case, it is better to get a fattier solution than a lean one.
Kiln masonry
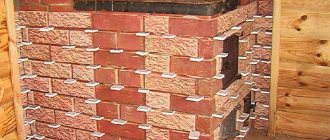
The main requirement for stove masonry is tightness. Therefore, only whole bricks without cracks are used for the stove, and the seams are made thin - no more than 5 mm. You cannot achieve airtightness by coating the inside of the furnace walls with clay - this reduces thermal conductivity and increases soot and soot deposits. In addition, the clay can flake off and clog the channels inside the oven, which can be difficult to clean. Laying methods used:
- “in a brick” - that is, the wall thickness is equal to the length of the brick;
- “half a brick” - the brick is laid flat along the wall;
- “in a quarter” - the brick is laid on its edge.
Bandaging the seams is done by using alternately bonded and spooned masonry in the corners (the brick is laid flat, and the next row is laid with the butt facing outward) or partial-size material. If ceramic bricks are used, they must be pre-soaked because they “pull” moisture out of the mortar. When laying, be sure to remove excess mixture, especially from the inside of the stove. The outer walls of the furnace are laid “in brick”, the inner walls are usually “in half a brick”.
Foundation
Stoves weighing less than 750 kg are installed on the floor without a foundation. Only a kitchen stove can be laid on a floor without a foundation. If the strength of the floor is insufficient, it is reinforced with beams that are installed on brick pillars. In this case, sheet asbestos in clay mortar is laid on the floor under the base of the furnace, an iron sheet is nailed on top, and only after that the base of the furnace (foundation) is raised with two rows of brickwork. After this, they begin laying the furnace from the first row according to the drawings. In this case, the distance from the combustible part of the floor to the chimneys will be equal to the thickness of three rows of brickwork. Reducing the thickness of the stove base is unacceptable in terms of fire safety.
Stove without foundation
But most stoves are installed on a specially constructed foundation, which supports the stove body and chimney.
Knowing that the average weight of one brick is 3.5 kg, you can approximately calculate the weight of any household stove. For example, to lay a Russian stove measuring 141x141 cm with a pipe, about 1,500 bricks will be required. The approximate mass of the stove is 1500×3.5 = 5250 kg.
Foundations for furnaces can be solid (Fig. 2, 3), columnar (Fig. 4, 5) and mixed. The foundations should be wider than the base of the stove by 5-7 cm in each direction. The depth of foundation placement depends on the properties of the soil and the groundwater level. Soils can be rocky, coarse, sandy and clayey.
Rocky soils are solid solid rocks and some sedimentary rocks: sandstones, limestones. They have high compressive strength and resistance to groundwater.
Rocky soil
Coarse soils are fragments of rock. They are also solid foundations, since these soils contain a large amount of crushed stone, gravel and pebbles.
Coarse soil
Sandy soils consist of sufficiently dense and strong particles for constructing foundations for furnace foundations.
Sandy soil
Clay soils are determined by their clay content. Clay in its pure form is very rare in nature, so soil that contains more than 25% clay is considered clayey. If the soil contains clay in the range of 10-25%, such soil is called loam, and soil with a clay content of up to 10% is called sandy loam.
Clay soil
Sometimes there are soils with large pores, which are dangerous because when groundwater gets into them, they easily liquefy and lose strength. These are bulk soils that have great looseness.
In dry sandy soils, the foundation depth can be 50 cm, in clayey soils - 75 cm.
The soil on which the base of the foundation rests is called its base. In wet soils, the depth of the pit from the ground level should be at least 1 m. The foundation is laid in them using clay-cement mortar. In dry soils, foundations are laid on a 1:3 lime mortar (1 part lime paste and 3 parts sand). In strong dry soils for furnaces weighing up to 2 tons, the foundation depth can be reduced to 25 cm, and for furnaces weighing up to 3 tons - accordingly, up to 40 cm. In wet soils, it is not recommended to reduce the depth of foundations.
Depth of laying the foundation for the furnace
For laying the foundations of furnaces, rubble stone, cobblestone, crushed brick of all types, gravel and pebbles, ordinary clay baked red brick, coal slag, and iron ore can be used.
To construct a foundation, a pit is dug in the ground. The dimensions of the pit should be 10-15 cm wider than the base of the furnace in each direction.
Rice. 1. The principle of foundation construction. 1 - floor; 2 - furnace body; 3 - two rows of brickwork; 4 - protrusion 50-70 mm; 5 - external foundation; 6 — ground level; 7 - foundation in the ground; 8 - base of the foundation
First, material (rubble stone, crushed brick, etc.) up to 10 cm thick is placed in a dug pit, then filled with liquid cement mortar. The rubble stone is laid out, observing the rules for bandaging the seams, the gaps are filled with small stones. In this way, the foundation is brought to ground level. A waterproofing layer (3 layers of roofing felt or roofing felt) is laid on top of the foundation in the ground. An external foundation is built on the waterproofing layer.
Laying the foundation for the furnace
The external foundation can be laid out from the same materials as the foundation in the ground. The height of the masonry depends on the depth of the underground space. When laying an external brick foundation, whole bricks are placed along the edges, and halves are placed in the middle. The external foundation should be 5-7 cm smaller than the foundation in the ground in all directions.
It should be remembered that the outer foundation area should be 5-7 cm wider than the stove base in all directions. The outer foundation is not brought to the floor level by 14-15 cm (two rows of brickwork). The floor is cut to the size of the stove base.
According to the dimensions of the stove base, following the rules for bandaging the seams, lay out one row of brickwork. After this, lay out the second layer of waterproofing (two layers of roofing felt or roofing felt). The second row of brickwork must correspond to the floor level or be higher, but not more than 3-5 cm. At this point, the laying of the furnace foundation is considered complete, then the laying of the furnace body begins.
Foundation for the stove
The figures below (2, 3) show solid foundations. External solid foundations made of small stone, crushed brick and gravel are laid out using boxes made of boards. The boxes are filled with layers of crushed stone up to 10 cm, carefully compacted with a tamper and filled with cement mortar. External slag concrete foundations should be 7-10 cm wider than the dimensions of the furnace base in each direction.
External solid foundations made of small stone, crushed brick, gravel and cinder concrete are also not brought to the floor level by 14-15 cm. The first layer of waterproofing made of two layers of roofing felt or roofing felt is laid on top of the foundation leveled with cement mortar. After this, the first row of brickwork is laid out according to the dimensions of the stove base, then the second layer of waterproofing is laid out. A second row of brickwork is laid on it, which should correspond to the floor level or be higher, but not more than 3-4 cm.
Rice. 2. Solid foundation made of small stone, crushed brick and gravel. 1 - floor; 2 - two rows of brickwork; 3.6 - waterproofing; 4.7 - leveling layers of cement mortar; 5 - external foundation made of slag concrete; 8 - foundation in soil made of crushed brick and gravel; 9 - soil
Rice. 3. Solid foundation made of rubble stone and brickwork. 1 - floor; 2 - external foundation made of brickwork; 3 - waterproofing; 4 - leveling layer; 3 - foundation in the ground; 6 - soil
On rocky and rocky soils, foundations are not made in the ground, but an external foundation is laid out from the surface of the soil. To save building material, external foundations can be erected on two columns (Figures 4, 5). In this case, foundations in the ground can be built solid, as mentioned above, or separately for each column. When laying brick columns, whole bricks are placed along the edges, and halves are placed in the middle. The width of the columns should be equal to the length of 1-1.5 bricks.
Rice. 4. A foundation of two columns connected by laying bricks with separate foundations in the ground. 1 - floor; 2 - waterproofing; 3 - columns made of brickwork; 4 - foundation in the ground; 5 - leveling layer; 6 - soil
Rice. 5. A solid foundation in the ground, connected to an external foundation of two columns covered with reinforced concrete lintels. 1 - floor; 2 - waterproofing; 3 - leveling layer; 4 - reinforced concrete lintels or slab; 5 - foundation in the ground made of rubble stone and crushed stone; 6 - soil; 7 - brick masonry columns
The distance between the columns is covered with reinforced concrete lintels or a reinforced concrete slab. After leveling with cement mortar, one row of brickwork is laid according to the dimensions of the furnace base. A second row of brickwork is laid over the laid waterproofing, which must correspond to the floor level.
If the distance between the columns is no more than the length of two bricks, then the columns can be connected by running bricks into the continuous plane of the foundation. In this case, the columns do not reach the overlap of 5 rows of brickwork (see Fig. 4). After connecting the continuous plane of the foundation, the first row of brickwork is laid according to the dimensions of the base of the furnace, waterproofing is laid on it, after that - the second row of brickwork, which should be at floor level.
During the construction of furnaces, the pressure on the ground gradually increases, and the settlement of the foundation also increases. With the completion of the laying of the stove and chimney, settlement of the foundation stops. Between the foundations of the walls of the building and the furnace, sedimentary joints 5-7 cm thick are left, which are filled with sand. Settlement seams are left due to varying degrees of settlement of the walls of the building and the furnace.
In the upper floors of buildings, furnaces can rest on a lower furnace or on special beams (steel, cast iron, reinforced concrete) embedded in the walls on fireproof partitions, which are provided for by the building design.
Construction Technology Tips
The construction of a Russian heating stove is a serious matter. It will be very difficult for a homeowner without experience in the stove business, so we recommend stocking up on time and patience. We published detailed instructions for preparing the mortar and laying it in an article about building a fireplace; we advise beginners to familiarize themselves with the specified material.
Here we will give general recommendations regarding the Russian home stove:
- Even the mini version of the heater weighs over 2 tons. The foundation slab must be supported on a stable soil horizon; the depth can be determined by the occurrence of the existing foundation of the dwelling.
- In the finished building, the “sole” must be arranged separately from the foundation of the house, retreating at least 10 cm. At the stage of construction of the cottage, the foundations, on the contrary, are combined - a common formwork is set up and concrete is poured.
- You need quality bricks and mortar, not a gully clay mixture. The correct geometry of the stones will make your work much easier - uneven bricks will have to be filed down.
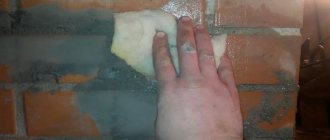
- Soak the red brick in the bucket for 2-3 minutes, as shown in the photo. Do not immerse the refractory in water, just rinse it to remove dust.
- It is allowed to lay the furnace and firebox from ceramic bricks, as our ancestors did. But remember: such cameras are afraid of accidental overheating; the material begins to crumble and crumble.
- A bed built on a loose base is also afraid of temperature fluctuations. This is why it is recommended to fill the void above the vault with clay mortar. If you fill the cavity with sand, small cracks may appear on the roof. No sooner had the stove been built than repairs needed to be done.
- The refractory masonry is not tied to the ceramic; cardboard is inserted to provide a gap between the two walls. Horizontal seams are laid with kaolin non-combustible wool.
- The pipe does not have to be made of brick all the way to the top. Lighten the structure - after cutting, install a sandwich - a chimney that goes out onto the roof, as shown in the photo.
Finally, a few words about how to properly heat a new stove.
After drying the stove for 2-3 days (in summer), first build a small fire on the top damper. When the pipe warms up, start heating the furnace little by little, then the lower chamber. Increase the amount of firewood slowly, do not rush. The task is to uniformly heat the furnace body for final drying. Date: September 25, 2022