Who seeks will always find.
All the news, hurry up to visit us.
New on the site
- How long can the suction line be?
How to test a pump on a bench.
Latest reviews
- Senovad : Hello, Sergey. I'm sorry, but, as a rule, in such cases.
- Sergey : They drilled a hole in a well 4m deep (the water was high, in .
- Senovad : HOW? How.
- Edward : Help me choose a septic tank.
- Senovad : Hello, Andrey. First. Frankly speaking, what .
About the site
I created this site to tell you about my mistakes, to share my experience, my knowledge, my past, present and future projects, my ideas - not only about plumbing. Do not judge strictly. Here I am also learning, and mistakes are inevitable. Ask, I will definitely answer. Share your experience, it will be interesting to everyone.
Preparatory work
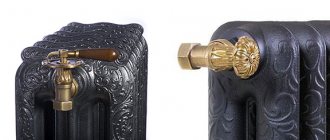
In order to disassemble the cast iron body, it must first be removed from its mounting on the wall. The hooks on which the battery is suspended are removed, then you need to disassemble the taps or couplings with which the radiator is connected to the heating pipes.
The weight of one assembly of 8-10 sections can easily exceed a hundred kilograms, so the battery is lifted to its end and in small “steps” it is moved to the place where it is planned to repair the radiator or simply disassemble it.
If the cast iron battery is relatively new, then a platform with an impact-resistant coating will be sufficient, for example, a sheet of chipboard can be laid on the floor. To disassemble an old cast iron heater, you will need a place where you can work with a torch and a heavy crowbar.
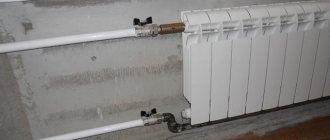
Types of radiator piping
Connecting devices to the pipeline can be done according to one of the following schemes:
- lateral (top or bottom);
- lower;
- diagonal.
Lateral upper and lower
In the first case, the coolant enters the upper collector and flows down through vertical channels.
The heat transfer from the radiator is uneven; the hottest area is located closer to the connection point.
The same situation is observed when tying in the lower side position. The first section heats up better, the last one worse.
Bottom connection
The coolant comes from below. According to the law of physics, it moves upward, then, cooling down, descends. Heat transfer with such a piping is better than with a side one, but losses still exist. They are 10-20% depending on the radiator model.
Diagonal connection
The coolant coming from above completely heats the radiator. All sections heat up equally well. Heat transfer with this type of piping is maximum. Thermal imager examination confirms this, so the diagonal scheme is the most effective and economical.
Upper
This is an unconventional type of connection, which is used for high-height radiators. For this method, a plug is installed in the upper manifold, due to which the coolant moves down and heats the heating device evenly.
If the model is standard, without design changes, then this connection does not work. The heated liquid passes through the upper manifold, while the lower part remains cold.
Required Tools
It is impossible to disassemble the cast-iron case with bare hands; without a tool, the battery can be broken with a sledgehammer or split if handled carelessly and dropped on the floor. To work, you will need at least four types of equipment:
- A special key with a square head for unscrewing nipples;
- Socket wrench for turning out plugs;
- Grinder with cutting wheels;
- Gas burner with reducer and cylinder.
Nipple keys
In addition, you will need a heavy plumber's hammer, chisel, tow, kerosene or brake fluid. All this will be needed in order to try to disassemble the sections with minimal damage. When rebuilding old batteries, the plugs and nipples still need to be replaced, so sometimes it's easier to cut them out than to try to unscrew them.
The installation process itself
Before starting work, it is necessary to completely shut off the heating circuit, drain the water from the system, and the pump will help remove any remaining water efficiently. Using a level, carefully check the battery hung on the supports vertically and horizontally.
- You need to unscrew all plugs from the device.
- Connect a valved bypass, which is only required for a single-pipe circuit. To connect to a two-pipe circuit, a bypass is not needed; only a squeegee with a valve connected to it is used for connection.
Using threaded connectors, we connect the battery to the system, using tow or another sealant to seal the joints (if you have experience in welding, the joints between the connectors and the pipeline can be welded).
A bypass is required for connection to a single-pipe circuit - connection diagram: 1 - tee for metal-plastic pipes; 2 - direct control valve; 3 - direct shut-off valve; 4 — adapter for metal-plastic pipes; 5 - rotating valve for air release
It is important to note that there is no need to remove the packaging from aluminum, bimetallic and steel devices until installation is completed. Installation is complete, but some more crimping will be required.
To do this, you will need to call a plumber. Both his experience and the device will be useful, which does not make sense to buy for the sake of installing several batteries
Installation is complete, but some more pressure testing will be required. To do this, you will need to call a plumber. Both his experience and the device will be useful, which does not make sense to buy for the sake of installing several batteries.
General recommendations
Experienced craftsmen and professionals recommend taking into account the following points:
- When using a cast iron radiator plug on heating appliances, caution should be exercised. The fact is that cast iron is easily compressible, but is considered a rather fragile material. Therefore, even a slight mechanical impact or impact on a hard surface can cause the formation of microcracks. As for steel products, they are more reliable in this regard.
- When studying materials for the assembly and installation of heating devices, there are recommendations for using ordinary paint for more airtight connections. To some extent, these statements are true, but it should be noted that such connections do not have a very attractive appearance, and when disassembling them you may encounter certain difficulties. It is important to understand that modern heating devices and their additional accessories do not require painting.
Selecting and installing radiator plugs is not difficult, but you need to approach this process quite responsibly. It is very important to select matching materials, correctly determine the type of thread and size of the plug, as well as its purpose. By following the recommendations of professional technicians, you can avoid many problems during the operation of the heating system, including batteries and radiators.
Classification
Plugs for heating radiators can be divided into groups according to several criteria.
Material
As a rule, it corresponds to the radiator material:
- For a cast iron battery, a cast iron radiator plug is used;
- For sectional steel and bimetallic radiators, steel pipe fittings are purchased.
However: for aluminum batteries, with rare exceptions, not aluminum, but the same steel products are used. The aluminum plug is too easily damaged when screwing in and installing the trim; in particular, 1/2-inch diameter threads cut into aluminum can be stripped with very little force.
Steel fitting for aluminum and bimetallic batteries.
Thread
It can be right-handed (screwed in clockwise) or left-handed. As a rule, the left plug for a cast iron radiator and the steel plug made in Russia for aluminum/steel/bimetallic devices are marked with the letter “L”.
If there is no marking, it is not difficult to identify the type of thread: it is enough to trace one of its threads over a couple of turns.
Functions
With a blind plug, everything is simple and clear: its only function is to plug the threads of the end section.
The pass-through radiator plug is used to connect the insulation and/or piping elements to the heating device. In fact, it is an adapter for a thread of a smaller diameter. The thread on the section depends on the material of the heating device:
| Battery Type | Thread size |
| Cast iron | DN32 (1 1/4 inches) |
| Aluminum, bimetallic | DN25 (1 inch) |
The diameter of the thread connected to the passage plug can also be different:
| Battery Type | Thread size |
| Cast iron | DU15, DU20, DU25 |
| Aluminum, bimetallic | DU15, DU20 |
Cast iron plug for liner with diameter DN20.
It’s curious: when connecting a 25 mm diameter line to a cast iron battery, not a drilled plug is used, but an ordinary cast iron adapter DU25-DU32.
In some cases, the harness or liner may not use through-hole plugs for connection, but directly the thread of the end section manifold.
When is this practiced?
- When connecting cast iron batteries to the filling gap in a system with natural circulation. The maximum filling diameter is important here - it affects the hydraulic resistance of the circuit; therefore, the DN32 pipe is screwed directly into the sections.
- When installing a welded flush valve. These products are also, as a rule, made to fit the thread size of the sections themselves.
- When installing the air vent. Many manufacturers produce Mayevsky taps and automatic air vents for DU25 threads.
How to disassemble a cast iron heating radiator into sections
Before disassembling a cast iron heating radiator, you need to prepare a set of tools:
- Wrench for disassembling cast iron batteries (5/4 inches for old devices and inch for new ones);
- Adjustable wrench of the second or third number;
- Chalk;
- Inch pipe 50-100 cm long.
You also need to find a convenient platform on which to disassemble the radiator. A good option would be a durable wooden board placed on a flat area. The battery is placed horizontally on this shield, and disassembly can begin.
The technology for disassembling the radiator is as follows:
- First of all, you need to understand in which direction the blind plugs are unscrewed, after which they need to be unscrewed. Before disassembling the heating battery, it is necessary to mark on the key the length to the unscrewed nipple. To do this, the key is placed on the battery and its edge is brought to the point where the bushing is located. A mark is made on the key using chalk in a circle until the key is inserted into the battery.
- Next, you need to figure out in which direction the key for cast iron batteries should rotate - they can have both left- and right-hand threads. Accordingly, when rotating in different directions, the battery sections will diverge or converge. The direction of rotation is determined using a fitting, which is screwed in on the same side where the key will subsequently be inserted.
- With a right-hand thread, the fitting is screwed in clockwise, so the direction of rotation of the key when unwinding will be the opposite. With a left-hand thread the situation is exactly the opposite.
- The actual promotion of the radiator begins with the first section. The first step is to strip the threads on both nipples one by one (as a rule, just half a turn of the key is enough). Next, the battery is gradually untwisted on each side so that the distance between the sections is about 0.5 cm.
- When unwinding, it is very important to maintain the specified gap between the sections - if you untwist the battery on one side more strongly, then there is a considerable probability that the thread will jam. During the unwinding process, it is worth putting a pipe on the key to reduce the required effort.
Any modern radiator can be disassembled using this technology. Often, such heating devices have plugs with the thread direction marked.
Replacing and installing batteries
Advice: having decided on the type of design, it is better to start by purchasing the batteries themselves. The fact is that such things as a plug for a cast iron radiator, a Mayevsky tap, brackets for suspension and other accessories are often included with the product.
Dismantling an old radiator
If your cast iron battery does not heat well enough, and for some reason you do not want to replace it with a new one, you can give it preventive maintenance, clean it, rinse it, repaint it, and it will last just as long.
Disassembling cast iron heating radiators is not a difficult task, but requires care.
- Initially, you should make sure that the water is drained from the system; in this case, you should not rely on your own knowledge; it is better to contact a mechanic. Since even in summer, water may not be drained unless absolutely necessary;
- Next, the instructions instruct you to disconnect the unit from the system. If there is a threaded connection, then everything is simple, take a gas wrench and unscrew it. In the absence of one, you will have to use a grinder, and then remove the structure from the canopies;
- In order to carry out major preventive maintenance, it is necessary to disassemble the “accordion” into sections. Direct disassembly of cast iron heating radiators begins with unscrewing all side plugs. There is one nuance here, so that the fragile metal does not burst, the plugs must first be heated with a blowtorch;
- Be careful when unscrewing. The thread of a cast iron radiator can be right or left;
Section connection diagram.
- The problem of how to determine the thread direction in cast iron radiators is easily solved among professionals. A right-hand thread is cut on the right side of the section, respectively, on the left side there will be a left-hand thread;
Advice: since it can be difficult for an amateur to determine the threads on a cast iron radiator, especially when unscrewing the plugs, pay attention to the plugs themselves. Under the layer of paint they must have the letter “P” or “L”. Which means right or left hand thread.
- After unscrewing the plugs, you have access to the inside. In general, the sections are connected by nipples; they resemble pieces of pipe with different types of threads at both ends. On the inside there are grooves in the nipple for the radiator key. The photo shows such a key and a screwing diagram;
Cleaning cast iron radiators
Washing is carried out before removing and disassembling the battery.
In order for cast iron batteries to serve for decades, they need to be cleaned regularly. Cleaning must be done before disassembling the battery. It is important to take into account that the structure is heavy; it is better to carry out the work with a partner. You can wash heating appliances in the yard or in your own bathroom.
It is recommended to use the following tools:
- water pneumatic gun;
- soda ash;
- means for flushing a car radiator;
- milk serum.
Cleaning with a car cleaner is carried out as follows:
- Two holes in one section are securely plugged.
- The product is poured into a product made of cast iron.
- Hot water is then poured in.
- The other two holes are also plugged, the structure is placed on the floor and waited for at least two hours.
- At intervals of 10-15 minutes, one edge of the battery is lifted so that the product is evenly distributed over the entire surface.
Finally, the radiator cavity is rinsed well with clean running water.
Disassembling a cast iron battery is not difficult if you follow all the recommendations. If there are doubts about the quality of the work, it is better to invite a qualified specialist.
Causes of breakdowns
As in the case of the sleigh in the famous saying, the heating system should be prepared for the new season in the summer.
The main causes of problems are:
- Low heating of the aluminum battery when there is no air in it.
- Noises and knocking are heard in the system.
- The aluminum radiator was found to be leaking.
- Plaque appeared at the joints of system elements.
In houses with autonomous heating, these problems can be easily identified by running the system at maximum operating mode. Higher pressure will show the integrity of the structure and allow you to see possible defects in it. In houses with centralized heating, it will not be possible to carry out such work on your own, but you can submit a request to the management service that their specialists have carried out the necessary work.
If during testing the system showed its best side, but problems began at the height of the season, then emergency dismantling of the radiator is required.
To do this you need to do the following:
- The shut-off devices are closed, as is the riser (the media must first be drained from it).
- A container for draining the coolant is installed under the bottom connection.
- Unscrew the lower ball valve so that the water (antifreeze) remaining in the battery drains out.
- The top valve is also unscrewed and the battery is removed from the brackets.
If the question arises of how to repair an aluminum heating radiator if it does not heat, then you should look for the reason for this condition of the device:
- The first thing you need to do is bleed the air from the system and wait until the batteries warm up.
- If nothing has changed, then you will have to dismantle the radiator and check for the possibility of clogging . Sectional aluminum radiators do not hold much coolant. By pouring water into the removed heater, you can calculate whether its quantity corresponds to the parameter stated in the data sheet. If not, then it is not necessary to repair the aluminum heating radiator, but to flush it , for which you should pass water under high pressure through the structure until it brightens.
- If the flow of water did not “cope” with the task, then you will need knowledge of how to disassemble an aluminum heating radiator into sections and do the same work with each element separately . Sometimes, when very dirty, a brush (not metal) is required to rid the battery of thick dirt.
Sometimes the only way to return the batteries to a hot state is to replace the aluminum radiator section or extend them. With the lateral type of connection this will not be difficult, whereas with the bottom or diagonal method you will have to increase or shorten the length of the pipe.
Rules for the selection and installation of plugs
The simplest element used when installing and assembling radiators is an aluminum plug for heating radiators. But even the simplest device requires special attention, otherwise big problems may arise during operation.
The process of installing a radiator plug cannot be called complicated, since almost all of them are made of the same type; the dimensions or type of thread may be different. Such devices also work on the same principle.
When choosing a radiator cap, it is important to consider the following points:
- The materials of the radiator and plug must be combined.
- The thread of the plug must be of a certain type. For example, for installation on the left side of the battery, it is recommended to use a left-hand thread, and on the right side, install a radiator plug with a right-hand thread.
- The hole in the radiator can be closed with a blind or through plug.
- The device must have an aesthetic appearance and match the color of the heating device.
- The diameter of the threads in a cast iron battery at the inlet and outlet is of great importance; plugs can be used as transition elements.
Most often, the battery is equipped with the following devices:
- Pass-through plugs for radiators in the amount of 4 pieces.
- Brackets for installing the heating device and plastic anchors for installing the fasteners themselves. For a standard size radiator, 2 brackets and anchors are required.
- Mayevsky plug and tap. Sometimes the second element is replaced with another plug.
According to the principle of operation, plugs are divided into two types. In the first case, they simply block the path of the coolant, in other words, they act as a plug. The second type is an adapter from one diameter to another. In this case, the plug has an external thread on one side and an internal thread on the other.
Air vent plug
We will dwell on the last point for a moment. What is a Mayevsky crane and why is it needed? This is a simple device for bleeding air from the heating circuit.
Air may appear there after the entire circuit or its individual sections are reset. Since the pressure difference that ensures circulation in central heating systems and in gravity heating systems is small - no more than 2-3 meters - an air lock can completely stop circulation.
The Mayevsky tap is installed on the radiator if its upper collector is the highest point of the riser or any other section of the circuit.
Radiator cast iron passage plug with a Mayevsky valve installed in it.
Please note: in apartment buildings with bottom filling, Mayevsky taps are often placed in the attic along with jumpers between paired risers.
The Mayevsky crane is good for everything, except that it requires the attention of the owner: after resetting a section of the circuit and its subsequent start-up, the air must be vented immediately. Otherwise, stopping circulation may lead to defrosting of a section of the circuit.
In an autonomous system this is not a problem; But in apartment buildings, where housing services do not have the opportunity to coordinate a repair schedule with residents of the upper floors, the inability to bleed air in a timely manner sometimes turns into a serious problem.
In such cases, an automatic air vent comes to the rescue - a simple mechanical device that bleeds air automatically, immediately after filling the circuit with water.
An automatic air vent is installed in the thread of the end section.
The principle of operation of a radiator cap with an automatic vent is very similar to the device of the filler valve of a toilet tank:
- When the system is reset, the float in the float chamber is in the down position and holds the shutoff valve open.
- As soon as the air is replaced by water, the float opens and closes the valve.
The price of the automatic plug is, of course, slightly higher than that of the Mayevsky tap for DU25 thread - approximately 500 rubles versus 100 - 120.
Disconnecting the first battery section
Take the radiator disassembly key. If you don't find such a key on sale, you can try making it yourself. To do this, you will need a piece of reinforcement with a diameter of 20 mm and a length of at least 60 cm. In order to unscrew the nipple, we need to flatten one of the ends of the reinforcement to such a state that it is wider than 26 mm, but narrower than 32 mm. To do this, take the burner you have, which you used to heat the plugs. Heat a section of reinforcement about 4 cm long at either end. After heating, use a hammer to shape the tip into a flat shape. If necessary, repeat the heating procedure and hammer the reinforcement section again.
The key can also be made from a piece of pipe with a diameter of 20 mm. To do this, give one end of the pipe a flat shape according to the specified dimensions. When using the factory key to disassemble radiators, you do not need additional equipment. If you have a homemade wrench made from fittings or pipes, it is most convenient to twist it using a pipe wrench. It has enough leverage to rip the nipple out of place. Insert the key into the radiator to a depth sufficient to engage the key and nipple tabs.
Next, start unscrewing the nipple in the direction in which you unscrewed the plug.
You can begin to disassemble the radiator both from the side of the blind plugs and from the side of the through plugs. Remember that they have left and right hand threads respectively. If you unscrew the nipple from the side of the blind plug, then you also twist the nipple clockwise, like a plug. Otherwise, you will break the nipple antennae, and then you will only be able to disassemble the battery using a hacksaw.
Make one or one and a half turns. Next, in the same way, make one or one and a half turns at the bottom of the battery. Unscrew each nipple in turn until the section is completely removed.
You cannot immediately try to unscrew the nipple completely. The section, like the nipple, is made of cast iron and is very fragile. You need to unscrew them gradually so that they don’t burst. If the fastener does not yield, heat the joint with a torch. This will help, as in the case of the cork.
In order to disconnect more than one section, it is not necessary to unscrew each section in turn. You can go straight to the section you need. To do this, use a radiator dismantling wrench to measure the distance to the desired nipple. Make a mark on the key using chalk or a marker. This will allow you not to miss the desired depth at which you need to insert the key. Next, start unscrewing the nipple in the same way as if you were unscrewing one section. It is important to have a key length of at least 50-60 cm in order to easily reach the desired section of the radiator and remove it.
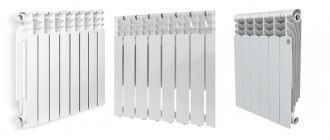
Types of heating devices
There is no official classification of cast iron batteries. We can roughly divide heaters into 3 types:
- Soviet-style “accordion” type MS-140;
- devices with an increased heat exchange area, simulating new bimetallic and aluminum heaters, only cast from cast iron;
- designer batteries made in retro, modern style.
Comment. Let us remind you: all cast iron heating devices are sectional, that is, stacked.
It is unrealistic to classify products based on other criteria. Technical characteristics - weight, dimensions, heat transfer - vary widely. Let's look at the properties of batteries by group.
Pros and cons of traditional accordions
To begin with, we present the technical parameters of one fin of the MS-140M radiator, taken from the technical data sheet:
- total height – 588 mm, between holes – 500 mm, depth – 14 cm (the number is included in the marking);
- heat flow (power) – 160 W, surface area – 0.21 m²;
- working pressure – no higher than 10 Bar;
- the volume of water inside the section is 1.45 liters, the maximum temperature is 130 °C;
- weight – 7.12 kg;
- material – gray cast iron SCh-10, plugs – malleable cast iron KCh-30 or steel;
- gaskets - rubber.
Dimensions of the MS-140 heater and recommended installation distances
Note. The amount of heat flow is indicated under certain operating conditions: the difference Δt between the temperature of the room air and the coolant is 70 degrees. The calculation of heat transfer of section 1 is described in a separate instruction. The letter "M" in the marking means "modernized".
“Accordions” are produced by several Russian enterprises and the Minsk Heating Equipment Plant. The average price for a MS-140M battery section is 10 USD. e., minimum – 6 cu. e.
The mentioned Belarusian plant also produces modified versions of “accordions”, shown in the photo below:
- lightweight model 2K60 with a power of 120 W, the fin weighs 5.1 kg;
- 2KP100-90-500 depth 9 cm, heat output - 140 W;
- modification BZ-140-300 with an interaxial distance of 30 cm, power - 120 W.
The undoubted advantages of radiators remain their affordable price, durability and corrosion resistance to chemically active substances. However, the latter advantage is inherent in all batteries made of cast iron.
- Soviet “accordions” of the MC type do not meet current interior design requirements. The new modifications look better.
- Fragility. A slight impact can cause a microcrack to form in the metal, and then a leak. Freezing of the coolant definitely leads to destruction; the expansion of water causes cast iron to split.
- Significant mass of the heating device, aggravated by spaciousness. Due to the coolant, each section is made heavier by 1-1.5 kg. The multi-section heater cannot be hung on a wall made of aerated concrete or a plasterboard partition, only placed on the floor.
- Limited scope. Due to the maximum operating pressure of 10 Bar, the radiator cannot be used in an apartment with central heating, where the water pressure reaches 12 Bar (at the time of testing the network).
- There is no bottom connection to the heating system, pipes are connected only from the side.
Inertia (long heating and cooling) cannot be attributed to the pros or cons of radiators. This is a feature of thick cast iron walls that does not affect the quality of heating.
Important note. The efficiency of the boiler and the efficiency of the system do not depend on the amount of water in the batteries. The load on the circulation pump is like fairy tales. If the volume of coolant is large, then only the time of initial heating and final cooling will change. Listen to the expert's opinion in the video:
It is worth mentioning one more advantage of the M-140 series batteries. Since “accordions” were previously used everywhere, working sections can be found for free or purchased from scrap metal. According to reviews from owners of private houses, used cast iron radiators are often used for heating outbuildings and utility rooms.
Radiators with increased heat transfer area
The uniformity of the shapes of cast iron appliances is due to the manufacturing technology - casting. The extrusion method used to produce aluminum sections is not applicable here. But in recent years the picture has improved - products with a flat front panel and side ribs, reminiscent of light alloy heaters, have appeared on the market.
Reference. The aluminum-look batteries shown in the photo are produced by Russian, Belarusian and Chinese companies: Konner, STI NOVA, Minsk Plant.
As an example, we list the characteristics of the KONNER Modern section with a standard center distance of 500 mm:
- total height – 60 cm, depth – 96 mm;
- heat transfer at Δt = 70 °C is 150 W;
- maximum water pressure in operating mode – 12 Bar;
- capacity – 0.9 liters;
- weight – 4.1 kg.
The outside of the heater is covered with polymer enamel (usually white). Gaskets are EPDM rubber, the kit includes 4 end plugs. The cost of one KONNER Modern rib is 500 – 12 USD. That is, at least 4 pieces are sold. For rooms with low window sills there is a series of low KONNER G1 batteries with a center distance of 300 mm and a power of 120 W.
Externally, Konner heaters are very similar to products made of aluminum alloy - the front section is flat, heat exchange fins are cast on the sides
How are these batteries better than accordions:
- The heat transfer surface has increased thanks to the side fins and flat front panel.
- Accordingly, the share of infrared heating has increased. That is, the radiator began to transfer more heat through radiation.
- The depth of the fins has decreased without reducing heat transfer.
- The operating pressure is increased to 12 atmospheres.
The disadvantages of batteries are typical - the products are fragile and limited in coolant pressure. But we managed to solve the problem of appearance - now the heaters look no worse than bimetal. Prices have increased slightly - a section costs between 10...17 USD. e.
Note. The cost of a Belarusian radiator 2K60PP, equipped with a flat panel, is 21 USD. e. by the rib. The reason is the complication of the manufacturing process; mechanical processing of the frontal plane and painting were added.
Designer retro batteries
The selection of antique radiators is impressive in variety. In this case, technical parameters fade into the background, giving way to other characteristics:
- beauty;
- compliance with the design of the rooms;
- overall dimensions.
In addition to traditional two-channel devices, you can choose heaters with 3-4-5 channels. There are radiators with smooth surfaces and a relief pattern, designed for floor installation. Batteries in the Art Nouveau style have angular outlines, while retro ones are more rounded.
Explanation. Two-channel radiators have 2 vertical coolant flows, three-channel radiators have 3, and so on.
High-quality retro batteries are produced in the Czech Republic, Germany, Turkey, the Russian Federation, and more recently in China. Famous brands:
- Viadrus;
- Guratec;
- Demir Dokum;
- EXEMET;
- Retro Style;
- Iron Lion;
- taps and other retro-style fittings are produced by the Italian brand Carlo Poletti.
What to do if the nipple is broken
In the case of homemade keys, haste, or applying too much force, you can break the nipple antennae. Then you can try to unscrew the next section of the radiator along with the one that cannot be removed, or use a hacksaw. You need to cut at the junction of two sections. Most likely, both sections will be damaged and you will no longer be able to connect them.
You can also saw the section with the broken nipple in half. Make another cut to leave a gap of about 5 cm between the halves. After this, using a pry bar or crowbar, rotate not the internal nipple, but the halves of the section itself, and thus get rid of the section with the broken nipple.
An extreme measure in analyzing problem areas of the radiator may be their destruction. You can use a sledgehammer for this. We recommend that you take your time and take each step gradually. Then you will successfully complete disassembly without resorting to extreme measures.
You can learn how to wash heating radiators at home without removing or dismantling them from the article at the link.
We suggest watching a video on the topic of disassembling the battery:
Marking the mounting locations
Mounting installation begins with determining where and how the heating device will be placed . The best place is a wall under a window or close to the door. In both cases, the heat that the sections will generate will become a barrier to the movement of cold air.
Installation of fastenings always begins with markings:
- The battery must be placed strictly in the center of the window . The maximum deviation of the center of the device from the center of the opening should not exceed 2 cm. The marking involves drawing a vertical line on the wall. It should be in the center of the window. Next, marks are made on the sides, retreating to a distance equal to half the assembled heating radiator.
- between the floor and the bottom of the cast iron structure .
- There should be 10-12 cm between the window sill and the top of the heating radiator . In accordance with these two rules, horizontal marks are made.
You also need to draw the marks along which the brackets will be installed. First, draw lines that will correspond to the levels of the supports. The top one needs to be drawn below the marks made near the window sill. The distance to them should be equal to the distance between the top of the heating radiator and the lower point of connection of the two sections. The bottom line is drawn above the marks made near the floor. It is raised as many centimeters as there are between the lower points of the section and the connection of the ribs. On these lines, mark with your own hands the places where the brackets should be. It is taken into account that for every 5 ribs there should be 1 fastening, both above and below.
Do-it-yourself disassembly and assembly of an aluminum radiator
The area where the radiator restoration will be carried out is covered with thick fabric . If this is a table surface, then the main work will not take place in weight. The prepared area will protect the soft aluminum from receiving unnecessary deformations and scratches.
Important ! Before removing the union couplings, a rag is spread under the radiator to protect the floor from dirty liquid that may leak out during dismantling. You need to have a rag on hand to absorb any remaining moisture remaining inside the sections.
Disconnection from the heating network
Before starting disassembly, the radiator is disconnected from the heating network using shut-off valves . If there are no shut-off valves at the radiator, then a housing and communal services worker is invited to turn off the heating riser for repair work.
During the heating season, after shutting off the radiator, they take a break. Since the water in it is still hot, wait for a while until the liquid cools down , and then disconnect the radiator from the heating pipes.
The coolant remaining in the battery is poured into a previously prepared bucket and the sections begin to be separated. Immediately after dismantling, the inner surface of the battery is washed with running water.
How to disassemble and reassemble the battery
Aluminum sections connected by nipple nuts . The inner part of such a connector has protrusions by which the nipple wrench grabs the nut and unscrews it. A nut is similar to a coupling, only it has an external thread . One nipple nut has both right-hand and left-hand threads. They are made in pairs for the top and bottom connections. When the nipple is untwisted, the sections move apart, and when twisted, they are pulled together.
All plugs and adapters are pre . The connector must be accessible from all sides by the nipple wrench.
Photo 1. Fastening sections of an aluminum radiator to each other: the nipple nuts unscrew when disconnected.
To disassemble the battery, place the tool blade through the open end of the radiator into the grooves of the unscrewed upper nipple nut and, with some pressure, make a test roll counterclockwise to move the connection. If the key turns the nut normally, then insert it into the grooves of the lower nipple nut and, as in the first case, try to turn it a couple of turns.
Important ! When unscrewing connectors, follow the sequence of actions to avoid distortion.
After disconnection, the exposed thread is carefully examined for cracks and chips , and for the integrity of the thread . If necessary, the joints are cleaned with fine emery cloth.
When assembling the radiator sections, paronite O-rings are placed and placed between the sections. I lightly press the sections together and screw them together alternately. Turning the nuts to prevent distortion is limited to two turns of the wrench .
If something went wrong
During operation, the joints between sections and steel nuts stick to each other . This comes from the quality of the coolant supplied to the heating system. Sometimes even significant physical efforts are useless.
Although sticking must be dealt with, aluminum warps easily because it is a soft metal.
By heating the joints with a construction hairdryer, you can overcome stuck rust . If this doesn’t help either, because the corrosive build-up is too corrosive, then the edger gets to work.
Advice. If the nipple nut does not turn off under great pressure, then there is no need to increase the applied force with excessive leverage . In the worst case scenario, not only will the nut itself break, but both sections that sit tightly on the nut will crack.
section is cut off with a grinder , from the reverse side and at a distance from the edge of the joint by no less than half the length of the coupling. This protects the working section from destruction and does not cut the connecting nut. During cutting, the rust bounces off, making it easier to unscrew the surviving section.
During assembly, it is advisable to replace old gaskets with new ones and clean the joints , paying attention to defects and irregularities. A tight connection protects against premature leaks .
Preparation for work, nuances
Preparing for dismantling and installation is not a difficult process, but it is very responsible, since there is a risk of ruining your renovation and your neighbor’s. First you need to make sure that there is no water in the heating system. We find out this in the housing office of your house, if there is a need to disconnect and drain the risers where the radiators will be replaced. Nuances: in the cold season, at temperatures below -10, no one will turn off the risers. And if the house has more than 15 floors, it is forbidden to cut out parts of the metal riser and replace them with polypropylene, otherwise during the heating season the iron riser will expand from heating and damage your structure.
Application of punching knives
The operating principle of this method is similar to die cutting, but in this case a simpler and less expensive tool is used. The production of seals in this way is inexpensive and quite fast. However, the pants are quite short-lived, so this technique is used for the production of small and medium-sized batches of gaskets.
First stage of installation
Considering that radiators today are presented in a huge variety, the installation of heating batteries in a private house begins with its choice. There is no ideal heating system - each type of radiator has its own pros and cons, and you should choose the option whose disadvantages will allow the system to function as efficiently as possible.
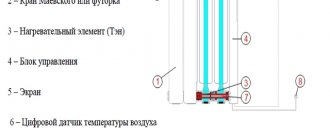
Cast iron
Photo 1 Diagram of a cast iron battery
The main advantage that such radiators have is their durability and long service life; they can be used for up to 50 years. Also, this metal can withstand aggressive conditions, including coolant with various impurities, without damage.
Among the disadvantages of cast iron, the weight of the battery and the lack of aesthetics should be noted.
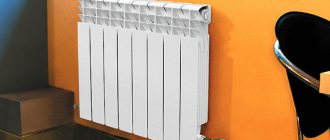
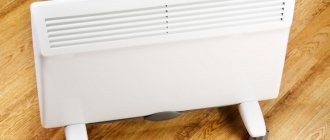
Aluminum
Photo 2 Aluminum radiators
Such batteries are distinguished by their light weight, external design, and high power ratings of approximately 190 W. They are clearly not suitable for apartments in high-rise buildings due to the low quality of the coolant, because aluminum quickly oxidizes due to constant exposure to dirty water, while for a private house such a radiator is the best option due to its high thermal conductivity and low inertia.
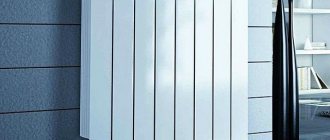
Bimetallic
Photo 3 Bimetallic batteries
This type of radiator is the most reliable. Among the main advantages are the following:
- resistance to sudden pressure changes in the system.
- high heat transfer.
- resistance to mechanical damage.
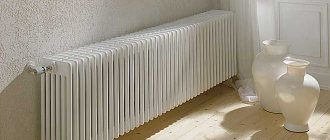
Steel
Photo 4 Steel radiator
These are new batteries for heating, which are still used quite rarely, they have not gained much popularity, but are still sometimes found. The heat dissipation area is high, the size and weight are small, maximum resistance to rust, provided they are always filled.
Which heating radiators to install in a private house can be decided based on the area of the building and its features.
Videos and useful tips
Having chosen a radiator, you should proceed to such a stage as installing heating radiators in a private house, the video of which can be watched below, and right now you can read useful tips.
The initial stage is calculating the battery power. To heat 1 cubic meter of a room in a modern house, built in compliance with building codes, you will need 20 W.
Calculate the volume of the house, multiply the figure by the figure described above, then divide the resulting figure by the power of the section. The resulting figure will be the number of sections.
Video 1 Installation of heating batteries (radiators) in a private house with your own hands
Installation tool
To do everything yourself, you should stock up on the following tools:
- building level;
- drill;
- screwdriver and tape measure;
- a wrench for tightening the pipes and a pencil;
- key for installing sections;
- bypass – when installing radiators in single-pipe heating;
- shut-off valves.
Installation instructions
The first thing you need to do is turn off the heating system, drain the water, even use the pump. Next, fix the radiator on the supports and, using a level, check how accurately this was done, after which you perform the following procedure:
- remove all plugs from the device.
- if you are using a single-pipe circuit, then you need to connect a bypass with a valve. Provided that the circuit is two-pipe, the connection is made only with the help of a drive, and a valve is also fixed to it.
- connect the structure to the system using threaded fittings, use special seals to seal the joints, ideally welding.
The rules for installing radiators provide for a process such as crimping, for which it is advisable to invite a professional technician who has the appropriate equipment.
During the installation process, remember that the distance from the radiator to various objects must be maintained as follows:
- from the wall - 5 centimeters or more.
- from the floor - at least 10 centimeters.
- from the bottom of the window sill to the top of the battery - 5-10 cm.
Cutting with circular knives
Only large round seals can be produced using this method. In the process of work you will need fairly cheap and high-performance equipment. Cutting is carried out with standard blades. Therefore, the production of gaskets of this type can be carried out independently and in any volume. Radiator leaks are often caused by a damaged gasket. And if you don’t know what to do if the heating battery leaks, first of all you should pay attention to the gaskets.
Radiator installation includes
- A specialist will visit the customer to provide technical advice and draw up an installation diagram.
- Installing radiators by level
- Layout of insulated pipes to radiators
- Without gating
- Installation of shut-off valves on radiators
- Connecting radiators to pipelines using a special tool
You can purchase radiators in one of our stores.
Our advantages
- The work is performed by qualified specialists who are citizens of the Russian Federation;
- We treat every order with great responsibility;
- We take on even very complex orders;
- We use only modern equipment and technologies;
- We are ready to repair the old boiler system, restoring its functionality;
- We give a good guarantee and provide technical support.
By contacting our company, you will receive high-quality installation of a boiler room in accordance with the agreed deadlines and on favorable terms.
- Radiator Henrad 500x800 22V
- Headset with bottom connection
- P-ethylene pipe Sanha MultiFit-Pex PE-Xc 16x2mm 20m
- Fitting
- Radiator installation (layout of the route, installation of the radiator at a level, laying pipes in thermal insulation, without grooves)
Total: ≈ 11,000 ₽.
Thermal molding
In this case, you will need an injection molding machine with a mold for casting products. The cost of a molding press is quite high, so in order to make production economically feasible, the production of gaskets using this method must be large-scale or even mass-produced.
The production of products in small batches using this technology is relevant only if they cannot be produced in any other way. It is noteworthy that only PVC seals are produced by thermoforming.
Disassembly procedure
It is very difficult to separate stuck intersection joints. In some cases, they become so attached that even significant physical efforts are powerless. In such situations, the joints are heated before disassembly using a blowtorch or hair dryer.
How to disassemble a heating radiator made of cast iron:
- The cast iron is heated with a blowtorch until it begins to emit a crimson glow. After this, you can begin the disassembly procedure.
- The first step is to unscrew the plugs.
- The radiator key is brought to the top of the battery: its head should be in the area where the nipple nut is unscrewed. At the end of the section, you need to use chalk to mark the circle for the location of the tool rod.
- The flattened part is inserted into the lower internal groove. Next, moving the tool in the desired direction, bring it to the marked circle.
Before starting the operation, it is important to find out in which direction the sections need to be twisted. If there is a nipple nut, screw it in turn onto the right and left ends of the battery: this makes it possible to determine the direction of rotation of the nipple
If the thread moves, it should not be completely unscrewed. To avoid distortions, the upper and lower nipples must be unscrewed one full turn alternately.
How to make old batteries look aesthetically pleasing
Once you have cleaned the inside of the batteries and replaced any worn gaskets, the job of upgrading the functionality is complete. It's time to take care of the appearance so that the heating devices fit well into the interior. To do this, just paint them. If desired, the batteries are decorated with original painting, images using the decoupage technique, or simply covered with special screens. But you will have to paint it anyway. It is important to choose the right paint composition and follow the application technology.
Subtleties of choosing radiator paints
Radiator paints are subject to increased requirements. They must be resistant to high temperatures, wear-resistant, and safe. It is also important that the coating does not reduce thermal conductivity. Manufacturers offer the following compositions:
- Acrylic enamels
These are organic based paints. With their help it is easy to create a beautiful coating with a glossy shine. Disadvantage: pungent odor. Until the paint dries, a specific aroma will be felt in the room.
- Alkyd enamels
Advantages: large selection of shades, good performance characteristics, durability. The drawback is the same - the smell. Moreover, it can appear when the batteries are very hot during the heating season.
- Water-dispersed compositions
They are often chosen due to their lack of odor and quick drying. When purchasing, pay attention to the manufacturer. There must be a mark on the can that the paint is intended specifically for heating radiators.
- Oil paints
They are sometimes bought for batteries, but this is the worst choice. Oil formulations have many disadvantages. They take a long time to dry, smell strongly, change color, and reduce the heat transfer of radiators.
Make sure that the paint you choose is marked “For heating radiators” and “Heat resistant”
Radiator paint application technology
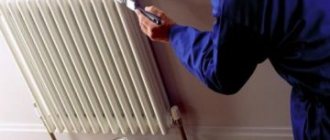
The coating must be removed before painting. Stores sell special paint removers, you can use them. In theory, washes help clean batteries, but in practice their effectiveness leaves much to be desired, because the paint literally sticks to surfaces under the influence of high temperatures. It is better to heat the coating with a blowtorch or a hair dryer, clean it with a spatula and a brush with metal bristles. After this, sand the surface with sandpaper and degrease.
You need to paint it like this:
- First, the internal surfaces are painted to prevent drips from appearing on the front of the battery.
- The brush or roller is applied from bottom to top.
- Drips are removed immediately before the paint thickens.
- The coating is applied to the entire surface of the radiator; there is no need to leave unpainted areas.
- You can make a single layer coating, but it is better to paint in two layers to achieve greater durability.
Floor-standing cast iron battery, painted in ombre style
An old cast iron radiator can create comfort in your home for several decades. Do not throw away the device if it has lost its presentable appearance and began to heat worse. All problems can be solved. Restore the battery, show your imagination - and the heating device will work and look no worse than new.
Troubleshooting methods
Now let's look at what and how you can seal the leak if the above cases are not suitable or do not help for some reason. The main ways to solve the problem if the battery is leaking are the following:
- Cold welding
- Application of a cement-plaster cast
- Using table salt
- Thermo- and moisture-resistant adhesives
Cold welding
There are highly durable and easy-to-use 2-component epoxy resin adhesives. A certain variation of cold welding has been created for each metal, but there are also universal options. For example, you can buy a repair rod to seal cracks, seal holes and eliminate leaks in cast iron, steel and bimetallic radiators.
Before covering the leak, you will have to dry and degrease the surface. If necessary, remove corrosion with a brush or sandpaper. After this, apply cold weld according to the instructions on the package.
Filling made of cement and gypsum
If there is no cold welding, and a cast iron or other battery is leaking heavily, what should you do in this case? Use a cement-plaster cast. You will need a bandage, plaster or cement. Dilute the dry mixture to a creamy consistency, soak a bandage in it and wrap it around the area where the cold or hot battery is leaking. Make several layers to form a strong bandage. If it is not possible to drain the coolant, replace the cement with alabaster or gypsum. It is recommended to apply 1-2 layers of bandage soaked in cement mixture on top.
Table salt
The simplest way to remove a radiator leak at home without the help of a professional is to use table salt. The product is suitable for leaking threaded connections. Soak a first aid bandage in water and roll in salt, then wrap it around the leaking area. When the salt dries, the hole will be securely closed. A cement bandage is applied on top for reliability.