The traditional Russian stove with a stove bench is currently considered a unique structure. Such a device can be found in both village and private city houses. It not only heats the room, but is also used for drying things or as a resting place. To build such a structure with your own hands, you need certain knowledge, so it is better to use the help of an experienced craftsman. Any mistake during construction can lead to having to redo everything.
Laying a Russian stove: technology and construction tips
In order to build a simple Russian stove you will need from 1.5 to 2 thousand bricks. The bricks are laid in rows. A standard stove includes 25-31 rows (excluding the chimney).
It is better to lay the first row of the stove with waterproof, heated bricks. The walls of the furnace are one brick thick, and the front part of the cooking surface is half as thick. Wood formwork is usually placed in the oven opening. When laying the vaults of the oven and furnace, it is best to use wedge-shaped bricks. They can be easily made with your own hands, since production involves processing ordinary bricks.
How to choose the location of the furnace?
It is very important to decide on the choice of place where the Russian stove will be installed. If its location is in a wooden room, be sure to make the distance between the walls of the stove and the house approximately 20 cm. For safety, it is best to protect wooden walls using non-flammable material, for example, asbestos boards. The created gap will allow for an inspection of the furnace walls, which is done before the onset of the heating season.
If the stove is installed in an opening between two rooms, then it is lined with brickwork, at least 20 cm thick. A gasket of asbestos sheet is made between the masonry and the wooden wall.
Why are Russian stoves so popular?
The Russian stove is a large structure that heats up well and retains heat for a long time. The variety of designs allows you to obtain many qualities that were the reasons for the return of fashion for Russian stoves.
The device warms up slowly, but at the same time, the massive brick walls give off heat for a long time. Thanks to this quality, the house is heated only twice a day, which reduces maintenance time. Modern building materials only improve efficiency and properties for maintaining a comfortable microclimate.
If you plan to cook food regularly, in addition to the obligatory crucible, the design includes a hob and a small oven. To use these elements, separate fireboxes are provided so as not to heat the house in the summer.
For small buildings, as well as for rarely visited dachas, it is advisable to build a Russian stove with a stove bench, which will warm up and become a comfortable resting place.
The walls of the structure do not heat up to high temperatures, so it is safe to dry clothes and shoes made of any materials on them.
In addition to serving practical purposes, a Russian stove can be a home decoration. To do this, they use tiles, tiles, and sometimes simply whitewashed walls add color.
You can build a stove of any size and design. The positive qualities of the structure add to its popularity:
- fire safety - surfaces do not heat up to high temperatures, which eliminates the ignition of walls, ceilings and surrounding objects;
- long service life before major repairs, ensured by the use of durable materials;
- uniform heat distribution due to the large area of heated walls;
- versatility, the ability to integrate the structure into various room designs;
- ease of maintenance.
Among the negative aspects are:
- the difficulty of self-building for an inexperienced user;
- the need for a massive foundation;
- high cost due to the large amount of building materials and payment for the work of professional stove-makers;
- high consumption of firewood, which must be stored in a place protected from precipitation.
Having decided to build a Russian stove with your own hands, they begin to select a project, prepare materials and directly start work.
Foundation
Before you build a Russian stove with your own hands, you need to carefully study the drawings and only then begin building the foundation and purchasing materials.
Although it is better to lay the foundation for the structure at the stage of forming the foundation for the house. However, they should not be connected. A separate foundation for a Russian stove with a gap of at least 5 cm - wet sand is poured here and compacted. Source chertegnik.ru
If it happens that the stove needs to be built in an already rebuilt house, then you should cut the floor down to the ground, make formwork and pour concrete, if necessary, with reinforcement. Depending on the location of the furnace, there are the following nuances of constructing its foundation:
- If the Russian stove will stand against an internal wall with a shallow base, then both soles should be at the same level, and the upper platform for the stove remains 14 cm below the finished floor.
- If the furnace is planned to be placed against a load-bearing wall on a buried strip foundation, then the foundation pit for the furnace base is expanded, a sand and gravel layer is made with a tamper, and concrete is poured into the formwork. In this case, the gap between the two foundations of 5 cm is filled with sand, the sidewalls directed into the house are formed with brickwork. The depth of the sole should be at least half a meter.
The foundation for the stove is in the corner - on both sides of it there is the foundation of the house. Source remont-system.ru
If the structure is located in a cut-out opening in a load-bearing wall, then the interrupted lower crown should be connected with steel strips (6 mm thick and 60 mm wide) by placing them on both sides of the ends of the logs and tightening them with bolts (16 mm diameter). The resulting opening is framed with wooden posts; the resulting gap (cut) should be 5 cm.
When you have decided on the location and foundation, you can.
Drawing plan of a Russian stove from different anglesSource kaminproekt.ru
Concept of blast furnace and smelting
Modern civilization is inextricably linked with the development of production technology, which is impossible without improving the tools and materials used for their manufacture.
Among all materials of natural origin or created by man, the most significant place is occupied by ferrous metals - an alloy of iron and carbon with the presence of other elements.
Alloys containing 2–5% carbon are classified as cast iron; those containing less than 2% carbon are classified as steel. For melting metals, a special blast furnace technology is used.
Blast smelting is the process of producing cast iron from iron ore processed in blast furnaces or, as they are also called, blast furnaces.
The main materials needed in the process of such production are:
- fuel in the form of coke obtained from coal;
- iron ore, which is the direct raw material for production;
- flux – special additives made from limestone, sand, and other materials.
A blast furnace is a device for producing cast iron by reducing smelting of iron ores or concentrates.
The main equipment of a blast furnace is a blast furnace - a round shaft furnace lined with refractory masonry.
To protect the furnace casing from heat, refrigeration devices are used. The furnace casing and furnace furnace device are installed on the foundation and supported by columns.
The starting material for smelting is called charge and consists of iron ore, manganese ore, sinter, and pellets. The charge is supplied to the furnace top by skips or a belt conveyor. The skips are unloaded into the furnace through the receiving funnel. Air is supplied through air heaters, the smelting product exits through tapholes into ladles located in the lower part.
Modern blast furnaces are equipped with a centralized control and monitoring system that provides recording of instrument indicators and complex indicators of blast furnace operation - coke consumption per 1 ton of pig iron and daily blast furnace productivity in tons.
Additional fuel is used, which reduces coke consumption and the cost of cast iron. Improving the design of a blast furnace is aimed at increasing its power (volume), improving the preparation of raw materials, and introducing new progressive, high-performance technologies.
Pig iron is smelted in blast furnaces, which are a shaft furnace. The essence of the process of producing cast iron in blast furnaces is the reduction of iron oxides included in the ore with gaseous (CO, H2) and solid (C) reducing agents formed during the combustion of fuel in the furnace.
The blast furnace smelting process is continuous. Source materials (sinter, pellets, coke) are loaded into the furnace from above, and heated air and gaseous, liquid or pulverized fuel are supplied to the lower part.
Gases obtained from fuel combustion pass through the charge column and give it their thermal energy. The descending charge is heated, reduced, and then melted.
Most of the coke is burned in the lower half of the furnace, providing a source of heat, and part of the coke is spent on reducing and carburizing the iron.
A blast furnace is a powerful and highly productive unit that consumes a huge amount of materials. A modern blast furnace consumes about 20,000 tons of charge per day and produces about 12,000 tons of pig iron every day.
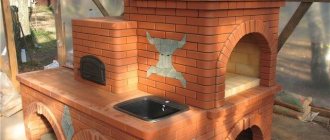
How to decorate a Russian stove in the house
To ensure that the Russian stove not only serves as a functional element, but also decorates the interior, a caring owner will pay attention to its appearance
Methods for whitewashing a stove
Whitewashing is the easiest and cheapest way to maintain a stove. In peasant houses, the hearth was usually whitened annually. Now, in addition to recipes inherited from ancestors based on chalk or slaked lime, many specialized compositions of a new generation are available. To prevent the chalk coating from staining your hands and clothes, the solution is made with skim milk containing casein. You can add ready-made wood glue or liquid glass.
Plastering and painting
The stove is plastered with a solution based on fireclay clay, which is not afraid of heating. Now special dry mixtures with a pre-selected composition are available for sale. After the finished layer has naturally dried for 3-5 days, the oven is lit and the coating is checked for defects.
First, the plaster is completely painted white. Then, using colored tints, designs are applied, the choice of which is limited only by the taste of the master. If you don’t have the ability to draw, printed stencils or a template printed on a printer will help.
Decorating the stove with tiles
Tiles are ceramic parts specially designed for decorating the surface of stoves. The tiles have a special box-shaped projection (rumpa) on the inside. An artistic layer of heat-resistant glaze is applied on the outside. Their installation must be provided for at the masonry stage in order to mount them to each other and to the surface.
Decorating the stove with tiles
Finishing with such elements belongs to the realm of art rather than construction.
Finishing a Russian stove with tiles
Ceramic tiles are quite suitable for external cladding of oven walls, because they are resistant to heat. To lay tiles on a vertical plane of the wall, nails are inserted into the masonry joints, each part is glued onto the mortar separately, leaving a wide joint to compensate for thermal expansion. The seams are rubbed with elastic mastic.
Mini stove finishing process
Incorrectly selected solutions may not immediately crack or even crumble the next day, but they will still not last long.
Building a stove with a firebox and a fireplace is a fairly long process. People often look forward to its end. The most labor-intensive and time-consuming part of the work is brickwork. However, even after the last brick is laid, it will be too early to consider the job finished. You will also need to complete the finishing that the mini-heater needs.
If the mini stove is very neatly built from beautiful facing bricks, has a smooth front edge and right corners, you can do without additional finishing. However, quite a large number of people have their own prejudices about the fact that brickwork should not be in the house at all. Consequently, the heated house is often provided plastered and whitewashed.
The traditional method would be to simply coat it with clay mortar.
This is done without the use of any special tools - clay is thrown on and smoothed with a moistened palm.
The surface after such a finishing process may not be completely smooth, with traces of handmade work. It is worth understanding that today this technique is widely used to create something unique in interior design.
Modern technology for applying plaster involves the use of special tools. among which there will be trowels that will be needed to apply the solution, trowels to level the applied solution, a grater with which the solution is compacted and the surface is leveled in a circular motion.
The heated building can only be plastered when it is 100% dry. Before moving on to this process, you should heat it. The solution will consist of clay and sand in a ratio of two parts sand to one part clay.
Finishing: options, photos
The finishing of the stove should be given special attention, because the stove is a very large structure and will undoubtedly be the center of attention in any room. When finishing the stove, it is best to strive for the smoothness of all surfaces and the ability to keep them clean. Before carrying out finishing work yourself, you need, first of all, to assess the scale and complexity of the work, as well as compare the cost of different finishing methods. Before any finishing work, the surfaces of the oven must be cleaned of dirt and dust.
Finishing methods can be very diverse; let’s look at the basic and frequently used ones, which can be done without special professional training:
- Plaster. Plaster gives the stove a neat appearance, it allows you to correct defects made during masonry, and also fills masonry joints. The plaster solution is selected depending on the required quality of finish, purpose and humidity of the room. Clay-sand mortar is mainly used, and if necessary, lime, alabaster or cement is added to it. It is recommended not to exceed the thickness of the plaster coating by more than 1 cm.
- Mopping the walls followed by jointing the masonry joints. Work is being carried out to clean the walls of the furnace from mortar protruding from the seams, to fill the seams more completely and give them the desired appearance. When performing work, it is very important to promptly clean the bricks from the mortar with a damp cloth before it hardens.
- Furnace finishing with natural stone. Lately, this method has been gaining great popularity. Before gluing the stone to the stove, you should first lay it out on a horizontal surface in order to ideally select the size and color, after which the stone is transferred to the walls according to the approved plan. For laying natural stone, ready-made heat-resistant mastics are used.
- Tiling. This method is very labor-intensive and responsible. The lining of the stove with tiles must be done in parallel with the brickwork, row by row, and the first row of tiles is laid out first, and then the row of brickwork. The tiles should be connected to the main masonry with wire, and to each other with staples and pins. The tiles are placed on a clay mortar, which is placed in the rumps (special projections of the tiles on the back side). Depending on the desired look, the tiles can be arranged one under the other or intertwined. Before installing the tiles, they are laid out on a horizontal surface to select the ornament and cut to the required dimensions. There are 1.5 mm thick seams between the tiles horizontally, which are filled with gypsum mortar. Vertical seams are done flush. When installing tiles, you must strictly observe horizontal, vertical, vertical planes and angles.
Painting the stove with paints
Use of natural stone in finishing the stove Artistic decoration with tiles The stove is plastered and whitewashed with lime The stove is neatly built of brick with jointing
After plastering or mopping the surfaces of the stove, it can be painted or covered with lime. Paints must be water or casein based. With the help of such paints, which can be multi-colored, you can paint the stove and give it a unique and inimitable design.
The metal elements of the stove are painted with special heat-resistant varnishes or paints.
Construction of a Russian stove with flooding
There are many design options for a Russian stove, but its constituent elements are always heating and cooking sections, an oven and at least a small-sized stove bench.
A modern Russian stove is additionally equipped with a flood chamber (an additional combustion chamber), thanks to which it heats up faster and releases more heat into the room. It can also be used for cooking in the warm season, when there is no need to heat up the entire oven.
Construction of a Russian stove with flood:
- Foundation. Stone, brick or concrete are used for its construction.
- Sub-kilns are cavities in the lower part of the stove where firewood is dried for storage.
- Cold stove - recesses in which you can store kitchen utensils.
- The six is a flat horizontal section in front of the entrance hole to the furnace. Cooked food left on the grill stays hot longer. Some stove models have a hob installed in this place.
- The hearth is the bottom of the furnace or cooking chamber. It is located at a slight angle to the pole, which makes it easier for heavy cast iron to move.
- The folds are the transitional plane between the hearth and the hearth.
- Cooking chamber or crucible - a cavity inside the oven intended for storing firewood and placing utensils made of heat-resistant material for cooking. The ceiling of the furnace, like the hearth, has a slope towards the entrance.
- Overtubes are cavities above the pole where smoke collects. It is the base of the smoke exhaust duct.
- Samavarnik (dushnik) - a narrow channel entering the chimney. Previously, a samovar pipe was connected to it. In modern models of Russian stoves, a choke is rarely installed.
- Chimney - a vertical channel above the hearth, designed to remove fuel combustion products into the atmosphere.
- Fluffs are an extended segment of the chimney located close to the ceiling.
- View - a small window with a door designed to completely cover the chimney. Through it there is access to the valve, which is used to adjust the draft in the furnace.
- The damper is a thick sheet of steel with well-finished edges and a handle. Serves as a door for the inlet of the furnace.
- Grate bars are cast iron grates installed between the fuel chamber and the blower.
- The bench is a large horizontal plane located behind the chimney. Underneath it there are channels with circulating streams of hot air, so during the firing of a Russian stove it is always warm, and if you close the necessary valve, it will retain heat for a long period of time.
Russian stove with a trench (right)
Example 2 (flood below, right)
Preparation for construction
Brick selection
The materials used in the construction of the furnace must comply with fire safety requirements. For this reason, various materials are used for its individual elements, which are listed in the table:
| Furnace element | Material |
| Laying the stove and chimney | · clay brick |
| Under and arch (lining) | · refractory brick · refractory brick |
| Facing | · plaster · tiles · natural stone |
| Fireproof insulation | · clay brick · asbestos cardboard · asbestos-cement heat-insulating boards · mineral wool boards, etc. |
The composition of the masonry mortar is chosen differently for each type of brick.
| Type of brick | Solution |
| Clay brick | clay-sand |
| Refractory brick | refractory clay and sand |
| Fire brick | fire clay and fireclay powder |
For the chimney, a solution based on lime and cement or lime and sand is used.
You can mix the solutions yourself or use ready-made certified mixtures, which are now available on the market in a large assortment. The advantage of using ready-made mixtures for a non-professional is compliance with technologies and proportions during production and compliance of the solution with the required characteristics.
With the correct selection and use of materials, the design of the stove: firstly, will comply with fire safety standards, which is of great importance in the house, and secondly, the entire structure will be provided with sufficient strength and stability.
When purchasing materials, you should carefully check their quality. The brick must have precise geometric dimensions and a smooth surface, and must not contain foreign inclusions. It is advisable to choose clay for the solution that is red, plastic, and free of impurities. Before mixing the solution, the clay is soaked in water and rubbed through a fine metal mesh. Sand must be fine-grained, the particle size of which should not be more than 1.5 mm.
Required Tools
Before starting furnace work, you must prepare the following tools:
- Ruler.
- Construction pencil.
- Trowel (trowel).
- Pick.
- Rubber mallet.
- Building level.
- Plumb.
- Bulgarian.
- Containers for solution.
- Construction mixer, if the solution is mixed independently.
- Joining, if no further finishing of the stove is planned.
Choosing a location for a future project
It is advisable to develop measures for the construction of a Russian stove at the time of designing the building. When determining a place in a house, pay attention primarily to the following factors:
- Foundation. They are considering the possibility of building a separate foundation or using an existing one that can withstand the additional load from the furnace. To build the foundation, ready-made concrete foundation blocks are used or a reinforced concrete monolithic slab is poured. Small gaps are left between the main foundation of the building and the foundation of the furnace, which are subsequently filled with sand. The base is not brought to the zero level of the floor to a height of two bricks, while a layer of waterproofing is laid on the first row of bricks.
- Free passage of the chimney over ceilings and coverings. It is important that supporting structures (beams, ridge beams, rafters, etc.) are not dismantled or damaged during the work. Failure to comply with this condition can lead to an emergency condition of the building and an increase in the total cost of constructing the furnace due to additional work on the construction of additional structures.
- Convenient location. The stove itself and the chimney can significantly influence the ergonomics of the room. Therefore, you need to carefully consider the placement of the entire structure in relation to windows, doors and furniture for ease of use. If the stove will be the main source of heating, then they try to place it in the center of the building, and if it is supposed to be used for cooking, then it is necessary to ensure that it is adjacent to the kitchen.
- Fire distances to combustible structures. This factor should be given close attention, since fire safety in the house must be organized at the highest level.
To prevent fires in ceilings and walls located near the stove, the following measures should be taken:
- In front of the pole window, a metal sheet measuring 700x500 mm is nailed to the floor, if it has a combustible coating.
- The distance between the stove and the combustible wall or partition is limited to a distance equal to the height of the stove. Thus, if the height of the structure is 1.2 m, then the nearby combustible wall must be at least 1.2 m away from it. In addition, the wall or partition must be protected from fire by thermal insulation materials (brick, plaster, asbestos-vermiculite boards, etc. ).
- The distance from the pole window to the opposite wall must be at least 125 cm.
- Metal and reinforced concrete beams passing near the chimney must be at a distance of at least 130 mm from its inner surface.
- Wooden beams passing near the chimney must be at a distance of at least 13 mm from its outer surface.
Is it worth it yourself
Does it make sense to take on such complex work yourself? How much does the work of an experienced and reliable stove-maker cost? If 100% of the cost of materials, as is customary in general construction work, then it is not that expensive.
By no means, not twice as much against the material. You can come across offers to build a stove for 20,000 rubles, but this is obvious nonsense. Let's try to figure it out ourselves.
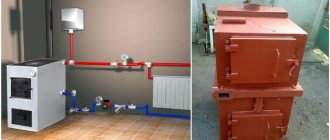
A stove maker works in mid-latitudes for six months, and always with an apprentice. Considering their employment at 100% of working time, the salary of a master at 25,000 rubles, and an assistant at 15,000, and the work completion time is 7 working days (this is a completely realistic period), we find that a simple stove will cost no less than 45,000 rubles, and a Russian stove with a stove and water heater (see figure) at 55,000-60,000 rubles.
But in a week it will be possible to heat it. There is only one condition: the master must tell where, when and to whom he has already installed the stoves, and they must be inspected personally. Good masters always stock up on recommendations, and if they hesitate and mumble, it’s better to turn to someone else.
To give a more complete idea of the complexity of the work, let's look briefly at how to lay out the simple oven described above. For example only; the detailed order of the Russian stove is a rather voluminous brochure.
How can you paint a stove?
It is clear that a newly minted master will not be able to build a beautiful stove the first time due to lack of experience. But this is a fixable matter, because the outside of a brick wall can be covered with paint. Previously, they were plastered and covered with two layers of chalk or lime whitewash, but now there are simpler and more convenient means. In addition, lime is easily transferred to clothing by accidental touch and constantly needs to be renewed.
If we talk about how to paint a brick stove, here are the following options:
The most preferred option is transparent enamel KO-85, KO-174 and KO-813. It is suitable both for the stove itself and for painting metal parts, since it can withstand temperatures up to 600 °C. Silicate and acrylic paints will not last as long, but they are also cheaper. The oven can also be painted with transparent varnish PF-238 or mixed with gouache of the required color, as shown in the photo above.
In any case, the coating is applied 2 times, the second layer is applied after the first has dried. The tools used are a brush and a roller. It is advisable to pre-treat the surface with a special primer intended specifically for such purposes.
Sizes and orders
Order for a Russian stove The heat transfer of a stove depends on the area of the surfaces that give off heat.
At the first stage of calculations, the possible heat loss of the house itself is determined. The parameter depends on the material, wall thickness, and insulation quality. If you don’t want to go deeper into the topic, you can use a simple option suitable for average buildings:
- Measure the length, width and height of the interior of the house.
- By multiplying the data obtained, the total volume is obtained.
- Multiply the volume by 40 W/h, obtaining the average energy loss of the building.
Example. The house is 10x10 meters with a wall thickness of 40 cm and ceilings of 2.6 m. The internal volume is 9.6x9.6x2.6. We get 240 m3. Heat loss will be (240 m3x40 W/h) 9600 W/h.
For heating, it is necessary to build a stove with a heat output of about 10 kW/h.
Builders recommend another method of calculation. For 10 m2 of area, the heater power is 1 kW/h. If you multiply 9.6x9.6 m, you get 92 m2. This also gives an approximate furnace power of 92/10 = 9.2 kW/h.
Operating experience shows that a square meter of the surface of a Russian stove is capable of delivering 0.5 kW/h of heat. For calculations, only side walls are taken without taking into account the base and ceiling. Therefore, with ceilings of 2.6 m, the perimeter of the furnace should be 20/2.6 = 7.69 m. Such a perimeter will be provided by a device of 2x1.7 meters.
Based on the dimensions, a suitable working drawing of a Russian stove with order is selected. Schemes can be found on the Internet; they are published by professional stove makers and specialized organizations.
Preparatory work
Preparatory stages:
- development of a detailed drawing of the main structure,
- preparation of concrete mixture, masonry mortar,
- construction of the foundation.
Scheme of a Russian stove with flooding
You can develop a diagram of a Russian stove yourself or download it from the Internet. Figure 1 shows a diagram of a stove with a stove bench and a firebox (below), capable of heating a room of up to 60 square meters. m.
Rice. 1
The installation location of the stove set is clearly shown in Figure 2:
Rice. 2
Preparation of mortar for masonry
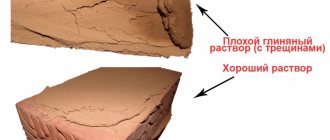
To ensure that combustion products do not enter the room during operation of the stove, the masonry must be carried out using high-quality and heat-resistant mortar. As the main ingredient, fatty clay is introduced into its composition, which will provide elasticity and prevent cracking when drying.
The purchased clay must be cleaned of debris, pebbles and various impurities. Then it should be soaked in a container of water for 24 hours. Pass the swollen clay through a strong metal mesh with a mesh size of no more than 5 mm. In this way, you can achieve homogeneity from the clay mass and rid it of small inclusions.
If the sand is purchased sown in bags, then there is no problem. And if the material was brought by a dump truck directly from the quarry, then it should also be well sifted.
You can find the right proportions experimentally: mix a small amount of ingredients in several versions and make cakes 1 cm thick. After the cakes have dried, check for cracks. In which of them there will be fewer cracks, such proportions of ingredients should be used as a basis when mixing the entire mass of the solution.
Making the foundation
The foundation of a Russian stove is constructed in the following order:
- excerpt of the pit;
- compaction of the foundation pit;
- filling the underlying layer of crushed stone 15 cm thick with layer-by-layer compaction;
- installation of a sand cushion 10 cm thick with watering and thorough compaction;
- installation of formwork. To prevent moisture from leaving the concrete mixture, the walls of the formwork from the inside of the pit must be sheathed with sheets of polyethylene film, overlapping at joints measuring 15 - 20 cm;
- knitting a frame from reinforcement;
- pouring concrete mortar.
After the concrete has hardened and gained strength, the formwork is dismantled and waterproofing measures are carried out: the side walls are coated with bitumen mastic, the upper plane is covered with two layers of roofing felt.
Laying order and arrangement
The laying of a Russian stove is carried out using the following order as a basis:
| Row No. | The order of the masonry of a Russian stove with flooding |
| 1 | The brick is laid solid: first they form the outer perimeter, and then fill the inner part |
| 2 | Form the bases of cleaning channels, furnace walls, ash pans |
| 3 | The masonry of the second row is repeated, with the difference that the seams are covered with entire blocks. Fix the blower door and cleaning chamber in the masonry. To do this, use steel wire, one end of which is attached to the door frames, and the other is placed in the seam between the bricks |
| 4 | Completely repeats the pattern of the third row (in dressing) |
| 5 | Continuing the formation of channels, laying the grate and installing the combustion door |
| 6 | Laying out the firebox with fireclay bricks and installing a water heater |
| 7,8,9,10 | Repeats the pattern of the sixth row |
| 11 | The furnace firebox is framed with a corner and the hob is mounted |
| 12,13,14 | Formation of the furnace chamber and the base of the chimney |
| 15,16, 17 | Formation of the furnace chamber, extension of the chimney channel |
| 18 | Formation of the arched vault of the furnace |
| 19; 20 | Extension of furnace walls |
| 21,22 | Formation of the overlap, the beginning of the narrowing of the overtube |
| 23 | A cleaning door is installed in the chimney |
| 24 | Installation of a valve for adjusting draft |
| 25,26 | Cover the space above the damper |
| 27, 28, 29 | Combine the overpipe with the chimney channel |
| 30,31,32 | The furnace flue channel is formed |
Example of a finished design
Example 2
Preparation of materials and tools
To build a Russian stove with a flood chamber with your own hands, you need to prepare in advance the full amount of building materials, tools, auxiliary equipment, as well as shaped parts made of cast iron and steel.
Materials
To design a Russian stove of traditional shape and dimensions: 1.9 - 2.0 m high, 1.6 m wide and 2.38 m long, you will need:
| Name of material or shaped part | Unit | Quantity |
| Hardened red brick M – 200 | Thousand PC. | 1,75 |
| Fireclay fire-resistant brick | Thousand PC. | 0,23 |
| Oily clay | kg | 250 |
| river sand | kg | 300 |
| Hob with two burners 40x70 cm | PC. | 1 |
| Grate 20x28 cm | PC. | 2 |
| Grate 25x38 cm | PC. | 1 |
| Fire door 25x21 cm | PC. | 1 |
| Fire door 25x18 cm | PC. | 1 |
| Cleaning door 13x13 cm | PC. | 2 |
| Blower door 25x15 cm | PC. | 1 |
| Smoke damper 18x26 cm | PC. | 1 |
| Damper 38x45 cm | PC. | 1 |
| Water heating tank 28x12x50 cm | PC. | 1 |
| Steel corner 5x60x60 mm | m | 1,5 |
| Steel strip 5x50 mm | m | 20-25 |
| Steel sheet 5x50x50 mm thick | PC. | 1 |
A Russian stove with a flood chamber is a rather massive structure and requires reliable support. When calculating its dimensions, not only the weight and dimensions of the furnace are taken into account, but also the soil composition and groundwater level in the area of the future pit. The support in the form of a rectangular slab should be wider than the main structure by 10-15 cm in each direction, and the depth, depending on the characteristics of the soil, should be 50-80 cm.
Concrete can be purchased ready-made, but it will be cheaper to mix it yourself. To build a monolithic foundation slab 1.7x2.5 m and 0.6 m thick, you need to purchase:
- crushed stone - 4.2 m3 (0.7 m3 - for the underlying layer and 3.5 m3 for concrete);
- sand - 3.5 m3 (0.43 m3 - underlying layer and 3 m3 - in concrete mortar);
- cement M400 - 0.66t (13 bags);
- reinforcement with a diameter of 8÷10 mm - 85 m (53 kg);
- board for formwork 40 mm thick - 0.2 m3;
- roofing felt - 9 m2;
- polyethylene film - 5-6 m2.
Tools
A standard stove maker's kit should consist of:
- Trowels (trowel) - used to take the masonry mixture from the container and distribute it over the surfaces of the brick. During the process of laying a Russian stove, a trowel is also used to clean off excess mortar that has protruded beyond the seam.
- Hammers - picks - split and trim brick blocks to fit individual masonry segments or give them a certain configuration.
- Joints are a special tool for designing seam lines.
- Cords - moorings - control the straightness of the rows and the perpendicularity of the walls, but more often craftsmen perform this work with a plumb line and a building level.
- Ordering - necessary to align the thickness of horizontal seams.
- Plumb line - a device for checking the verticality of walls.
- A building level is a tool for controlling the evenness of each row.
- Rules - used to create a smooth plane on top of the foundation structure.
- Shovels and two containers for making concrete and mortar.
- Measuring bar - for measuring the thickness of the seam.
We increase the efficiency of the Russian stove due to the lower heating
As I already drew your attention to earlier, the lower flood in the Russian stove is a modern modification. A chimney channel runs into the lower part of a modern Russian stove, which serves to heat the lower part of the stove. This is a huge contribution to reducing the amount of fuel burned
Moreover, if you heat a Russian stove with a stove bench only through the main firebox, then your feet will simply be cold and you will have to walk around the house in warm shoes. But the lower heating of the Russian stove solves this problem easily and simply! This is how it looks in the photo of a Russian stove with a bottom flood
This is a huge contribution to reducing the amount of fuel burned. Moreover, if you heat a Russian stove with a stove bench only through the main firebox, then your feet will simply be cold and you will have to walk around the house in warm shoes. But the lower heating of the Russian stove solves this problem easily and simply! This is how it looks in the photo of a Russian stove with a bottom flood.
Thus, we double the area of the heating source! Therefore, to heat the same room to the desired temperature, you will need half as much wood as if you had a classic Russian stove
. Well, now let's turn to solving the second problem - fast cooking. This solution follows from the first thesis.
A Russian oven with a stove is the best solution for cooking in such an oven. After all, it’s worth throwing a few firewood into the lower flood, and within 15 minutes the stove of the Russian stove will be hot enough to heat water or heat up food. Unlike the classic version, when you want the wood in the hearth of a Russian stove to burn out, only coals remain. This will take at least an hour. And such a Russian stove with a stove
- the most effective solution in 2022!
Russian stove for a summer residence
.
Now let's talk about sizes. I specifically want to post a photo where we are designing the dimensions of a Russian stove with a hob
. This is a photograph of the same Russian stove No. 180,
If you take any version of the Russian stove with a stove bench
- then such a design in depth (due to the couch) has a dimension of at least 2.5 m! It’s not easy to imagine a country house with dimensions of 5x5, that is, 25 squares, where 3.5 squares are occupied by a stove, because there is already not much space... and most importantly, a huge amount of brick and firewood goes into the stove, which is not always affordable for the owners of small houses. In our case, the customer and I came to the conclusion to completely abandon the couch, which would take up a lot of space.
The size of my Russian stove with hob and heating element
came out: 7 bricks x 6.5 bricks, or 1.7 meters x 1.6, which is quite acceptable for any small house.
Of course, my work is only a private solution for a specific customer. Here, for example, is another one of my Russian stoves with a stove bench and a stove, and a lower heating
.
I built this stove at the beginning of 2010, and I don’t have a photo of the stove bench, but the structure turned out to be huge. I hope you like my work, but the price for such a Russian stove will be much higher due to the large volume of work. Russian stove No. 182
If you are interested in my approach to work, then I am always ready to help solve any of your problems in the field of laying Russian stoves
, especially since there are not many stove makers in St. Petersburg with such real experience and their own photographs.
And there are many factors: firstly, this is not the most common task. For example, over the course of the entire year, 10-12 people may contact me with a request to lay a Russian stove with a stove
.
And many people by the price of a Russian
stove.
The price of work on a Russian stove
ranges from 180,000 - 350,000, the same range of materials, depending on the volume and type of brick.
In order to give any assessment of my work and the necessary materials, I need to fully understand the task. To do this, call me directly, I will identify all your needs, describe all the parameters for myself and be able to draw up an estimate for your Russian stove.
Advantages and disadvantages
The main advantage of the Russian stove is that it takes a long time to cool down.
The advantages of the Russian stove include the following properties:
- Durability. The brick structure, subject to operating conditions, will last for decades.
- High degree of fire safety.
- Cooking occurs without direct contact with fire.
- The oven is cooling slowly.
- Wide functionality of modern models.
- Low cost. This is due to the simplicity of the design and the lack of automation.
- You can build it yourself. A design for the future furnace is first created, and then installation work is carried out.
The disadvantages are the following:
- Low efficiency (about 30%) compared to modern heating devices, whose efficiency exceeds 90%.
- Uneconomical consumption of firewood.
- Uneven heating of the room. The difference between the top and bottom points can be 20°C.
- Uneven combustion of fuel. Wood in different parts of the stove burns with different intensity.
- It is impossible to observe the cooking process.
After studying the positive and negative qualities of the Russian stove, you can decide whether to make it in the house or not.
Laying 7-10 rows
The seventh row is laid out in the same way as the fifth, squeezing the butts of the side walls under the heel. The eighth row is formed according to the same principle as the sixth. This is where the creation of the foundation for the pole begins, which includes three rows of full-size interlocking bricks. The countdown starts from the frontal plane of the unit.
The ninth row repeats the location and shape of the bricks of the seventh row. The base of the pole continues to be laid out on it. It is formed above the arch of the substructure, forming a continuous lining. When laying out a Russian stove with flooding, the order must be followed exactly, otherwise the design will turn out to be unreliable.
The corners of the tenth row are laid out from 3/4 bricks, the sides from full-size spoons, and the back from full-size bonded bricks. The front part of the structure is laid with three rows of full-size bricks deep. As a result, each row should have 7 bricks laid flat. As a result, a special plane is formed - a sixth. The space created between the back wall and the pole must be filled with gravel, sand and clay.
What materials will be needed for construction?
- red brick – 750 pcs.;
- fireclay clay;
- sand;
- felt or asbestos fiber for insulation;
- roofing felt on the bottom layer also for heat and waterproofing;
- fasteners;
- metal corner, sheet and steel wire;
- grate – 2 pcs.;
- doors for the combustion chamber and ash pan – 2 pcs.;
- damper – 1 pc.;
- valve – 1 pc.
... and tools:
- building level;
- spatulas;
- Master OK;
- drill with a mixer attachment for mixing the solution;
- buckets;
- sieve for sifting clay and sand.
Don’t forget about the tools: spatula, trowel, drill with mixer. Additionally, have buckets or tanks and a sieve on hand. To ensure the oven is level, use a level.
Types of Russian stoves
Small Russian stove When selecting a project, pay attention to the classification of heating devices. Furnaces differ in several parameters:
Furnaces differ in several parameters:
- Size. An economy option with dimensions up to 1500x1700 mm is most often built in a bathhouse or summer kitchen. Medium-sized ones with sides from 1500 to 1700 mm are used in small houses and in the kitchen. The composition may include a stove, fireplace, ovens. Large forms from 1.7 m are used for heating large houses or as kitchens in public catering. The buildings are equipped with full-sized beds, baking cabinets and cooking surfaces.
- Location. There are free-standing or combined models with fireplaces, hobs, barbecue areas, etc.
- Device. The traditional look has unheated elements at the bottom. Modern structures are heated throughout their entire height.
- Firebox method. Black and gray are now used extremely rarely. Modern designs are heated “on white”.
Before construction, carefully consider the options for using the device, which will save money on construction and choose the optimal location of the stove in the house.
Selection of furnace design
There are countless designs for brick wood stoves, and experienced craftsmen are constantly coming up with new designs. A home owner who decides to build a brick stove will have a hard time choosing a suitable heater. Therefore, first give clear answers to the following questions:
Advice. At first, a beginner should not take on the task of laying a serious brick stove in the house, but to begin with, build something simple and small in the yard - a barbecue or grill, fortunately, quite a lot of such projects have been published. After practicing and becoming more experienced, you will understand the nuances of this work and begin building a home heater with more confidence.
Of course, an ignorant person is unlikely to be able to immediately build a beautiful stove with a built-in panoramic glass with his own hands. But you can always invite a stove-maker to carry out this work and provide consultation. As a rule, these people are friendly, because building a home should always be approached with soul. As for choosing a project, you are offered 3 simple options:
The technology for building the original rocket stove is presented in our separate guide.
Cooker with water boiler
This stove has dimensions of 890 x 510 mm and is designed for cooking while simultaneously heating water in a tank located in the path of the flue gases leaving the furnace. The total heat output of the stove is 1.2 kW when adding firewood twice a day. Below this furnace is shown in cross-sectional drawings:
The stove contains a tank-boiler that is connected to the water heating system of the house
Such a small-sized brick oven, built with your own hands, is quite simple to make and will take up little space in the kitchen. Subsequently, a heating shield can be attached to it in order to extract more heat from the flue gases. The masonry diagram below shows the order of the furnace:
To assemble the hob yourself, you must purchase the following materials and stove accessories in advance:
Note. Hereinafter, the dimensions of fittings and materials are indicated in millimeters.
Also, for lining under the stove you will need roofing steel and asbestos sheets measuring 115 x 64 cm, and for laying in front of the stove on the floor you need a sheet of metal 50 x 70 cm.
Dutch duct stove
This classic duct-type heating stove actually comes from Holland. Its advantages are simplicity and undemanding quality of materials, and the body of the stove can be increased to any height and thus heat rooms on two floors. In addition, the Dutch oven can be safely considered a mini-oven, since it occupies a small area.
Making a simple 3-channel Dutch oven, shown in the drawing below, will not be very difficult for an experienced craftsman. A beginner will have to work hard to make high-quality masonry with plan dimensions of 1010 x 510 mm, extending to a height of more than 2 m plus the chimney. But first, it is suggested that you familiarize yourself with the laying diagram of this brick kiln and the order:
From the drawing it is not difficult to understand the principle of operation of the Dutch oven - combustion products heat the walls of the heater, moving along the internal vertical channels
For construction you will need the following materials:
Heating and cooking stove
The design of this heat source is more complex, although outwardly the stove resembles the same Dutch oven. Its dimensions are 650 x 510 mm, and the developed thermal power is about 1.5 kW. By the name of the brick stove - heating and cooking - it is easy to understand that it is intended both for heating rooms in the house and for cooking. The construction diagram is shown in the figure:
Diagram of a combined stove for heating and cooking
Important point. If you carefully study the diagram, you can understand that summer operation is not provided for in this simple design.
This means that cooking on a stove in the summer will be hot if it is located in the house. You will have to cook in a different way or choose a more suitable heat source design. Homeowners who are not embarrassed by this fact are offered a list of materials and procedures to successfully build a brick stove:
Device order
Laying layers in rows:
1. Laying reheated bricks without screeds on a material that will protect the structure from water penetration.
2. Solid bricks on the sides of the future hearth must be placed edge-on.
3. It is recommended to install a blower door.
4. Conventional bricklaying
It is important to remember to leave a gap for the cleaning channel
5. Continuation of the cleaning channel. Construction of the base for the arches.
6. Narrowing the cleaning channel and installing a grate.
7-8. Placing a sheet of steel. Fastening the wire for tight installation of the combustion door.
9. Creation of sand bedding. The hearth bricks are installed in a complete row on edge.
10-11. Installation on top of the hob. On the edge of the hearth you need to lay out bricks, divided in half.
12, 13, 14. The rows are laid out similarly to the previous ones.
Photo 4. Option for arranging a Russian brick stove with a firebox and a hob. The construction includes 27 stages.
15. Raising the arch.
16-18. Laying knitting metal wire. Narrowing of the arch.
19-21. The final stage of building a bed.
22. Raising the height.
23-31. Formation of a pipe channel. Installation of blower and valve.
Difficulties when working with your own hands
A number of difficulties that you may encounter during construction:
- Insufficient knowledge of the stove craft.
- Delays in the construction of the device due to lack of time or experience.
To facilitate the construction process you need:
- Lay bricks only one at a time. If you are a beginner, it is better to lay out each new row on a dry, flat surface.
- Before laying, thoroughly clean the brick from crumbs and dust with a hair brush.
- Dip the ceramic brick into clean water for a few seconds, then shake it off. The rule does not apply to fireclay bricks.
- If the brick lays incorrectly the first time, it needs to be removed, cleaned off the mortar and put back.
- Do not forget that the removed solution is not suitable for use.
What kind of brick should the stove be made of?
The main building material for the construction of the furnace is red ceramic brick grade 150, made from baked clay. Its dimensions are standard - 250 x 120 x 65 mm, although in past times other stones were also produced for stove making. But now all the dimensions are unified, so the fireclay (fireproof) brick, from which the firebox of the stove is often laid, is the same in size as a regular one.
Stone 88 mm high is also used in construction, but it is not suitable for laying stoves because it has cavities. Here, only solid stone is required, without voids and cracks, of good quality. True, there is 1 exception - a Dutch oven, it can be laid from used bricks. But you shouldn’t take it to the point of absurdity; a heat source made of cobblestones definitely won’t provide heat.
The fact is that a heating and cooking stove, built with your own hands from low-quality red brick, can crack even at the stage of drying of the masonry mortar. It should be noted that the clay mortar dries, and does not harden, like cement. Therefore, beginners are not recommended to experiment with bad or used bricks, otherwise the newly built stove will immediately require repairs.
The firebox of a wood stove is formed from fireclay stone (if required by the project)
A separate recommendation concerns masonry mortar. At first, you should not go to the nearest ravine for clay, because it still needs to be brought to the correct condition. It is better to buy a ready-made building mixture for laying stoves, clay or fireclay.
How to fold a stove with your own hands: step-by-step instructions
The construction of brick stoves requires care and a lot of patience. The time that will have to be spent on masonry depends on the dimensions of the structure and the qualifications of the worker. In order to complete the work as quickly as possible, it is necessary to understand in detail the features of furnace construction and determine the principle of work.
So, regardless of size and type, the construction of a cooking heating structure includes:
- Preparatory stage. At this stage, the dimensions of the stove are calculated, its location in the house is determined, and drawings are prepared.
- Laying the foundation - the foundation for the furnace.
- Formation of the ash chamber and purge channels.
- Installation of the stove panel and formation of a cooking niche with two channels.
- Formation of a steam exhaust channel.
- Organization of the drying chamber and chimney.
- Laying a chimney.
An outdoor stove is installed in exactly the same way. After completing the work, the structure should be dried. Drying can be natural or forced. In the first case, drying takes 6-9 months, in the second - 3 weeks.
We put the furnace into operation: drying and test firing
The oven is dried using shavings, chips and small logs. Initially, no more than 30% of the usual volume of fuel is added, then the volume is gradually increased. Drying time depends on the size of the kiln and the moisture level of the brickwork. The result of high-quality drying of the oven should be the complete absence of damp spots on its surface and the absence of condensation on metal elements. The valve and combustion damper are opened for the entire drying period. The surfaces of the oven during drying should have a temperature of about 50 ° C.
After drying the oven, a test fire is carried out. Pre-check the draft and tightness of closing the valves.
The first lighting of the stove is carried out in the following sequence:
- With the valve open, they place dry firewood in very dense rows, filling the furnace as much as possible. The valve at the mouth closes tightly during lighting.
- Subsequent stacks of firewood are made after the first stack burns down to coals. Their volume is already a third less than the first bookmark.
- The degree of combustion in the furnace should be adjusted using a valve.
- After all the wood has burned, they wait until all the coals have burned out. The pipe valve can be closed only after the fuel has completely burned out. If there are a few unburned coals left, it is better to extinguish them yourself so that the heat does not escape.
- To prevent cracking, the oven should not be overheated; its temperature should not exceed 90 °C.
Cleaning the oven
Before the start of the season, the internal surfaces of the stove must be cleaned of soot and ash with a poker. The chimney is cleaned more often as it becomes dirty. With proper design and proper operation of the stove, almost no soot is formed, but to prevent its formation, it is still recommended to periodically heat the stove with aspen or alder wood.
Design elements
Elements of the design of a Russian stove To understand the drawings, explanations for them and understand the order, you should study the terms used by stove makers.
- A firebox or crucible is a part of a structure in which fuel is burned and, in some cases, food is cooked by baking or simmering.
- The vault is a massive element that bounds the top of the furnace. The laying is carried out without voids. Due to the large mass of stone, the vault accumulates heat during combustion and warms the room for a long time in the period between laying firewood.
- Under (flat) - the bottom of the firebox, necessary to give the structure strength.
- Cheek (chip) - the façade of the furnace, combining the under, crucible and vault.
- The mouth is the opening of the furnace through which fuel is added and dishes are loaded.
- The sixth is a horizontal surface that makes it easy to work with dishes. Utensils are placed on the platform before placing them in the crucible and after removing them.
- The subrack is used to store utensils, fuel and other accessories. The element is located under the pole and does not heat up.
- The oven is the space under the hearth in which a supply of firewood is stored.
- Hailo is a device connecting the furnace and the chimney.
- Stoves are niches that increase the area of the walls and improve heat transfer. The recesses are used for drying herbs and small items.
- Threshold (tooth, gas threshold) - an arc-shaped ceiling of the arch to retain hot flue gases and increase the heat transfer area, thereby increasing efficiency. Sometimes the element is called a scutum or shield.
- The roof is the part of the stove on which the stove bench is installed.
- The hearth is a hollow space to increase the combustion time of flue gases.
- The subtop is a small oven located under the hearth or on the side of it.
How does a heating stove work on two floors?
To fully understand how a stove works in a two-story house, you can pay attention to the photo. If the house is made of brickwork, then the stove can be installed on steel beams, which were initially built into the walls of the building. When installing beams, you need to use spacers that will soften the effect of weight on the walls and thereby prevent their deformation
The space between the beams is filled with ordinary mortar, but clay mortar is used to reliably cement the furnaces
When installing beams, you need to use spacers that will soften the effect of weight on the walls and thereby prevent their deformation. The space between the beams is filled with ordinary mortar, but clay mortar is used to reliably cement the furnaces.
When installing stoves for heating a cottage, it is necessary to maintain the independence of the systems: each stove in a two-story cottage must be able to operate separately from the other. If desired, a fireplace can be installed into the erected structure, which will add an additional dose of comfort. If you choose a heating and cooking option as the main stove, located on the lower floor, then this design will provide the house with everything necessary.
Home heating options
The choice of heating method depends on the layout of the building - side or bottom. The first option is the best solution for houses with several rooms, since the adjacent room is heated using a side heating panel. The second method is used to supply heat to one room, but having a larger area.
The walls of the sub-floor space are heated from below. Currently, in order to increase efficiency, designs are equipped with a bell-type combustion, which makes it possible to ensure uniform heating and stable draft. In such units, fuel burns completely and less soot accumulates in them.
Ordinary masonry of the stove
After preparing the base and familiarizing yourself with the drawings, you can move on
It is important to strictly follow the order indicating the correct position of the bricks and installation of stove fittings
With stove and bed
If you plan to bake a stove with your own hands, then the simple procedure looks like this:
- Make a continuous and even row.
- Lay out the internal compartments, design the cleaning channels and ash pan chamber.
- Place the door of the blower and cleaning chamber. Secure them with steel wire, placing the ends in the seams.
- Close the vault, block the entrances to the channels, form holes and decorate the ceiling of the bottom channel from the inside.
- Fix the grate in a large firebox. Carry out the internal masonry without mortar; it is better to use fireclay, cutting it in half in thickness. Place the door on the small firebox.
- Install the hot water tank.
- Place the grate on the small firebox and the door on the large firebox. Stretch the right wall with a strip of steel. There is no need for mortar behind a large firebox.
- Install and secure the small firebox door. Continue to output internal channels.
- This row is combined with the previous one.
- Lay out the bottom of the furnace, combine the combustion vaults. Bring the channel holes into the chamber and close the water heating tank.
- At the edge of the masonry, secure a 5x5 cm metal corner between the fireboxes. Cover the space of the large firebox behind the stove with a grate. There is no need to secure it.
- Form the chimney and the walls of the furnace. Install a damper on the left.
- Continue the algorithm.
- Form an entrance to the chimney. It will be opened by a valve (vertical). Remove the walls of the furnace and make a hole for the damper.
- Begin to narrow the masonry, blocking the roof of the chamber. Proceed with the removal of the chimney.
- Reinforce the walls with strips of metal.
- Secure the back wall with a strip of metal. Narrow the chamber vault further and prepare to lay the vault. Above the niche with the slab, lay a corner and a strip of metal - the basis for the masonry that creates the ceiling.
- Lay out the outer walls and roof of the furnace in the shape of a dome. You can install a template or weld an arch from strips of metal.
- Strengthen the wall above the entrance to the chamber with a strip of metal and surround the roof of the furnace with walls.
- Pour sand and compact it.
- Proceed to the base of the bed. Lay a sand embankment and narrow the slit in front.
- Narrow the overpipe and install a panel with a circular hole to change the direction of the smoke.
- Install the cleaning window door.
- Install the draft control valve.
- Continue to cover the space.
- Work according to the algorithm.
- Combine the overpipe and chimney on rows 27-29. Lay out the chimney before starting to form the groove. In the place where the chimney passes the attic floor, use cement mortar.
When the pipe is brought to the roof, make an otter - an extension above the roof in the form of an overlap. Close the gaps between the roof and the chimney with waterproofing.
The Russian stove with a fireplace and a stove bench is multifunctional. It gives warmth, they cook food on it, and they rest on top. Any things will dry on it instantly.
With a stove for a cauldron
Both the components and the masonry resemble a Russian stove with a fireplace and a stove bench. Refusal of the latter is beneficial due to the reduction in dimensions and a stove on which a large cauldron will fit. The order is:
- Make a level and continuous base.
- Install an ash chamber.
- Secure the cleanout doors.
- Place the grate.
- Form a flood chamber.
- Start lining the firebox.
- Start building the walls.
- Align the corners.
- Align under.
- Form a hailo.
- Place the stove.
- Build a combustion chamber.
- Close the smoke duct.
- Form the roof of a large firebox.
- Build walls.
- Continue the previous row.
- Connect the walls with the arches.
- Continue the row.
- Insulate the furnace.
- Take care of the general overlap.
- Continue the algorithm.
- Set the valves.
- Install cleanout doors.
- Continue the previous row.
- Follow the algorithm.
- Close the channel.
- Form a chimney.
- Install the valves.
All that remains is to build the pipe to the ceiling. Cover it with 2x1.5 bricks. To insulate the ceiling, non-combustible material is used - metal, asbestos.
You can build a stove with a firebox and a stove bench. In this case, the length of the combustion chamber is increased or an extension is built, inside of which there will be smoke channels.
Are you planning to build a Russian stove for yourself?
Not really
Recommendations for use
The stove does not require maintenance. To avoid undesirable consequences, you must follow the rules for using a mini-oven:
- You cannot fire two fireboxes at the same time. In this case, the ash and combustion doors of the unused firebox must be tightly closed;
- Do not use flammable liquids such as gasoline or kerosene for kindling;
- keep the heater damper closed. If there is a need to open it, then first you need to open the ventilation duct valve;
- monitor the amount of ash. Remove it in a timely manner, otherwise there will be no fuel savings, because it will absorb heat and the heating of the rooms will deteriorate. It is better to do this procedure at least twice a week;
- you need to let the fuel warm up well for ten minutes, and only then start cooking food in the oven;
- It is not very practical to use paper for kindling - it burns quickly. It’s better to put wood chips or birch bark in the oven;
- Check periodically for any cracks in your stove. If any are found, they need to be repaired. If the damage is significant, then major repairs will have to be made. A clear indicator of a problem is a decrease in the heating temperature produced by the stove. The house has become colder - inspect the stove;
- It is preferable to carry out repairs in the warm season, when the stove is not used for heating;
- Before burning fuel, you need to close the doors of the ash pit and fireboxes;
- you need to clean the chimney in a timely manner;
- It’s better to start heating the stove during the day, then by the evening the whole room will warm up;
- It is preferable that the fuel be dry. And to ensure that it is not exposed to moisture and water and does not become damp, store it in a specially designated place. It should be dry and closed;
- It is desirable that the logs are approximately the same thickness and length. This is necessary because thin ones burn too quickly, and thick ones, on the contrary. The house will not be heated well enough in this way;
- stack the logs not randomly, but in a certain order. First, rake the coals with a poker closer to the door. Place a log across it. Then thinner firewood is laid obliquely, and thicker firewood is laid on top of it.
Mortar for laying the stove
The thinness and elasticity of the composition and the absence of cracks after drying are important. You can use a ready-made mixture from the store or make it yourself. For this you need purified clay. It needs to be soaked in water, and after a day kneaded with sand - first, several variations of the solution are made for testing, changing the proportions. From each they form cakes, 1 cm thick. After 2-3 days they are examined - where there are fewer cracks, the composition is better.
66cc21e0577ca4d907f14c51c1e7267e.jpe
To ensure uniformity of the clay, after soaking it is wiped through a mesh with 0.5 cm cells. When preparing the solution for the firebox, it is better to replace ordinary sand with fireclay powder. Mix it with clay 1:3(4).
Chimney installation
The chimney required for the operation of a Russian stove is absolutely no different from the chimney of any stationary solid fuel unit, be it a “Dutch”, “Swedish” or some new-fangled bell-type stove, calculated using computer modeling. The design and arrangement of the chimney can be taken from the drawing below.
Chimney device for a Russian stove with orders
During the work process, we recommend following a few simple rules:
- The design and installation location of the pipe for removing combustion products must comply with the standards of the current SNiP.
- At the point of transition from the ceiling to the attic, the pipe should thicken.
- The lower part of the chimney is placed on the same solution as the stove.
- The internal cross-section of the smoke duct must correspond to the power of the heating device.
- Above the roof, the chimney is built using a mortar with the addition of cement.
- The places where the pipe passes through the ceilings are insulated using non-flammable and waterproofing materials.
During work, the geometry of the structure and the deviation from the vertical are constantly monitored using a level or plumb line.