When arranging a heating system, it is necessary to take into account many factors, among which correctly installed radiators play an important role. Installation of heating devices is impossible without the use of special fasteners, in particular, radiator brackets. They will help securely fix the radiators, which in this case will last for a long time without requiring repairs or special maintenance. We present all the necessary fasteners for installation on various base surfaces of radiators made of cast iron, aluminum and bimetal.
Connection to pipelines
The final step when installing heating radiators in an apartment with your own hands is connecting to the pipeline system. It can be carried out by the side or bottom, depending on how provided by the manufacturer of the heating device.
In turn, the lateral connection of the radiator to the pipes can be carried out in several options:
Of course, the connection diagram and all other nuances regarding how to install a heating radiator in an apartment must be carefully thought out in advance, before installation work begins. If everything was done correctly, then the result of such work is a comfortable temperature microclimate in the home, allowing you to survive the harsh and cold winter season without any problems.
https://youtube.com/watch?v=3BaaUUG4JZE
Holders for cast iron radiators
The heaviest batteries are cast iron, so the fasteners for them are the most durable and massive. Such a fastening element must withstand not only the weight of the heating device, but also the coolant circulating in it. Since the gaps of the pipes in cast iron batteries are large, a lot of coolant circulates in them, which increases the already considerable weight of the radiator.
To mount cast iron batteries on the wall, separate pins or the same elements mounted on a strip are used. As a rule, such fastening devices are of considerable thickness and are labeled as “reinforced”. The bracket itself may or may not be painted. The standard color scheme for such holders is white, but when installing a designer battery, the bracket can be repainted in the desired shade.
In addition to special brackets, cast iron batteries can be hung on regular hooks. Such elements are sold together with dowels. There is a thread on one side of this hook.
Installation is carried out as follows:
- a hole is drilled in the wall in the right place;
- a dowel is driven into it;
- A hook is screwed into this dowel using a threaded thread on one side.
There is also a special bracket for a floor heating radiator. Such stands can be adjusted in height or have specified standard dimensions. Floor fasteners may differ in the upper arcs, which are responsible for fixing the section on the rack. Thus, there are arcs in the form of a chain consisting of moving links, as well as elements made of steel wire. These stands for heating radiators come complete with clamping bolts.
How to hang a heating radiator on brackets
Almost any radiator is hung on brackets as follows:
- Holes are drilled in previously marked places, dowels are driven into them and brackets are screwed in (when screwing pin brackets, the depth of screwing is determined by the requirements for the gap between the radiator and the wall). The hooks should hit the junctions of the sections.
- The lower brackets are fixed in the same way.
- After installing the battery on the brackets, pressing checks the reliability of the installation and the accuracy of the level.
- If floor supports are used, adjust them in height and secure them.
The algorithm for installing any radiators is the same: high-quality markings, installing brackets, hanging batteries, checking the level, fixing them in place, connecting the pipeline, control and monitoring systems. The nuances of the specific model of heating device and the fasteners used are reflected in the accompanying documentation, but the general construction work is the same.
Heating radiators
How to hang a battery
Installing batteries is considered one of the stages of creating a heating system in a house. Here you need to take into account a lot: the dimensions, the number of heating devices, as well as the design of the mounting of the heating batteries, and so on. To avoid forgetting anything, follow these simple recommendations.
- — heating devices with plugs;
- — spider fasteners;
- — adapters;
- — gaskets;
- - Mayevsky valve or air vent, and also an installation kit;
- — taps with a round hole;
- - metal-plastic or plastic pipes (if necessary).
Before purchasing heating radiators, first of all, calculate how many elbows you will need for any of the rooms. Calculate based on one knee for every two square meters. m. area. It turns out that if the room area is 12 m2, six bends will be required to supply it with heat. When you think about the metal for your batteries, remember that in most cases aluminum batteries are installed in personal homes, and in residential areas - bimetallic ones. Cast iron batteries are gradually being phased out. The battery should be hung with a gap of at least 2.5 cm from the wall surface, otherwise its heat transfer will be low. It is also not recommended to place batteries close enough to the floor surface. Step back 8-10 centimeters from the floor so as not to disturb the heat exchange. And it will be easier to clean under the heating device. If you place the battery under a windowsill, you don’t need to place it too close to it. First of all, mark the places for attaching the spider fasteners: one at the bottom and two at the top. Spider fasteners will be attached to the wall using dowels or by recessing them into the wall and then sealing them with cement mortar. Check the verticality of the fastening using a level. Unevenly hung heating appliances look bad, and heating technology is also disrupted. After installing the spider fasteners, hang the battery on them so that the bottom edges of the water collectors rest on the hook of the support. Next you need to combine the battery with the pipes that lead to the heating system. They are equipped with a thermostatic valve and valve. First of all, insert the Mayevsky tap into the top plug of the heating device from the side opposite to the connection. If you still want to paint newly installed heating devices, remember that they cannot be coated with silver paint or any other iron paint. And you need to be careful not to accidentally paint over the hole in the Mayevsky tap.
how to hang a cast iron battery in 2018
List of tools and materials required to install the radiator mount
Heating radiator installation diagram.
In order to mount the battery to the wall, you must use the following parts and tools:
- dowels;
- brackets;
- Mayevsky crane;
- traffic jams;
- stub;
- horizontal level;
- hammer drill
For concrete or brick walls, you can use brackets, since the strength of the walls will allow them to be drilled for fastening dowels.
Some of the plugs supplied with the radiator are pass-through - they allow the installation of return and supply pipes to them. So, one of these plugs must be plugged, and the Mayevsky tap must be installed in the second.
To fasten steel or bimetallic pipes of a single-pipe heating system, tees with sizes ranging from 25 to 32 millimeters should be used.
Each radiator must be equipped with two tees. In order to properly attach the radiator to the wall, you should also use radiator taps. The use of polypropylene or steel taps is allowed. The material for taps must be selected depending on the coolant. There should be two taps per device.
In order to hang the battery on a wall made of chipboard or plasterboard, you should use special brackets.
https://youtube.com/watch?v=s0y73jaY3Ow
Classification of heating batteries
To understand what heating devices are, you need to study their classification. Types of radiators are distinguished depending on the material of manufacture:
- cast iron;
- steel;
- aluminum;
- bimetallic.
Each type has its own advantages over other models. Therefore, it is difficult to say that any of them is definitely better.
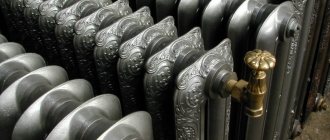
Cast iron models
Batteries made of cast iron are massive, have the ability to retain heat for a longer time, and are not susceptible to corrosion. A definite plus is resistance to large pressure surges. Cast iron radiators are the most suitable option for apartment buildings. The service life is at least 50 years, sometimes longer. Instead of regular models, you can install ones decorated with patterns.
It is worth considering that due to the large mass, it is necessary to select a reinforced mount for cast iron heating radiators.
Steel radiators
A steel battery is a steel casing, inside of which there are plates and pipes made of the same metal. Structures are divided into panel and tubular. A well-thought-out structure allows air to actively circulate, so the room quickly warms up. But the device cools down quickly after the heating supply is stopped, which can be considered a significant drawback. Due to its low weight, mounting the radiator to the wall is not particularly difficult. Compared to cast iron representatives, steel appliances consume one third less coolant, which makes them very economical.
Aluminum radiators
The complex design of the convector allows for efficient circulation of air masses. The thermostat quickly responds to commands, which allows you to change the room temperature in a short time. Depending on the production method, structures are divided into injection molding and extrusion. The first ones are of better quality, but expensive. The latter are cheaper, but cannot be repaired. They are relatively lightweight, which greatly simplifies the installation process. These batteries look attractive, but are not very easy to clean.
Bimetallic radiators
An improved version of aluminum batteries is bimetallic. The system is reinforced with steel elements, which make them resistant to higher pressures. Convectors quickly warm up and begin to give off heat. They weigh a little, making them easy to install. The surface is easy to clean from various contaminants, unlike cast iron models. These devices are more resistant to corrosion. But bimetallic heat exchangers are more demanding on the quality of incoming water.
Standardized distances and number of brackets
Most heating radiators are mounted on the wall under the window opening in the room to create a thermal curtain, because the most heat is lost through the glazing of the window.
When installing a radiator under a window, it is important to observe the following standardized distances:
- the device is mounted so that there is at least 8-12 cm from the floor to its bottom edge;
- there should be at least 3-5 cm from the back vertical surface of the battery to the wall;
- There should be a free distance of at least 6-10 cm to the window sill.
It is equally important to correctly calculate the number of fasteners and determine the location of their installation. The total number of brackets required to install one battery depends on the length of the heater
If the total number of sections does not exceed 8-10 pieces, then to mount the battery you will only need two holders at the top and one hook at the bottom.
If the total number of sections exceeds 10, then three brackets need to be installed on top, and two holders should be placed at the bottom. With the subsequent addition of 5-7 sections to cast iron heating devices and 10 sections to aluminum or bimetallic radiators, the total number of fasteners is increased by two (one holder on top and one on bottom).
Marking fastening points and calculating the number of fastenings
A water heating radiator passively heats the air, radiating heat into the interior of the room and organizing the movement of thermal air upward, receiving a cooled flow from below. For its normal operation, choosing a location where there are no obstacles to performing functions is the main task. Specific recommendations for the location of the heater and corresponding fastenings are given in the technical documentation for the device, but they are based on the following standards SNiP 3.05.01-85:
- the central axis of the radiator should not deviate from the central vertical axis of the window by more than 20 mm;
- the width of the heating radiator should be within 50-75% of the window width;
- the distance from the floor to the radiator is at least 60 mm;
- the gap between the radiator and the wall is in the range of 25-50 mm. Closer to 50 mm is better;
- the distance between the battery and the window sill is at least 50 mm.
Recommendations for placing heating radiators under classic windows.
Some tips:
- The batteries need to be placed further from the entrance, in a niche under the window, then it will not fog up.
- If it is impossible to comply with the standards in a tight niche under the window, you need to make decorative holes or slits in the window sill board.
- It is necessary to maintain a slope of 4-5 mm in the supply pipe to the heating device so that air pockets do not form in the radiator.
Is it worth it to install radiators yourself?
Many experts do not recommend installing a radiator in a city apartment yourself unless you have good skills in this matter. We are inclined to agree with this opinion for a number of reasons:
- Installing a radiator requires some time, even for experts. If you don't have experience, it will take much longer. And during the period of work it is necessary to turn off the heating throughout the riser. Although, of course, you can postpone everything to the summer, when there is no coolant in the system.
- In addition to time, as we have already said, experience is required. Connecting radiators to a heating system is a very important matter. If you undertighten or overtighten any of the connections a little, and after some time it may lose its tightness. You will flood not only yourself, but also your neighbors with hot water.
- Proper mounting of the battery to the wall is also very important. We will talk about this further.
In fairness, it should be noted that all of the above also applies to performing work in your own home. But in this case, all the damage will concern only you, so the degree of responsibility is still somewhat less.
Types, design and application of fasteners
Wall mounting
Here, manufacturers do not spoil us with variety: wall mounting brackets come in only two varieties.
- Angular (plate, cantilever). Behind these names lies only an L- or T-shaped steel plate with holes for screws. After marking the attachment points, the bracket is attached to the wall using a standard mount or (which is much more reasonable) anchor bolts; the heating device is hung by the collector on a plate with a recess perpendicular to the wall.
The product is suitable for lightweight aluminum batteries.
- Pin brackets are a curved rod with a pipe thread that is screwed into a plastic dowel. The dowel, in turn, is driven into a hole pre-drilled in the wall. This type of fastening is noticeably more reliable than the previous one and is designed for greater load.
This type of fastener has a greater load-bearing capacity.
Please note: it is better to hang massive cast iron heating devices on pin brackets.
crazy hands
If for some reason you do not have the opportunity to purchase a mounting kit for wall mounting of a radiator, the situation can be saved by ordinary smooth fittings with a diameter of 10 - 12 millimeters.
- The radiator is placed on any supports (bars, bricks, etc.) in the working position.
- Mounting points are marked on the wall. Their total number is selected at the rate of one per three sections of the heating device; In this case, both the upper and lower collectors need fastening.
- The wall is drilled under reinforcement with a diameter 0.5 mm less than the own diameter of the rods.
- The reinforcement is cut into pieces of approximately 25 cm; on one side (hammered into the wall) the chamfer is removed.
- The rod sections are hammered into the wall, after which the heating device is hung on them.
- The edges of the rods are bent upward using any pipe as a lever and cut in place.
Floor mounting
Here are the most common types of floor brackets.
Bracket K10.100.
This floor mount for aluminum radiators is designed for fixed depth sections (100 millimeters). The heater is installed on a support with the lower manifold; the rear fins of the sections are fixed with a pair of screw clamps.
Bracket K 21.7.
Unlike the previous one, this product:
- It is adjustable in height, which allows you to install the heating device both at a minimum distance from the floor and with a gap below it.
- Universal: you can install an aluminum or bimetallic radiator of any size on it.
The retail price of the stand varies from 300 to 450 rubles.
Installing the heater on a rack is extremely simple:
- The upper holder is set at the desired height;
- The radiator is hung on it;
- The lower holder rises to the level of the lower manifold and is clamped with a screw.
Bracket K10.7.
Another device for fixing a heating device of fixed dimensions. In this case, it is designed for a center-to-center distance between collectors of 500 mm with a section depth of 100 mm. The absence of moving parts makes it reliable and cheap (retail cost is only 200 rubles).
Bracket K 11.33.
Here is an adjustable stand for panel radiators; The diagram makes it clear how to fix them with stops. The maximum mounting height is 640 millimeters (along the upper edge of the radiator); The retail price of the product is 350 rubles.
Bracket K 10.10.
Economy version of the mount for a panel steel radiator. There is no height adjustment; The simplest method of fastening the panel is used - standard eyes are put on the hooks of the racks. The cost predictably turns out to be very affordable: in batches of 100 pieces, K 10.10 can be purchased for 150 rubles.
Bracket K 12.3.
Unlike previous products designed for relatively lightweight aluminum and bimetallic heating devices, K12.3 is a floor mount for cast iron radiators.
Please note: cast iron appliances are not only heavy in themselves. They also have an impressive internal volume (up to 4 liters per section), which significantly increases the load on the mount after filling the battery with coolant.
The lower rack holder is rigidly fixed; This is where the main load falls. The top one is movable, which allows you to install a device with a height of both 500 and 350 mm.
Bracket K 11.3.
The difference from K 12.3 is only in the ability to adjust the height of the lower collector above the floor. Otherwise the products are completely identical.
Recommendations
We take the liberty of giving the reader some recommendations for floor installation of radiators.
- The racks must be secured as rigidly as possible - with anchors or, when installed on a wooden floor, with thick (at least 8 mm) self-tapping screws with hexagonal heads.
- On a wooden base, it is better to additionally secure the battery to the wall. Even to a light internal partition: this will significantly reduce the likelihood of the racks falling and breaking the tightness of the liner.
- As already mentioned, when installing the device in the middle of the room, it is better to lay the connections to it hidden, in the floor. The instructions are due to the fact that, for example, metal-plastic pipes are quite capable of deforming under the weight of an overweight person.
The photo clearly shows the eyeliners going into the floor.
Features of radiator installation instructions
You should first mark on the wall the place where the radiators will be hung. So, initially, using a pencil, a place for the brackets is outlined. In the future, when installing steel radiators, it should be taken into account that the brackets should be located at the joints between.
After the markings have been applied to the wall, holes of the appropriate diameter should be drilled in the wall. The size of the hole must correspond to the diameter of the dowel supplied with the radiator. After this, a dowel should be inserted into the hole, into which the bracket will later be screwed.
Diagram of the dependence of radiator power on the installation method.
must be carried out in accordance with certain requirements. The threaded part should be unscrewed from the tap and a winder should be wound onto the free thread. In this case, the winding can be a special paste that is resistant to high temperatures. This paste can provide high-quality tightness of threaded connections. Together with the paste, it is allowed to use tow with paint or fum tape.
When using tow, paint should be applied to the threaded area of the part and spread evenly over the entire area of the thread. Along the thread, you should wind the tow itself.
On the part with the tow, the next step is to install the union nut from the tap, which will then need to be screwed into the battery plug. The nut must be tightened tightly using a wrench. The Mayevsky key and plug are installed in the same way.
At the location of the radiator plugs, you can use standard or special gaskets instead of windings, but in this case the degree of tightness of steel heating devices will be lower.
The installation of battery cells must take into account that half of the plugs are equipped with a right-hand thread, and the other half - with a left-hand thread.
The union nut located in the radiator valve does not require additional winding, since it is equipped with a special ring seal. This seal can be chamfered and form a tight connection.
After the plugs are screwed in, the radiator valves should be installed. After the first part of the work - the installation of steel heating radiators - is completed, the final part of the work should begin. Branch pipes should be soldered to the tee on one side and to the radiator valve on the other.
When installing the taps, it is necessary to pay special attention to their length - it is necessary that a certain section of this tube goes into the inner diameter of the part with which the connection is made. When soldering branch pipes, the direction of the tee and the radiator valve must coincide; for this, you can first make marks with a pencil
It is advisable to carry out marking work on a flat, flat surface.
After the installation of the radiator taps is completed, specialists hang the batteries on the brackets and check their horizontal position using a level.
Similarly, all other radiators in the heating system are installed. After installation is completed, the radiators should be connected to each other using pipelines and, ultimately, to the boiler.
Areas of use
In what cases each type of fastener is used is not difficult to figure out.
- Wall mounts are traditionally used for mounting heating devices on solid walls.
- In rooms with light partitions (slag and aerated concrete, plasterboard, plywood, etc.), floor installation is preferred.
However, the scope of application of floor fasteners is not limited to this.
It applies:
- In rooms with panoramic windows. Heating devices of small height form a thermal curtain that prevents windows from fogging up without blocking the view through them.
- In rooms where the entire wall area is occupied by hanging furniture, plumbing fixtures and other equipment. The floor battery can be placed not only near the wall, but also in the center of the room.
However: such an installation implies a hidden installation of the lines to the radiator. It is performed in a screed or under a subfloor.
- In rooms with a certain style. For example, a floor-mounted cast iron radiator will fit perfectly into the design of a room designed in retro or loft styles.
A cast iron battery on racks will organically fit into the loft style.
Types of fasteners
When choosing fasteners for radiators, you need to focus on the convector model. The brackets allow you to qualitatively fix the heating element in the required place. To mount heating radiators, wall holders are best suited. Floor fastenings are used as additional ones, less often as main ones. Such brackets will be needed when the niche is not suitable for installing a battery or design ideas require such an implementation.
Wall
Convectors installed under the window prevent cold air leaking through the glazing from entering the room. Before attaching the radiator to the wall, you should make sure that the fasteners are suitable for installation and include the following parts:
- anchor clamps of different lengths;
- holders that can be adjusted in height, thereby helping to hide various surface defects. For example, adjustable steel fasteners facilitate faster installation of cast iron heating radiators to the wall. The mount allows you to change the position of the battery horizontally and vertically, and correct possible gaps with the wall;
- holders with rubberized surfaces for better insulation of extraneous noise;
- corner fasteners used in installing small, lightweight batteries.
Hooks
For steel heating radiators, a metal corner mount is suitable. One part of it is attached to the wall, the other is equipped with hooks for further fixation of the heating element. To fix cast iron batteries, use hooks supplied with dowels. As a rule, the clamp is recessed into the wall by approximately 100–150 mm.
If you are installing cast iron appliances with a large number of sections, then hooks alone will not do. It is worth strengthening the structure with floor fastenings.
Brackets
Attaching cast iron radiators to the wall is the most labor-intensive process due to their large mass. Despite this, they are perfectly held using special brackets or bent pins. High quality indicators are achieved through the use of a reinforced metal alloy, indicated in price lists as “reinforced”. You need to take into account that fasteners for heating radiators to the wall require a certain size, because sections with different depths must be equally distant from the wall at a distance of at least 30 mm. Therefore, the bracket must be larger than the heating element by the length of the recommended indentation.
Floor-standing
Installing heating elements on the floor has a number of positive aspects:
- happens quickly;
- you can fix any convector, from the lightest to the heaviest;
- the design will be more stable and reliable.
There are no special differences between wall and floor fixation. You just need to know that when installing on a wooden floor, it is still better to use an additional wall bracket.
If you use a floor mount for aluminum radiators, the battery can be installed even next to a wall made of aerated concrete and similar materials.
The stand for mounting the radiator is designed in the form of a metal leg. It is manufactured in two versions - regular or with a mechanism that allows you to adjust the height. The arches on top are made differently, which are designed to fix the sections in the stop. Some are made in the form of a solid steel wire, others in the form of a chain with moving links.
How to choose the right mounts for heating radiators
The surfaces on which brackets for heating radiators are fixed divide them into two types: wall holders and floor holders. Walls provide the base for most heaters, and mountings for them are widely available. Floor racks are rarely used as the main fastening, and together with wall racks - only in special cases.
Wall brackets
The main types of fastenings for wall installation of radiators of different materials are summarized in the table below.
| Radiator material | Standard fixture |
| Cast iron |
|
| Aluminum, bimetal, steel |
|
For cast iron radiators
When choosing fasteners for cast iron radiators, two features should be taken into account. MS-140 batteries are heavy in weight, and the cast iron from which they are made is very fragile, so the safety margin and reliability of the bracket structures must be very high (this also applies to other cast iron models).
Brackets cast from ductile iron come in various shapes and with varying numbers of holes for dowels. They are selected for cast iron batteries depending on the number of sections. They are able to withstand a lot of weight, and the grade of cast iron from which such fasteners are made makes it possible to reduce the fragility of the structure.
This is what cast iron fasteners look like; it’s not difficult to distinguish them from others. Suitable for wooden and concrete walls, fastened with self-tapping screws and dowels.
Replacing cast iron with steel in fasteners made it possible to simplify the design of the brackets to curved pipes - hooks with threads and dowels up to 300-400 mm long. This reinforced pin fastener allows you to hold particularly heavy sets of cast iron battery sections.
Anchor (pin) fastenings. Suitable for concrete walls; to hold cast iron radiators, a length of at least 300 mm is recommended.
Further developments in fastenings resulted in two hooks either rigidly welded or secured to a steel mounting strip.
Reliable double bracket on the strip. Suitable for wooden and concrete walls, fastened with self-tapping screws and dowels.
The photo on the right shows a bar with welded hooks. The axial size of the upper and lower hooks is equal to the interaxial size of the pipes of the cast iron battery section (the parameter is always indicated in the radiator specifications). This plate has several holes for dowels, which allows you to drill the wall to a shallow depth while maintaining the reliability of the installation due to the number of holes.
When marking, it is important to evenly distribute the weight of the battery between the brackets.
The mounting posts on the left side of the photo allow you to select the center-to-center size between the hooks and the distance to the wall. In some designs, the hooks are made sliding, but this weakens the reliability of the fastening and is used more often in combination with floor racks.
Advice. To find devices that can withstand very heavy antique cast iron batteries, look for ones that mention “reinforced” in their specification descriptions.
For aluminum and bimetallic
The weight characteristics of sections of bimetallic and aluminum radiators are close to each other and are much lighter than cast iron ones. The devices for their installation are structurally interchangeable, and differ from cast iron fasteners in their lower weight and load-bearing capacity.
Corner stamped fasteners. Suitable for wooden, brick and concrete walls, fastened with self-tapping screws.
Stamped brackets of various designs securely fasten aluminum and bimetallic radiators to walls made of plasterboard and plywood. A flat seat with two or four holes allows radiators to be attached to brick and wooden walls. A significant drawback is the requirement for the quality of the wall surface. Plate corners are not intended for high loads and, if in doubt, even for these types of radiators it is advisable to secure it with floor stands.
This is what Saber type pin fasteners look like. Suitable for brick, wood and concrete walls.
Pin brackets, despite their simplicity, have the advantage of not requiring high-quality wall surfaces. High load-bearing capacity allows you to hold batteries with an increased number of sections. The elongated thread at the end of the pin regulates the gap between the radiator and the wall, and the flat hook at the end allows for neat and reliable fastening of bimetallic and aluminum heating devices. They are mainly used in concrete and brick premises.
The universal adjustable mounts for these radiators do not differ in appearance from similar brackets and strips for cast iron radiators. Their load-bearing capacity is less than that of devices for cast iron batteries, and the dimensions must be carefully specified when choosing. Most manufacturers of modern radiators complete their brackets with plastic covers to insulate the brackets and protect the radiator material from damage. Initially, bimetallic and aluminum radiators were not planned for floor installation, therefore, for lightweight wooden and plasterboard walls, fasteners with two support points from a set for cast iron radiators are used.
For steel panel heating devices
The configurations of steel radiators are quite varied and are divided into two types: panel and tubular designs.
Standard fastenings. Due to their fixed parameters, they can rarely be found on sale; most often they come complete with radiators and are adjusted to the parameters of a specific heating device.
Metal corners of various configurations with special hooks are used for installing panel radiators. One side of the corner is secured with anchor bolts to the wall. On the second side there are special hooks with linings onto which brackets for steel radiators are inserted. The corners have a universal design and can be placed on any side of the radiator. Marking for such corners must be done very carefully.
Modern universal mounts that allow you to adjust the design to any radiator parameters. Attached using self-tapping screws and dowels.
Modern panel radiators do not always have welded mounting brackets. The light weight of the panels allows them to be hung on vertical slats with various adjustments and plastic clamps. The panel is simply inserted and adjusted to the desired position. The markings for such planks must be precise, and the requirements for the quality of the wall surface are high.
This is what typical mounts for tubular steel radiators look like.
Tubular steel radiators are fastened with two sufficiently reinforced corners on anchor bolts with dowels. On the side of the corner where the device is hung, there is a comb that allows you to change the gap between the heater and the wall. To maintain the radiator in a vertical position, plastic adjustment clips are used, which are installed from the bottom. Marking for the installation of such radiators is simpler, but the wall must be perfectly flat.
Floor mounts
The reasons for using floor mounts for heating radiators may be the following:
- heavy weight of installed equipment;
- plasterboard, plywood or sandwich panel walls do not provide confidence in their reliability;
- panoramic windows with a heating radiator placed next to them do not suggest other options;
- design ideas that require implementation;
- lack of space to install the heater on the wall.
Based on these circumstances and manufacturers’ recommendations regarding specific radiator models, the design of floor mountings is selected.
This is what typical floor mounts look like. The choice between the shape of the comb and the hook depends on what type of mounting the radiator itself is designed for.
Lightweight radiators can be mounted on such structures, fixing them to the finished floor and under the screed. Bolt-on brackets allow you to adjust the installation height of the radiator and the distance between the axes of the upper and lower pipes. There are options for racks with welded hooks; they are more reliable.
Stylish, weight-bearing floor stands.
Floor stands that secure the radiator batteries with a clamp or chain will take the weight of the heavy cast-iron structure. They also allow adjustment of the installation height of the device. Such fasteners can be installed on any finished floor or fixed to a rough floor for grouting. Radiator stands greatly increase the reliability of installation of any devices and look quite stylish.
Rules for mounting the holder
The ideal placement of the heating device is considered to be in the center of the window opening. For efficient heating of the room, the holders are mounted at a certain distance:
- about 100-150 mm from the floor;
- 40-50 mm from the wall;
- at least 90-120 mm to the window sill.
Most often, radiators are placed under windows
For successful marking, it is necessary to determine the middle of the window opening and mark this place with a level. Further calculations depend on the wiring:
- in the case of lower wiring, a horizontal line parallel to the floor surface is marked;
- with a lateral connection, the calculation is carried out based on the position of the upper supply pipe - the horizontal is marked parallel to the axis of the supply pipe.
The distance between the points of the holder is transferred to the marked horizontal lines; for greater accuracy, you can attach the bracket directly to the mounting surface. Upon completion of installation work, the reliability of the system is checked by light pressure from top to bottom. There are three main types of radiator connections:
- lateral one-sided - the most common option. The supply pipe is connected to the upper pipe, which discharges, respectively, to the lower one;
- lower. Used if the heating system is hidden in the floor;
- diagonal. The best option for long radiators. The supply pipe is connected to the upper pipe on one side, and the outlet pipe is connected to the lower pipe on the other side.
Fixed type bracket
Installation method
The fixation process does not depend in any way on the material of the convector. Only the mounting of the radiator to the wall changes.
The longer the battery, the more holders required. When the number of sections is small, you will need 2 brackets on top and 1 on the bottom. If more than 10, then you will have to install 3 upper supports and 2 lower ones. Subsequent ones are calculated so that for every 10 aluminum and 5–7 cast iron sections there is one more holder on top and bottom.
Selecting a position for the radiator
The efficiency of heating devices depends on many factors. One of them is the choice of installation location. The radiator is installed on a wall or under a window, away from the entrance to the room. Moreover, you must adhere to the following distances:
- from the floor at least 80–120 mm;
- to the window sill at least 60–100 mm;
- to the wall at least 30–50 mm.
There are situations when you have to fix the convector close to the wall, and then it is blocked by the edge of the window sill. To ensure the release of warm air, you will have to make holes in the window sill board, otherwise condensation will form on the window.
Marking the installation locations of the brackets
The radiator is usually located in the middle of the window opening. If bottom wiring is performed, then you need to draw a horizontal line indicating where the top edge of the heating device is located. To measure a battery with a side connection, you need to draw a horizontal line along the top edge of the pipe. Constant monitoring of the lines along which fasteners are fixed is required.
Stages of work
If you decide to do the battery installation work yourself, you need to know what steps the process involves.
The instructions for carrying out such work divide it into:
- Preparation of materials and equipment.
- Location calculation.
- Installation of brackets.
- Production of the actual installation.
- Soldering or sealing the joint.
- System check.
Preparatory stage
These operations are not recommended to be performed in winter, especially in severe frosts - this is unsafe. Even if you decide to do all the work yourself, you will still have to call a plumber from the housing office to disconnect your apartment from the common riser. In preparation for installing the system, you will need to purchase or find the following tools and additional materials, such as:
- Keys.
- Tow.
- Valves.
- Sgony.
- Couplings.
- Adapters.
- Brackets.
- Bushings.
- Nipples.
- Corners.
If you still choose, for example, cast iron batteries, you will probably have to purchase Mayevsky taps and install them yourself. In bimetallic and aluminum sections they are already built-in. This device allows you to bleed excess air from the system and maintain its functionality, preventing airing.
Features of radiator installation instructions
You should first mark on the wall the place where the radiators will be hung. So, initially, using a pencil, a place for the brackets is outlined. In the future, when installing steel radiators, it should be taken into account that the brackets should be located at the joints between the radiator sections.
After the markings have been applied to the wall, holes of the appropriate diameter should be drilled in the wall. The size of the hole must correspond to the diameter of the dowel supplied with the radiator. After this, a dowel should be inserted into the hole, into which the bracket will later be screwed.
Diagram of the dependence of radiator power on the installation method.
The installation of bimetallic radiators must be carried out in accordance with certain requirements. The threaded part should be unscrewed from the tap and a winder should be wound onto the free thread. In this case, the winding can be a special paste that is resistant to high temperatures. This paste can provide high-quality tightness of threaded connections. Together with the paste, it is allowed to use tow with paint or fum tape.
When using tow, paint should be applied to the threaded area of the part and spread evenly over the entire area of the thread. Along the thread, you should wind the tow itself.
On the part with the tow, the next step is to install the union nut from the tap, which will then need to be screwed into the battery plug. The nut must be tightened tightly using a wrench. The Mayevsky key and plug are installed in the same way.
At the location of the radiator plugs, you can use standard or special gaskets instead of windings, but in this case the degree of tightness of steel heating devices will be lower.
The installation of battery cells must take into account that half of the plugs are equipped with a right-hand thread, and the other half - with a left-hand thread.
The union nut located in the radiator valve does not require additional winding, since it is equipped with a special ring seal. This seal can be chamfered and form a tight connection.
After the plugs are screwed in, the radiator valves should be installed. After the first part of the work - the installation of steel heating radiators - is completed, the final part of the work should begin. Branch pipes should be soldered to the tee on one side and to the radiator valve on the other.
When installing the taps, it is necessary to pay special attention to their length - it is necessary that a certain section of this tube goes into the inner diameter of the part with which the connection is made. When soldering branch pipes, the direction of the tee and the radiator valve must coincide; for this, you can first make marks with a pencil
It is advisable to carry out marking work on a flat, flat surface.
After the installation of the radiator taps is completed, specialists hang the batteries on the brackets and check their horizontal position using a level.
Similarly, all other radiators in the heating system are installed. After installation is completed, the radiators should be connected to each other using pipelines and, ultimately, to the boiler.
Procedure for installing the radiator to the wall
Radiator mounting dimensions diagram.
You should first assemble the battery (do not completely remove it from the original packaging). To do this, you need to screw the radiator plugs into the plug using gaskets.
After this, shut-off valves and the Mayevsky valve are installed. On the radiator you need to mark the areas where the brackets will be installed. Next, the brackets are fixed to the wall using dowels so that their hooks are located exactly between the sections of the battery.
Now you need to establish the degree of horizontality of the heating device using a horizontal building level. If necessary, adjust the level of the radiator using brackets.
In accordance with the diagram, you need to connect the batteries to the heating system. If you install the radiator at a level less than 7 cm from the floor, heat transfer will be significantly reduced and difficulties may arise with cleaning the room.
When this occurs, the shut-off and control valves should be opened smoothly and carefully to prevent water hammer from occurring. After installing the radiator, you need to draw up a report on its commissioning.