Making a metal stove yourself
The use of potbelly stoves in most cases was associated with production. This includes drying clothes and heating personnel in trailers, industrial premises or greenhouses. The impetus for the subsequent formation of structures was their improvement in terms of heat transfer efficiency. The use of the latest technologies makes it possible to make metal stoves designed by the designer.
Heater dimensions and parameters
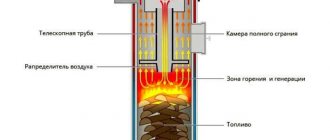
Since the maximum heating zone is relatively narrow and constantly shifts downward, it is quite difficult to calculate the real power of the Bubafonya stove. We suggest that you do not waste time on calculations; it is better to use data obtained from practical experience:
- to heat a garage or small utility room with an area of up to 20 m², we make a potbelly stove from a 50-liter gas cylinder with a diameter of 300 mm;
- to heat a room of 20...30 square meters, we take a steel pipe Ø400...500 mm or a round iron container of the same size;
- to heat the greenhouse you will need a stove with a diameter of 50–60 cm (for example, from a 200-liter barrel).
Note. In a large greenhouse, it is better to place 2 small potbelly stoves in opposite corners.
Now about the diameters of the air duct and chimney. Above is a drawing of a “Bubafoni” from a gas cylinder with pipe sizes: air - DN50 (internal passage 50 mm), smoke - DN100. If you plan to make a stove Ø400...600 mm, increase the diameter of the air duct to DN65 (Ø76 x 3.5 mm), the gas duct - DN150 (Ø159 x 4 mm).
The minimum width of the gap between the edge of the disk weight and the wall of the firebox should be 1 cm. The dimensions of the remaining parts are indicated in the table:
You should not increase the diameter of the Bubafoni beyond 60 cm; the unit will be too bulky and inconvenient to use. Imagine a stove made from a 600 mm barrel with a Ø580 mm piston and an Ø76 air duct - the result is a rather heavy bundura that will have to be lifted by hand.
In long-burning boilers the issue is resolved differently. Instead of a hefty pancake, a cross-shaped weight is used, shown in the photo. However, another problem arises - sometimes the fuel “hangs” because the ends of the load do not reach the walls.
Cross-shaped load of long-burning factory boilers (left) and a large “pancake” for a potbelly stove made from a barrel
How to make a potbelly stove with your own hands
First of all, it is necessary to express the concept of “potbelly stove”. As usual, this is a heating apparatus made of metal for the use of solid fuel. Basically, firewood is used. To remove furnace gases, an iron pipe is installed, ducted outside through a wall or window.
The advantage of this design is the rapid heating of the walls with further heat transfer to the space around. The downside is that when the supply of firewood to the combustion chamber is stopped, the stove quickly cools down, and you have to add additional firewood to maintain the temperature in the room. Several such operations must be performed per night.
Potbelly stoves can have different purposes
Assembling the heating unit
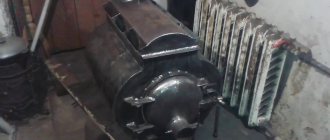
After cutting the parts, assembly and welding are carried out in two stages: the base with the combustion compartment is assembled, and the water jacket with the water pipe system is welded in parallel. At the second stage, the welded parts are combined into one whole and fixed with welding seams. You need to do it with at least two assistants, the weight of the parts is large. Details of the operations are visible in the photo.
Main joints
The assembly of parts, the water jacket, the water pipe system, and the combustion chamber must be done with a semi-automatic welding machine using high-quality wire. Allows you to create an even, high-quality seam. The semi-automatic machine is very convenient to work in narrow, cramped spaces. The seams must be done double.
When connecting parts with double seams, you need to work carefully - there is a high risk of lack of penetration.
Combustion compartment
Fuel burns in the combustion chamber, and the released thermal energy is transferred to water in the surrounding jacket. It is necessary to weld carefully using double seams. A grate is placed at the very bottom of the firebox. You can purchase a firebox ready-made to size and make it yourself. Reinforcement with a thickness of at least 20-30 mm is taken, cut into pieces with a grinder, and welded. In the firebox, the resulting grate is installed on stops made of steel corners welded around the perimeter.
The power depends on the volume of the combustion chamber. For conventional designs - 1-1.5 kW per liter of volume. For pyrolysis (they burn furnace gas released during slow combustion of fuel in an oxygen-poor atmosphere) - 1.5-2.5 kW per liter of furnace volume.
Lower body
In the lower part of the body there is a blower door, an ash pan, a bottom, and supports attached to it. The blower door is cut out with a grinder or drill, hung into the prepared opening of the housing on steel hinges, not forgetting to secure the sealing asbestos cord around the perimeter. In the closed position, the door is held by a latch, any of the designs available to the master.
An ash pan is a box made of sheet steel, which is completely removable through the ash pan, allowing you to quickly clear ash. The supports must be made from sections of thick-walled pipe with a diameter of 5-7 cm and a length of about 3-6 cm. They must be welded efficiently, at an equal distance from the edges of the bottom - the weight of the device will rest on them (including water - at least 250-300 kg).
Blower valve design
The blower valve, called a damper, can be made independently or purchased separately in finished form. When deciding to make it yourself, you need to focus on the dimensions. You will need a steel angle, a rectangular piece of steel, 5-8 mm thick. It is necessary to cut a series of vertical slits in increments of 2-3 cm. The slits are cut in the blower door. The welded corners will hold the gate plate and allow it to be moved in the horizontal plane by 3-5 cm. By changing the size of the slots, it will be possible to regulate the flow of oxygen into the firebox and the intensity of combustion of wood and coal.
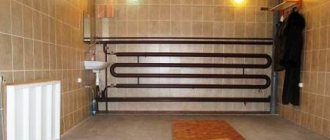
Water pipe system
Equipping a potbelly stove with a hydraulic circuit
To remove this significant design disadvantage, such heating units are equipped with an additional heating system.
The purpose of this modification is to increase the overall heat capacity, which will make it possible to maintain a favorable temperature in the room for a longer period and, therefore, to fire the stove less often.
The heating medium is heated directly from the combustion chamber of the furnace. There are several options for this:
- Arrangement of “pockets” on the side walls into which the coolant is poured.
- Installation of a water tank with outlets to a traditional heating system.
- The process of installing a collector around the chimney very close to the stove, passing through which the air is heated specifically from the chimney.
- Installation of a water heater in the combustion chamber of a furnace.
The potbelly stove can be used for traditional heating
When starting to make a potbelly stove with a water heater, the home craftsman focuses, first of all, on the materials available and determines the heating method himself.
The advantages of this heat supply device include its speed. The room can be heated to a suitable temperature too quickly, and maintain the required level for a long time.
The disadvantages usually include the following:
- Such a stove requires continuous attention and timely heating within 24 hours.
- In a house outside the city, where you sometimes appear as a coolant, it is necessary to use antifreeze or mineral oils, preferably transformer oil, but regular oil can also be used. Otherwise, the water will freeze in winter and rupture the parts of the heating system. Repairs in cold weather are unrealistic.
An iron furnace with a water jacket has a high level of efficiency
Cooling system
The cooling system is designed to maintain normal engine thermal conditions.
When the engine is running, the temperature in the engine cylinders periodically rises above 2000 degrees, and the average temperature is 800–900°C!
If you do not remove heat from the engine, then within a few tens of seconds after starting it will no longer be cold, but hopelessly hot. The next time you can start your cold engine only after it has been overhauled.
The cooling system is necessary to remove heat from the mechanisms and parts of the engine, but this is only half of its purpose, although the larger half.
To ensure normal operating process, it is also important to speed up the warm-up of a cold engine. And this is the second part of the cooling system.
As a rule, cars use a liquid cooling system, a closed type, with forced circulation of liquid and an expansion tank (Fig. 29).
The cooling system consists of:
In Fig. 29 you can easily distinguish two circles of coolant circulation.
Rice. 29. Diagram of the engine cooling system: 1 – radiator; 2 – pipe for coolant circulation; 3 – expansion tank; 4 – thermostat; 5 – water pump; 6 – cylinder block cooling jacket; 7 – cooling jacket for the block head; 8 – heater radiator with electric fan; 9 – heater radiator valve; 10 – plug for draining coolant from the block; 11 – plug for draining coolant from the radiator; 12 – fan
The small circulation circle (red arrows) serves to warm up a cold engine as quickly as possible. And when the blue arrows join the red arrows, the already heated liquid begins to circulate in a large circle, cooling in the radiator. This process is controlled by an automatic device - a thermostat.
To monitor the operation of the cooling system, there is a coolant temperature indicator on the instrument panel (see Fig. 67). The normal coolant temperature when the engine is running should be between 80–90°C.
The engine cooling jacket consists of many channels in the block and cylinder head through which coolant circulates.
A centrifugal pump forces fluid to move through the engine cooling jacket and the entire system. The pump is driven by a belt drive from the engine crankshaft pulley. The belt tension is regulated by the deflection of the generator housing (see Fig. 63 a) or the tension roller of the engine camshaft drive (see Fig. 11 b).
The thermostat is designed to maintain a constant optimal thermal condition of the engine. When starting a cold engine, the thermostat is closed, and all the liquid circulates only in a small circle (Fig. 29 a) to warm it up as quickly as possible. When the temperature in the cooling system rises above 80–85°C, the thermostat automatically opens and some of the liquid enters the radiator for cooling. At high temperatures, the thermostat opens completely, and now all the hot liquid is directed in a large circle for its active cooling.
The radiator serves to cool the liquid passing through it due to the air flow that is created when the car is moving or using a fan. The radiator has many tubes and baffles that create a large cooling surface area.
The expansion tank is necessary to compensate for changes in the volume and pressure of the coolant during heating and cooling.
The fan is designed to forcefully increase the air flow passing through the radiator of a moving car, as well as to create air flow when the car is stationary with the engine running.
Two types of fans are used: a constantly on fan, driven by a belt from the crankshaft pulley, and an electric fan, which turns on automatically when the coolant temperature reaches approximately 100°C.
Pipes and hoses are used to connect the cooling jacket to the thermostat, pump, radiator and expansion tank.
The engine cooling system also includes a cabin heater. Hot coolant passes through the heater core and heats the air supplied to the vehicle interior.
The air temperature in the cabin is regulated by a special tap, with the help of which the driver increases or decreases the flow of liquid passing through the heater radiator.
Basic cooling system malfunctions
Coolant leakage can occur as a result of damage to the radiator, hoses, gaskets and seals.
To eliminate the malfunction, it is necessary to tighten the clamps securing the hoses and tubes, and replace the damaged parts with new ones. If the radiator tubes are damaged, you can try to patch holes and cracks, but, as a rule, everything ends with replacing the radiator.
Engine overheating occurs due to insufficient coolant level, weak fan belt tension, clogged radiator tubes, or a malfunctioning thermostat.
Furnace design, its specifics
The important elements of a potbelly stove are:
- Furnace compartment. It is located approximately in the middle third of the oven. Designed for burning fuel - wood or coal. Equipped with a door on the side wall of the oven for loading.
- An ash pan is necessary to collect solid residues after burning wood or coal. It is disconnected from the part for the firebox at the top by grates, which are cast iron rods of a specialized shape. Ash awakens in the gap between them and penetrates into the waste collection tray. At the bottom of the ash pan, a bottom is made of sheet metal 1.2–1.5 mm thick.
- The container with the coolant is a tank made of sheet metal, filled with water or the rest of the heating agent. This device requires absolute tightness. At the top of the tank there is a hole for the outlet of water, at the bottom there is a return pipe through which the coolant cooled in the heating system is returned.
- The smoke exhaust duct is installed on top of the stove body; it can be vertical, horizontal or inclined. It is brought out through the wall. For potbelly stoves, in most cases a pipe diameter of 150 mm is used.
- The supporting part is legs made of profile metal, providing a clearance between the body and the floor of at least 20–25 cm. Under them it is necessary to install a protective sheet of metal with an asbestos backing . This is very important if the heating unit is placed on a floor made of combustible materials.
Photo gallery: designs of iron furnaces
Pipe coils
The design of this unit depends on the design of the furnace. There are different types:
- With right angles. Such thermal units are made of sheet metal up to three millimeters thick. Naturally, the most technologically advanced pipe coil is made in the form of a jacket located around the combustion chamber. The distance between the walls of the jacket and the furnace body depends on the volume of the heat exchanger. The higher it is, the very slowly the heating of the coolant in it occurs. Often containers are installed on top of the combustion chamber, but in this case the surface for cooking the stove becomes inaccessible.
The quadrangular shape of the stove is most suitable for a potbelly stove
Cylindrical vertical potbelly stove is very cheap
A potbelly stove can be made from a metal pipe needed for a high-pressure pipeline
Lining can be compared with thermal insulation
You can also heat the room with sawdust
Photo gallery: pipe coils for wood stoves
Case manufacturing
The body is made of sheet heat-resistant steel with a thickness of at least 5 mm. Before work, the material is cleaned of rust using an angle grinder. Parts are marked and cut. Angle grinder is also used.
Strictly follow the rules for working with angle grinders. Work using protective equipment for your hands (gaiters) and eyes (glasses).
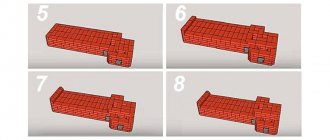
The stages of manufacturing the case are shown in the photographs.
Firebox
Holes for firebox, blower
The holes are pre-marked on the front part of the housing. They are cut through by an abrasive wheel of an angle grinder. The edge is additionally processed - sharp edges and burrs are unacceptable (will lead to injury).
Holes for pipes
Through the upper and lower pipes there is an outflow of hot water and an influx of cold water from the heating system. For pipes, it is recommended to use sections of seamless pipe with a diameter of at least 50 mm. Smaller sizes create too much resistance to water flow and lead to boiling in the boiler when the radiators are not warmed up. Holes are cut with a welding machine, drill, chisel, sledgehammer (the method is described in detail below). The edges need to be smoothed with a file and the pipe welded.
It is convenient to use pipe sections with threads on one side as pipes. Makes it easier to connect (disconnect) to the system. There will be no need for welding - just tighten (unscrew) the locknut with a plumbing adjustable wrench.
Boiler assembly - smoke circulation, water pipe system (without water jacket)
Calculations of potbelly stove indicators
Thermal engineering calculations of furnaces are the most complex. In construction and manufacturing, such operations are performed by specialized laboratories. For domestic use, they are significantly simplified, leaving only the key indicators of thermal units for independent determination:
- Calculation of the thermal resistance of a room, in other words, the designation of its ability to retain heat. This indicator depends on the material and thickness of the floor and walls, its thermal conductivity, the structural properties of window and door structures. But in any case, heat resistance also depends on the quality of all components.
- Calculation of the cross-section of smoke exhaust channels, since the quality and rate of fuel combustion in the furnace depends specifically on this parameter. If the diameter is larger than good, then most of the heat will be lost without return, reducing the efficiency of the device. On the contrary, an insufficient cross-section can lead to incomplete combustion of fuel and gas pollution in the room. To determine the size of the chimney pipe, an indicator of 2.7 is used in relation to the volume of the furnace firebox. If this figure is 40 liters, then the suitable chimney size will be 40 / 2.7 = 14.8 cm.
The classic size of a metal chimney pipe is 150 mm. In most cases, 15–20% is added to the calculated value. The final adjustment of the draft in the furnace is carried out using a damper, which makes it possible to perfectly adjust the cross-section of the chimney. It must be said that the amount of thrust will depend not only on the diameter, but also on the weather, so the use of a gate is considered necessary.
The height of the chimney is of priority. There is a limiting parameter - its total height should not be more than 5 meters counting from the point of exit from the combustion chamber. The level of elevation above the roof depends on the location in relation to the ridge.
It is fundamentally important to determine the dimensions of the chimney correctly
Basic information about solid fuel units
The high price of diesel fuel and electricity, the cost of connecting gas equipment emphasize the advisability of the decision to purchase a boiler operating on solid fuel. Based on it, it is possible to create a heating system that is independent of external energy sources, since most units of this class can operate without electricity or with minimal electricity consumption.
Solid fuel boilers are used as central units of an autonomous heating system in areas where there are problems with the supply of main gas. And in some settlements, of which there are quite a few in Russia, a wood-burning boiler is absolutely irreplaceable.
What does it consist of?
Diagram of a solid fuel apparatus
To understand how units of this class function, let's look at the design of a solid fuel boiler, which includes the following parts:
- The firebox is the so-called fuel combustion chamber and at the same time a heat exchanger. The design of the firebox includes: a portal for fuel supply, an area for removing volatile combustion products, a grate, containers for collecting ash and openings for air supply. During the combustion of solid fuel, the walls of the firebox heat up, and the water around the firebox in the water jacket of the unit heats up.
Firebox
- Water jacket. As a rule, in the firebox of a wood-burning boiler there are double walls, between which there is a coolant (hereinafter simply water) - this is the water jacket. When the fuel in the firebox begins to burn, the water in the water jacket heats up, resulting in heat flows that raise hot water to the top of the jacket. From this part of the boiler, hot water enters the heating pipe. Having passed through the entire heating system and given off heat to the room, the already cooled water returns back to the water jacket through the lower pipe. In order to speed up the movement of water throughout the system, some solid fuel boilers are equipped with special heating circulation pumps. But still, most models are designed for open heating systems (that is, for those systems where water circulation is carried out not using pumps, but by gravity). This is due to the fact that gravity systems are simple, reliable, economical and independent. They can be used even in areas where there are no signs of civilization.
Traditional unit running on solid fuel
- Carbon monoxide removal system. Due to the combustion of solid fuel, a large amount of smoke is generated in the unit itself, so a chimney is a mandatory component of such devices. The smoke is removed using heat-insulated pipes leading from the boiler to the street.
Chimney installation diagrams
Note! Some models are also equipped with forced ventilation units.
Design of a solid fuel unit with forced ventilation
- Temperature control and regulation system. It is no secret that any combustion is simply impossible without air supply. And, it should also be noted that the intensity of combustion depends on the intensity of air supply to the firebox. And the design of solid fuel boilers involves regulating the air supply using mechanical dampers and dampers. This control system is very simple and reliable - the damper is tightly connected to a special regulator. When the temperature rises excessively, the walls of the regulator expand and the damper lowers, thereby reducing the air supply to the firebox. When the regulator cools down, the reverse process occurs - the damper rises, thereby increasing the air supply and, as a result, the combustion intensity. Of course, this method may seem very primitive and outdated. However, it is also the most efficient, which is why it is used in many models of solid fuel heating boilers. In addition, it still has no competitors, since the operation of such a mechanism does not require electricity, which costs a lot of money.
Classifications
A modern heating scheme with a solid fuel boiler can include both the simplest single-circuit devices and the most powerful, high-performance and multifunctional units. Let's look at what classifications solid fuel boilers are divided into.
According to the material of manufacture:
- Steel units. Cheaper than their cast iron counterparts, easier to maintain and much easier to clean with your own hands. But they are very demanding on the temperature in the return pipeline of the heating system (at least +60°C). Therefore, they need to install special valves that maintain the required return temperature (that is, hot water from the supply pipeline is mixed into the return pipeline).
Steel model Logano S121
- Cast iron units are durable, but they are more difficult to maintain. Solid fuel boilers made of cast iron are recommended to be purchased in cases where they are expected to be used continuously. But buying a super reliable cast iron unit only for emergencies does not make sense. A cheaper steel boiler can handle this quite well.
Cast iron model SIME SOLIDA 4
By type of fuel used:
- Firewood, peat, woodworking waste, their derivatives in the form of special briquettes;
Logs
- Coal;
Coal
- Pellets (are granules formed as a result of processing wood, resin, pine needles and other organic materials);
Pellets
- Today there are also models that operate on absolutely all types of solid fuel.
By heat transfer method:
- Air;
- Steam;
- Water (the most popular).
According to the principle of fuel combustion:
- Traditional (we think there is no need to explain anything here).
- Long burning - the latest innovation in heating technology. Long-burning solid fuel boilers are a vertical, elongated combustion chamber, around which there is a container with water. Combustion in such a chamber occurs not from bottom to top, but from top to bottom (this process can be compared to the burning of a candle). Thanks to this system, complete combustion of the fuel is achieved, the burning time of one bookmark increases (up to 7 days), a stable and high coolant temperature and decent efficiency.
Long burning apparatus Stopuva 7
For uninterrupted and safe operation of such units, they are equipped with a fan for emergency extinguishing, a safety valve and a heating circulation pump.
Attention! Long-burning boilers are automated and therefore require electricity. And, by the way, the instructions on how to operate these devices are quite simple, and even a child can figure it out.
- Pellet - that is, operating on special pellets. They actually consist of the boiler itself, an automatic pellet supply system and a bunker. The electronic control system checks the presence of fuel in the combustion chamber, and if it is not there, it turns on the mechanism for feeding pellets from the hopper. Quite convenient, but again a volatile solution.
Nice pellet model
- Pyrolysis (gas generating) The uniqueness of this type of solid fuel boilers lies in the fact that in addition to the combustion energy of solid fuel, they also use the heat release of gases that are formed during the combustion of solid fuel. As a result, much more thermal energy is generated from a minimum volume of fuel, which means the efficiency of the unit increases and its environmental performance improves.
Pyrolysis apparatus
Tools and materials for making potbelly stoves
The set of tools, devices and materials is low.
To produce a furnace you will need:
- Manual grinding machine for cutting steel sheets and profiles.
- Discs for cutting metal.
- Clamps necessary for securing parts during cutting and assembly.
- Household welding machine.
- Electrodes with a diameter of 3 and 4 mm, required by the material used.
- Hammer.
- Tool for masonry when developing linings.
- Steel sheet 4–5 mm thick for the outer walls of the housing.
- Steel sheet 1.5–3 mm thick for interior partitions and jackets for thermal fluid.
- Rod grates (for rectangular ovens) or cast grate in the shape of a circle.
- Large-diameter profile pipes for the production of casings and jackets of cylindrical furnaces.
- Chimney pipes, also “sandwich”.
- Steel corner 32 x 32 mm for spider fasteners of the pipe and an external stand for it.
- Stainless steel wire for chimney extensions (if needed, depending on the installation location).
- Brick for lining and fireclay clay.
Depending on the design, other general purpose tools may be required.
To produce a heating system, you need to create a preliminary design, on the basis of which the need for materials, shut-off, control and control valves is calculated. It is advisable to use pipes made of metal-plastic. Installation of such pipelines cannot be done at a distance closer than 1.5 m from the furnace. It is necessary to take into account that with a potbelly stove you can only use a gravity heating system with an expansion tank.
Testing, connection to the heating system
After assembling the main part and applying the final seam, it is necessary to check the tightness. Just pour water into it. Gross welding errors will be identified. Deeper lack of penetration will remain unknown and will appear at the most unexpected moment during operation.
To test the heating device, before connecting it to the home heating system, you need to use a pressure test pump. You can create the required pressure and identify design flaws.
Using a pressure test pump, you need to create a water pressure inside of at least 3.5-4 atmospheres. If it does not leak during testing, it will successfully operate at the standard 1.5-2.5 atmospheres of internal pressure.
A pressure test pump is expensive equipment and requires skill to use. It is impractical to purchase just once. It’s easier and more effective to contact a plumber or a specialist who installs heating equipment.
After pressure testing, the test firebox can be installed in the planned location and connected to the heating system of the house. It is necessary to include an expansion tank in the safety group. Safety group - pressure gauge showing the pressure in the system, automatic air release valve, emergency valve.
Start of assembly
Preparation work
At this step you need:
- Make a preliminary design of the furnace with details.
- Prepare financial statements for the purchase.
- Buy materials and missing tools.
- Make all the parts for the stove.
The final point is the most time-consuming and serious.
The potbelly stove can be connected to traditional heating
What are the advantages of wood stoves?
When choosing between different types of boilers, the first question that arises is the choice of fuel.
Gas is undoubtedly the most inexpensive option, but it is not available everywhere, and installation costs and paperwork in the first stages deter many from purchasing a gas boiler.
It is the easiest way to heat a house with electricity - no chimney, constant monitoring or cleaning of soot is required. But this method is very, very expensive! In addition, it makes housing energy-dependent. Purchasing expensive UPS helps to insure yourself a little, but if the outages are long, the system may freeze.
And wood-burning (and coal) stoves are classics that have been used for centuries:
- Firewood and coal are often the most affordable and versatile fuels.
- There is a wide selection of models and capacities of such heaters on the market.
- They do not require approval or permissions from services during installation.
- If the boiler has no electronics, it will be completely autonomous.
- It is possible to fold the brick heating shield and connect it to the water jacket.
- A chimney in a house is also an exhaust hood; to create natural ventilation, all that remains is to ensure inflow.
Many of the work on creating the furnace itself, its installation and further maintenance can be done with your own hands.
By the way, when the firebox is surrounded by a water jacket, all the first heat goes to it, and the brick does not burn out so quickly.
Stove installation
This process is done in the following order:
- First of all, you should assemble the body. This should be done using oven mitts. After checking with the product drawing, perform the final welding of the parts, then move on to the next one. It is undesirable to leave parts on tacks, as they will later become inaccessible. Gaps between parts and lack of penetration of seams must be excluded.
There should be no gaps between the parts in the potbelly stove body
You can check the tightness of welding with chalk and kerasin
A modern potbelly stove with traditional heating can be included in any decor
Industrial products
Although it is not at all difficult to make a boiler with your own hands using ready-made drawings, such products are still produced by industrial enterprises.
It is recommended to use such equipment for heating the following premises:
- animal pens;
- warehouses and garages;
- production workshops and technological lines;
- winter gardens and greenhouses;
- city and private baths;
- country houses.
It is noteworthy that equipping a heating boiler with a water circuit will allow it to be used more efficiently and heat a larger area.
Among the most well-known brands of exhaust boilers from industrial manufacturers are several:
- Boiler Kroll SKE 100 F, made in Germany. A universal unit capable of operating on any type of waste, including vegetable oil, as well as diesel fuel.
- Model Kroll W401-L, made in Germany. This device is also suitable for any type of waste. There is no need for additional installation of the burner.
- Finnish boiler DanVex B-30 and B-220 with a single-stage burner. Processes diesel fuel, any type of waste and even traditional furnace fuel.
- The Teplamos NT-320 and NT-370 models, manufactured in Russia, are capable of operating on any liquid fuel, including kerosene and diesel fuel.
In any case, you can assemble such a boiler yourself, and even connect a water circuit to it.
Operational Features
The use of a potbelly stove has a number of special characteristics:
- The smoke exhaust duct must be led outside through a wall or ceiling. Connecting the pipe to the ventilation system is prohibited. The intersection points must be insulated with non-flammable materials.
- Modern metal stoves are capable of efficiently heating one room up to thirty meters 2. At the same time, it must be well insulated.
- For a larger heated area, it is necessary to use a traditional heating system from the same stove.
- In a room with such a stove, you should have a box of sand and keep a container of water ready.
- It is best to equip a separate room in the house with a supply of firewood for a potbelly stove, since fuel consumption is high.
Compliance with operating rules and fire safety will protect your property and health.
Operating rules
When using a heating boiler that runs on waste oil, certain rules must be followed. Otherwise, gas pollution in the room or even a fire may occur.
The basic rules for using the boiler are as follows:
- A working device must not be left unattended;;
- When the boiler is turned on, no fuel should be added to it;
- A boiler of this design can only burn waste oil; it is not suitable for using other types of fuel;
- It is necessary to ensure that no water gets on the surface of the hot boiler, otherwise it may simply burst due to sudden cooling;
- When the boiler is running, the burner hole must always be open;
- It is strictly prohibited to keep combustible and flammable substances near the boiler;
- When the boiler is on, the damper is not closed, otherwise all the carbon monoxide will go into the room.
When the boiler is running, the burner hole must always be open
Care and maintenance of the potbelly stove
The stove will serve you for a long time if you follow the rules for caring for it:
- The condensate collector installed on the chimney must be opened weekly to drain the water.
- at the beginning of the heating period, the chimney must be cleaned of soot with a specialized tool.
- During operation, the stove body and pipe must be constantly monitored for smoke penetration into the room.
- Monitor the condition of supply and exhaust ventilation.
Self-made iron wood stoves can not only be spectacular, but also become a real interior decoration of the room. But do not forget about the need to follow all installation and operation rules.
Photo gallery of solid fuel heating boilers
©Obotoplenii.ru
Other articles in the section: Heating boilers
- How to connect a heating element to a 380 Volt and 220 Volt boiler
- Power cable for an electric heating boiler: selection of cross-section and brand
- Types of gas heating boilers
- Safety valve diagram for a solid fuel boiler
- Wissmann liquid fuel boilers: description, features, models
- Uninterruptible power supplies for home heating
- Installation of gas ventilation
Positive qualities of using a potbelly stove with a water jacket
The furnace with a cavity for heating the coolant is designed in such a way that hot vapors wash the container on each side, which makes it possible to maintain a high temperature for a long time. In addition, a similar potbelly stove stands out as follows:
- A potbelly stove with a hydraulic circuit provides high productivity. The cost of creation and operation will be much less when compared with other furnaces.
A potbelly stove with a hydraulic circuit can be created from waste material, which also saves money.
- To ignite the stove, you can use available fuel: coal, firewood and various vegetable wastes.
- A potbelly stove with a water jacket does not require an electricity supply. It operates on the principle of gravitational circulation.
What is an open engine cooling jacket?
Don't forget to watch the video at the end of the article!
During operation, parts of an internal combustion engine are exposed to very high temperatures, and without removing excess heat, its operation is impossible. The main purpose of the engine cooling system is to cool the parts of a running engine.
The next most important function of the cooling system is heating the air in the cabin. In turbocharged engines, the cooling system reduces the temperature of the air pumped into the cylinders; in cars with automatic transmissions, it cools the working fluid in the gearbox. In some car models, an oil cooler is installed in the engine lubrication system for additional oil cooling.
Making a potbelly stove with a hydraulic circuit with your own hands
When installing this type of heating system, you can either build a water boiler into a potbelly stove or create the stove itself from scratch. Thanks to this, figuratively speaking, the process can be divided into 2 stages.
We also advise you to study the publication: Traditional heating from a stove on this site!
Development of the potbelly stove
Before work begins, drawings are drawn up that include all dimensions of the furnace, and key materials are prepared for working with metal: an inverter unit, a hammer, an angle grinder, as well as pliers and special protective clothing.
When creating a diagram of a potbelly stove with a water jacket with your own hands, it is important to take into account the thickness of the components of the future unit.
Once the metal has been cut, we proceed to the next steps:
- Combine the bottom with the walls, excluding the front. All parts should be welded at right angles.
Important: It is better to place the bottom of the stove at a level of 25-30 cm from the floor. Likewise, engineered iron legs can reduce the effect of heat on the flooring.
- A partition is welded into the space between the combustion chamber and the blower. You need to drill several longitudinal holes in it through which the ash will be removed.
The blower opening must be up to 3 cm smaller compared to the blower itself.
- Openings for doors are made on the front wall. After which it can be placed to the key structure;
- Roof protrusions are added to both sides of the front part and doors are installed;
It is better to equip all doors with deadbolts
- A chimney pipe is welded to the part on top of the stove. At the end of the work, all parts should be checked for flaws in the seams. If none are found, we proceed to the second stage - adding a hydraulic circuit.
Adding a hydraulic circuit to a potbelly stove
The basis of a similar type of furnace is a pipe coil, which can be constructed from various materials, for example, hollow steel pipes or steel sheets. In addition to the heat exchanger, to create a potbelly stove with a hydraulic circuit you will need:
- Finished furnace body.
- Heating appliances.
- Pipes.
- Sheets of metal.
We recommend reading about traditional stove heating on this site.
The system installation process is as follows:
- Two holes are made on top of the base of the potbelly stove for the supply and return of water.
Drawing up a drawing of a future potbelly stove with a hydraulic circuit, created on your own, can help make the work easier.
- A water tank is formed from metal or other suitable non-usable materials; the largest space should be allocated for it when compared with the combustion chamber and ash pan. Holes for the pipes are made in the tank, then it is placed behind the combustion chamber. The space is disconnected by a sheet of metal.
- Next comes the process of installing the pipework. It can be one-pipe, two-pipe or manifold.
Important: A two-pipe design is considered more preferable, as it makes it possible to change the temperature using installed taps and provides the same heating, unlike a single-pipe design. The collector is considered very difficult for independent construction.
- The next step is the methodical connection of pipes with heating devices throughout the house.
It is recommended to install heating appliances under windows. This will increase the heat conductivity of the stove. The design of a potbelly stove with a hydraulic circuit is examined for the absence of holes where water can leak through the circuit.
- An expansion tank is installed to the supply line, which will prevent the supply of cold water. Its size is selected based on the volume of water that will be located in the entire system - the tank must be made 20% larger.
Example of a potbelly stove with an expansion tank
- With proper construction, the water will heat up in the heat exchanger, pass through the pipes to the heating devices, cool and return to the pipe coil.
We recommend reading in detail about the types of heat exchangers for all this material.
The finished structure can be painted or finished using brick, depending on what appearance the owner prefers.
Video: project of a potbelly stove with a hydraulic circuit
With the help of a potbelly stove with a water jacket, designed with your own hands, you can save a lot on heating a country house. Such a structure can provide the required amount of heat to any room.
4.1. Liquid cooling system
Most automobile engines have closed liquid cooling systems (Fig. 28, 29). The liquid cooling system is more inertial. The engine warms up slowly, but also cools down slowly. In addition, the large heat capacity of the coolant ensures intense and uniform heat removal and lower temperature of parts. The heat removed from the engines is used to heat the intake manifold and improve mixture formation, as well as to heat the cabin or interior of the car in cold weather.
Rice. 28. Engine cooling system of the ZIL-508.10 car: 1 - radiator; 2 - blinds; 3 - fan; 4 - liquid pump; 5 and 27 - upper and lower radiator tanks, respectively; 6 — radiator cap; 7 — outlet hose; 8 - compressor; 9 — supply hose; 10 — bypass hose; 11 — thermostat; 12 - pipe; 13 — flange for installing a carburetor; 14 — inlet pipeline; 15 — heater valve; 16 and 17—inlet and outlet tubes, respectively; 18 — heater radiator; 19 — liquid temperature indicator sensor; 20 — dosing insert; 21 — water jacket of the cylinder head; 22 — water jacket of the cylinder block; 23 — drain valve of the cylinder block jacket; 24 — drain valve drive handle; 25 — drain valve of the radiator pipe; 26 — supply pipe
The engine cooling system consists of a radiator, fan, liquid pump, cylinder block cooling jacket, cylinder head cooling jacket, thermostat, pipes, hoses, expansion tank, fluid temperature monitoring devices, drain taps.
Liquid circulation in the cooling system is carried out in two circles: small and large.
Rice. 29. Cooling system of the KamAZ-740 diesel engine: 1 — crankshaft pulley; 2 - lower tank; 3 - blinds; 4 - radiator; 5 — fluid coupling of the fan drive; 6 — bypass pipe; 7 - discharge pipe; 8 — upper tank; 9 — upper pipe; 10 — thermostat; 11 — water distribution box; 12 — connecting pipe; 13 — supply tube; 14 — right pipe; 15 — outlet tube; 16 — intake manifold; 17 — liquid overheat warning lamp sensor; 18 — expansion tank; 19 — neck with plug; 20 — plug with valves; 21 — outlet pipe from the compressor; 22 — outlet tube of the left pipe; 23 - compressor; 24 — left pipe; 25 — head cover; 26 — cylinder head; 27 - liquid pump; 28 — drain valve (plug); 29 — liquid pump pulley; 30 - fan; 31 - lower pipe
The liquid circulates in a small circle when starting a cold engine, ensuring its rapid warming up in the following sequence: liquid pump - distribution pipes - cylinder block cooling jacket - cylinder head cooling jacket - upper thermostat pipe (valve closed) - bypass hose, receiving cavity of the liquid pump.
In a large circle, the liquid circulates when the engine is warm: liquid pump (as well as in a small circle) - thermostat (valve open) - rubber hose - radiator pipe - upper radiator tank - radiator core - lower radiator tank - pipe - hoses - receiving cavity of the liquid pump .
How a potbelly stove with a hydraulic circuit works - DIY construction
The heating system in city apartments helps create coziness and comfort. For most regions, heat supply is the most integral part of ensuring life. Residents of private houses in these regions solve problems of this type with the help of stoves. A very popular type of heating system in a private home can be called a potbelly stove with a hydraulic circuit. Its design includes heating batteries, which makes it possible to heat the entire building. You can purchase a ready-made design in a special store, but it should be noted that its price is higher. With a small budget, you can make your own traditional heating system from a potbelly stove.
Boiler with pyrolysis combustion of solid fuel
The difference between this design is that solid fuel does not burn in it, as in a conventional one, but if there is a lack of primary air supply, it is “distilled” into wood (pyrolysis) gas, which is burned in a special afterburner chamber when secondary air is supplied to it. Such a presentation can be either natural or forced.
Scheme-drawing of one of the variants of a pyrliz boiler
1 — draft regulator with temperature sensor; 3 - firewood; 4 - bottom door; 5 - grate; 6 — air damper for primary air supply; 7 - ash pan; 8 — grate; 10 — cleaning; 11 - drain; 12 — thermal insulation of the body; 13 — return (coolant supply from the system); 14 — nozzle; 15 — secondary air supply; 16 — chimney damper; 17 - pipe with heated water; 18 — damper; 21 — loading door; 22 - afterburning chamber.
Advantages of stoves with hydraulic circuits
A potbelly stove with traditional heating has a cavity in the middle for heating water, which is washed with hot air on each side. As a result, the high temperature is maintained for a long time. It is also worth saying that a potbelly stove has the following advantages:
- High productivity of potbelly stoves with a hydraulic circuit and low price in terms of installation and use when compared with structures of a similar type.
- The ability to light the stove with any available fuel: coal, wood and various plant waste.
- There is no need for power supply to operate a potbelly stove with a water jacket; the coolant moves through the stove in a real way.
Drawing of a simple long-burning boiler
This design of a solid fuel boiler is quite simple. The heat exchanger can be made of sheet steel in the form of a “water jacket”. To maximize heat transfer efficiency and increase the contact area with flame and hot gases, its design includes two reflectors (protrusions inward).
Drawing of a simple solid fuel boiler
In this design, the heat exchanger is a combination of a “water jacket” around the combustion chamber and an additional slot-like sheet metal register in its upper part.
Diagram of a boiler with a slot-type heat exchanger
1 - chimney; 2 - water jacket; 3 - slot heat exchanger; 4 - loading door; 5 - firewood; 6 — lower door for ignition and cleaning; 7 - grate; 8 - door for regulating air supply and cleaning the ash pan.
In these options, the “water jacket” is supplemented with heat exchange registers made of pipes in the upper part of the combustion chamber. In addition, such units are designed for cooking food on them. Option 4 is more powerful and has a top loading door.
Rice. 3 Designs of solid fuel boilers with additional registers and hob
1 - firebox; 2 - register made of pipes; 5 — return pipe; 6 - supply pipe; 7 - upper loading door; 8 — lower door for ignition and air supply; 9 — loading door; 10 - chimney; 13 — grate; 14,15,16 — reflectors; 17 - damper; 19 — water jacket; 20 - ash pan; 21 - hob.
Creating an oven from scratch
The creation of a wide variety of designs begins with a drawing or drawing on which all dimensions are indicated; in this regard, traditional heating from a potbelly stove in the garage is no exception. It is also worth saying that before starting work you need to prepare a set of necessary tools. In particular, we are talking about welding equipment, an angle grinder, a hammer and pliers. It is imperative to purchase protective clothing. In other words, you will need everything you need to work with metal.
According to the drawing, important elements are cut from metal sheets, after which the following actions are performed:
- By welding, the parts on the side and the back wall are combined with the bottom. In this case, it is necessary to ensure that a right angle is maintained between the elements being connected.
- In the gap between the blower and the combustion chamber, a partition with several longitudinal holes should be placed. They are needed to remove ash that appears during the combustion of solid fuel.
- At the front, two holes are cut for the doors and welded to the key structure.
- The roof overhangs are welded and the doors are installed.
- A pipe is welded to the part on top to remove combustion products.
- Check the quality of weld seams. If there are no deficiencies, proceed to adding a hydraulic circuit.
In the assembly process of a potbelly stove with a hydraulic circuit with your own hands, you must remember about fire safety, so it is important to reduce the effect of high temperatures on the floor surface, especially for wood flooring. For this purpose, the bottom of the stove is installed at a height of 0.25-0.3 meters, using specially designed legs made of metal.
Cooling system of UAZ Patriot with ZMZ-409 engine 1
"On the shelves"
Let's consider the components of the “loaf” cooling system.
It consists of a wide range of spare parts:
- A radiator containing coolant , the main function of which is to supply heat to the atmosphere. Most often made of copper or aluminum, there are also three types - tubular, honeycomb and plate. The last option is the most common. Each of the listed models is designed in a special way.
- Oil cooler , which cools the oil with air. This unit is used as an addition.
- Grille , which protects the radiator itself from temperature disturbances and foreign parts.
- Heater radiator , which is very similar to the first option, but it is installed in the car interior.
Scheme of the UAZ Bukhanka cooling system
Almost all car enthusiasts know that their car has an engine cooling system. UAZ Bukhanka or 452 is equipped with a simple power unit design, and therefore the rest of the systems have simple design features.
Purpose of the cooling system
The UAZ Bukhanka engine cooling system is designed to cool the engine during operation. Thus, the cooling elements remove the generated heat from the cylinder block and head using coolant and cool it in the radiator.
During operation, the car's power unit heats up to prohibitive temperatures and if there is no cooling, the engine parts will simply overheat and become deformed. Although, such situations also happen if there is a coolant system, in the case when it is not in working order or one of the important elements has failed.
The operating temperature of the engine on the UAZ Bukhanka is 80-100 degrees Celsius. It is in this interval that the thermostat opens to a large cooling circle.
Since this car does not have an electric fan, but has a forced cooling system, additional cooling of the radiator is constantly on.
The power unit may overheat if one of the cooling elements fails. First, there will be a mild stage, during which the engine will simply boil. But there can also be serious consequences, such as deflection and deformation of the cylinder head. At this stage, the situation can be corrected by ordinary grinding of the surface of the block head.
At the middle stage, engine elements may become deformed. This includes the valve mechanism. Subsequently, the block head will require major repairs, and this will cost the vehicle owner a pretty penny.
The severe stage is when the piston group is destroyed due to strong exposure to heat. But, and this is not the worst thing that can happen, because if the coolant gets into the car’s cylinders, the engine will suffer a water hammer, in which a major overhaul does not always save the day.
How to add a hydraulic circuit to a stove-stove
A specific feature of furnaces with a hydraulic circuit is the presence of a heat exchanger, for the production of which steel sheets or pipes can be used. It is also worth saying that for such a design it is necessary to prepare the following:
- Ready stove-stove.
- Heat supply devices.
- Pipes.
- Metal sheets.
The assembly proceeds according to the following scheme:
- Holes are cut on top of the key body, through which the supply and return of the coolant will be carried out.
- Then they begin to make the water tank. For this purpose, use any material that is suitable for use in the appropriate conditions. During manufacturing, it is necessary to take into account that the tank occupies the largest space in the entire structure than the combustion chamber and ash pan. It is necessary to make two holes in the tank in which the pipe sections will be installed. The ready-made structure is placed in the space between the combustion chamber and the rear wall; this space is pre-divided with a sheet of metal.
- At the next step, the pipes are laid out; a collector, single-pipe or two-pipe heat supply from a potbelly stove with a hydraulic circuit can be used. It should be borne in mind that in many cases preference is given to a two-pipe design. The explanation consists of the disadvantages of other types. In particular, the collector circuit is not easy to do with your own hands, without resorting to the help of professional craftsmen, and a single-pipe circuit does not provide equal heating for all devices for heating the room.
- Further, throughout the heated room, sections of pipe for heating devices and specifically heat supply devices are gradually connected to the pipeline.
- To provide the circuit with cold water, an expansion tank is connected to the supply pipe. To determine its indicators, the volume of liquid in the heating circuit is taken as a basis. Experts advise making the expansion tank 20% larger than this value.
- After assembling the entire system, a test is carried out to identify unusable areas. In their absence, they begin operating a potbelly stove with a hydraulic circuit.
- If the system is assembled correctly, then the work will be carried out according to the following principle: the water in the boiler is heated, enters the design radiators, cools and returns to the pipe coil.
Depending on the wishes of the owner, an iron stove-potbelly stove with a hydraulic circuit usually has a different appearance. It can be coated with paint or faced with brick.
A potbelly stove with a hydraulic circuit, manufactured in its own way, makes it possible to obtain great cost savings associated with the heat supply of a private home. Thanks to this design, it is possible to provide heat to any residential building, increasing the coziness and comfort in the middle of the room.
First lighting of the boiler
After completing the assembly of the structure and installing the chimney (you can limit yourself to a temporary version, placing the boiler outdoors), you need to carry out the first firebox. It will reveal possible, unnoticed flaws and deficiencies in the design.
Before placing fuel in the boiler furnace, you need to connect a temporary heating circuit with a radiator (a single-pipe circuit based on inch plastic pipes is suitable).
It is not permissible to directly connect plastic pipes to the boiler. You will need steel leads 20-30 cm long.
After filling the heating circuit with water, you need to visually inspect the seams of the boiler water jacket from the outside and inside. If a leak is detected, you need to mark the location, drain the water, and additionally weld the seam.
If no deficiencies are identified, a little fuel is placed (no more than 1/3 of the firebox volume). Well-dried birch firewood is suitable. Open the draft damper in the chimney, the damper in the lower part of the boiler, near the blower. Light a fire in the firebox. As the wood burns, the water in the jacket heats up and moves along the heating circuit. Allows you to check the overall performance of the assembled boiler, individual elements - safety group, water jacket.
During the first fire, flaws in the welds, if any, will be revealed. Identified leaks and places where smoke leaks are noted and later corrected by additional welding with a semi-automatic welding machine.
Before applying a new seam, you need to remove a section of the old one with an angle grinder, otherwise there is a risk of burning or lack of penetration.
Oven burner
In conclusion, let us recall one more method of fairly effective drip combustion of waste. This is a water-oil burner. These were once widely used by builders and road workers to heat up bitumen boilers, but now they have practically fallen out of use because the water-oil burner itself is bad: it is gluttonous and produces a lot of smoke. However, if it is attached to the combustion door of any furnace (air enters through the ash pan), then the oil vapor will burn out perfectly in the hot combustion chamber and the water-oil drip furnace will show very good efficiency.
The design of a water-oil burner is simple: fuel and water are dripped simultaneously into a hot bowl over which there is an air flow. Drops of water explode like on a hot frying pan and spray oil into the mist. Fuel vapor flows through the socket through the air flow (furnace draft or pressurization) into the furnace firebox, where it burns. The difficulty in this case is the need to configure 2 drops, fuel and water, but the design of a water-oil burner is simpler than any of the stoves described above, except for the wick. But its efficiency in combination with a potbelly stove is no worse than that of stoves with a flame bowl. How to make a water-oil burner for a stove with your own hands, see the final video:
Below you can share your thoughts and results with our readers and regular visitors.
You can also ask questions to the author*, he will try to answer them.
Useful tips and general recommendations from experienced craftsmen
For long-term stable operation of the heating system with a homemade boiler, it is important to remember that:
- Gaskets and latches that seal open lids and doors improve installation efficiency.
- If a wood-burning boiler is used in conjunction with an electric one, the damper on the chimney will reduce heat loss.
- Automatic control increases the operating comfort of the unit.
- Installation on a concrete floor eliminates distortions and ensures the durability of the heat exchanger pipes.
Accurate and high-quality in-house execution is important to obtain an equivalent alternative to factory assembly.
Safety regulations
Operating the boiler requires constant care.
Generally accepted standards for safe operation:
- finish the premises with fireproof materials;
- store fuel separately.
Small heaters with a power of up to 35 kW can be placed not in a separate room, but in an enclosed space with constant ventilation.
Rules for safe distances from the firebox:
- to the opposite wall - at least 1.25 m;
- to the rear and side walls - at least 0.7 m.
All hazardous surfaces and areas are protected with fireproof materials.
What is pyrolysis combustion
As you know, it is not very convenient to heat a particular room with firewood, since this fuel burns quickly without releasing the required amount of energy. However, if the oxygen content in the firebox is low, the material will be consumed much more slowly. This is precisely what the principle of pyrolysis combustion is based on, due to which significantly less fuel is required and efficiency increases. The main products obtained in this case are coke, ash, and flammable gas, which also releases a large amount of heat.
This means that when constructing a homemade long-burning boiler, you need to take into account the following points:
- Initially, wood burning with a limited supply of oxygen releases flammable gas;
- then the resulting mixture is burned, in turn releasing heat.
Many home-made boilers operate on this principle, but it is important to remember that the equipment must be adjusted so that its operation does not damage the overall system for providing heat to the home
Fuel requirements
The fuel can be any used oil: motor, transmission or industrial. The only condition is that it should not contain any impurities. The presence of even minor inclusions can lead to an explosion.
The presence of water in the oil is also unacceptable - it begins to boil much faster than the oil, foaming, splashing and sudden ignition occur. All this can lead to a fire.
The oil must be filtered before filling the tank! Do not use other flammable liquids! Gasoline is used only in small quantities to ignite a cold stove!
Installation and commissioning
Installation conditions for long-term, safe operation of the boiler are as follows:
- Solid foundation. A reliable option is a concrete floor.
- Effective ventilation.
- Safe chimney - insulation of the passage in the ceiling or wall.
- Protecting adjacent surfaces from fire - attaching durable, non-flammable, heat-insulating materials to them.
The housing is installed strictly vertically, the chimney pipe is installed coaxially with the receiving pipe of the main channel, excluding a reverse slope, otherwise a loss of draft is possible.
The heat exchanger is connected to the heating system and filled with water. Check the tightness of threaded connections and welding seams. All that remains is to light the boiler and monitor the heating system until the fuel burns out.
For safe operation of the boiler you need a solid foundation.
Premises requirements
The operation of the boiler provokes the appearance of dust. Brief emissions of smoke may occur.
Therefore, a separate room is required:
- equipped boiler room;
- technical, utility space in the house.
Only with low power and an acute shortage of space is it possible to install the unit in a well-ventilated corridor. Free access for loading, servicing the boiler, and cleaning the chimney is important.
Advantages of double-circuit heating
Double-circuit heating is the type of heating in which water is heated using a boiler specifically for use in the home and for heating the entire room. Thus, the entire need for hot water is provided by one double-circuit boiler. There are other reasons why it is gaining more and more popularity:
- Makes it possible not to depend on utilities and allows you to regulate the heating yourself, thereby creating comfort at home
- Possibility of installation in any part of the house. since no additional exhaust system is required, ventilation is also not required
- Apart from the boiler itself, you will not need anything, because everything necessary for heating and supplying the house with hot water for a long time will already be built in
- Favorable and affordable price
How a wood-burning stove with a water circuit works. Choosing fireplace stoves for a summer residence with a water circuit and a heat exchanger. Brick stove with a water circuit. A stove with a water circuit in development - how to do it yourself.
What are the requirements for waste furnaces?
Scheme of work
The heating device must be located on an absolutely flat horizontal surface so that the oil level in the lower reservoir is at an equal distance relative to the top of its sides.
The components of such a heater must be made of heat-resistant and high-quality materials. At the very beginning, the slope of the chimney must be made at an angle of 30 degrees, after which it must be given a strictly vertical position and taken out of the heated room. To make a chimney, steel with a thickness of at least 3 mm is required, and only its outer part can be made of galvanized sheet metal or asbestos-cement pipe. The diameter of the smoke exhaust structure or its internal cross-section should not be less than 10 cm in diameter.
The design of the lower tank must be equipped with a valve that can be easily rotated. This will allow you to regulate the power of the stove and control oil consumption. The thickness of the walls of the tank into which the waste is poured should not be less than 3 mm.
The holes in the connecting pipe, like the pipe itself, can have different sizes, but they must be proportional. The diameter of the holes should be equal to 1/10 of the diameter of the pipe itself.
Preparatory activities
To make your own long-burning boiler you need:
- Equipment for metal processing. It will be needed from marking and preparing parts to final assembly of the finished structure.
- Locksmith skills. After a few trials, cutting and fitting will become accessible even to beginners.
- Experience with welding. Auto modes allow you to quickly learn how to properly operate the inverter.
All operations will require special clothing and protective equipment.
Schemes and drawings
For manufacturing you will need a detailed sketch with dimensions or an assembly drawing. In addition to the general ones - frontal, side and top views - it is desirable to have sections and images of individual nodes.
Diagram of a long-burning boiler.
All dimensions must be entered, including:
- loading openings;
- doors for them;
- firebox;
- air ducts;
- diameters of inlet and outlet pipes;
- heat exchanger;
- ash pan, etc.
The more information is provided, the easier it is to build. It makes no sense to hope for the schematic correctness of the proportions.
It is advisable to repeat the design, confirmed by successful use in a well-functioning heating system. If there is no such prototype, you can focus on industrial models.
List of necessary tools and materials
In order to build a long-burning wood-burning boiler with your own hands, you will need plumbing tools and equipment:
- tape measure, ruler – put down dimensions;
- scriber, marker or chalk - apply markings;
- electric drill with drills;
- a large grinder with cutting discs - the metal in the work will be too thick for a low-power angle grinder;
- inverter-type device - suitable for beginners in welding; experience is needed to work with a transformer;
- protection for eyes and hands.
To build a boiler you need an inverter type apparatus.
Before procuring materials, you need to decide on the design. Exactly how much of what is required will become clear from the drawings.
The general list is:
- a large diameter pipe, or 1-2 old gas cylinders - for the body;
- thick steel sheet - for making a piston;
- metal corner - for air distributor;
- pipes - for air supply, chimney;
- hinges and handles, asbestos cord - for doors;
- grates or fittings for their manufacture.
Advantages of using a water boiler in a brick stove
One of the key advantages is efficient heat dissipation. It is also an important fact that the pipes can be connected to all rooms from the pipe.
A water-based boiler can be perfectly combined with different heat generators. When using antifreeze, the system will not defrost when the oven is turned off. Among other things, a water boiler in a brick stove can operate both in the presence of central heating and in autonomous mode.
It should also be noted that a water boiler in a brick is very reliable. like the brick oven itself, traditionally considered a reliable heat source. And when such a stove is combined with a water-based boiler, their mutual efficiency becomes many times stronger, and additional heat transfer appears. Together they are able to heat a room of up to one hundred square meters, without forcing you to spend a lot of money on such heating.
For a typical Russian winter, only two fireboxes per day will be enough to create a comfortable temperature in the room. In addition, the temperature can be regulated using modern automated systems.