Arrangement of the territory in the garden requires effort in organizing a fireplace for cooking.
Laying stoves is a complex operation that requires a lot of experience and a sufficient amount of knowledge. We invite you to learn about the basics of laying stoves in order to have an idea of how it is done. The simplest is considered to be the laying of brick stoves. In fact, laying brick stoves requires a lot of special knowledge on the construction of fireboxes and vaults, chimney systems and other technological elements. This page describes how to lay simple stoves in a garden plot. A similar principle can be used to create heating and sauna stoves. Look at the photo of the furnace masonry, which illustrates the basics of all operations and the materials used. The video of furnace laying offers more clarity, where the work of a real professional and his advice are presented.
Seams in stove masonry
When applying the mortar to the masonry not with your hand, but with a trowel (21), it is recommended to moisten the surface of the brick with water.
Place a mound of mortar on the brick and quickly level it. Place a moistened or soaked brick on the mortar, press it tightly, rub it in and remove the excess. The mortar is applied to the bonded edge with a trowel or the brick itself. Refractory brick is only rinsed with water. Seams in stove masonry are made in different ways. If the masonry is supposed to be plastered, the seams are hollowed out, i.e. they are not filled with mortar to a depth of 5... 10 mm. When plastering, the solution flows into the seams and adheres better to the surface of the stove.
If the masonry is not plastered, the seams are completely filled with mortar and they remain in the same plane with the wall surface. This type of masonry is called undercut. If you want to give the surface of the stove a more beautiful appearance with the help of seams, separating the bricks from each other with seams, then the seams are given a convex or concave shape, making masonry for jointing.
In this case, a tool is used - a jointer, which is made of roofing steel, giving it the desired shape, which has the reverse image of the seam.
The jointing technique consists of cutting the extruded mortar into an undercut, applying the jointing to the seam and running it over the mortar (22).
The mortar should be such that with slight pressure on the brick during laying, the excess is easily squeezed out of the seams.
Figure 23 shows the main parts of a brick. The brick is laid flat in half a brick or flush on an edge in a quarter of a brick and upright (24).
This suggests that the furnace walls and channels can be laid out in different thicknesses. A half-brick masonry is considered normal, a quarter-brick masonry or thin masonry is considered (25, a). The most common laying is flat or flush (25, b). The same thickness of masonry can be obtained from two-fours laid on an edge (25, c). Laying three-quarter bricks is done in half a brick and a quarter of a brick, i.e. on an edge (25, g).
When it is necessary to completely cover the seams, the masonry is laid from two-fours on an edge, but so that one row of masonry is 5...6 cm higher than the other (25, d).
When laying the first row of the furnace, its shape and dimensions are checked using a rule, a square, a meter or a cord stretched across the corners of the masonry (26). The first row is first laid out dry and only after that on the solution, carefully observing the dressing of the seams. Each laid out row must be checked horizontally with a rule with a level, vertically with a rule with a level or plumb line, and for rectangularity with a square or a cord along the diagonals (27). Identified inaccuracies are corrected. Frequent inspections are time-consuming, so to improve productivity, guide posts or racks with movable formwork, which are installed strictly vertically, have been proposed.
The box can be made for several rows of masonry. In this case, the last row of masonry, for example the third, must be strictly on the same level with the top of the box.
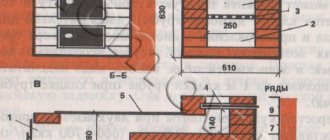
Furnace designs
Laying and lining of the firebox and furnace wells
The laying and lining of the furnace should be carried out only according to accurate, pre-made calculations. Fireboxes up to 42 cm wide should be covered with a simplified triangular vault, placing the brick flat, followed by continuation of the masonry walls, which will firmly press the heels to the underlying rows of masonry. If such a vault is erected without continuing the masonry, this may cause the heels to shift due to the thrust of the vault, and then lead to its collapse.
To avoid this, the heels laid under the arch for laying the firebox must be tightened using pieces of square, rectangular, corner or T-steel connected with a wire harness. A wire bundle consists of several wires twisted together using a nail.
The harness should be located inside the masonry, in the seam. If the harness is open, it will quickly burn out. Instead of wire, you can use strip steel, firmly fixing it to the bars. In some designs, the ends of the bars may extend outward. In this case, they should be tied together with strands or round steel rods with threads and nuts at the ends, for which holes should be drilled in the ends of the bars.
Fireboxes with spans up to 38 cm can be covered by releasing bricks from the side walls of the masonry. To firmly fix the overhanging supporting bricks, the side walls of the masonry must be located at least four rows of masonry above the row to be overlapped. The more rows are laid out, the better the laying of the furnace fireboxes, this way you can avoid the ceiling tipping over inside the furnace.
In the process of laying furnace wells, it is recommended to block the combustion openings with various jumpers. It is forbidden to rest bricks on the door frame. If the width of the combustion hole is less than 250 mm, it is blocked into a lock by cutting off the brick. If the opening width is more than a brick, it is necessary to make a brick lintel.
Masonry process technology
We lay the very first row first without applying mortar to the brick.
Having reached the corner bricks and making sure that the real picture coincides with the sketched project, we proceed to the complete addition of the row. We do not let go of the level - the first rows must be laid out clearly horizontally. Using a construction tape measure, we compare the dimensions of the stove in width, length and diagonals. Both diagonal straight lines must be the same; if this is not the case, then you will have to knock down the corner bricks until the dimensions are equal. Then the inside of the oven is laid out for the first row. We start the second row with corner bricks, the position of which we constantly check with a level. And then, as in the first row, we lay out two lengths and two widths, then the inside. We constantly refer to the drawing and compare the layout for correctness. Having already two rows, we drive nails, about 100 mm long, into the corner parts of the mortar between the rows.
Using a plumb line, we transfer to the ceiling the location of the corners of the laid out second row. We hammer a nail into these transferred points on the ceiling. We tie a nylon thread to each of them and secure it to the corners of the masonry. The result was a good lightweight formwork made from nylon thread. Using this method, the layout will go much faster and will not take much time to check the level. If, when checking the plumb line of the threads, any deviation becomes noticeable, then this can be very easily removed by adjusting the nails in the ceiling.
Now we lay out row by row, not forgetting to remove excess solution. After laying out every five rows, moisten the inner walls of the oven with a damp sponge. We try to achieve the narrowest possible seams in the masonry. According to brick construction technology, each vertical seam must be covered on top with a clear middle of the brick in the next row. This rule should be followed at all times. To avoid mistakes, look at the drawing more often. Do not use even slightly damaged bricks. This will lead to the fact that when the oven is heated to maximum temperature, such a brick, which does not have good integrity, will crack and fall apart into small pieces.
It is advisable to lay out the firebox itself from fireclay bricks, as it is more fire-resistant. But the bricks of the firebox and the outer wall of the furnace should not touch each other. There should be a gap of no less than 0.5 cm between them. This is due to different degrees of expansion of the material when heated.
Installing doors
In order to properly install the furnace door or vent door, it is necessary to first attach the existing part to the laid wall and check how tightly it is in contact. If there are any defects, they must be eliminated before applying the solution. Then we screw a double wire, up to 60 cm long, to each corner. The bricks are treated with mortar, and the mounted door is checked with a level for the correct position relative to two perpendicular axes. Twisted wire is inserted into the joints of the brickwork on four sides.
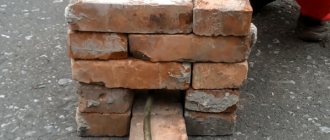
The remaining bricks after laying the stove can be used to build paths with your own hands.
You can make formwork for the foundation of the furnace using the instructions.
Slab installation
To install the slab, the bricks are first laid “dry”.
We find a brick that would have a gap of 5 mm, necessary for expansion when heated from all sides of the slab. And then we lay out everything thoroughly. We pour the solution into this gap, and lay an asbestos wire along the entire perimeter. The laid slab is compacted to the correct vertical position. Laying a stove is a very interesting and exciting activity, but it requires good dexterity and a minimum amount of knowledge from the master. A self-made stove will bring coziness and warmth into the interior of your home and create a more homely atmosphere. And guests and visitors will tirelessly praise the owner of the home for such a handmade work.
Do-it-yourself brick stoves for your home
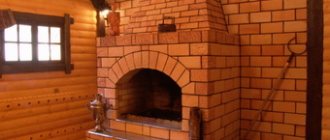
Although private homes now mostly have gas or electric heating systems, many owners would not mind having a simple but reliable stove in their household, which will always help out in the cold and rid the home of humidity. In addition, such a device, lined with tiles or high-quality bricks, looks great in the interior of a dacha or country house. There are different types of ovens - exclusively for heating, for heating and cooking, universal with an oven and a device for drying fruit. In this example, we did not show how complex structures with a vault are built, but limited ourselves to an example where the construction of a small stove with a heating panel is simulated.
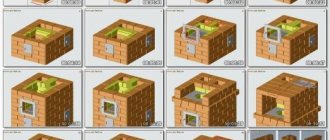
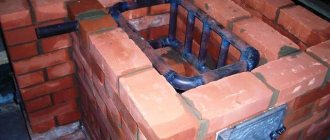
DIY small brick oven
For work we will need 250 whole bricks, 6 pieces cut to ¾, 43 halves, 20 pieces cut to ¼. In total we will have 22 rows of bricks laid out. You should also purchase 3 valves, a combustion and blower door, and a cast iron hob. You will see that bricks with small chips and cracks (low quality) can be laid inside, and on the outside we line the oven with facing material. But first you need to lay a foundation under the stove, because the mass of such a structure is several tons, which is a fairly significant load on the foundation. It is best to pour a reinforced concrete pad, which has an area 15% larger than the area of the base. In our case, we will build a simple brick oven with our own hands, which is suitable for heating the room and for cooking. We lay out the first continuous row of material according to the pattern you chose. It should be as even as possible, because the reliability and beauty of our building depends on this. In this example, we will not use mortar, making only educational dry masonry for speed and clarity. When laying the second or third row, you need to lay out the ash pan. The doors of the ash chamber and cleaning compartments are installed immediately. Standard products have fastening ears; a wire is passed through them and inserted into the seam. Until the solution dries, the doors are fixed with temporary stops (bricks or other material). On the fourth row, places are laid for cast-iron cleaning doors (we have bricks there, placed on edge). The sixth row is laid out. The beginning of 2 vertical channels is formed. In the place where the grates are installed, samples were made on the brick using a grinder. We install grate bars. The 7th row is laid. Our grates are free-standing (installation takes place without mortar), and they should be easy to remove. The resulting voids must be filled with sand. Place the smoke damper on the back of the stove
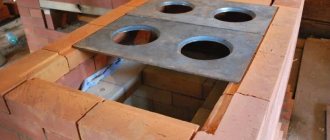
In our question of how to make a brick oven with your own hands, we have reached an important stage. Installing the combustion door
This can be done on a corner or on a wire with nails. On the eighth row we form a connection between the vertical channels of the heating shield. In the place where the cleaning door is installed, we again temporarily place half a brick on the edge. We put the cast iron stove in place. It is advisable to cut a niche under it with a thermal gap, which is then covered with sand to allow the metal to expand. 22 rows will be enough to create a good DIY brick wood stove for your home with excellent heat dissipation. We begin laying a three-channel heating panel with vertical chimneys. In the future, our rows (even and odd) are copied. We connect the 2nd and 3rd vertical channels. We put another valve at the top. We complete the construction by laying a chimney. The work is finished, we managed to make a simple but quite effective brick oven for our home with our own hands.
One of the most important stages in building a fireplace in a house is its cladding. We will show you how to perform this task efficiently yourself in the master class.
The most important stage of home renovation is leveling the walls, which is often done with plasterboard. We will show you how to cover walls with plasterboard with your own hands in a master class.
In apartments where it is impossible to install a real fireplace, an imitation would be a good option. We will show you how to make a decorative fireplace out of cardboard in the master class.
A brick stove is not only a heating method, but also an element of cozy home design. We will show you how to build a brick oven with your own hands in the master class.
Types of adhesives and solutions for lining furnaces
The facing adhesive can be one-component - for laying tiles without cutting joints, and two-component - respectively, for laying tiles with cutting joints. Based on their properties, adhesives are divided into heat-resistant and heat-resistant.
The term “heat-resistant” describes compositions that can withstand thermal cycles with temperature fluctuations of no less than 150⁰C. Only compositions that can withstand prolonged heating of 500⁰C are called heat-resistant. For stove cladding, only heat-resistant adhesives are used; for fireplaces, heat-resistant adhesives are acceptable.
For fireplace linings, domestically produced compositions have been tested in practice - Moment-Crystal, Vetonit Weber, Plitonit SuperKamin and others. Among the recognizable import brands is Ceresit-SM. For a decorative fireplace that is lit only periodically, these compositions are quite suitable, but heat-resistant compositions are required for stoves. For example, a two-component composition K-77 with a primer of the same name, which has a high load-bearing capacity. Complete hardening of the composition occurs after three to four weeks, and it is unacceptable to start the accelerating firebox before the curing period of the glue has expired. When this facing composition gains strength, the room temperature should be within 18-28⁰C. There are special compositions for terracotta and majolica. The market offers quite a lot of heat-resistant and heat-resistant compounds, and you should carefully study the scope of application and follow the recommendations indicated on the packaging.
It is also possible to lay tiles on clay mortars filled with quartz sand or sawdust.
When using clays, it is important to choose the correct proportion depending on the fat content of the clays, so that the solution is sufficiently plastic, but does not subsequently crack. Filler/clay proportions for fatty clays 4:1, for normal clays 3:1, for lean clays 2.5:1
In addition to fillers, fireclay powders are added to clay solutions to increase resistance to high temperatures and changes, this is especially justified in the case of a coal furnace. Some craftsmen add salt additives to the solution - up to one glass of table salt per bucket of water. Salt retains water in the mortar mixture, and there is less risk of cracks. The usual ratio of clay and water in solution is 4:1, but selection is carried out experimentally and also depends on the fat content of the clays used. One of the recipes, which is considered classic, includes cement. One part clay, three parts sand, one part chalk and one part cement. The amount of water is selected according to the type of clay. This composition provides not only good adhesion to bricks and tiles, but also higher strength compared to clay mortar.
What does simple mean?
It is further understood that a simple oven, which can be quickly made with your own hands, should satisfy the requirement. requirements:
- A person building such a stove does not need to have a deep understanding of the stove business. Ideally, he doesn't need to understand anything about it at all;
- The stove must operate on low-quality waste fuel with a thermal efficiency (this is analogous to the efficiency of heat engines) of at least 35-40%;
- A brick kiln should not require long-term drying after construction and “accelerating” fireboxes to reach the rated thermal power;
- It should consist of no more than 115-120 bricks, so that all the necessary materials can be brought at one time in the trunk of a car or on a trailer to it;
- Stove fittings (doors, hobs, burners) should be the most common (so that you can use used ones) and/or cheap;
- The masonry of a brick kiln should not contain complex joints, sawn (cut with a grinder) bricks, transitions from red brick to fireclay and steel mortgages.
Types of furnaces
Currently, the most popular options are heating and cooking stoves designed for space heating and cooking. The design of such a stove can have a hob or a full-fledged oven.
A heating stove, which performs only one function - heating the room, has a simpler design and is built in a shorter time. The cost of installing such a stove will be minimal.
Fireplaces are classified as a separate category of stoves. Fireplace configurations can be varied - from the simplest to the most complex design developments. As a rule, the high cost of fireplaces is due to the use of a large number of expensive finishing materials.
Readers found these materials useful:
- “Shvedka” stove - a method of arrangement with a bell-type firebox and a stove bench
- Independent construction of a Dutch oven according to diagrams and drawings
Types of tile layouts may vary
- Vertical seams match. This layout is for tiles of the same size. If rectangular tiles are installed, then the layout can be both vertical and horizontal, while you can lay out colored contrasting zones and insert panels - it looks linear and neat
- Bandaging, or displacement along vertical seams. Used in geometrically complex areas so that trimmed fragments are not noticeable
- Diagonally. Artistic and complex layout, allowing for rare designs. Very original, but you will need about 10-15% more tiles, a lot of trimming and waste
- Tiles of different sizes are laid out in checkers, carpets, highlighting fragments and contrasting zones, panels and decorative elements are possible
Features of masonry of an outdoor fireplace
The laying of an outdoor hearth is similar to a fireplace. To prevent the outer surfaces from heating up, use vermiculite or kaolin wool in a layer of 100-150 mm. Or 250mm, which depends on the purpose of the fireplace. Also, such thermal insulation is necessary for maximum heat accumulation by the surfaces inside + to create the highest temperature in the firebox of a barbecue, tandoor oven, barbecue, etc.
Share on social media networks
0
Tweet
Standard set of tools for making furnace linings
- For cutting and fitting – tile cutter or grinder
- For straightening tiles - hammers with a rubber head
- For drilling - drill
- The solutions are mixed with a construction mixer or a drill with a whisk attachment.
- Rubber and notched spatulas for applying adhesives
- To control the verticality and horizontality of the cladding - a plumb line and a building level. More convenient are rack levels with bubble ampoules not only on the long sides, but also on the ends
Consumables - dowels or staples, crosses for tiles (plastic crosses must be removed from the seams), special grouting compounds for stove linings on a mineral or silicone basis, designed for high temperatures.
Only metal meshes are used for furnace lining; fiberglass meshes are unacceptable. The reason is that the mesh distributes not only mechanical impact, but also thermal impact. Therefore, a reinforcing metal wire mesh with a cell of 25 * 25 mm - 50 * 50 mm and a steel cross-section of 1.2-2 mm is used. For a standard layer of glue or primer of 3 mm, this is optimal. But even if the thickness of the glue applied according to the instructions is greater - 4 or 5 mm, it is not recommended to use wire mesh thicker than 2 mm, since the linear expansion of steel is significant, and this creates a danger that when the oven is heated, the tile cladding may begin to peel off.
How to lay stove bricks correctly
To successfully build a functional outdoor stove, be sure to follow the following masonry rules:
- First fold each level like a construction set, without mortar. Trying on will allow you to accurately cut the stones in the right places and fit them to each other.
- The ceramic brick is soaked for 2-3 minutes in a container of water, then placed in place. The refractory stone is only rinsed from dust.
- The maximum thickness of a masonry joint on a clay-sand mortar is 5 mm. Exceeding threatens the formation of cracks.
- Do not tie a fire-resistant wall with a regular one. Insert sheets of basalt cardboard into the gaps between different types of bricks.
- Check the horizontality of each tier with a building level, and the verticality with a plumb line.
Remove any mortar protruding outwards with a trowel, and wipe the internal surfaces with a damp cloth. If you lack experience, do not try to chop stones with a pick; it is better to use a grinder with a cutting wheel for concrete.
The tile installation technology is different
- With cutting of joints - removing mortar from masonry joints to a depth of about a centimeter
- No seams
Cladding using the method of cutting seams is considered the best - metal elements, hardware and dowels are not introduced into the masonry bricks, which pose a risk of cracking of the brick during thermal expansion, because the walls of the furnace can heat up by more than +500⁰C. The mesh is attached only with thin staples. In addition, when facing along cut seams, mechanical impacts on the furnace body will be minimized. But the labor costs for this method are, on the contrary, maximum.
It is dangerous to get cracks in the masonry while knocking the mortar out of the seams, especially in cases where the stove has been heated many times and the mortar seams have sintered to a stone state. Carefully cutting seams to a depth of 8-10 mm is not an easy and painstaking job and requires attention and experience.
Seam cutting sequence:
- First, soften the mortar joints a little with water, without strong impregnation - apply a damp cloth (rags, burlap) to the walls of the oven and leave this “soap” for an hour or two.
- Knock the mortar out of the seam with a narrow chisel (called a cross-section), which is used to cut a groove. The hammer is struck lightly, no force is used.
- When the softened layers run out, make new “lotions” and repeat the whole process until the seam is released by at least 8 mm, and preferably 1 cm.
- Remove all fragments and crumbs of the extracted solution, remove dust from the surfaces
- Apply the first layer of soil to the masonry surface. When facing with joint cutting, a two-component adhesive composition is used, and the primer component is applied first, completely filling the joints. The thickness of application depends on the composition used and is carried out in accordance with the instructions for use or instructions
- Next, install the mesh over wet plastic soil, and at a pace until the soil sets. For this reason, they do not cover the entire stove with soil at once, but work in 1-2 m2 sections.
Fastening the mesh along the cut seams:
- As soon as soil is applied to the first grip with an area of about 1-1.6 m2, the mesh is pressed into it and temporary fixation is made into pre-drilled holes, using dowels with plastic sleeves - three dowels at the top and three at the bottom. The dowels are driven not into the seam, but into the brick - this is a mandatory requirement. The holes in the bricks should be smaller than the length of the sleeves so that their edges protrude from the holes and can be removed with pliers.
- After tacking the mesh, permanent fasteners are installed - wire staples, sticking them into the seams filled with soil at intervals of 25-30 cm, after two or three rows of brickwork.
- After the soil hardens, remove the dowels and fill the remaining holes in the brick with soil.
- Then you need to wait until the soil is completely dry, including the holes - during this time the layer in which the mesh is pressed will have the necessary strength for further work.
When the mesh is attached to the masonry without cutting the seams, fastening is possible only with steel dowels. Plastic is not suitable for the outer walls of the oven, as it will melt when heated. In addition, hardware creates risks of cracking of brickwork due to the significant difference in the thermal linear expansion of metal compared to brick.
Proper completion of the laying of a wood-burning stove for a summer residence
At this point, the laying of the outdoor stove is almost complete, but there are a few technological aspects remaining. Grate bars and grates should be located 7-14 mm below the combustion opening. A gap of at least 5-10 mm should be left between the grate and the masonry of wood-burning stoves along the entire perimeter, filling it with ash or sand so that the expanding metal does not damage the masonry when heated. When laying the grates, it is recommended to tilt them towards the door by 2-3 cm, which will ensure that unburned fuel rolls off the back wall onto the grate. The grate slots must be placed along the firebox (from the door to the rear wall).
Cast iron stoves used in kitchen fireplaces are best laid level on a thin layer of clay mortar.
Proper laying of the furnace implies that the structure must be dried naturally, or, in extreme cases, artificially. During the drying process, all valves must be open around the clock. The pipe can only be closed during a thunderstorm. This drying process takes approximately 10-12 days.
Artificial drying is faster. To do this, it is necessary to heat the stove with a gradual increase in the amount of dry fuel: shavings, straw, wood chips, finely chopped firewood. It is forbidden to dry the stove by burning a large amount of wood at once, since the water in the brick, turning into steam, can destroy the masonry.
The first addition of fuel should not exceed 20-25% of the amount required for normal combustion. For the second furnace, the volume of fuel can be increased to 30-40%, for the third - to 60-70%, etc. up to the full norm. After each firebox, all stove devices must be open, and the temperature of its outer surface should not exceed 50-60 °C.
Laying a stove for a summer residence and drying is considered complete when damp spots no longer form on the surface of the stove and there are no traces of condensation on the valve.
Tile installation
Surface preparation is standard - if the stove has old plaster or finishing, it is knocked down with a chisel and cleaned with metal brushes, and then dusted. Then the joints are done - if it is decided to install the tiles on a grid with jointing. Prepare the adhesive composition according to the instructions. Pour the dry mixtures into the water, portionwise, with constant stirring. The speed of the drill or mixer is adjusted so that the glue does not foam; air is not needed in the structure. Leave the glue for as many minutes as indicated in the preparation instructions - usually up to 15 minutes. Start facing from the bottom. Apply glue or primer (if cladding is done using jointing) for four tiles horizontally. Fix the reinforcing mesh. Along cut seams - on wire staples, without cutting - on dowels. The adhesive is applied with a notched trowel, the first tile is pressed and slightly rotated to secure it tightly. Crosses are used to calibrate seams, but not all craftsmen recommend crosses, and some designs involve the illusion of unevenness of the seams - to imitate ancient masonry. Verify the horizontality of the tiles using a level, then the vertical. The first row is the most responsible
Deviations are corrected carefully by moving the tiles with light blows with a rubber hammer. Seams for different types of tiles can be from 8 to 12 mm, except for clinker ones, the thermal expansion of which is so insignificant that a neat seam of only 3 mm is possible
All tiles of the first grip are verified with a level and plumb line. The first three rows of tiles after laying should be left until the adhesive composition sets. Plastic adhesive may not hold heavy tiles, and the trim will slide off from its own weight. Furnace linings do not require high speeds. Pauses between grips are about three hours, depending on the properties of the glue or solution used. For fitting and trimming, use tile cutters or a grinder. They usually try to hide the cut tiles adjacent to the wall or in other inconspicuous areas. After the glue has completely set - after 24 hours, remove the crosses and clean the seams from glue deposits.
Grout the seams only after the glue has completely cured, according to the instructions for the composition, otherwise you may end up with microcracks in the grout or the tiles peeling off. Mineral grouting is done manually - with a spatula, or with a mounting gun if the seam is made convex. Grouting with silicone compounds is very sticky and is only possible with the use of mounting guns.
The first fire is possible only after the glue has completely cured, from a week to a month, depending on the composition used.
Preparatory process
Each oven, especially one built independently, is unique.
Therefore, before you start laying bricks, study the structure of your house well and create your own project. If in doubt, you can resort to a ready-made drawing suitable for the specific layout of the house. The main thing is that the furnace is built exactly in the place where the greatest heat transfer is achieved. When creating a project, you should consider how correctly the chimney will exit through the roof and whether it will damage the roof structures. Having sketched out your drawing, you will confidently imagine the structure of the future furnace from the inside, and you will be able to look at the layout of the bricks. The created project will help to more realistically visualize the future structure, and therefore will be able to provide complete information about how harmoniously this stove will fit into the overall design of the room.
Before installing the stove, take care of calculating the heating of a private house.
Take a break from laying the stove by reading about the most unusual houses in the world in the article.
Materials for laying the furnace
Under no circumstances should you lay the same foundation for the walls and for the stove. Since the load on the foundation is different, this can lead to cracks and splits. In the worst case, a fire may occur.
The foundation for the furnace is laid from gravel, small brick chips or rubble stone. In size, the foundation should protrude beyond the boundaries of the stove itself by 5-7 cm along each side. The most important thing about the brick used is its correct geometric shape. In other words, all corners must be clear and even, maintaining a right angle on all sides. Each brick should be carefully checked for cracks, and it is best to use a well-burnt brick. For interior masonry, only red brick is suitable.
The brick is fastened with cement mortar. Before adding the kiln with mortar, it is recommended to lay the entire brick as it will lie already bonded without mortar. For clearer boundaries, it is advisable to use formwork - this way you can protect yourself from unevenness and distortions. The very first few rows should be laid out perfectly even and smooth. The quality of the masonry of the rest of the furnace will depend on them. After laying out the first two rows, waterproofing is carried out by laying two layers of roofing material.
The mortar for the main furnace is made from sand and clay. Only the foundation and the pipe on the outer sides are laid with cement mortar. Of course, it is better to take fatter clay and use cleaner sand.
Advice. It is impossible to accurately determine the proportions of clay and sand, since the fat content of the clay and the purity of the sand are different everywhere. But before mixing the solution, try sifting the sand and leaving the clay in a plywood box for a couple of days. Mix the solution by constant testing. If there is more sand than required, the seam will quickly crumble. And if there is an excess of clay, the greasy seams will quickly crack and shrink greatly.
The solution should reach the consistency of sour cream. To check whether the ratio of ingredients is correct, fashion a small ball and throw it from a height of one meter. Also, try to burn it well. If in both cases the ball remains intact and unharmed, then the proportions are correct. The density of the mortar should also differ in its plasticity, which allows you to remove excess mortar between the bricks. The level of plasticity is affected by the water content in the solution.
Why do you need brick cladding?
Without a stove, it is impossible to create coziness and comfort in a private household or bathhouse. Units made of metal have undeniable advantages, including:
- compactness;
- mobility;
- good room heating;
- Installation is simple and can be done by hand.
But due to the fact that metal is characterized by high heat capacity and the body made of it quickly heats up and cools down similarly quickly, many property owners prefer brick structures, despite their massiveness.
It only takes half an hour to heat a metal unit, but to constantly maintain heat in the house, the fuel in it must be constantly burning. True, much depends on the design features of the device. For example, a long-burning stove can operate effectively for 24 hours on just one load of fuel.
To significantly extend the heating time, you need to figure out how to brick a metal stove in the house. Thanks to this, the time for generating thermal energy increases several times. Brick tends to heat up for a long time and cool down slowly. Therefore, even when all the wood in the combustion chamber has already burned, the heated walls of the structure will continue to give off heat for several more hours.
When a metal stove is operating, its body becomes very hot and careless contact with it will be enough to cause a serious burn. If the unit is protected with brickwork, it will help protect the residents of the house from such injuries. Of course, its surface will not be cold, but it will not heat up enough to damage the skin.
In addition, a metal stove lined with bricks looks more beautiful and original. In this case, the masonry can be done using decorative techniques or painted. As a result, the interior of the room will be transformed for the better.
Types of stoves
Building a stove is a simple matter, but before you start, you need to decide on the type of structure. It is selected depending on the required options, the availability of free space in the house, as well as other parameters. Afterwards, a diagram of the stove is created with the required dimensions and notes - it is according to this diagram that the subsequent laying of the stove will take place.
Heating. Its name fully describes its purpose. This is a run-of-the-mill stove that is the easiest to put together. It is characterized by the simplest design compared to the following subtypes. Often equipped with a bed.
Heating stove for a summer residence
Heating and cooking. In this category of stoves for the home, a secondary option is added - cooking in pots or pans. This design will not replace a full-fledged stove, but it will cope with the task of saving gas. Heating and cooking stove Combined. This is a multifunctional unit, which is located in the kitchen of the house, and is equipped with an oven or a fully working stove for cooking. Furnace designs of this type are quite complex and are recommended for construction exclusively by craftsmen. Stoves and fireplaces. Building such a stove with your own hands is also not difficult, but there are certain requirements for its appearance. The facade should be beautiful and neat; its task, in addition to heating, is also to decorate the house. Fireplaces take up much less space and are easy to light, which is why their popularity is growing.
Brick stove-fireplace
These are not all types of stoves, but the most common ones are listed. Next we will talk about how to fold a heating discharge furnace.
Laying the floors of smoke ducts
Smoke ducts and chimneys are blocked as follows:
On the front surfaces of the fireplace stove, incomplete bricks are installed, which are sawn lengthwise into 2 parts, and the ceilings of the smoke ducts, one brick wide, are covered with three or four pieces. Half-brick-wide floors are covered with full-length bricks along the length (along) of the chimney masonry. So, on the outer sides of the fireplace, ligation of seams of 0.5 bricks will be strictly observed.
The butt sides of the brick should not extend onto the front (outer) parts of the hearth, and also should not tie the front masonry of the hearth with the inner one.
Rehearsal for the future oven
Gaining experience in this craft is quite easy. To do this, you will have to make small bricks yourself, for example, five times smaller than standard ones, and build a stove five times smaller. Wait until the solution sets and try to heat it.
In this way, you can check the level of acquired skills. Then you can disassemble the stove and try to assemble another model, thereby training your hand on different models and their features.
The main attribute of any stove is the pipe. Folding the pipe is one of the main points in laying the entire furnace, so you must strictly follow all instructions.