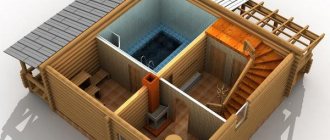
The main item in all the houses of our ancestors was the stove. Most often it was erected in the very center of the room in order to heat the house as evenly as possible. In addition, food was prepared on it and colds were treated if there was a bed. But at present, a brick oven is only a heating structure. At the same time, making it with your own hands is not so difficult. The procedure does not require expensive specialized equipment, extensive experience or the involvement of a professional stove-maker. And if you use high-quality and outwardly beautiful brick, then you won’t have to do any finishing work. But despite all the ease, basic knowledge must be present.
Additional requirements for choosing a furnace
Since we suggest doing everything yourself, rather than buying a ready-made stove in a store, when choosing the required design, we recommend paying attention to the following parameters:
- Easy to use . The heating process should be a pleasant and uncomplicated task that every family member can handle.
- Economical . This point is especially important if you plan to use only this stove to heat the house on an ongoing basis (in winter). In this case, one unit of fuel will provide maximum heat transfer.
- Simplicity of design . If a person who does not have experience in masonry takes on the construction of a complex model of a device, difficulties may arise that will subsequently lead to incorrect operation of the stove.
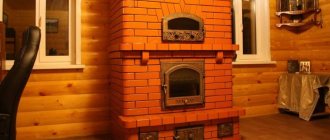
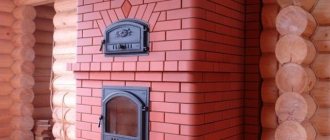
- Appearance . The design of the structure should please the eye and create coziness in the room, so it is worth paying special attention to the quality of the brick.
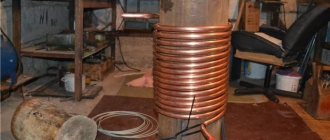
- Presence of a water circuit . It is known that even a small heating stove with a built-in heat exchanger for heating the coolant is much more productive than other models without this device.
When choosing a heating stove, you should consult with a qualified stove builder. He will tell you which configuration to choose and what you should pay special attention to.
Reasons for the popularity of the Krokha stove
The rationality of the stove was very well thought out by the designer, therefore, even despite its small size, its heat transfer is very high. This is one of the main reasons why Krokha has become so popular in the modern world.
When the combustion process occurs, the lower section begins to heat up, and the so-called cap, located on top, retains the released heat and prevents it from quickly escaping into the chimney.
The stove has a “summer stroke”, with the help of which only the hob is heated, but the rest of the structure remains at its original temperature. This is especially important when hot summer days arrive.
Laying the Krokha stove
The Krohu stove can be manufactured in several design options, which differ in the location of the cooking surface relative to the firebox. In most cases, the simplest and most convenient type is used, where the firebox and stove are located on one side. This is very convenient, since the stove is installed so that these parts are located in the kitchen, and the remaining walls, built into the partition, can heat the adjacent room.
The stove is as safe as possible during operation, since the fuel chamber is lined with fire-resistant fireclay bricks. Thanks to this feature, the walls can withstand not only the heat obtained from heating firewood, but also fuels such as peat, coals and briquettes.
An undoubted advantage of the structure is that the crumb can be assembled independently at home.
Selecting a location
Before you begin construction, you should decide where the stove will be located. If there is only one small free area in the house, there is nothing you can do about it. But to obtain maximum heat transfer, it is recommended to place the stove in the central part of the house or room. Thus, none of its elements will touch the street wall, and accordingly, warm air will not escape outside. In addition, when adjacent to the supporting structure, temperature changes may occur, which negatively affects the durability of the heating device and the operation of the chimney.
What are we going to build?
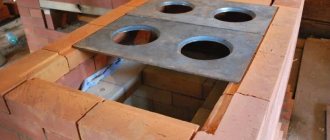
The stove that we propose to build with our own hands has several names among the people: Malyutka or the single-bell stove PTO-2300. Its dimensions are 770x510x2380 mm. This design is well suited for country house construction. The firebox is made of refractory bricks. The device can operate on almost any solid fuel, namely wood, coal, peat, anthracite.
PTO-2300 is the most compact of all thick-walled models. Below you can see a 2x3 brick oven with a fairly simple design. The name itself speaks about its power, i.e. the device can produce up to 2300 watts per hour. One firebox is enough to heat a room measuring 25 m² or two adjacent rooms measuring 35 m².
Basically, a similar structure is installed in the central part of the house. Thanks to the shape of an elongated rectangle, it acts as a partition between rooms.
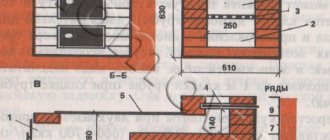
Device
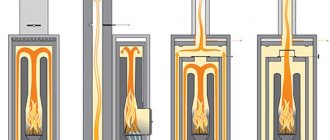
In the presented furnace, hot gases rise through the firebox channel into the bell (their path is indicated by arrows in the diagram). Next, the gases descend, go around the “undercut,” enter a vertical channel and rush into the chimney, where two valves are installed.
In the absence of a convective system, the solid fuel stove would not have time to heat up. The cap serves to slow down gases and increase their contact time with brick walls.
You can download the drawing in high quality from this Link.
Advantages of a small stove
Among the main advantages the following are noted:
- The simplest design allows even a non-professional to build a stove independently.
- The device occupies an area of only 0.4 m². Thanks to these dimensions, this heating device is popular in country houses.
- A strong foundation is not required since the weight of the structure is light.
- The efficiency of the stove allows you not to make large stocks of firewood. In addition, it can be heated with other types of fuel: coal, peat, anthracite.
- The device does not contain heating channels. Their functions are performed by the fuel cap.
- Can heat a room up to 35 m². In the spring and autumn, one firebox will be enough to heat the room, and in winter – two.
- The structure can be installed in a wall, thereby saving space and uniformly heating two rooms.
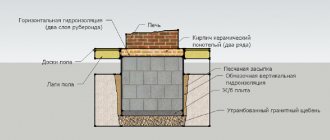
Foundation
The foundation must be separate, not connected to the house. Depending on the material, rubble, rubble concrete and brick foundations are distinguished. Usually cement or lime-cement mortar is used.
The size of the foundation should be laid 5-7 cm larger than the dimensions of the stove itself. In depth it should be 15-20 cm below the floor. A cement-sand screed is placed on top of the masonry. It is recommended to use a level and check that it is horizontal. Then you need to lay two layers of roofing felt and lay out 2-3 rows of bricks to the floor level.
Main elements of the furnace unit
One of the most commonly erected types of furnace structures is the unit known as PTOU-2500. You can see a diagram of such a furnace design in Fig. 1.
The stove has become so popular for a number of reasons. Its design is universal. Such a stove can be used without any problems for high-quality heating of a room with an area of 50 m2 or more. This home stove has a very reliable masonry that has been tested for decades. It is durable and easy to use. To build such a brick stove, you do not need to purchase a lot of expensive materials. Everything that is needed during the work process can be found and purchased without any problems at any more or less large building materials store.
Prepare materials for work:
Construction of a Russian stove.
- Solid ceramic brick. The required amount of brick, as well as other materials, may vary depending on the selected size of the unit. In this example, we consider a home oven made of 245 bricks.
- Refractory brick. You will need to buy 110 pieces.
- Clay. Usually 0.2 m3 of this material is sufficient.
- Sand. You will need the same amount as clay.
- Fireclay clay. About 12 kg of material should be enough.
- Ruberoid. Buy 1.2 m2 of waterproofing material.
The design of the oven provides for the presence of various elements in the form of doors, grates, etc. You will need 1 piece of all the items listed below. Prepare the following:
- Grate. For the brick oven considered in this example, you will need a 25x25 cm grate.
- Fire door. You need a product 25x20.5 cm.
- Blower door. A product measuring 13x14 cm will be sufficient.
- Cleaning door. Should be the same size as the blower door.
- Smoke valve. It has the shape of a square with a side of 13 cm.
- Pre-furnace sheet. A size of 50x70 cm will be sufficient.
Furnace order
Below we will consider in detail the order of the heating furnace.
Row 0. As described above, you first need to lay out two levels to the floor mark. They are placed on the waterproofing layer of the foundation. For this purpose, roofing material is used.
Row 0(1) is continuous. The number of bricks in a row is 12 (red).
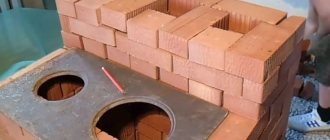
Row 1. An ash chamber is formed, where ash from products burned in the oven will be collected. To make it easier to remove the combustion residue, two bricks are cut down to the middle in the front part.
1 row. The number of bricks is 11 and ½ (red).
Row 2. We continue to form the ash chamber, to access which we install a hole for the door. Its size is 140x140 mm.
2nd row. Number of bricks – 12 (red).
Row 3. Identical to the previous row and continues to form the ash chamber.
3rd row. The number of bricks in a row is 10 and ½ (red).
Row 4. Here the ash chamber is blocked and grooves are cut out in the bricks for installing a grate measuring 200x300 mm. It is recommended to do this as follows: apply the existing grate to the row without mortar and trace it along the contour with a margin (usually about 5 mm is left, which is necessary for temperature deformation of the metal). Next, each brick needs to be processed and hewn. Then an estimate is made and everything is put into solution. After this, the grate is immediately placed.
4 row. The number of bricks is 11 and ½ (red).
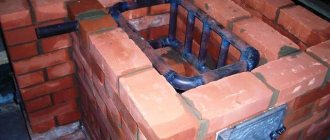
Row 5. Refractory bricks are laid and a fuel chamber is formed. At the front and rear it contains bevels of the inner surface towards the grate. This is necessary so that combustion products can roll down to where there is sufficient air access.
5 row. The bricks installed in the front and back of the chamber are cut at an angle of 45 degrees. Number of bricks – 11 (fireclay).
Row 6. Continuation of the fuel chamber. Here the door for the combustion chamber begins to form. Its size is 250x210 mm. It is worth noting that the rear brick has a slight slope towards the combustion area.
6th row. We cut the brick of the back wall of the chamber at an angle of 45 degrees. Number of bricks – 8 (fireclay).
Rows 7 and 8. Continuation of the fuel chamber.
7th row. Number of bricks – 7 (fireclay).
8 row. Number of bricks – 7 (fireclay).
Row 9. The fuel chamber door is closed and its height continues to increase.
9 row. Number of bricks – 8 (fireclay).
Rows 10 and 11. The fuel chamber is formed. It turns out to be quite voluminous. It is necessary to pay attention to the different placement of bricks on levels 10 and 11.
10 row. Number of bricks – 8 (fireclay).
11 row. Number of bricks – 9 (fireclay).
Row 12. The chamber begins to overlap. Three-quarter bricks with an edge are installed, leaving a vertical channel that will be used for the escape of gases.
12 row. Number of bricks – 11 and ½ (fireclay).
Row 13. Complete closure of the fuel chamber continues, leaving only the vertical channel. Its size is similar to the parameters of a whole brick.
13 row. Number of bricks – 13 (fireclay).
Row 14. The formation of the vertical channel continues. The chamber is covered with another level of fireclay bricks.
14 row. Number of bricks – 12 (fireclay).
Row 15. The formation of a new vertical channel and a hole for installing a door for cleaning begins. Its size is 140x140 mm.
15 row. Number of bricks – 9 (fireclay).
Row 16. Regular brick is used here. It should be noted that it is not placed in the center, since a connection is formed there between the first and second channels to ensure the passage of hot gases.
16th row. Number of bricks – 8 (red).
Row 17. The cleaning door opening is blocked. The channels are still connected to each other in the center, the brick is not laid.
17th row. Number of bricks – 9 (red).
Row 18. The formation of the cap begins, which will continue to the very top. Subsequently, the front channel will turn into a pipe.
18th row. The number of bricks is 9 and ½ (red).
Rows 19, 20, 21, 22, 23. The configuration completely repeats the previous level.
19 row. Number of bricks – 10 (red).
Row 24. The hole in the vertical channel narrows in the shape of the letter G. A hole is formed for the valve.
24 row. Number of bricks – 10 (red).
Row 25. A hole equal to half a brick is left, and a seat for the smoke valve is cut out.
DIY construction technology
Before you start making the Krokha stove with your own hands, you need to do the preparatory work:
- Purchase the necessary materials, prepare metal parts for the stove.
- Collect all necessary tools and containers for cement mortar.
- Prepare the installation site.
Safe location
As for the location, it is necessary to choose a room in which explosive materials are not located. If you need to heat a country house, then it is advisable to make sure that there are no containers with gasoline inside, which can heat up at high temperatures and explode. It is also not recommended to install the stove near pipes through which gas passes.
Tools and materials
Before starting all work, you should make sure that you have all the materials necessary for construction on hand:
| Name of materials and components | Dimensions in millimeters | Amount |
| Fireclay brick brand sha-8 | 21 | |
| Red brick, suitable for making a chimney pipe | 352 | |
| Curly red brick with a rounded shape | 124 | |
| Cast iron grate | 350 to 250 | 1 |
| The firebox door is made of heat-resistant glass in a cast iron frame. Model DP 308-1S is suitable. Glass is optional and is for decoration only. | 210 to 250 | 1 |
| Convenient door made of cast iron | 140 by 140 | 1 |
| Single burner cast iron stove | 410 by 340 | 1 |
| A sheet of metal intended for placement in front of the firebox | 500 to 700 | 1 |
| Chimney damper | 130 to 250 | 1 |
| Steel corner | 40 by 40 by 5 by 250 | 4 |
Also, we must not forget about the stove maker’s tools, and a convenient stand with which you can rise to the top to lay out the last rows.
List of available tools:
- Putty knife,
- Master OK,
- Jointing to create a beautiful relief.
- Trowel.
- Hammer.
- Mallet.
- Building level.
- Construction plumb.
- Timber for making a frame.
- Threads, chalk, fishing line to mark the base.
- Grinder and a set of wheels for it.
- Aluminum rule.
Once all the tools and materials have been collected, you can proceed to actual manufacturing.
Preparing to pour the foundation
Before you start laying bricks, you need to create a solid foundation. It must be taken into account that even the simplest stove design will weigh at least 500 kg. The pressure on the boards in the house will be too great, and therefore you should not take risks and use unreliable materials.
There are several types of foundations that can be built for the manufacture of a furnace.
To make a concrete base, you must follow these steps:
- Dig a pit to a depth of 50-70 cm.
- Compact the soil well.
- Pour a 25 cm layer of crushed stone into the pit.
- Next, a 20 cm layer of sand is laid.
- Crushed stone and sand are compacted efficiently. You will need to take a sledgehammer and, using a medium-strong blow, compact the entire surface.
- Waterproofing is being carried out. For this purpose, high-quality roofing felt is used. All joints must be sealed with tar and bitumen mastic.
Base reinforcement
The previous steps were intended to ensure a tight seal, eliminating possible moisture ingress. The next step is to strengthen the foundation. For this purpose, steel reinforcement is installed. The diameter of the cells should be approximately 10 cm.
The reinforcement must be as strong and high quality as possible to eliminate the possibility of cracking.
Pouring concrete
The last step in creating a good foundation is pouring the concrete itself. The solution is either mixed independently or ordered ready-made. We must not forget that the foundation must set properly, so construction work cannot be continued immediately. A week is given for hardening. The cement is watered daily to avoid cracks. A month is enough to achieve maximum strength. But this does not mean that you have to wait this time. Sufficient strength, enough to withstand the construction, is achieved in a week. After this period, the construction of further structures can begin.
It is still necessary to put several layers of roofing felt on the dried concrete in order to produce high-quality waterproofing.
It is important to know that the stove is installed on a foundation that protrudes beyond its perimeter by about 10-20 cm. On the side where the firebox is located, you need to retreat 50-70 cm of the foundation in order to mount the firebox in this place.
Order
- When constructing the first and second rows, continuous brickwork is used.
- When we reached the third row, we need to make a chamber for the blower. The blower door is installed in this place. To do this, use wire or metal strips to pre-fix the part.
- On the fourth row, the installation of the blower and securing the door continues. A ledge is made on which the cast iron grate will rest.
- Fifth row. A grate is placed on the protrusions without the use of cement mortar. There should be a 7mm gap around the fixture.
- On the 6th row, a combustion door is installed in the portal. Steel strips are used for fastening. They are also placed on the solution.
- Rows 7-11. The door is finally fixed in the mortar, and the masonry of the firebox continues.
- When the 11th row is completed, it is necessary to put a corner or a metal strip to fix the cooking floor. After this, the flooring itself is installed.
- Rows 12-15 - erection of walls around the flooring. A chimney from the firebox is being built.
- 15 row. To ensure that there is a non-combustible material above the cooking chamber, flat slate is used.
- On the sixteenth row, continuous masonry is used, with the continued formation of the chimney.
- 17th row. A small door is installed through which you can clean the chimney.
- Row 18 - the door is secured.
- Rows 19-22. Continuation of masonry.
- On the 23rd row, a niche is formed for the oven.
- 24 row. The walls are being laid and the oven is being installed. At the very bottom, strips of asbestos cardboard are installed around the perimeter. The oven must be wrapped with asbestos rope and installed in a niche. The rope is necessary to ensure high-quality contact with the masonry and to accumulate heat.
- Rows 24-27. Brickwork is formed around the oven.
- Row 28 is used to install an additional door, with which you can access the smoke channel for cleaning.
- On row 29, a valve is installed above the channel.
- Row 30 - masonry continues according to the pattern used.
- on the 31st row, a second valve is placed above the smoke channels.
- Row 32 completes the construction. On the thirty-second row, the construction of the chimney begins. It can be made of metal or continued brickwork.
Do-it-yourself Krokha oven
FAQ
Question: Is a 14x14 chimney section sufficient for this project? Answer: The device power is 1760 W. With this parameter, the chimney cross-section is quite sufficient.
Q: On what mortar is it better to lay fireclay bricks? A: It is recommended to use a ready-made mixture for refractory masonry, which is sold in any specialized store. As a rule, the packaging contains instructions for its use. You can use a regular solution, but it is recommended to add fireproof mortar to it in the amount indicated on the package. There may be pieces in it, so you should either sift it or grind it further.
Q: The power of such a stove will not be enough for a 6x6 m house consisting of three rooms? The walls are made of adobe blocks or frame-panel. In winter, the average temperature is -10 °C, but there are frosts and up to 35-40 degrees below zero. A: For such conditions this will not be enough. You need to use something the size of a Swede.
Q: If the oven is extended by four meters, stretching the hood higher, will it function normally?
A: In practice, it has never happened that the furnace was extended to four meters. The design, of course, provides for a change in height due to the upper cap, but 4 m - this needs to be tried.
Q: Is it possible to make a stove without a foundation by placing it on the floor? A: The weight of the structure excluding the pipe is almost 1.5 tons. See for yourself whether the floor can withstand this.
Q: Can the height be reduced? A: This can be done using rows 19-22 and 27-30. If any two consecutive levels are removed from the presented range, the design will not be broken.
Q: Tell me, will this stove be enough to heat two rooms (20 m² and 15 m²)? A: It all depends on how well the house is insulated and at what outside air temperature you will heat it. If you are going to live in this house in winter, it is better to choose a larger stove.
Q: What is the advantage of having 2 dampers? Is it possible to leave only the top one to simplify the design? A: Two valves hold heat better. You are allowed to place one, but it must close tightly.
Q: Can these ovens be made entirely of refractory? Will it be possible to lower the firebox and what will this affect? A: Laying a furnace from refractory bricks is possible. There is no need to make the firebox lower. In this case, the fuel may not burn completely and soot will form.
Q: How is the difference in size between regular and fireclay bricks resolved? A: Due to the better geometry of the refractory material, the seams are thinner when laying. This hides the difference in brick sizes.
Base reinforcement
The upper limit of the finished foundation will be approximately 70 mm below the floor plane. In view of this, the height of the foundation slab, minus the mentioned 7-centimeter gap and 10-centimeter sand backfill, will be 28 cm. Rely on this value when assembling the reinforcing frame.
If you wish, you can make a single-layer sheathing from thick rods, but professional builders recommend taking rods of a slightly smaller diameter and making 2 reinforcing meshes.
First step. Lay the reinforcing frame. First, lay out the longitudinal rods in parallel at a distance of about 100 mm. As a result, you use 7 rods 80 cm long. On top of the longitudinal rods, lay rods perpendicular to them with a similar pitch. This will take 8 rods, each 70 cm long.
Second step. Tighten the joints of the rods with flexible steel wire. Lay the same second one on top of the first sheathing. Tighten the joints of the sheathings with wire.
Third step. Take 9 reinforcing rods, each 25 cm long. You will place four of these rods at the corners of the mesh, four rods will be placed along the edges, and the remaining one rod will be placed at the central point of the reinforcing layer.
Place some stones or other elements in places where the reinforcement comes into contact with the sand to prevent contact of the metal with the ground.
Fourth step. Sink the reinforcing elements into a sand cushion. The reinforcement should not be allowed to protrude above the concrete pour.
Start pouring. Concrete is poured in a uniform, continuous horizontal layer in one go.
After pouring, treat the material with a vibrating tool or at least pierce the concrete with a reinforcing rod to eliminate excess air. Such treatment will help increase the final strength of the foundation.
Leave the poured concrete for a month to dry and gain strength. During the first week, regularly water the fill, otherwise the foundation will crack. It is better to lay a thick baggy cloth on the concrete and pour water directly onto it.
Cover the hardened concrete with aluminum foil (reflective side up) and begin laying out the “Malyutka” stove.