Any house located outside the city cannot do without a heating device. Early spring or late autumn are characterized by cold nights and evenings, and avid summer residents do not want to waste time on daily trips to the city, and therefore often stay overnight in their own house. It should be noted that, unfortunately, not all gardening communities have electricity supply, and not every owner of a plot outside the city can afford to build a brick oven, so you are left with cooking over a fire and freezing at night.
Today there are excellent options for heating and cooking stoves on sale, which are recommended to be installed in the country; this is an excellent solution to all problems. Different models differ in technical characteristics and design and, despite their functionality, really look like objects of art! You can purchase a very simple, affordable stove for heating and preparing simple dishes, or choose an expensive, antique-style, stylish model.
What should it be
It would seem that there is nothing easier than replacing the suitable surface of a brick oven with a metal insert with your own hands, getting a stove for cooking.
In reality, everything is much more complicated. A stove is a complex device, and the thermophysical processes occurring in it depend on the correct arrangement of its elements. There are special requirements for furnaces of this type. On the one hand, it must effectively accumulate heat in the thickness of the brickwork, on the other hand, it must take a significant part of the heat to heat the hob. In the summer, when heating the house is not required, the hob should warm up quickly with economical fuel consumption.
Requirements
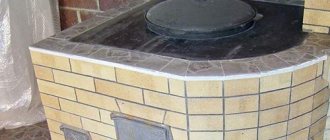
Theoretically, the hob can be made from any material that can heat up to high temperatures when the stove is fired. In practice, they use cast iron plates with holes covered with a removable lid.
This design allows you to create zones with different temperatures on the stove. The thermal conductivity of cast iron, unlike steel, is not very high, so you can heat food on the plane of the stove, as well as cook or stew it over low heat. And by opening the lid, you can achieve direct heating of the cookware with an open flame, which allows you to quickly boil water or fry food in a frying pan.
The most practical are the burners shown in the photo, consisting of concentric rings of different diameters - they can be adjusted to the size of the bottom of the cookware. In addition, the gaps between the rings compensate for the thermal expansion of cast iron that occurs when overheated, and the plate can withstand multiple heating and cooling cycles without damage. Solid cast iron stoves are less reliable and require more careful firing.
Materials
Which brick is preferable for laying a stove equipped with a hob? In most cases, on the ordering diagrams of stoves for a home, cottage or bathhouse, you can see two types of bricks: regular solid ceramic and fire-resistant fireclay - it is most often indicated in yellow. From fireclay bricks, they lay out with their own hands those parts that experience the greatest thermal loads during combustion: the firebox and the roof of the furnace, part of the smoke channel directly after the combustion chamber.
The main difference between fireclay bricks is its increased heat capacity. It is able to accumulate and release the resulting heat for a long time more efficiently than ceramic. For laying a heating stove, and especially a sauna stove, this is an undeniable plus.
But if the stove is used primarily as a cooking stove, then the increased heat capacity of fireclay is rather a disadvantage: it will absorb a significant part of the heat, and cooking will take more time. In the summer it will be impossible to cook on such a stove - the room will become hot and stuffy.
If the stove is used primarily for cooking, it is recommended to use a minimum amount of fireclay bricks!
Dutch, Swedish - who's who
Differences
Stoves, which are designed for heating a home and cooking food, have been called “Swedish” for a long time. In some areas you can find heating cooking stoves called “Dutch stoves”. This is not entirely true. The Dutch stove was usually used in huts as an addition to the Russian stove and was intended for heating the house.
Of course, there were some options on which cast iron hobs were installed, but they were mainly intended for heating rather than for basic cooking. Dutch women, as a rule, were decorated with tiles; this is a kind of “fashionista” of the Russian hut.
The order of the stove is also different: the Dutch heating stove does not require the installation of a hob, as in a Russian stove.
Kitchen workhorse
The Swedish stove, like the Russian stove, is a workhorse that performs several functions at once. You can successfully cook food on it, it can provide heat to your home, and some options allow you to use it as an oven, bake bread and more.
Today we will tell you about a do-it-yourself device of just such an option. Before us are the drawings and order of the heating and cooking furnace.
Heating and cooking stove - ordering
Features of cooking ovens
Depending on the model, cooking stoves combine a real oven, stove and oven, differing in fairly compact dimensions. Most cooking stoves are no larger than a standard gas stove. In addition, manufacturers of cooking stoves place great emphasis on the design of this equipment, which makes them a real decoration of the interior. Installing the stove is quite simple and does not take much time, but it should be entrusted to professionals, this will guarantee long and correct operation of the equipment. A modern cooking and heating unit is mobile and, if necessary, transporting it to another place will not be difficult.
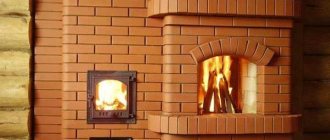
Typical heating and cooking stove
It is recommended to begin familiarization with stove craftsmanship by studying the instructions for laying the most popular version of a heating and cooking stove.
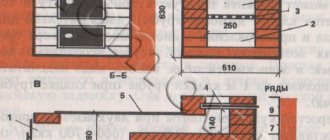
Diagram of a heating and cooking furnace
First step. Lay out the first row of the oven. At this stage, you must strictly monitor the perpendicularity of the corners and the evenness of laying the bricks. The durability and overall quality of the finished heating and cooking structure directly depends on the correct arrangement of the starting row.
Second step. After laying out the initial row, install the blower door.
Third step. Lay out the 2nd row with regular masonry.
Fourth step. Proceed with laying out the third row. At this stage, you need to trim your bricks from both sides so as to create the optimal configuration for the blower. Make sure that the row has a height corresponding to the height of the blower door.
Fifth step. Proceed with laying out the fourth row. It must be placed from left to right. Install the ash pan door. During the laying process, be guided by the pre-selected stove diagram. On the same row you need to close the blower door. Create a hole above the ash chamber.
Sixth step. Lay out the fifth row with the ash pan opening narrowed. Otherwise, the masonry of this row is similar to that of the fourth.
Seventh step. Lay out the sixth row of fireproof bricks. You can also use simple brick, but it will fail much faster than its fireclay counterpart.
You need to chop the brick in front of the grate. This will make it possible to place better quality fuel in the future. The grate itself will rest securely on the 5th row of the stove masonry.
Leave approximately 1-1.5 cm gap between the sixth row and the grille. Fill the gap with sand.
Kitchen stove masonry
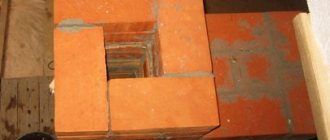
Eighth step. Lay out the seventh row. At this stage, you need to create a U-shaped channel and block it so that one channel turns into three at once.
Ninth step. Install the firebox door. To support the door, use the 6th row of masonry.
Tenth step. Lay out the eighth and ninth rows in the same way as the seventh row. The height of the ninth row should correspond to the fire door.
You need to close the left channel and the combustion baffle. Bricks for this should be prepared in a special way. Preparation comes down to chipping bricks on both sides to ensure smooth and high-quality transportation of gases from the furnace to the furnace channel.
Eleventh step. Lay out the tenth row of fireclay bricks. In this case, the products themselves must be placed strictly vertically. Be sure to check the verticality using a level. You will lay the cooking floor on top of this row.
Twelfth step. Close the combustion chamber door. Only two square channels will remain in the design.
Further laying of the heating and cooking unit is carried out in exactly the same way as the laying of ordinary heating stoves. Follow the chosen ordering scheme.
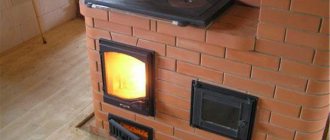
An example of a heating and cooking stove
Finally, install the hob with damper, firebox door and door cover. You also need to equip the ventilation chamber and chimney. Select the design and material of the chimney individually in accordance with the dimensions and other important characteristics of the stove.
Orders of heating and cooking stoves
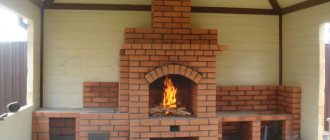
Brick oven
The most common options are heating and cooking stoves made of brick. One of the disadvantages of such a stove is the complexity of its construction. A person without construction experience cannot build a heating and cooking stove with his own hands.
It is better to contact a professional stove builder, he will build the structure of the stove and build a chimney.
- Brick stoves take quite a long time to warm up the room; after starting the fire, you will have to wait a while for the room to warm up.
- The advantage of a brick stove is that the brick gives off heat for a long time, despite the fact that the coal in it has already burned out.
- If you rarely visit a country house during the cold season, a brick oven is not suitable for such purposes. It is cracking and requires repair.
- It is better to use it constantly; short breaks in operation are allowed.
The design of a brick oven can be very different, large, small, equipped with a stove bench. Heating and cooking stoves with an oven can also be built in a summer house.
In a summer house, you can build a barrel of water into a brick oven. Its purpose can be very different. Heat water for personal use or perform an additional heating function at home.
Advantages of wood stoves
Wood-burning stoves have many advantages that make these designs popular both in the past and now. Among the advantages of such equipment:
- autonomy; wood-burning appliances do not require a mains connection - heat generation is possible at any time; This is probably the main advantage of such stoves;
- financial savings; firewood in Russia is available to anyone, and those who live in rural areas are doubly lucky - the savings are even more significant;
- the ability to build a stove yourself; this is both a chance to test yourself, and, again, savings, and the reason for the exclusive design; autonomy results in the possibility of absolute adjustment to the characteristics of the room in which the stove will be installed;
- the ability to connect the device to the heating system of the house;
- environmental friendliness of stoves and fuel; both the stove and the firewood are completely safe for health; the materials from which the stoves are made are harmless, and combustion products are completely removed through air draft in the chimney.
A disadvantage of wood-burning equipment is the need for fuel replenishment. But if the stove is of high quality, and, moreover, designed for long-term burning of wood, the frequency of adding fuel is small. In addition, the advantages clearly outweigh the disadvantages.
Special characteristics of furnaces that are specific only to some models
Before you go to the store and choose a suitable model for your dacha, it is better to familiarize yourself in advance with the different options for such heating devices in order to know what parameters you need to rely on.
Cast iron stove
Simple, but effective and quite cute
This unit has a simple design, but its main advantage lies in the material from which it is made. Cast iron heats up well, retains heat for a long time and has excellent heat dissipation, while it tolerates temperature changes well. With its compact size, a cast iron stove is capable of heating a room with a volume of 100 to 120 cubic meters. meters. The height of this device is 56, depth 54, width 35.2 centimeters. The stove is ideal for a summer residence, since, despite its simple design, with proper combustion it can retain heat for a long time - from five to eight hours.
The ribbed surface of the cast iron side walls increases heat transfer, and the interesting ornament on the door makes the stove aesthetically attractive. When purchasing such a stove, you need to take into account its weight - it is almost 75 kilograms.
Cooking stove with fireplace function
Combines the functions of both a stove and a fireplace
Another very attractive heating stove option is the Bavaria Optima eco-fireplace, which has an elegant appearance and compact shape. The top panel of the unit is made of cast iron and equipped with a burner, so it is capable of giving off heat for a long time, and makes it possible to cook food or warm water. The fireclay slabs with which the firebox is finished are capable of equalizing the temperatures inside, and thereby extend the life of the device. The oven is equipped with a sealed door with heat-resistant glass, and the transparent screen blowing system does not allow smoke to settle on its inner surface - the glass always remains clean. This option may well serve as a decoration for the room due to its fireplace shape, and in the evenings it will be very comfortable to watch the play of the flames.
The dimensions of this model are as follows: body height 93, depth 47.5, width 42.5 centimeters. The stove can not only decorate a room, but also heat a room with a volume of 160-170 cubic meters. meters. The efficiency of the unit is 78-85%, so the efficiency of the furnace can be considered quite high.
Do you need a water circuit in your dacha?
Cooking oven for increased versatility
The appearance of this stove speaks for itself - it is not as compact as the previous ones, but has a very attractive appearance due to its shape and color scheme. The versatility of the unit allows you to solve many economic problems. In the oven you can cook stews, bake bread or a pie, the stove will never let you down, and the fire will bring comfort and warmth to the house. Since the stove is designed with a water circuit, it will heat not only a separate room, but the entire house. In addition, it is equipped with a secondary combustion chamber protected by fireclay slabs, i.e. heat will come not only from burning wood, but also from the burning gases that they emit during the smoldering process. When panels made of natural stone heat up, they will also give off soft heat to the room and will not allow the body to cool down quickly.
The oven has the following dimensions in centimeters: height - 97; depth - 62; width 86. Such a unit is capable of heating rooms with a total area of 170-175 cubic meters. meters.
Types of wood-burning kitchen stoves
Wood-burning stoves are divided into cast iron and steel based on the material they are made of, and based on their location in the room - into built-in, corner and free-standing. Their size can be very different, as well as their power, varying from 6 kW to 30 kW. Some models perform mainly the function of a hob, others allow not only cooking, but also heating the room, often combining this work with heating water for sanitary needs.
The smallest versions of wood-burning kitchen stoves are narrow and tall fireplace stoves, with an oven in the upper part of the body, which makes them easier to install in very small rooms. Large home wood-burning stoves can combine a powerful fireplace with a domed oven, which is convenient for baking traditional country bread, so they are installed either in spacious kitchens or in patios or gardens.
Furnace masonry designed by V. Grum-Grzhimailo
The ductless heating furnace laying scheme shown in the photo was developed by Professor V. Grum-Grzhimailo. There is no smoke circulation in this heating design. It has a round shape and is placed in a case made of sheet steel. Gases move in the furnace not due to the draft created by the chimney, but under the influence of gravity. As a result, cooled and heavier gases sink to the bottom, and light, hot gases rise to the top.
This home stove device consists of two parts - the firebox is located at the bottom. In its roof there is a small-sized haylo (mouth), which ensures the passage of flue gases into the upper part, which represents a chamber without smoke circulation.
It looks like an overturned cap, shaped like a glass. Due to this feature, such heating structures are called ductless or bell-type. The heated gases in them do not enter their mouths into the chimney, since they first go up under the roof, and when cooled, they descend along the walls to the base. From here they enter the chimney and, under the influence of draft, are carried into the atmosphere. One vertical cut is located across the firebox, and the second horizontal cut is located along it.
Along the walls of the structure, from the ceiling towards the vault, there are buttresses designed to increase the internal heat absorption surface and to better absorb heat from the exhaust gases into the brick mass. The fins heated by gases allow the stove to retain heat for a longer time. The efficiency of the design developed by Grum-Grzhimailo reaches 80%. The iron case allows you to make masonry with a thickness of only a quarter of a brick, despite the fact that the unit heats up quite quickly.
Diagram of an ordinary wood stove
Such a heating device is built entirely of brick. The pipe is led out through the roof, and a metal sheet is used as a damper.
The main building element is brick, which has the ability to accumulate and gradually release heat energy into the room. The more basic building material is used in the manufacture of the stove, the longer it will take to heat up and cool down.
When laying out the firebox, it is necessary to use fire-resistant building material and mortar. If we are talking about a chimney, it needs to be laid out dry with the selection and layout of individual rows. When laying out the first ones, you should adhere to the parallelism rule, which is checked with a special square.
To do this, you need to measure the opposite distances between the main angles. If these distances are equal, we can conclude that the masonry was done correctly. The size of such a stove is quite large; as a rule, the device occupies an area of 5 to 8 square meters.
Long burning stove
When making a stove, it is necessary to take into account that in the future it will work thanks to pyrolysis. This concept denotes the process of fuel combustion at high temperatures in the furnace and a lack of oxygen masses
The peculiarity of the device is that the air to maintain the fire is supplied not from below, but from above. This supply is carried out in doses. Air masses reach only a thin layer of solid fuel. This prevents the load from catching fire. As a result, long-term operation of the furnace and complete combustion of gases are ensured.
To make such a unit with your own hands, you will have to acquire a metal barrel. It can be replaced by a gas cylinder and large-diameter steel pipes. The thickness of the walls should not be less than 4-5 mm. If they are thinner, they may burn out during the operation of the oven. The height of the future unit is at least 1 m. The furnace is divided into three sections, namely: the loading chamber, the combustion zone and the system responsible for the removal of gases.
Stove with stove for a summer residence
To assemble the main body of such a unit, you should use a special red stove brick. It has fire-resistant properties and, when laid correctly, can ensure the durability of the future product.
Cement mortar should not be used, as it tends to crack when exposed to high temperatures.
When manufacturing the body, special attention must be paid and the structure must be checked by drying its parts.
During laying, it is taken into account that a little heat will be enough to heat both the room and the hob. The oven element responsible for cooking does not require a large amount of thermal energy. Despite the relative complexity, finishing such a stove can be done using various building materials, for example:
- ceramics;
- facing bricks;
- ordinary plaster.
You can also use modern glass wallpaper. But they are viewed with distrust by many people who prefer to use elite materials such as marble, granite or semi-precious stones. Thus, the oven consists of:
- made of 230 red fire bricks;
- from 200 kg of clay and fine sand;
- from steel angle;
- from the doors of the blower and combustion chamber;
- from a cast iron stove with burners;
- from a box for heating water and oven.
What should you pay attention to when choosing a stove for your summer house?
It is very important that your heating stove satisfies as many requirements as possible and at the same time consumes as little fuel as possible - firewood. Therefore, before purchasing, you need to pay attention not only to the appearance of the product, but also, first of all, to the characteristics.
We recommend that you write out this list for yourself and go through it, researching the model of stove you are thinking of buying:
- Since not all country houses have a large area, the compactness of the stove is extremely important so that it fits well in the place chosen for it. We must not forget about leading the pipe to the street - it should not bump into a floor beam or roof rafters.
- An important point is the volume of space the stove is designed to heat. Typically the recommended area is indicated in square meters.
- Particular attention is paid to the presence of a hob and its size. It’s more convenient to be able to cook a couple of dishes at the same time.
- The choice of location of the chimney pipe will depend on how it is planned to be discharged outside - through a wall or roof.
- The height of the stove should also be comfortable, so that it is comfortable to stand near the stove while cooking.
- Heating devices are also available with glass doors. Thus, the stove can serve as a fireplace. Such doors will be especially useful if there is no electricity at the dacha, and in the evening hours the stove will not only heat the room, but will also create a kind of cozy lighting for it.
Tips for increasing the life of cast iron stoves
To ensure that your stove hob lasts as long as possible, you should follow these simple rules:
- to lay the slab, use liquid cement mortar, maintaining a distance of 5–6 mm from the upper edge of the oven;
- The largest burner should always be located above the firebox;
- the brickwork of the top row must be strengthened with a steel angle;
- Do not forget that there should be gaps of up to 2 mm along the entire perimeter of the slab to prevent deformation and cracking of the metal;
- correctly load the stove for the first time and heat it, gradually warming it up for about 8 hours, and increasing the temperature by 70–80 degrees every hour. For proper heating, you need to start heating with shavings and wood chips, and then add larger firewood. After heating the stove for 8 hours, it must be left to cool until the firewood is completely extinguished.
If the buyer himself is not confident in his competence in installing cast iron slabs, then it is better to seek the help of professionals. Thanks to their special knowledge and many years of experience, they will help you save your time and nerves. This is the case when it is better to give way to a specialist, so that later you do not have to pay for your own inexperience.
And then, when you have at your disposal a beautiful stove with a properly installed cast-iron stove on the surface, you can fully enjoy the warmth and comfort emitted by such a design.
Main manufacturers of cooking floors
Cast iron slabs are produced by both foreign and domestic companies. Among foreign slabs, the most popular and in demand slabs are brands of Finnish origin - Pisla and HTT.
We can proudly note that domestic manufacturers are not lagging behind and produce products no worse.
Among the range of stove surfaces produced in Russia, NMK, Litkom, and SibStalShar slabs stand out. In addition to the quality characteristics, along with strength and temperature resistance, one can note the aesthetic appearance of the cooking floors. Thanks to the desire to surprise and win over the buyer, manufacturers have done a great job of creating a competitive product of the highest level.
All stoves on the market are divided into two categories: prefabricated and solid cast iron stoves.
Cooking floors "Litkom"
Main advantages:
- Beautiful appearance in an elegant embodiment.
- Thermal stability – resistance to high temperatures up to 1000 °C;
- Environmentally friendly - manufactured using materials that are harmless to the life and health of users.
Below is the range of Litkom stove surfaces
| Name | Bookmark size | Average weight | price, rub. |
A stove with one hole for burners for a cauldron up to 20 liters. P1 – 5 512x512x10 21.3 kg. 3 755.40 Plate with one hole for burners for a cauldron up to 40 l. P1 – 6 600x600x16.5 46.16 kg. 8622.70 Stove stove “Warm Potok” P1–7 413x340x8 9.32 kg. 1229.60 Stove with one hole for burners PS2–3/2 362.5x410x8 10.04 kg. 1,314.98 Solid stove with two holes for burners P2–3 710x410x12 24.56 kg 3140.25 Combined stove with two holes for burners PS2–3 710x410x8 19.98 kg. 2260.11 Stove flooring 410x245x15 10.5 kg. 1,053.92 Stove with one hole for burners for a cauldron up to 20 liters. Art.D–440 640*640*10 54.3 kg. 12526.26
Let's consider two more popular models of stove stoves from the Balezinsky Foundry and Mechanical Plant:
- Single-burner cast iron stove stove P 1–2 (710*410): dimensions 710*410 mm, material – cast iron, price – 2180 rubles.
- Cast iron stove stove PS (710*410): dimensions 710*410 mm, material – cast iron, price – 2260 rubles.
Cast iron stove for P 1-2 stoveCast iron stove for PS stove
Fireplace stove design
A fireplace stove combines a combustion chamber, covered with glass ceramics, with an oven or hob, often with both together. At the bottom of the stove there is most often an open or closed firewood box, which greatly simplifies the task of storing fuel wood. Burners usually have removable rings in case of cooking over an open fire. The oven of a fireplace stove is usually located at the top - in the firebox area, and in stoves with a hob - next to the combustion chamber.
The firebox of the fireplace slab can be made of cast iron or high-temperature steel, and furred from the inside with chamon bricks or cast iron tiles to improve the performance of the device. The same purpose is served by the “double afterburning” technology, which allows you to lengthen the combustion process by re-igniting unburned wood residues.
The cladding of a kitchen wood-burning stove can be very different: from expensive majolica to polished steel or artificial/natural stone.
Steel furnaces
The advantage of steel stoves is the rapid heating of the structure and the room; as soon as the coal burns out in the stove, it quickly cools down and the room quickly begins to cool down.
To maintain the temperature, it is necessary to constantly add coal or wood to the stove.
- The problem of quick cooling of a steel furnace can be solved using bricks.
- By covering a steel stove with bricks, you will significantly increase the heating time of the room. As you know, brick gives off its heat for some time after the firewood burns.
- Some steel furnaces are equipped with a conversion system. Cold air enters the oven from the bottom and heats up from the top.
In some steel stoves, wood can burn for a long time; this can be from 8 to 10 hours. They smolder and release gas, which also burns to form heat. This effect is achieved using a built-in pyrolysis chamber.
How to build with your own hands, site preparation
Before laying out such a structure in the house, you need to prepare:
- Special tiles are laid on the floor in the place where the stove will stand. For better grip, you need to use a primer called Betokontakt. The first row of tiles is laid perfectly evenly, since the quality of the entire work depends on this. The grout is applied one day after installation.
- You can start tiling the walls with special tiles. For better adhesion, the same primer is used as in the first stage. Heat-resistant adhesive mastic is used. Grout also needs to be applied one day after laying the tiles in full.
- Let's start preparing the ceiling area. It is necessary to make a hole for the chimney so that its internal diameter matches the individual characteristics of the stove. You need to screw a special flange to the hole using self-tapping screws.
Construction of the furnace itself
The procedure is carried out taking into account the following algorithm:
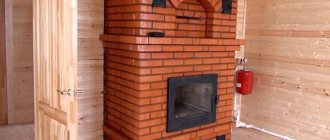
- The foundation is being laid. To do this, they find out what depth the soil freezes in a certain area. If the foundation is laid in an already finished house, the depth of the trench can reach half a meter. Measures are being taken to prevent freezing of the structure.
- Walls are being built. It must be remembered that the dimensions of the ash pan must correspond to the dimensions of the furnace itself and ensure the flow of oxygen necessary for combustion. The grate should be square in shape and installed at an angle to the firebox door.
- Final finishing is being carried out. If the owner is more concerned about the efficiency of the structure than its appearance, he plasters the walls with a clay solution. After such treatment, you need to apply a special mixture consisting of chalk, water and milk to the structure.
Photo 2. The process of building a brick oven. The image shows how the grate and fire door are installed.
If you adhere to the described algorithm, you can get an excellent stove that effectively heats the room.
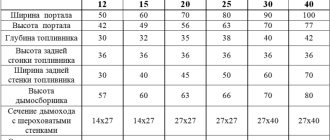
Schemes of stoves for the home with preferential bottom heating
If the heating structure has a predominant bottom heating, its size, as a rule, is 115x56x231 centimeters with a heat transfer of 2640 kcal/hour. In accordance with the smoke circulation system, this stove is classified as a combined duct heating unit with bottom heating.
When a stove heating scheme for a private house is created using such a design, it is assumed that the flue gases from the firebox will first descend and then rise along the riser to the ceiling (
Swedish stove laying
Laying a Swedish stove
The Swedish stove is one of the most popular and most convenient to use stove options. The laying of such a stove is carried out in several simple stages.
Foundation diagram for a homemade Swedish stove
First step. Prepare the brick for laying. To do this, just dip it in clean water and leave it there for about a day. The material will be saturated with moisture and will not absorb it from the masonry mortar.
Second step. Prepare a masonry solution from clay, water and sifted sand. You should get a plastic homogeneous mixture. Laying 100 bricks takes about 20 liters of mortar.
Third step. Lay out the starting row of bricks, making sure to check the perpendicularity of the corners, verticals and horizontals. The row must be continuous. You can use half-bricks to lay out the interior space.
Fourth step. Lay out the second row. This row should be the same as the first.
Arrangement of the Shvedka stove
Fifth step. Lay out the third and fourth rows. Start forming the ash pan compartment. Install a door for this chamber and three cleaning doors and one blower door. Place smoke vents on the back of the stove. They must be vertical and communicate with the combustion chamber through a hole.
Sixth step. Install the grate and mount the oven chamber. Cover the blower door and cleanout holes.
Seventh step. Lay out rows 6 to 10. At this stage you should form the combustion chamber. Between the firebox and the oven chamber, lay the bricks on edge. Install the walls of the combustion chamber and oven. Between them there should be a partition one row taller than the camera.
After laying the 10th row, lay a steel angle and cast iron tile on the front side. Secure the corner with wire and mortar.
Eighth step. Lay out the 11th row. At this stage you should completely block the channel between the tile and the right wall.
Ninth step. Lay out rows 12 to 16. Form a brewing compartment and three vertical flues. Lay out chimney openings using fireclay bricks.
Tenth step. Lay out rows 17 and 18. Arrange the ceiling of the cooking chamber.
Eleventh step. Lay out rows 19 and 20. At this stage, you need to place two cleaning gas duct doors on the front of the stove.
Twelfth step. Lay out rows 21 to 28. Form smoke channels in accordance with the chosen ordering scheme. Observe correct ligation of stitches. When laying out the 27th row, install a chimney damper. Leave a hole above it through which the flue ducts will connect to the ventilation ducts.
Thirteenth step. Lay out rows 29-30. Close the upper chimneys. At this stage, the masonry must be expanded by 50 mm around the perimeter. Due to this, a cornice will be formed.
Fourteenth step. Lay out the 31st row. At this stage, the dimensions of the overlap must be brought to the dimensions of the 27th row.
Fifteenth step. Lay out the 32nd row. At this stage, start laying out a chimney pipe measuring 130x250 mm.
Lay out the chimney to the required height, and your Swedish stove will be completely ready. Finally, it will need to be covered with ceramics or painted.
Cast iron stoves
The advantages of a cast iron heating and cooking stove are the rapid heating of the room, similar to a steel stove; just like brick stoves, it gradually releases its heat after the wood burns out.
Cast iron stoves confidently hold second place among all options. In some points they are superior to brick and steel stoves, but there are also nuances in which they are inferior.
Cast iron stoves are very easy to use; with long-term use they are not subject to destruction and do not rust. After a long break in operation, they work without any defects, performing their function perfectly.
Cast iron stoves are very expensive and cannot be made independently.
Types of cast iron stove surfaces
Regardless of the configuration, all cast iron surfaces perform heat transfer functions well and are suitable for cooking. The difference between a solid and prefabricated slab is the presence of thermal gaps between the elements, which compensate for the expansion of the metal when heated. You can understand the structure of hob surfaces in more detail by reading about each of them separately.
Prefabricated slabs
The prefabricated cooking deck is a structure made of a cast iron surface and several rings that differ in diameter. They are inserted into each other and assembled into a single plane like a puzzle.
All prefabricated stoves can include from one to several burners, and thanks to the ability to remove and put on rings, you can choose the most suitable burner size for each specific cookware.
This type of flooring is more durable and resistant to temperature changes. Due to the presence of gaps between the rings, the metal can expand during heating without deformation or other damage. To provide extra strength, some slabs are produced with additional stiffening ribs on the inside. A significant advantage of this addition is an increase in the temperature of the hob, and thus an increase in the efficiency of the oven in cooking.
Solid slabs
A solid cooktop comes in the form of a single sheet of metal, usually with
one or two burners with a constant diameter. There are also blind stoves that do not have burners.
This design of the stove plate has virtually no thermal gaps, which makes it not as reliable and practical as the previous model. Due to the lack of free space, deformation of the cast iron may occur during heating.
However, an important advantage of solid slabs is ease of installation and reasonable cost compared to prefabricated ones.
The main nuances when installing a cast iron stove:
- When making a furnace, it will be appropriate to compare the difference in the behavior of different materials under the influence of temperature. Metal and brick have different expansions, and during the heating process the oven may collapse. To prevent this from happening, it is necessary to provide gaps between the cast iron slab and the brick surface of up to 5 mm around the entire perimeter. This way you can significantly increase the service life of the furnace.
- The metal plate on the surface of the furnace is fixed with a liquid clay-asbestos solution. To prepare it, clay is mixed with crushed asbestos and by adding water the solution is brought to the correct consistency (liquid sour cream).
- When installing a cast iron stove, be sure to control the process using a level. The largest burner is always located above the firebox.
- To strengthen the structure of the stove, the top row of brickwork should be fixed with a steel angle around the perimeter.
Laying a furnace created by the Thermotechnical Institute
Schemes of home stoves, developed at the Thermotechnical Institute by engineer Kovalevsky, have dimensions of 100x85x217 centimeters. They use a shaft-type firebox designed for the use of coal.
Through the channel, flue gases enter under the roof, from where they enter two side channels. Then they follow to the very bottom and move through the collection channel into the smoke riser. If the smoke valve is open, then the gases are vented to the atmosphere.
The peculiarity of the furnace arrangement lies in the different thickness of the walls of the smoke circulation channels. The first of them, coming from the firebox, is called the fire channel. It has an outer wall 3/4 brick thick. The rest of its walls are made of half a brick. This heating structure does not fit into an iron casing. Its masonry is simple. The efficiency of engineer Kovalevsky's furnace is 75-80%. The disadvantage of the heating unit is the possibility of overheating its upper part, since the hottest gases are directed into it. They will reach the bottom of the oven completely cooled, as a result of which the degree of heating of the lower part is insufficient. A certain amount of gases from the firebox enters the side channels through the screws, which increases the heating of the lower part of the outer walls (about