Russian stove: drawings of brick stoves
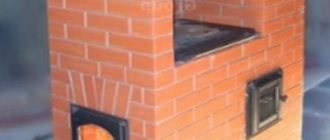
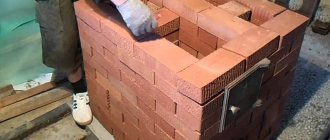
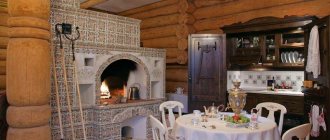
Previously, such designs were found in every home, but nowadays they are already a rarity. Despite this, a Russian stove can successfully fit into the interior of the room. Also, Russian brick stoves are not only a heating device - they also have a hob. To lay the stove you will need the following materials:
- solid red brick – 1610 pieces;
- view for a valve measuring 0.3x0.3 meters - 2 pieces;
- dry clay solution in dissolved form;
- samovar 14x14 centimeters - 1 piece;
- flap 43x34 centimeters - 1 piece.
Advantages and disadvantages of use
A Swedish stove with oven and stove is a heating device with successful engineering solutions and the following advantages:
- Compact sizes . Due to its small dimensions (sometimes one square meter), it is preferred in small country houses and dachas.
Compactness is an important advantage of the Swede Source infradom.ru
- Efficient combustion of fuel . Regardless of its type (firewood, wood chips or reeds), the resulting thermal energy does not go into the chimney, but remains in the house. You get the opportunity to heat two rooms at the same time.
- Quick warm up . A significant advantage over the traditional Russian stove: 10-15 minutes after lighting, you will feel the room filling with warmth.
- Functionality . You get the opportunity to fully heat two rooms, cook dinner, heat water, and bake in the oven.
If we talk about shortcomings, then, by and large, there are only two significant ones:
- Demanding choice of materials . If you want to maintain the efficiency of the furnace, standard brick is not enough. Construction will require significant investments in the purchase of truly high-quality materials.
- It is almost impossible to build such a stove without appropriate experience and knowledge of the intricacies of the device . That is, it can be assembled, but it is not a fact that it will have the necessary efficiency; It will be difficult to identify and eliminate errors.
Swedish stove with a stove bench and tiled lining Source bestpechi.ru
Buslaevskaya stove: projects
The design has a built-in hood. The oven is small in size. It is ideal for any private home, as it allows you not only to heat the premises, but also to cook food. Despite its compact size, the stove heats spacious rooms well, which is why there are ready-made designs for houses with a stove. Special schemes for laying brick stoves will help you complete the work without carrying out complex calculations. For installation you will need the following materials:
- doors - firebox (0.2x0.25 meters), VK (0.39x0.5 meters), blower (0.14x0.14 meters);
- refractory - 43 pieces;
- solid brick – 382 pieces;
- oven-cabinet 28x33x50 centimeters;
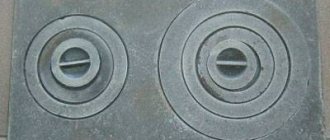
- cast iron stove 0.7x0.4 meters with burners (removable rings of different diameters);
- valves - steam exhaust (12x13 centimeters) and smoke (12x25 centimeters);
- grate - grate 30x20 centimeters;
- corner - three equal-flange blanks 1 meter long and 45x45 millimeters in size;
- steel - piece 0.3x0.28 meters;
- strip - 4 pieces of meter (4 graph paper), 0.25 meters (2 graph paper), 0.35 meters (3 graph paper);
- cast iron plate – 0.4 x 0.25 meters; 40x15 centimeters.
Projects for brick stoves of this type look like this:
- Full row.
- Blower door.
- Window opening for cleaning.
- The bottom of the oven is lined with refractory, three sides are lined with iron.
- Installation of the combustion door, grate, refractory under the firebox, cleaning cover, ash door.
- Installation of DS.
- Laying refractory on the edge around the door.
- Laying according to the scheme.
- The oven is top coated with clay (1 centimeter), the heater is covered, and a stove with burners is attached.
- Installation of smoke circulation with cleaning windows, the stove is not laid. Subsequently, the brick is placed on its edge.
- The cleaning is overlapped, channels are created, and 25-centimeter strips are laid.
- The cleaning is completed and the fastening wire is installed.
- The cap is installed.
- Installation of the VK ceiling, while the hoods remain.
- The stoves are laid out according to the diagram.
- The small stove ends in sheet iron, the masonry is done in the same order as a brick stove.
- The cleaning hole of a large stove is laid out, the edges of the side walls of the channels are cramped.
- Laying protrusions.
- The projections are duplicated and the corner is installed.
- The BP chimney is closed in the same way as row 19.
- A three-row neck is made, the size of the chimney is reduced to a section of 26x13 centimeters for the top valve.
- A chimney is created with grooves on this and subsequent rows.
The dimensions of the structure increase when using clinker facing bricks, so using them instead of solid material is not recommended. When finishing with tiles, durability is ensured (the material lasts for decades), in addition, it can be dismantled for cladding other heating structures.
Varieties
Over the centuries of its existence, the Swedish stove has been tirelessly refined and improved by generations of stove makers, and several designs are now available, each with its own pros and cons. When choosing a suitable option, it is worth remembering the following features of furnaces:
- With vertical channels . The simplest version for reproduction has three channels (the so-called three-turn). The model is easy to light in any weather, it is easy to maintain, and does not require frequent cleaning. The downside is low efficiency, uneven heating and rapid cooling. There is a high probability of cracking of the first channel.
- With horizontal channels . The design is also simple to construct, is characterized by higher efficiency, and retains heat longer. An unpleasant consequence of a horizontal device is increased soot deposition, so it has to be cleaned more often (and here it is important to have properly cleaned units). The stove is more difficult to light; it needs more draft in the chimney; Under certain weather conditions, vagaries are possible.
Modern model built into the kitchen space Source akvapro42.rf
- Bell furnace . A combination of the first two varieties with high efficiency and other pleasant properties: uniform and long heating, simple maintenance, easy melting, long service life. Bell-type models are extremely varied in form and function and are capable of heating 3-4 rooms. Sometimes they are made two-tier, for the second floor or attic.
Furnace designs differ in the format of use, and, consequently, in the method of installation, choice of materials and availability of parts. There are traditional, modern and decorative stoves.
Traditional Swedes are the pinnacle of engineering of the past. Although a lot of time has passed since they were developed, they are still beloved and are often made to order or homemade. Unlike the Dutch one, which was originally intended only for heating, the Swedish version appeared as a heating and cooking unit. For masonry, a special refractory brick is chosen, and it is also used for cladding.
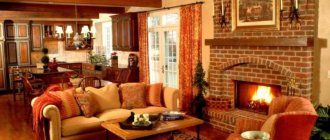
A Swedish woman with a fireplace is a decoration for any home Source terman-s.ru
Modern models are often larger in size, have a stylish design, are highly efficient, and help save heat. They are variations on a classic theme, sometimes made of titanium or magnesite, and combine a stove, oven and hood. There are also more complex models: with a fireplace, with a couch, with a built-in water circuit.
Decorative varieties of Swedish women repeat the features of classic products. They are more compact and, although they can help cook dinner or heat a room, they are not considered as a main heating device. But the brick building, lined with tiles, looks great in different interior styles.
Ordering a sauna stove: diagrams
Designs of brick heating stoves show the location of fireclay and clay bricks in each row.
Explanations for the order: 1st, 2nd row. A blower is created (a window for air supply), and a dressing is used. 3. A window is left for the main chimney. 4. The damper and ash pan door are installed. 5. The grate and firebox are mounted, and the refractory is subsequently laid on them. 6. The shape of the chimney and firebox is repeated, and doors are installed. Rows 7-11. The firebox ends on the 11th row. Rows 12-14. The heater box is installed. 15-16. The shaft expands and becomes half similar to the 6th row. 18. The cleaning door is installed. 22.23. The shafts are combined, and the edges of the bricks are ground down. Then the shaft above the heater is completely blocked, leaving only the chimney.
Frame structures can facilitate the installation process. In this case, brick is present only in the outer walls, and all internal elements are welded from metal. This can speed up the process of laying the stove.
Equipment and building materials for building a stove with your own hands
Brick
There are sources on the Internet that claim that bricks for stoves and fireproof bricks are one and the same. In fact, they only have linear dimensions in common. The dimensions of a regular single building brick are 250 by 125 by 65 mm, and a standard stove brick has a size of 230 by 114 by 40 mm. Sometimes 230 by 114 by 65 mm is found. In the construction of the furnace, special high-quality brick of grade 150 is used. It is resistant to temperatures up to 800 degrees. It would be possible to build an entire furnace from it, but it cools quickly and is not suitable for a full-fledged furnace.
Fireclay bricks are used to lay the furnace channels in the combustion chamber. It can withstand high thermal loads. It is used in Swedish stoves or sauna stoves. It can withstand temperatures up to 1800 degrees, but in home ovens this temperature does not exist. It is valued for other qualities - the ability to retain heat for a long time. It makes no sense to build the entire body of the furnace out of it, since it is very expensive and has weak strength.
Bricks for the stove
To distinguish high-quality fireclay from low-quality one, there is an opinion that it should have a yellowish tint. But such a calculation is not correct, since fireclay can change color depending on its deposit. A sign of high-quality fireclay is the fine grain of the brick. Another way to check is to check for sound. The brick is tapped with a hammer. The sound should be clear and clear, not dull. The last way to determine the quality of a material is radical. They break the brick in half and look at the break. High-quality fireclay is broken into large pieces.
As a substitute for expensive fireclay, clinker bricks are sometimes used in kiln construction. It is just like red ceramic, but it is fired at elevated temperatures. It has greater strength and fire resistance.
White silicate is not suitable for any parts. It is not resistant to thermal stress and absorbs moisture too much.
Sand
Medium-fraction quarry sand is used as sand in the cement-sand mortar. It is sifted through a sieve to remove large fractions and various organic inclusions. The presence of additional inclusions in this case is very important. All organic impurities will burn from heat, causing the masonry to crack and begin to crumble.
Masonry mortar
To lay the stove you will have to use several types of mortar based on:
- Cement;
- Lime;
- Clays;
- Chamotte.
Clay-based mortar is characterized by its plasticity. It is used in places experiencing high temperature loads. This solution is cheap in price. Clay can be easily found on almost any plot of land by first cleaning it. It can withstand temperatures up to 1100 degrees Celsius. This mixture dries when exposed to high temperatures, but becomes wet when exposed to moisture. The furnace masonry can always be disassembled and reassembled. But you can’t lay a foundation on such a solution.
A mixture of clay with the addition of fireclay is used in the combustion chambers. This solution can withstand the highest thermal loads.
The lime mixture is used on the foundation masonry or for the chimney. This solution is quite strong, but can only withstand 450 degrees Celsius.
Cement-lime is even more durable than ordinary lime, but fire resistance is reduced even more. Used in the foundation.
Cement-sand mortar is used for laying a chimney. It has the best strength and resistance to precipitation. The seams of such a solution will not allow smoke and digging into the room and will provide good draft for the firebox.
Brick heating panel.
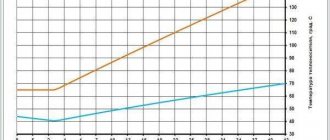
The scheme is as follows. As you can see in the figure, smoke valves are made in the upper part of the shield. The second valve is responsible for the summer flow of gases. The third is the winter mode (it is open, and the gases go into the smoke circuits of the shield, the second valve is closed). While the gases pass through the channels, they cool, giving up part of their heat to the shield, and in a cooled state they go into the pipe. .
The dimensions of our thick-walled heating panel are 89 x 38 x 224 cm. Weight - 1.2 tons. Heat transfer: one good firebox - 430 kcal/h; two fireboxes respectively - 600 kcal/h. As a rule, the panels are plastered or laid directly from beautiful refractory bricks. Three smoke dampers make it possible to regulate the movement of gases. The operating modes are as follows.
Shield operating modes.
- In winter, the winter valve is closed, the first and second valves are open. Going along all the passages of the shield, the gases lose their heat, giving off their heat to the shield.
- In summer, valves 1 and 3 are open, the second is closed. Gases, bypassing the chimney of the shield, go directly through the pipe. For better ventilation of the room, a special channel is installed in the mounted pipe. It opens with a grille having louvers (valves). Their presence allows the ventilation system to be operated in 3 modes: open, half open and closed. Next we will see the laying of the heating shield.
Material for laying the heating shield:
- refractory brick - 400 pcs.;
- river sand - three to four bags;
- clay mixture - three bags;
- roofing felt for waterproofing - 1-2 m.
- cast iron valves 13 x 13 cm -3 pcs.;
- ventilation draught with valve (15-20 cm);
- cast iron doors 14 x 13 cm - 3 pcs.
When laying the foundation under the shield, it is not brought up to the level of the finished floor by two rows in height. One row of brick is placed on top of the foundation, waterproofing is laid over it, after which the shape of the stove is marked out. Next, the second row is laid, with its upper surface reaching the level of the finished floor. After this, you can start laying out the shield.
- 1st row - made of solid brick.
- 2nd and 3rd rows - according to the picture.
- 4th row - during the laying process, a window is left for entry to the furnace panel and 2 cleanings are installed.
- The 5th row is similar to the fourth, the ligation of the seams is exactly as in Fig.
- 7th row and next. odd, up to the 25th - according to the figure with the formation of three channels.
- 8th row and next. even numbers up to and including the 26th - according to the order in the picture.
- Rows 10, 11, 17, 23 and 24 are similar to the previous ones. However, for the purpose of better reliability, ligation of sutures occurs differently.
The 18th row is placed similarly to the 10th and 24th. A valve is installed in the channel on the right wall. The 21st and 22nd rows are placed with the installation of a samovar. 27th row - during the laying process, the two left channels converge into one and overlap. samovar. 28th row - a cast iron valve is installed during the laying process. 29th row - according to the order
Pay attention to the dressing. 30th row - during masonry, a valve is placed on the right side of the shield, an overlap on the left. channel. In the 31st and 32nd rows we bandage the seams differently. Top of the shield - overlap in three rows
This can be seen in the figure. This scheme is completely made according to fire safety requirements. 33, 34 and 35th rows - according to Fig. 36th row - during masonry we make a ventilation and smoke passage
The top of the shield will be covered in three rows. This can be seen in the figure. This scheme is completely made according to fire safety requirements. 33, 34 and 35th rows - according to Fig. 36th row - during masonry we make a ventilation and smoke passage
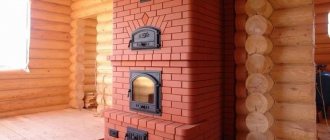
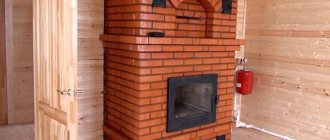
In kitchen wood stoves, most of the heat energy literally goes up the chimney, and only a small amount of heat is used to heat the stove. To trap hot gases and use them to heat your home, you need a heating panel - a brick wall with smoke circulation channels inside. A heating and cooking stove with a shield is ideal for a summer house and summer kitchen - it does not take up much space, effectively heats the room and can operate in winter and summer modes.
Brick heating panel.
The scheme is as follows.
As you can see in the figure, smoke valves are made in the upper part of the shield. The second valve is responsible for the summer flow of gases. The third is the winter mode (it is open, and the gases go into the smoke circuits of the shield, the second valve is closed). While the gases pass through the channels, they cool, giving up part of their heat to the shield, and in a cooled state they go into the pipe. . The dimensions of our thick-walled heating panel are 89 x 38 x 224 cm. Weight - 1.2 tons. Heat transfer: one good firebox - 430 kcal/h; two fireboxes respectively - 600 kcal/h. As a rule, the panels are plastered or laid directly from beautiful refractory bricks. Three smoke dampers make it possible to regulate the movement of gases. The operating modes are as follows.
Shield operating modes.
- In winter, the winter valve is closed, the first and second valves are open. Going along all the passages of the shield, the gases lose their heat, giving off their heat to the shield.
- In summer, valves 1 and 3 are open, the second is closed. Gases, bypassing the chimney of the shield, go directly through the pipe. For better ventilation of the room, a special channel is installed in the mounted pipe. It opens with a grille having louvers (valves). Their presence allows the ventilation system to be operated in 3 modes: open, half open and closed. Next we will see the laying of the heating shield.
Material for laying the heating shield:
- refractory brick - 400 pcs.;
- river sand - three to four bags;
- clay mixture - three bags;
- roofing felt for waterproofing - 1-2 m.
- cast iron valves 13 x 13 cm -3 pcs.;
- ventilation draught with valve (15-20 cm);
- cast iron doors 14 x 13 cm - 3 pcs.
When laying the foundation under the shield, it is not brought up to the level of the finished floor by two rows in height. One row of brick is placed on top of the foundation, waterproofing is laid over it, after which the shape of the stove is marked out. Next, the second row is laid, with its upper surface reaching the level of the finished floor. After this, you can start laying out the shield.
- 1st row - made of solid brick.
- 2nd and 3rd rows - according to the picture.
- 4th row - during the laying process, a window is left for entry to the furnace panel and 2 cleanings are installed.
- The 5th row is similar to the fourth, the ligation of the seams is exactly as in Fig.
- 7th row and next. odd, up to the 25th - according to the figure with the formation of three channels.
- 8th row and next. even numbers up to and including the 26th - according to the order in the picture.
- Rows 10, 11, 17, 23 and 24 are similar to the previous ones. However, for the purpose of better reliability, ligation of sutures occurs differently.
The 18th row is placed similarly to the 10th and 24th. A valve is installed in the channel on the right wall. The 21st and 22nd rows are placed with the installation of a samovar. 27th row - during the laying process, the two left channels converge into one and overlap. samovar. 28th row - a cast iron valve is installed during the laying process. 29th row - according to the order
Pay attention to the dressing. 30th row - during masonry, a valve is placed on the right side of the shield, on the left it is crossed
channel. In the 31st and 32nd rows we bandage the seams differently
The top of the shield will be covered in three rows. This can be seen in the figure. This scheme is completely made according to fire safety requirements. 33, 34 and 35th rows - according to Fig. 36th row - during masonry we make a ventilation and smoke passage
In kitchen wood stoves, most of the heat energy literally goes up the chimney, and only a small amount of heat is used to heat the stove. To trap hot gases and use them to heat your home, you need a heating panel - a brick wall with smoke circulation channels inside. A heating and cooking stove with a shield is ideal for a summer house and summer kitchen - it does not take up much space, effectively heats the room and can operate in winter and summer modes.