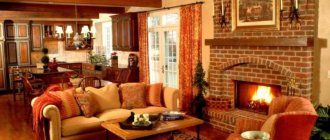
It is simply impossible to imagine a private house or cottage without a stove, which provides not only warmth, but also comfort in the home. Today there is a huge variety of brick stoves for the home. The main advantage of this design is the fact that, thanks to its diversity, it will fit into any interior and will complement any setting. Many owners of private houses can make a stove with their own hands; the most important thing is to know the basics, which will be discussed in this article.
Advantages and disadvantages of a brick kiln
Before you seriously start arranging a brick oven with your own hands, you should consider all its advantages and disadvantages.
The good and positive aspects include, perhaps, the following:
- The choice of material directly affects how much heat is released into the brick kiln;
- Less fuel consumption and efficiency;
- Efficiency is equal to 70%;
- The oven retains heat longer;
- Despite the high temperatures, you cannot get burned on such a stove as badly as, for example, on a cast iron one;
- The humidity in the room remains almost unchanged;
- The temperature balance is maintained, due to which the air in the room does not dry out;
- It is the brick stove that ensures the uniform spread of heat throughout its body;
Thanks to its rich functionality, this heating device is suitable for a wide variety of applications.
As for the obvious and obvious disadvantages:
- To heat the premises, it is advisable to install a large stove, since its smaller counterparts are more suitable for cooking;
- Rooms that do not need to constantly maintain the same temperature level, that is, for example, in situations where the stove has completely cooled down, it becomes difficult to heat it up again;
- In most cases, it is worth thinking about laying a brick oven even when building a house due to its considerable dimensions;
- On farms, greenhouses and other areas with specific fumes, the use of such stoves is inappropriate.
Types of brick kilns
It should be noted that brick heating devices can be divided into several categories according to the functions they can perform, performance and how often they can be used for heating.
The oven that best suits your needs should meet at least two or three criteria. Based on its purpose and the area available to you for laying the stove, you can say for sure how large it will turn out.
Thus, brick kilns are divided into several types, choosing their purpose as a guide:
- Heat the room: as the name suggests, such stoves are suitable for heating a certain area and nothing more. Depending on the size and type of gas movement inside, it can simultaneously heat three rooms;
- Cook food: such heating devices are not large in size; rather, on the contrary, they are compact and have a special surface for cooking and frying;
- Heating and cooking: they simultaneously combine the functions of the two above-mentioned stoves.
- An oven with great functionality: not limited to heating and cooking.
How to install a stove
It is necessary to install the stove only after the owners of the house have decided on its main purpose, based on which it will become clear what the features and nuances will be during its construction.
- For example, in a house with a relatively small area, it would be advisable to build a small stove that will serve as a fireplace. Moreover, it can be used in frying kebabs or barbecues.
- In buildings where the square footage allows for plenty of room, the stove can serve as a heating element. You can also arrange a warm bed on its surface or place a clothes dryer nearby.
The only important point is that the preliminary insulation of the house itself should be taken care of in advance. An additional layer will increase the efficiency of room heating.
Scheme for laying a stove for a home
A diagram for laying a stove for a home is the first thing that a person who decides to install heating in his home using a stove will need. In this material we will look at what layout schemes for home brick ovens exist, what are their features and differences.
Laying a stone stove can be done in the following ways:
- 1. undercut;
- 2. with empty seams;
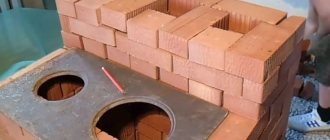
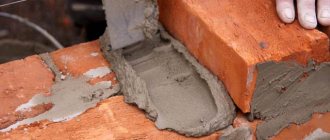
When arranging a stove using the first method, plastering the stove is not required, since all seams are filled with mortar. The thickness of the kiln walls determines the way in which the bricks are laid. The walls are laid out with a thickness of one brick and half a brick. Sometimes you can find a masonry of 3.4 bricks. For work on the installation of a stove, it is imperative to use stove bricks. It is also called “red brick”, solid. Under no circumstances should you use bricks that have been taken from a dismantled building, expanded clay blocks or slotted bricks.
The first row is laid simply with bricks, without using mortar. The brick is leveled, the front wall and the places where all the doors will be located are determined. These operations can be called the last "estimate". When these actions are completed, the bricks are laid with mortar.
After this, they begin to lay the corners. The next stage, according to the advice of experts, is the arrangement of the contour of the entire stove. Using plumb lines, string is stretched from the ceiling to the corners of the stove. With the help of these vertical lines, you can easily navigate while working.
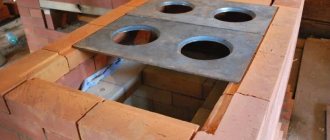
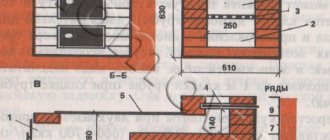
Considering the model of the stove you have chosen, you should determine the areas in which the following will be located: the ash pan, the combustion chamber, and the ash pan. The door under the ash pit is installed when the third row of bricks is laid, and after one row the ash pit is laid out.
After this, the firebox is arranged. Each door is attached with burnt wire. When you get to laying out the vault, you will need to cut the bricks. A calculation will be required to ensure good joining of the bricks with each other. The laying of the vault begins after the second row of bricks is laid after the firebox door.
To line the combustion chamber, special refractory bricks are used. Since facing bricks and masonry bricks have different temperature characteristics, installation of the lining to the furnace itself should not be done rigidly. When installing a chimney pipe, care should be taken to install a special valve, the adjustment of which should be smooth and easy.
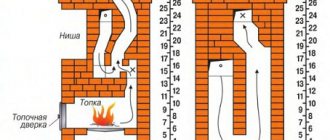
Furnace structure
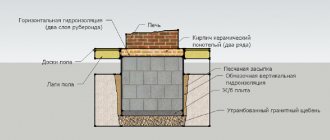
Important knowledge for those who are planning to install a stove on their own is the concept of the structure of the stove. For clarity, we can name three main components - the body, the foundation and, of course, the chimney.
The design includes the following elements:
- Basis for the foundation;
- Waterproofing;
- Holes for special purposes;
- Blower;
- Air duct for heating the room;
- Grate;
- Firebox and area around it;
- Doors for cleaning;
- Gate valve;
- Chimney;
- Fluff and overlap.
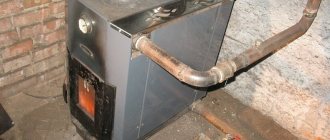
Manufacturing of thin-walled frame furnace
The thin-walled frame oven weighs about 300 kg. A foundation is required for its installation. The bathhouse design provides for an attached pipe, which must be connected to the wall chimney (see article “Calculation of a chimney - possibilities and reality”). Its heat output is 1.2 kW, which the furnace produces when running two fireboxes throughout the day.
Accessories
To carry out the work we will need:
- ordinary solid brick – 64 pcs.;
- refractory brick – 16 pcs.;
- ordinary clay – 40 kg;
- river sand – 90 kg;
- metal corner 2.5/2.5/0.3 cm – 10 kg;
- steel strips 3/0.4 cm - 2 kg;
- asbestos-cement sheet 5 mm thick – 2 m²;
- grate 13/13 cm – 1 pc.;
- combustion door – 25/20.5 cm – 1 pc.;
- sheet steel with a thickness of 1 mm – 12 pcs.;
- roofing steel – 7 kg;
- valve with pipe.
Making a frame
When lining the furnace with a small-sized sheet of metal or asbestos cement, in addition to the corner that forms the lower and upper chords of the frame, strip steel is also used, which should be installed at the joint points of the facing material. For quick installation, it is allowed to use bolted connections in the structure.
- The oven frame is made from a 25/25/3 mm corner, which includes vertical posts.
- In the lower belt, front corners and gussets are attached by welding.
- In the upper belt, the linings and front corners are fastened. The linings use 40/3 mm strip steel.
This installation allows you to form the rear and front pivot frames. They are equipped with stripes and side corners.
- The overlays must be located inside the frame joints. Asbestos-cement sheets should be cut in accordance with the overlays.
- For technological execution of bolted connections, holes should be made in the plates and welding should be done flush with the inner plane of the nut.
- The furnace fittings and cleaning doors should be attached to the front frame of the frame.
- When preparing the frame, the facing material should be cut at the same time. You can paint it to match the color of the room.
Criterias of choice
- The design of the furnace must be the same size as the area allocated for its installation. The amount of heat transfer depends on compliance with this rule.
- Choose the right oven shape. For heating the room, a shape is suitable where the side walls are long and the front and back walls are narrow.
- The stove must be located in the house in such a way that it does not disturb anyone and at the same time is in its place to perform certain functions.
- A small house does not need a massive stove - its impressive dimensions will not warm the house faster. It is better to have a smaller oven that quickly reaches the desired temperature than a large and wasteful one.
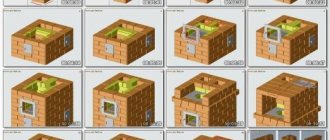
Features of a 4 by 4 brick heating stove
The dimensions of the stove at the base are 102x102 cm, and the height is 2 m 10 cm. The minimum ceiling height, taking into account fire safety requirements, is 2 m 45 cm.
These parameters are approximate and depend on the size of the bricks. To find out the exact width and depth of the oven, you need to lay out the first row.
In this case, leave a distance for the seams (about 5 mm). To determine the height of the furnace, add the height of the brick and the thickness of the seam, and then multiply by the number of rows.
If necessary, the oven is made higher. To do this, repeat rows 23 and 24.
With a two-time firebox, the heat transfer will be at least 4480 W. This is enough to heat 35-40 square meters with proper thermal insulation.
The model has a straight stroke, making it easier to kindle in bad weather. It is also used in summer, as heating is noticeably reduced.
The right place for the stove
As already mentioned earlier, the installation of the furnace needs to be thought out during the construction of the house itself. After all, based on the number and location of rooms and other equally important criteria, you can choose the most suitable place for the stove.
For example:
- In a house with many rooms, the stove should be positioned in such a way that its structure is located between the walls that divide the house into rooms.
- A good option is to build the heating element closer to the entrance, which will subsequently eliminate the cold air currents entering the room from the street.
- The walls of the stove and the house should not touch. This requirement is imposed to ensure safety precautions.
Compact oven models
Today, compact stoves are very popular due to certain savings and less hassle with their installation.
Due to the great demand for such heating devices, engineers have now developed a large number of heating design options.
Vivid examples of such furnaces are the following:
- “Krokha”: it is distinguished by its small size, simple and elegant design, which even a novice master can do.
- “Baby”: unlike the previous model, it is low and wider; if installed correctly, it can distribute heat to several rooms at once.
- “Swedish”: combines the features of a heating and cooking stove.
Conclusions and useful video on the topic
Video #1. A video to help independent stove makers, the material presents a visual arrangement of a heating stove:
Video #2. A detailed guide to the construction of a heating and cooking unit according to ready-made procedures, but with some changes from the contractor:
When choosing a design for your own construction of a stove for a summer residence, you need to take into account your own capabilities and skills. It is possible that someone will consider the options we have proposed to be too complex or simple. In any case, the information presented will help you get an idea of the stove structures in order to use it yourself or monitor the actions of hired stove workers.
If you had to build a brick stove for your dacha yourself, please share photos of your own designs.
Perhaps you know some subtleties that we did not take into account in our article? Tell our readers about them - leave comments in the block below. Date: September 25, 2022