Major home renovations often involve replacing pipes. After the installation of pipes or radiators is completed, it becomes necessary to hide communications to create a favorable appearance for the walls in the bathroom, toilet or any other room. A lot of work done during the renovation period using expensive tiles, heated floors and attractive plumbing fixtures, and a lot of effort put into creating a pleasant interior can be in vain if you do not think through the camouflage of communications.
For such work, various materials are used, but the most acceptable is the use of plasterboard, from which the box is made. Why does the choice fall on drywall?
The advantages of a plasterboard box for covering pipes are due to the following:
- affordability of drywall;
- ease of production of plasterboard structures.
- environmental safety of drywall, characterized by the absence of harmful substances in its composition. This is especially true in the manufacture of boxes for batteries and heating pipes that generate heat when heating rooms.
Features of drywall
Some information about drywall. This popular building material is characterized by a multilayer structure with alternating gypsum and paper layers. Drywall sheets are available for sale in sizes of 2.5 by 1.2 meters. One sheet of drywall will be enough to make a box for the fan riser.
Note!
To construct a box in rooms with high humidity, such as a bathroom and toilet, you should use a moisture-resistant type of plasterboard.
How can you decorate batteries?
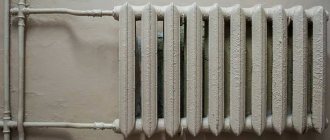
The easiest way to decorate a radiator is to paint it. It is not at all necessary to choose white color - the paint can be any color. Before this, you need to dismantle the radiator, remove rust, degrease with acetone or burn with a torch or blowtorch.
Interesting materials:
How to get an EDS key for your phone? How to get digital signature online 2022? How to get digital signature online via phone? How to obtain Jewish citizenship? How to get a European passport? How can a Ukrainian obtain European citizenship? How to obtain Finnish citizenship? How to get a Finnish visa in St. Petersburg? How to obtain French citizenship? How to obtain German citizenship?
Wood or metal
Metal profile base
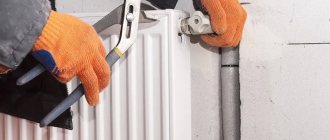
First of all, you need to assemble the frame. To make the box, either a metal profile or a wooden beam can be used. The advantages of a metal profile made of galvanized steel are that, unlike wooden beams, it has increased resistance to moisture and is not exposed to rust for a long time.
The advantages of a wooden frame include the environmental friendliness of wood and a higher degree of sound insulation.
Preliminary work
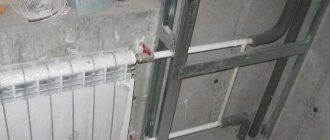
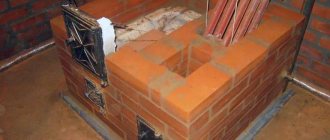
Heating pipe box
Preparatory work includes processing steel heating pipes and radiators (heating radiators), from which old paint is removed and, if necessary, new paint is applied. Paint as an insulating material will protect metal pipes from premature damage by rust. These works must be completed before installing the box, which will subsequently block access to the pipes.
The above work will not be required if the box being manufactured will be used for sheathing plastic water pipes.
Note!
You can continue installing the box only after the paint on the pipes or batteries has completely dried.
Advantages of plasterboard boxes
In general, the construction of an outer box can serve various purposes, for example:
- Give structures an aesthetic appearance.
- Provide protection from accidental mechanical and other damage.
- Achieve a soundproofing effect (especially in the case of sewer pipes).
Plasterboard sheets meet all these requirements well, and although other materials can be used to construct the box, they are preferable for a number of reasons:
- Low price.
- Easy to assemble structure.
- Excellent environmental performance.
- High sound absorption rates.
Working with this material is not difficult, and therefore the involvement of professionals is optional, and if you have some skills, you can cover the pipes with plasterboard yourself.
Is it possible to hide heating in the walls?
Many people are interested in whether it is possible to hide heating pipes in the wall. There are quite a lot of supporters and people with opposing opinions of the described method. Some argue that this cannot be done, others say that it is possible to hide the heating in the wall.
So, is it still possible or not? Which opinion is correct, and what are the pros and cons of such decisions? And, in order not to keep the intrigue for long, you need to answer that you can use this method. And they use it very often.
This is an effective option for hiding unsightly pipes in your home. There is no technical need for such actions, and in terms of operation it is quite possible to do without it.
Consensus on this issue, as well as on the only correct version of the gasket, has not yet been found. Therefore, everyone will make their own decisions, after carefully weighing all the pros and cons.
Installation of the frame and its covering
Heating pipe box
The plasterboard box is fixed to a strong metal frame with vertical and horizontal elements made of profiles.
Note!
When alternating horizontal elements, a step of 60 cm must be observed.
The finished frame is sheathed with sheets and strips of plasterboard, pre-cut to fit the dimensions of the frame. Plasterboard parts are fixed to the profiles using self-tapping screws. They are screwed into the drywall with a small recess so that they can be hidden under a layer of plaster.
There are several methods for covering pipes with plasterboard:
1. Carry out “preservation” of the vent riser pipeline: remove rust from the pipes, replace damaged sections of the pipeline, prime or paint the pipes, seal the joints between sections of pipes.
2. Work on installing the casing box should begin from the bottom. This means that the dimensions of the box, taking into account its contours, should be marked by drawing straight lines using a corner, starting directly from the floor surface - to the left and right of the pipe. Sections of profiles of the required length are fixed horizontally using dowels along the lines drawn on the floor. Horizontal profiles are installed in the same way on the ceiling (or in another place at the top of the future box). Vertical profiles are attached to installed horizontal ones. Next, the remaining horizontal profile elements are added in increments of 60 cm.
Self-tapping bug
Note!
The vertical profile elements are attached to the horizontal guides using special self-tapping screws.
3. Cutting plasterboard blanks is carried out after the final installation of the profile frame. Drywall is cut with a special knife, often used for cutting wallpaper. On the front side of the plasterboard sheet, lines of the external dimensions of the individual sides of the box of profiles are drawn. Furrows are applied along these lines with a knife, one at a time for each workpiece. The cut plasterboard blank is simply broken and then cut on the back side of the plasterboard sheet.
Note!
Plasterboard blanks are secured to the box frame using ordinary metal screws.
How to hide pipes in the bathroom
4. Arrangement of a window (ventilation hole) in a plasterboard box opposite the fitting (taps and connecting devices on pipelines). The need for such a window is obvious - during operation, regular inspection and repair of the sewer system is necessary.
Only after you have learned how to cover pipes with plasterboard and have completed all the work on installing the box, can you begin finishing work. They may include applying plaster to the surface of the box and then painting it, or lining the box with ceramic tiles.
Useful tips
In order not to deteriorate the quality of heating and to disguise the battery as beautifully as possible, it would be a good idea to listen to a few useful tips:
- It is better to install a decorative screen made of plastic or metal. The material has good thermal conductivity. The wooden lattice looks beautiful. However, such a screen is bulky, heavy, and has low thermal conductivity.
- When the heating is running, warm air from the battery, according to the laws of physics, is directed upward, where it encounters an obstacle in the form of a window sill or the upper edge of the box. For better convection under the window, it is optimal to make a false wall where the lower and side ends of the niche will be closed. The upper end is not closed so that warm air is directed to the window sill, and a decorative ventilation grille is cut into it. The front part of the niche is similarly covered with a screen.
- To improve heat transfer, the surface of the niche is covered with foil material.
The grille on the windowsill will improve the convection of air masses.
It is optimal to develop the simplest casing design so that the battery can be easily reached if repairs are necessary.
The video shows an example of battery casing:
Materials and tools
Drill for frame assembly
Before you start making a box, you should consider a set of tools and materials.
Materials and tools:
- sheet plasterboard;
- metal profile (guide and rack);
- dowel-nails, self-tapping screws for fastening parts of the box;
- special knife for cutting drywall.
You will need materials such as polyurethane foam, shock-absorbing tape, putty to level the surface of the box. Tools that will be useful are a drill, a hammer, a screwdriver, a tape measure, a level, a plumb line, and a pencil.
Preparation for covering pipes with plasterboard box
Before sheathing the pipes with plasterboard, you should do some preliminary work, which is as follows:
- Preparation of the necessary materials, including metal profiles (guides, racks), screws, dowels and the plasterboard sheets themselves.
- Preparation of the necessary tools (knife, screwdriver, hacksaw, plumb line, level, pencil).
- In the case of metal pipe products, it is advisable, before covering the pipes with plasterboard, to clean their surfaces of old paint and repaint. After covering the pipes with plasterboard, access to them becomes very difficult or impossible.
Upon completion of the above work, before covering the pipes in the room or bathroom with plasterboard, you must first prepare a reliable frame for its fastening.
External gasket technology
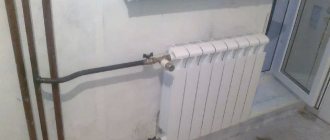
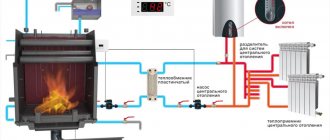
Installation of devices. The laying of heating pipelines, carried out in open areas, begins with the installation of all devices that are part of the future system. We are talking about boilers, radiators, pumps and expansion tanks. The list is not final. Sometimes it can increase due to various technical solutions. Given as an example.
Gasket calculation
This event is largely decorative in nature. The main goal is to calculate the location of the pipes in such a way that they do not spoil the overall design of the premises. Therefore, the stage often includes the creation of preliminary design sketches taking into account the heating pipeline.
Selecting a working option
Currently, there are the following three methods of arranging external gaskets:
- Top + bottom. The discharge pipe is mounted at the highest possible height. The lower pipeline is laid almost along the floor surface in the baseboard area. Excellent for natural circulation of working fluid.
- Bottom wiring. Both pipes are installed in the lower part of the rooms. This option is used only with forced circulation of the coolant. The pipeline is almost invisible to the eye, since it is located in the baseboard area and is often decorated to match it.
- Installation on radiators. The discharge pipeline, which has a large cross-section, is stretched between the heating devices directly under the window sills. This is done from one stub to another. The lower pipe is laid in the floor area. As a result, fewer pipes are needed. The system is getting cheaper. It is possible to connect heating devices either in parallel or in series.
The external installation of communications, although simpler, is less attractive from an aesthetic point of view.
Who is responsible for the riser (central sewerage) or what is common property?
The riser itself is community property. This conclusion can be made on the basis of Decree of the Government of the Russian Federation dated 08/13/2006 N 491 (as amended on 07/09/2016) “On approval of the Rules for the maintenance of common property in an apartment building and the rules for changing the amount of fees for the maintenance and repair of residential premises in the case of the provision of services, etc. , namely part 2, paragraph 2
... other equipment serving more than one residential and (or) non-residential premises in an apartment building (including boiler rooms, boiler rooms, elevator units and other engineering equipment);
also part 5 of the same document
The common property includes an in-house engineering drainage system, consisting of sewer outlets, fittings (including bends, transitions, pipes, revisions, crosses, tees), risers, plugs, exhaust pipes, drainage funnels, clearings, branches from risers to first butt connections, as well as other equipment located in this system
That is, the riser (central communication) belongs to the common property of the house. As a result, the management company, residential complex, homeowners association, etc. should be responsible for its maintenance. She is the one who raises funds for the renovation of common property.
Which pipe elements should not be masked?
This paragraph concerns the camouflage option, in which the pipes are laid in a groove in the wall and tightly walled up in it under a layer of a special solution, and then under facing materials. In this case, you need to be extremely careful. After all, if any damage occurs, in order to eliminate it, you will need to irreversibly damage the walls. It is not recommended to immediately hide the newly completed installation under cement mortar. Yes, plastic, steel or copper pipes have a very long service life, but if the soldering is done poorly, you may not see it right away. Sometimes a seam may be too thin in one place and leak, and this is not visible immediately, but only the next day. Therefore, give the pipes and their joints the opportunity to experience water pressure and stand free for a couple of days. And only after you are convinced of their tightness, you can seal the grooves.
So, you can sew into the walls:
- Welded steel or copper pipes without threaded connections;
- Brazed plastic pipes without threaded connections.
It is not recommended to mask the following elements without quick access:
- Metal connection fittings having an L-, T- or X-shape. These areas have an increased risk of leakage.
- Connections made using threaded elements;
- Installation locations for meters or filters.