Reflective insulation is a relatively new product. But soon one could see foil screens behind radiators and other heating devices. But this is only the visible part of the application. In fact, there is much greater potential hidden in isolation. How effective is this material, which Penofol is better to choose, how to use it correctly and which side to mount it on? About all this in our article!
What is Penofol and its analogues
Thin polymer insulation is made from the following materials:
- The main insulating layer is foamed polyethylene 3...10 mm thick with closed air pores. The thermal conductivity coefficient λ of this layer lies in the range of 0.037–0.051 W/(m • °C) depending on operating conditions.
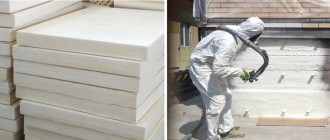
- The outer reflective layer is aluminum foil 14 microns thick, securely glued to a polymer base.
- The third layer on the back side of the polyethylene can be glue for ease of installation or the same aluminum.
Reference. All given characteristics are taken from the official website of the manufacturer. Thermal insulation parameters of other brands may vary. For example, the thickness of a similar material reaches 150 mm.
A special feature of the material is its impermeability to moisture, the declared indicator is simply scanty - 0.001 mg/m • h • Pa. The insulation is quite light - the density ranges from 16...35 kg/m³, and is sold in rolls. Thanks to these parameters, the material serves well as an internal vapor barrier.
"Penofol" is available in 3 versions:
- double layer type A;
- three-layer – the base is coated with aluminum on both sides (type B);
- the same, with an adhesive layer - Type C.
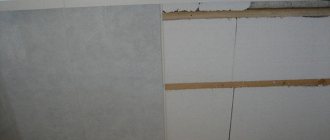
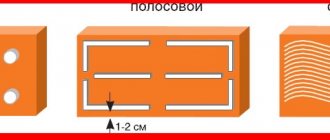
The foil side works as a reflector of the radiant (infrared) component, polyethylene foam resists direct heat transfer. For exterior wall cladding, a perforated version of Penofol, shown in the photo, is offered. Many small holes are designed to allow water vapor to escape from the thickness of building structures.
External wall cladding is made with special insulation with perforation
How to lay insulation with foil
Today we will tell you on what principle reflective insulation works and which side to lay the insulation with foil. These two aspects simply cannot be separated, because if installed incorrectly, foil insulation simply does not work. In addition, we will tell you about the most important aspects of installation and their impact on heat loss and the microclimate in the room. And naturally, we will conduct our educational program separately for each type of insulation with foil. These include polystyrene foam in sheets, mineral wool in sheets and rolls, foamed polyethylene in rolls, as well as shells for insulating pipes made of polystyrene foam and mineral wool.
Properties and characteristics of penofol
Penofol is a rolled multilayer insulating material consisting of polyethylene foam with a closed cell structure and a layer of aluminum foil. It has the property of reducing heat loss by convective and radiative methods. The material is superior in efficiency to other insulating materials due to its high moisture resistance, minimal weight and several times smaller thickness.
The efficiency of reflecting thermal waves due to the use of a polished foil layer is more than 97%. Its thickness is only 12-30 microns.
Due to the cellular structure filled with air, thermal conductivity is significantly reduced, which is 0.037-0.052 W/m K, with a polyethylene layer thickness of up to 10 mm. The level of water absorption is also minimal and does not exceed 0.7% of the total volume.
It is important to note that the vapor permeability of the insulation is not impaired, the value of which is from 0.001 mg/m∙h∙Pa. This allows it to easily come into contact with wood and other natural materials without the appearance of condensation, mold and mildew.
Penofol close up
Insulating a house from the inside with penofol is also beneficial due to its following characteristics:
- operating temperature range from -600C to +1000C;
- resistance to compressive stresses up to 0.035 MPa;
- sound insulation level up to 32 dB;
- the material belongs to the class of flame-retardant;
- standard roll sizes: width from 58 to 120 cm, insulation area 18-36 m2;
- specific gravity 44-74 kg/m3;
- specific heat capacity 1.95 J/kg K.
Penofol with one-sided foil layer and self-adhesive base
Tepofol NPE “S” Self-adhesive – Foil / Metallized
| Name | Thickness | Dimensions | Square | Photo | Price per m2 |
| Tepofol 3mm foil self-adhesive | 3mm | 1mx25m | 25m2 | Photo | 87 |
| Tepofol 4mm foil self-adhesive | 4mm | 1mx25m | 25m2 | Photo | 90 |
| Tepofol 5mm foil self-adhesive | 5mm | 1mx25m | 25m2 | Photo | 95 |
| Tepofol 8mm foil self-adhesive | 8mm | 1mx25m | 25m2 | Photo | 105 |
| Tepofol 10mm foil self-adhesive | 10mm | 1mx25m | 25m2 | Photo | 115 |
| Tepofol 15mm foil self-adhesive | 15mm | 1mx25m | 25m2 | Photo | 180 |
| Tepofol 20mm foil self-adhesive | 20mm | 1mx25m | 25m2 | Photo | 190 |
| Tepofol 25mm foil self-adhesive | 25mm | 1mx2m | 2m2 | Photo | 265 |
| Tepofol 30mm foil self-adhesive | 30mm | 1mx2m | 2m2 | Photo | 245 |
| Tepofol 40mm foil self-adhesive | 40mm | 1mx2m | 2m2 | Photo | 300 |
| Tepofol 50mm foil self-adhesive | 50mm | 1mx2m | 2m2 | Photo | 360 |
Scope of application
Due to its high technical characteristics and versatility, penofol is widely used as insulation, both in the industrial sector and in the construction of residential buildings and domestic agricultural buildings.
When constructing buildings, foil material is used for thermal insulation:
- ceilings;
- floors;
- external and internal walls;
- windows and doors;
- roofs and attics;
- basements.
Penofol is used to insulate various types of pipelines, ventilation, heating and water supply systems, as well as railway cars, trucks and cars.
Pros and cons of insulating walls with Penofol from the inside
The material has more than enough advantages - it’s not for nothing that it has become so widespread. Let's name the following positive qualities:
- Saving usable space
. This became possible due to the small thickness of Penofol compared to other insulation materials. At the same time, it can replace heat insulators with a thickness tens of times greater. - Good thermal insulation
. Provided by the reflective ability of the material. - High degree of environmental friendliness
. The insulator is practically non-toxic because it is produced on the basis of aluminum foil and polyethylene, which have long been used in the food industry. - Fire safety
. This quality is due to the fact that Penofol is classified as a highly flammable material. - Low vapor permeability
. It doesn’t matter what the weather is like outside the window, since moisture is not absorbed by the insulation. - Sanitary safety
. Penofol is considered a material difficult to access by rodents. - Ease of transportation
. This is due to the fact that the heat insulator is rolled up and easily transported. - Excellent sound insulation
. If such material is mounted on the main structure, it will help protect against acoustic noise. - Ease of installation
. Penofol can be easily cut with any knife, and it can be secured not only with small nails, but even with tape. But at the same time it is difficult to break or crumble.
However, as is the case with other thermal insulation materials, Penofol also has certain disadvantages. They are as follows:
- The need to use an additional layer that will help reflect thermal energy and protect against moisture.
- The lack of sufficient rigidity does not allow it to be used for plastering or wallpapering. The material can be pressed through with light pressure.
- The need to use special adhesive mixtures, since it is not recommended to nail the insulator to the wall - this causes it to lose some of its thermal insulation qualities.
Life time
Since foil insulation appeared relatively recently, it is not yet possible to determine the exact expiration date. However, after conducting experiments, we can say that the material does not lose its properties for 200 years.
The service life of the installed insulation depends on the adhesive used. If the adhesive composition has passed its expiration date, then you can re-install it with the same heat insulator.
There are a lot of insulation materials on the construction market. The choice is so wide that the question arises, which is better. To answer, you need to compare the characteristics of the thermal insulation material and the scope of application - street, living room, garage or agricultural building.
Kinds
There are 3 main types of penofol depending on production technology, dimensions and technical characteristics:
Type A
Polymer insulation material of varying thickness, foil is applied only to one side of the building material. This type of insulation is popular in complex insulation of building structures; it can also be combined with some insulation materials: glass wool, mineral wool.
Type B
Insulation covered with foil on both sides. Thanks to this design, the material has maximum insulation effect.
This type of insulation is used for thermal insulation of load-bearing structures of the attic, waterproofing of basements, floors and walls. Foil material placed under the roof prevents heat from entering the room.
Type C
Self-adhesive penofol, which is covered with foil on one side, and on the other, a thin layer of adhesive composition covered with film is applied to it. Depending on the dimensions of the product, it can be used on almost any surface, which saves time. Before starting work, this building material must be cut into strips of a certain size.
Regular penofol (types: A, B, C) has a white base, while penofol 2000 has a blue base.
There are several other types of penofol, which are not in great demand among consumers.
Type R
One-sided insulation, which has a relief pattern on the foil side of the insulation. It is similar to penofol type A, but is mainly used as a decorative special element for finishing premises.
Dimensions
Penofol is available in rolls of various lengths, the maximum length of which is 30 m. The width of the canvas varies from 0.6 to 1.2 meters. The thickness of the material depends on the type of penofol. Standardized material thickness: 2,3,4,5,8,10 mm. In rare cases, materials with a thickness of 40 mm are produced.
The foil material, which is 1 cm thick, has a high level of noise protection and retains heat much better. Insulation with a thickness of 5 mm, which has high technical characteristics, is very popular.
Penofol is available in rolls. The standard length of rolled sheets depends on the thickness of the building material and can be 5, 10, 15, 30, 50 m.
Nuances of foam installation technology
Foil penofol is one of the best materials for home insulation. With its help, you can provide high-quality thermal insulation of both the interior and exterior of the building. At the same time, the entire installation process is not particularly difficult, and you can do the insulation yourself.
Tools and materials
To insulate a residential building, it is enough to use penofol grades “A”, “B” and “C”. To install it you need to select the following tools:
- chancellor's knife;
- construction stapler;
- hammer;
- screwdriver;
- roulette
The following materials will be used during the installation process:
- penofol in rolls;
- wooden slats with a thickness of 1.5 to 2 centimeters;
- staples;
- adhesive composition;
- self-adhesive aluminum tape.
Fixing the insulation can best be done using staples, but self-tapping screws are also well suited for these purposes.
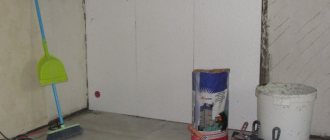
Insulation of house walls from the inside
Internal thermal insulation of walls with penofol will not only keep the house warm, but will also protect against the formation of moisture. Installation of the material is carried out in the following sequence:
- Fix the slats vertically on the wall surface. It is recommended to maintain a distance of 60 centimeters between wooden elements, since the width of the insulating material is 1 meter 20 centimeters. Such parameters ensure convenient use of foil fabric.
- Place penofol on the wall between the wooden frame. Thermal insulation sheets should be positioned with the reflective side facing the inside of the room. Laying is done so that the edges of the material are in the middle of the installed slats. Each subsequent panel is mounted end-to-end with the previous one. The material is fixed to the staples.
- Ensure seams are sealed. All joints should be taped with special self-adhesive tape.
Insulating the walls of a house from the inside with penofol.
A frame of wooden slats is placed on the insulated surface of the wall. Its design depends on the type of future finishing.
Ceiling and roof covering
It is proposed to do preliminary insulation of attic roof slopes according to the following scheme (shown above in the drawing):
- Waterproofing - a diffusion membrane - is laid horizontally on top of the rafters, with a minimum overlap of 100 mm. The order of fastening the canvases is from bottom to top.
- The membrane is pressed against the beams with counter-lattice bars, and horizontal boards of the main sheathing are nailed to them. A roofing covering is mounted on top - metal tiles, slate, profiled sheets, and so on.
- From the inside, horizontal beams 50-60 mm thick are attached to the rafters, the installation step is 60 cm.
- Three-layer “Penofol” type B with two foil surfaces is applied to the bars. Note that the thin insulation goes around the rafters so that there is a gap on both sides.
- The internal lining - lining, moisture-resistant plasterboard, chipboard panels or other finishing materials - is vertically screwed to the ends of the bars.
Attention! The Penofol roll is rolled out vertically on the surface, adjacent sheets are laid end-to-end, not overlapping. We carefully seal the seams with aluminum tape.
For gluing joints, use mounting tape with a width of at least 50 mm
In this case, the insulation reflects heat flows on both sides, which is very useful in the summer when the metal roof gets very hot. The inner layer remains unventilated, moisture from the external air is removed through the membrane. Since Penofol serves as a vapor barrier, it is necessary to organize natural exhaust in the attic using a separate ventilation duct.
Please note that there is an inaccuracy in the drawing above - there is no external counter-lattice that creates a ventilation duct above the superdiffusion membrane. In the next version of the diagram, which shows the thermal insulation “pie” of the attic roof, the frame of the sheathing is clearly visible. What is different about this cladding method:
- Between the rafters there is a thick layer of basic insulation - 120-200 mm of mineral wool.
- The bottom of the mineral wool is lined with two-layer “Penofol” type A right along the ends of the beams. The aluminum faces the inside of the attic room, the canvases are turned horizontally.
- A gap of 2-3 cm is left between the polyethylene and mineral wool insulation, and about 4 cm on the foil side.
- We nail the bars for interior finishing to the ends of the beams directly through the layer of polyethylene.
The foil surface faces the inside of the room, a gap is provided between it and the lining.
The section clearly shows that Penofol plays the role of an additional insulator and vapor barrier - traditional film is not used from the inside. The moisture formed in the mineral wool is removed through the upper vent and the waterproofing membrane. Vapors from human activity are removed by supply and exhaust ventilation.
Advice. When working with Penofol, it is important to understand the essence: we always leave a layer in front of the foil, and lay the polyethylene base close to the building structures. We connect the canvases only end-to-end.
Ceilings are insulated according to a similar principle:
- If on the attic side the wooden floor is covered with expanded clay, sawdust or reeds, it is enough to lay 1 layer of “Penofol” type B, creating gaps using lathing.
- Type C material can be glued directly to a concrete ceiling, with the foil facing down. Next, mount the frame for attaching the gypsum board or other finishing.
- When major insulation of the ceiling is necessary, use the attic scheme, only without a membrane and external sheathing. Install a frame of beams or galvanized profiles, insert the main insulation between them, then hem the bottom with type A polyethylene foam.
If Penofol is the only insulator of heat flow (which is not always correct), choose the maximum thickness of the material - 8...10 mm. In tandem with other insulation materials, a sheet with a thickness of 3-4 mm works well. For more details on the construction of an attic roof, see the video:
Floors and ceilings
We would like to warn you right away: when thermally insulating an existing wooden floor, you cannot do it without opening it. You need to remove the topcoat and get to the joists to properly install the reflective insulation. The ceiling can be insulated according to a simplified scheme that replicates the roof insulation:
- Rolled Penofol type B, 8-10 mm thick, is rolled out across the logs. The material is aimed at the beams in such a way that 2 layers are formed on top and bottom.
- The second canvas is laid end-to-end with the first, fixed with a stapler, and then glued with metallized tape.
- The subfloor and finishing coating are laid on top of the joists.
An important nuance. Theoretically, the roll can be rolled out directly under laminate or linoleum. But the whole point of reflective insulation will be lost - the aluminum coating will not work.
The second option involves laying one-sided “Penofol” type A under the subfloors with the foil layer down. Note: under the thin insulator there remains a large cavity equal to the width of the joist. If the room is located above a cold basement or unheated room, be sure to lay 10-15 cm thick mineral wool between the beams. Do not forget to provide a layer of 20-30 mm between polyethylene foam and mineral wool.
Penofol insulation technology for internal walls
Depending on the characteristics of the room and the method of thermal insulation, the appropriate type of Penofol is selected. Some of them can be attached independently (type B), others serve as waterproofing for more powerful insulation (type A), and others act as the basis of a thermal insulation layer (type C). This material successfully allows the surface to breathe without accumulating moisture. It rids walls of mold and mildew that occur after exposure to steam.
Preparatory work before thermal insulation of walls with Penofol
Before installing Penofol, be sure to check the quality of the electrical wiring in the room. Unlike other thermal insulation materials, it contains aluminum foil, which is known to have good electrical conductivity. Wire protection must be provided to prevent insulation from coming into contact with bare cables. It goes without saying that the working surface is prepared - debris is removed, and sanding is carried out. If necessary, seal the cracks with putty solution. It is also advisable to buy primer paint and paint over the wall, which will allow you to get a perfectly flat surface. We will need the following tools and equipment to carry out the work:
- Well sharpened knife;
- Furniture (construction) stapler with staples for it;
- Ruler;
- Level;
- Pencil;
- Construction spatula;
- Hammer;
- Working deep container for solution;
- Sandpaper of varying degrees of grain;
- Screwdriver;
- Roulette;
- Dowels;
- Electric drill.
Instructions for installing Penofol on walls
Armed with the necessary tools and using the help of another person, carry out the following actions:
- Initially, a wall-mounted wooden frame is constructed. Its task is to enhance the effect of using thermal insulation material. To fasten the bars, dowels are taken, which are driven no wider than 1 m from each other.
- Penofol is fixed to the frame with a furniture stapler. To do this, the material is cut into strips with a sharp knife. The strips are not overlapped, but end to end, so that condensation does not form along the joint line. The seams can be taped with special tape.
- After this, another frame is attached, at a distance of 2 cm. This is done in order to allow air circulation. Now it can be covered with cladding panels, puttied or wallpaper pasted on top.
A vapor barrier film is not laid, because the material itself is considered vapor-tight. However, it cannot replace waterproofing. A common mistake associated with improper installation of insulation: some craftsmen install Penofol directly on the ceiling or wall, leaving an air gap on only one side. This leads to a decrease in its thermal insulation characteristics. Important! When installing Penofol, its foil part must look inside the room and not at the wall. This is a necessary condition for additional heat reflection.
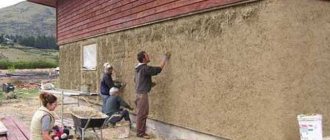
Finishing the walls
After laying the heat insulator, covering the top with lathing and wood boards, you can begin finishing the surface. You need to start by leveling it: remove any defects that may interfere with the reliable fastening of the plaster or the gluing of a roll of wallpaper. It is best to smooth out irregularities with sandpaper, starting with coarse-grain sandpaper and ending with fine sandpaper, which makes the surface even and smooth. Most often, a solution of plaster is applied to the finished wall, which can then be painted or decorated in other ways. The most common are cement-based or gypsum-based plaster mixtures. At the same time, gypsum is not subject to shrinkage over time and has good ductility and connecting properties. It does not require the use of reinforcing fastening mesh. If you have little experience in plastering walls, you can purchase plastering alarms that will act as limiters - they allow you to measure the thickness of the layer and protect against unevenness. After attaching the signaling beacons to the working surface, you can begin preparing the solution. Take a bucket or other container and fill it about a third with water. Gradually add the solution and stir constantly to achieve a homogeneous mass. The solution should be of such a consistency that it does not flow off the spatula, and its thickness will depend on how thick the plaster layer should be. If the walls in the room strongly absorb moisture, they must be additionally moistened. A household spray bottle is suitable for these purposes. This is done so that the solution retains its moisture, otherwise it will crack after drying. The plaster is applied to the wall by spreading it with a spatula. If such skills are difficult to master at first, then you can apply the solution to a wooden trowel and level it on the surface. Alignment is done from bottom to top. If plastering is carried out in the area of the slopes of window and door openings, then it is better to apply the solution with a slight overlap. Using the rule, you can remove excess solution. Its sharp edge is directed perpendicular to the plaster beacons. You should start from the bottom border. Gradually, the tool is raised higher and the excess solution is removed, throwing it upward. After this, the final smoothing of the wall is carried out. This is done several times to achieve a smooth surface. In order to make sure that the surface is smooth, the rule is applied at different angles. The resulting lumps are scraped off with the sharp edge of the tool. All that remains is to pull the beacons out of the wall with a screwdriver. Now you can grout the plaster or paint it. At this point, the insulation of walls with Penofol from the inside can be considered complete.
Advantages, disadvantages
The main advantages of penofol are wear resistance and reflection of heat flows. Lightweight raw materials are partially moisture resistant, easy to install and fasten.
If the coating is exposed to a hot or very cold air stream, there will be no deformation. It is resistant to fire, does not contain harmful substances, and reduces the noise level in the room.
The insulation has antiseptic properties and is not affected by mold.
The sheathing does not require additional coating with a vapor barrier film, does not rot, and can withstand any transportation.
Disadvantages - the softness of penofol, which makes finishing with wallpaper or plaster impossible.
The high thermal insulation properties of the material declared by the manufacturers turn out to be overestimated. Expectations are somewhat leveled with the Finnish insulation method, which involves a small air space between the thermal insulation and the sheathing.
Thermal insulation of wooden walls with Penofol
In this case, the work is somewhat different, since wood itself is already a warm material. But, despite the fact that such a surface has a “breathing” ability, retains heat and helps create a favorable microclimate, warm air can still leak out into the street. During use, wood undergoes some shrinkage under the influence of natural and climatic factors. This causes the appearance of fresh cracks, cracks, and other unfavorable places. The tightness is broken, which leads to the need to apply a heat-insulating layer. Before carrying out insulation work on wooden walls, you need to make sure what type of wood they are made of. This is due to the fact that different varieties and species of wood have different thermal insulation characteristics. All this leads to the fact that the costs of insulation may vary. It is the lack of external insulation that leads to the need for internal thermal insulation of walls. Penofol in this case is perfect, especially if you combine it with other materials. Work on insulating a wooden house is carried out according to the following algorithm:
- Insulation of wooden walls from the inside with Penofol should begin with sealing the cracks and gaps that form naturally in the wood. It is recommended to pay special attention to checking joints, window frames, door frames, and corners.
- Making a frame for a heat insulator for wooden walls is not necessary.
- If sheet Penofol with one-sided foil is used, then it is the side with foil that should be facing the sheathing, that is, inside the room.
- A sharp knife is used to cut strips.
- The strips are attached using special staples and a powerful construction stapler. At the same time, they should be in close contact with each other so that there is no free space between them.
- To secure the joints, they are glued with aluminum tape. This will provide a smooth and uniform reflective surface.
- Maintaining an air gap is a mandatory factor for effective insulation and the absence of condensation. The air space must pass between the material and the wall.
- Wooden blocks are placed on top of the insulator, which will serve as lathing. You can attach chipboard sheets or plastic panels to them. Final finishing occurs in the same way as in the case of concrete walls.
Note! It is necessary to carry out work on the internal insulation of a wooden house after the final shrinkage of its walls and foundation occurs. Usually this happens no earlier than a year after completion of all construction work. How to insulate walls from the inside with Penofol - watch the video:
The attractiveness of Penofol as insulation is largely due to its unique properties. However, we should also pay tribute to its cost, which fluctuates in ranges below the market average.
Laying methods
Let's consider which side is the correct way to lay the insulation with foil on the floor.
Heat-saving properties depend on how correctly the insulation is installed.
Foil reflects infrared radiation, therefore, the metallized layer must be laid so that it faces the inside of the room.
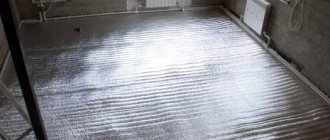
Insulation of concrete floor
Place the casing with the foil side down
Most often, the rolled material is fixed to the concrete base using a special glue made on the basis of rubber.
Installation sequence:
- We prepare the surface. We level the slab so that there is no large difference in height. We seal all cracks and cracks with cement mortar.
- We spread the material on the floor with the foil layer facing up and cut it to the required length. We move the strip aside and apply glue to the place where it is laid. Let it sit for a few minutes according to the instructions for the glue. We lay and press the material well. We place the strips close to each other.
- We secure the joints with foil tape, which is sold in hardware stores.
For additional insulation of cold floors, wooden logs can be laid on top, the space between which is filled with slab insulation. Floorboards or sheet material (OSB, fiberboard, chipboard) are placed on top of it. For an interesting comparison of foil materials, watch this video:
https://youtube.com/watch?v=RgKvM3-JFRU
Wood floor insulation
It is most convenient to lay the material on an adhesive layer
It is most convenient to lay foil insulation on a wooden floor, which has a bottom self-adhesive layer.
If you bought material without an adhesive base, then you need to fix it with staples using a construction stapler or with double-sided tape.
Laying sequence:
- We remove the baseboards, remove debris and dust using a vacuum cleaner.
- If the boards have uneven surfaces, we sand them with a special machine and, if necessary, sand them (remove the top layer of the board).
- We seal all existing cracks with wood putty.
- We prime with an antiseptic composition.
- We measure the room, cut the roll, and lay it up with foil. It can be easily cut to size using sharp sewing scissors.
- Lay out the strips end to end. We wait a day for the material to settle and straighten out. If the heat insulator has a self-adhesive base, gradually remove the protective film and press it tightly to the surface. We lay the next strip end-to-end.
- We fix the joints of the strips with foil tape.
Foil insulation for heated floors
When laying insulation under heated floors, lay the material with the foil facing up so that it reflects heat into the room
The base for heated floors must be flat without differences in height or defects. All errors must be eliminated.
Stages of laying thermal insulation with a layer of foil:
- We lay out the foil material in strips end to end, and glue the joints with special tape.
- We install a system of electric or water heated floors on top.
- We lay hydro- and vapor barrier material. It will prevent concrete from leaking onto the floor heating elements.
- We fill the screed with a thickness of 30-50 mm, depending on the type of heating elements and the functional purpose of the room.
Insulation under floating screed
Having bought a two-layer material, you don’t have to bother with the question of which side to lay the insulation on
It is characterized by the fact that the slab is not rigidly fastened to the concrete screed; thermal insulation is laid between them.
Installation sequence:
- We prepare the base and eliminate all defects.
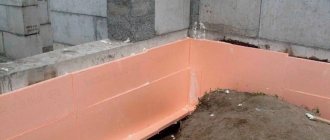
- We plaster the lower part of the walls.
- We stick damper tape around the perimeter of the walls; its height should be equal to the thickness of the floor: from the slab to the floor covering.
- We prime the base in two layers. Apply the next layer after the previous one has dried.
- We lay thermal insulating foil boards with the foil facing up. We use a metallized coating that is resistant to cement mortar. We lay the slabs strictly in a horizontal plane, close to each other. Uneven laying of insulation boards contributes to the formation of cracks in the concrete solution.
- We glue the joints of the plates with tape.
- We pour the concrete screed.
Lightweight and durable insulation with a layer of foil is becoming increasingly popular among consumers and professional builders due to its high heat retention and ease of installation. For more information about isolation, watch this video:
We looked at how to properly lay foil material for high-quality floor insulation. Thermal insulating material is always laid with foil on the outside; if you lay it the other way around, it will not retain heat fully.
Criterias of choice
To perform high-quality insulation of the floor with penofol, as well as walls and ceilings, it is necessary to choose the right insulation. To do this, you should be guided by the following criteria:
- for ease of installation, it is recommended to choose a material thickness of at least 5 mm;
- when insulating steam rooms, boiler rooms and industrial premises with high temperatures and humidity, it is better to abandon the use of penofol in favor of multilayer materials with increased moisture and heat resistance, for example, foiled polypropylene;
- It is imperative to pay attention to the quality of polishing of the foil and the type of metal from which it is made, since the amount of reflected thermal energy, and, accordingly, the efficiency of the material will depend on this;
- when purchasing the required amount of penofol, it should be taken into account that rolls are sold not by linear meters, but by coverage area, which varies between 9-18 m2;
- It is recommended to either refuse to purchase cross-linked insulation or carefully study the technology as it was done (physical or chemical method), since this criterion has a significant impact on thermal conductivity;
- It is worth paying attention to branded manufacturers who can guarantee the stated technical characteristics.
Floor insulation with penofol
Dew point
In other words, the dew point can be characterized as a parameter indicating the exact temperature threshold at which water begins to change its state of aggregation and becomes condensate.
To determine this parameter, use the following values:
- atmospheric pressure indicator;
- a value indicating the relative humidity of the air;
- actual temperature level in the atmosphere.
To identify a suitable parameter, starting from the last two values, you need to use the table from the appendix to SP 23-101-2004 “Design of thermal protection of buildings”.
The formula for calculating dew is given below:
Tr=b*f(TRh)/af(TRh), where Tr is the desired parameter, T (C o ) is temperature, Rh(%) is relative humidity.
Benefits of penofol - debunking myths
Manufacturers and sellers of penofol attribute wonderful thermal insulation characteristics to this insulation, which is actually a myth.
Also, installation diagrams with air gaps, one of which we described at the beginning of the previous section, can be considered misleading the buyer. How the manufacturer proposes to insulate floors and roofs is shown in the figures:
In fact, the presented schemes are nothing more than another way to improve the thermal insulation of external fences using air gaps, since penofol’s own resistance to heat transfer is absolutely not enough.
This can be easily checked by taking as a basis the best thermal conductivity indicator from the technical characteristics table - 0.037 W/m2 °C. Next, we take the canonical formula and determine the thermal resistance of a material 4 mm thick:
R = δ / λ, where:
- δ – penofol thickness in meters, taken 0.004 m;
- λ is its thermal conductivity coefficient, equal to 0.037 W/m2 °C.
We get R = 0.004 / 0.037 = 0.11 m2 °C/W. Now look at the comparison table, which is presented on the same resource as the technical data. It says that 4 mm of penofol can easily replace 77 mm thick mineral wool or 46 mm thick polystyrene foam.
This means that, for comparison, it is necessary to determine the thermal resistance of a 77 mm mineral wool layer (its thermal conductivity is 0.05 W/m2 °C):
Rminwool = 0.077 / 0.05 = 1.54 m2 °C/W, which is 10 times more than that of foamed polyethylene.
Hence the conclusion: the presented comparative table is a pure fake. The data given in it is unreliable, and although the material is a good insulator, it is not better than others. The reason is that it is too thin, although its thermal conductivity is equal to extruded polystyrene foam.
Against this background, all other advantages of penofol fade. However, there is another myth - about the reflection of infrared heat back into the room thanks to the foil surface. But none of the manufacturers explains what the foil will reflect behind the interior trim. After all, infrared radiation spreads across open space; it will not pass through drywall or other obstacles.
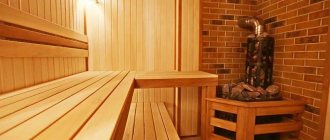
What is really good about penofol is its low cost and ability to act as a vapor barrier together with other insulation, as evidenced by reviews on the forums. In addition, it is easy to install and the process does not take much time. You can also note the durability of the insulation, reaching 50 years, provided that it is located inside the building and not outside. By the way, it is better not to use penofol for external insulation of walls; it will be of little use there. You should not use it for thermal insulation of a bathhouse, like any polymer; when heated to 100 ° C, the material will begin to release harmful substances.
How to calculate the thickness of penoplex for high-quality insulation
In order to accurately determine the required thickness of extruded polystyrene foam, you should take into account the material of the wall that needs to be insulated, its thickness, and the features of the finishing.
Thermal resistance is calculated. The data is determined based on SNiP readings for a specific region. So, for the central region this figure is close to 3.
The thermal resistance of each layer of the cake is different, so it is determined by adding the indicators of each layer and their thickness.
According to the formula, the thermal conductivity coefficient is determined as follows:
P=R/K, where R is the layer thickness, K is thermal conductivity.
Each material has its own thermal conductivity.
Calculation of penoplex thickness
After determining the values of the coefficients of all layers from the regional indicator (in our case it is equal to 3), the sum of all coefficients should be subtracted. This results in the thickness of the insulation layer.
IMPORTANT! As a rule, penoplex up to 30 mm thick is used for internal thermal insulation.
The manufacturer recommends using “Wall” penoplex for interior finishing.