Among the many ways to provide heat in a country house, a heating-cooking stove or Swedish stove stands out. Indeed, baking a Swedish stove with your own hands with a fireplace is quite affordable and feasible. By the way, in order to build it yourself, it is not at all necessary to have the qualifications of a professional stove maker - here you only need basic skills.
Swedish stove options
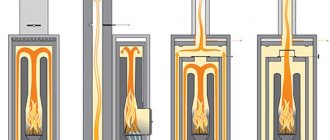
Design and operating principle
The classic “Swedish” is a symbiosis of two heaters: a traditional stove and a slightly expanded “Dutch” - a simple channel-type stove. An indispensable attribute of the structure is the oven located next to the firebox.
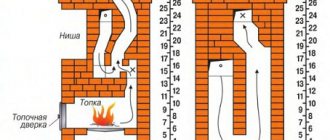
How does a Swedish stove work:
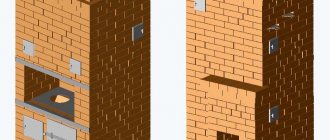
- The flame burning in the firebox heats the hob directly. The nearby oven is separated by a quarter- or half-brick wall, so it receives heat from the heat of the firebox and flue gases.
- Hot combustion products wash the oven body from above and behind, then, under the influence of the natural draft of the chimney, they fall into the lower zone, where the outlet channel is located.
- Through this opening, hot gases leave the cooking section and penetrate inside the heating panel, which consists of 3-4 vertical channels. Moving along the smoke circulation, combustion products heat up the brick walls, then go out into the street through the chimney.
- Above the cooking niche there is a drying cabinet with stoves, heated from below by a stove, and from behind by a system of ducts.
Note. There are furnaces with horizontal flue ducts, but due to the accumulation of soot, such designs are used less frequently.
The Swedish combustion chamber, together with the oven, forms a mini-hood, since the horizontal outlet channel is located at the bottom. On the way to the hole, the heated gases give off a large amount of heat to the cast-iron lid of the stove and the metal walls of the oven. Thanks to this device, the “Swedish” stove is not much inferior in efficiency to the Russian stove, but is more compact and easier to use.
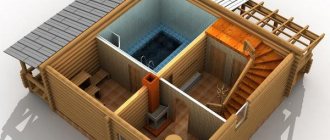
Initially, a Swedish heating and cooking stove is designed to be placed in a wall between two heated rooms - a kitchen and a bedroom (or living room), as shown in the photo below. The first room is heated by the stove itself and an open oven, the second by a brick slab. There are varieties of stoves with a summer operation mode - the valve closes, the gases go out bypassing the smoke circulation.
The photo shows a Russian stove, but the principle of placement is similar - in the partition between rooms
Video description
About the laying of a heating and cooking stove with a shield in the following video:
Drying the oven
Drying the stove is a must before you start using it. Drying includes two stages:
- Natural . After completing the masonry work, the Swede is left for 6-8 days with the doors and latches open. Natural air circulation helps remove moisture through the pipe to the street. In this way, only the surface of the brickwork can be dried.
- Forced . Over the next 1.5-2 weeks, the oven is prepared for use. To do this, small (2-3 kg) portions of firewood are burned daily. It is better to use firewood that produces less soot (for example, aspen).
A stove lined with stone in a country interior Source pinimg.com
Nuances of construction
The proportions and dimensions of the “Swedish” chambers are carefully verified, so only experienced stove makers can make changes to the masonry scheme. When constructing a furnace, you need to consider the following points:
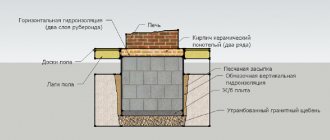
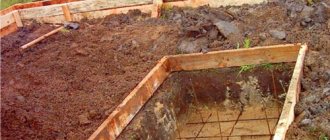
- The structure is massive - a reliable foundation is needed that is not connected to the foundation of the house.
- Since exhaust gases move into the shafts through the lower hole, the stove intensively heats the floor. To avoid wasteful heat consumption, heat-resistant thermal insulation is laid under the base - 3-5 layers of basalt cardboard.
- The body of the Swedish heater experiences high temperature stress. Therefore, the inside of the firebox is lined with fireclay (fireproof) stone, and a high-quality sand-clay mortar with the addition of mortar is used for construction.
- It is unacceptable to install a water heating boiler instead of an oven if such reconstruction is not included in the project. Intense heat removal will significantly reduce the temperature of the gases, reducing draft and heating efficiency from roughage. Gas ducts will become clogged with soot.
- The “Swedish” can be supplemented with a fireplace - build it on the side of the heating panel, organizing separate chimneys. Option two: the fireplace insert with its own flue is discharged into a common pipe, but is heated when the stove is not working.
Construction of a reinforced concrete base for a stove - sectional diagram
Important point. Good draft is required to move gases inside vertical channels. The chimney head will have to be raised at least 60 cm above the ridge and ensure that it does not fall into the wind pressure zone of other buildings.
Video description
About the Swede with a do-it-yourself bed in the following video:
Pipe requirements
The technology for laying the chimney of a Swedish heating and cooking stove differs in some details from the method of forming the body. While working, you need to remember the following subtleties:
- The height of the chimney generally depends on the roof configuration. But to ensure good traction, the length is set to at least three meters.
- The chimney is built exclusively from whole bricks. If you use halves and quarters of material, the area of the seams will increase, and this will reduce the reliability and safety of the entire structure.
- For lining (cladding) fireclay bricks are used (they are laid on the edge).
The pipe needs reliable thermal insulation Source termopaneli59.ru
- The chimney is a place of increased fire hazard, therefore, when constructing it, the rules of SNiP are observed: the distance between the chimney and the wall of the house is maintained (at least 40 cm). At the point of passage through the ceiling, thermal insulation is carried out with asbestos.
- The joints between the bricks are carefully sealed. High-quality seams will increase heat transfer, provide maximum traction and protect against the penetration of combustion products into the home.
Instructions for carrying out work
In this publication, we will not teach you how to make a stove - the masonry technology is outlined in the corresponding instructions - how to build a fireplace for heating a house using wood. Here we offer general recommendations for the construction of a Swedish stove:
- The rubble or reinforced concrete foundation of the structure is placed on a stable soil horizon. Remove the top soil layer and dig a pit of the required depth, the size is 10 cm wider than the dimensions of the stove. In subsidence soils, lay a pile-screw or pile-grillage foundation.
- The furnace is laid using a mortar mixture of fine sand (particles 1...1.5 mm) with clay of medium fat content. For beginners, it is better to buy ready-made building mixture in bags.
- Soak the red brick for 24 hours, and make the solution thick so that it does not spread when in contact with building materials.
- Fireclay bricks are not soaked, but only rinsed from dust immediately before being placed in a row.
- Refractory stones are placed on a solution of fireclay + refractory clay in a ratio of 1: 1, the optimal solution is to purchase a ready-made mixture such as “Super Fireplace Refractory”. The ceramic masonry is not tied with fireclay; a gap of 5-6 mm wide is made between them, laid with basalt cardboard.
- Foundations and pipes are built on ordinary cement-sand mortar; clay mortar is not suitable.
To build a stove, prepare the tools shown in the photo. The concrete base must harden within 28 days after pouring, then it is covered with roofing felt waterproofing (2 layers) and basalt cardboard.
Material selection
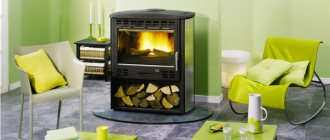
You have to choose from two options: brick or metal (cast iron, steel). Each material has its own characteristics; for metal models they take on the following form:
- The main advantage is that they are the most compact, which can be a decisive factor for a modest-sized house.
- The metal product heats up quickly, almost immediately starting to heat the room.
Fireproof (fireclay brick) Source stroyfora.ru
- Metal models are cheaper than brick ones, and are offered by manufacturers in finished form. This is the best option if you need to quickly organize comfort in your home, since installation will take very little time.
- The disadvantage is ineffective heating; You need to stock up on firewood and be prepared for its high consumption.
- Another significant disadvantage of metal structures is that with regular use they break down relatively quickly. The walls burn through, increasing the risk of a fire, and you have to solve the dilemma: buy another metal Swede, or invite a stove maker.
Brick structures have their own characteristics:
- They take longer to warm up, but they cool down more slowly. This means that they need to be heated less often. The brick surface does not heat up like a metal one; a soft warmth emanates from her. The rooms also warm up more slowly, but the comfortable microclimate remains for a long time.
- Brick stoves are durable (subject to the technology of stove masonry), but are more expensive. An important selection factor is their maintainability.
A stove with a stove bench requires a lot of space Source bestpechi.ru
- If you do not have experience in such activities, you will need an experienced stove maker. Masonry errors will certainly manifest themselves in an unpleasant way, for example, there will be poor draft, or smoke will escape into the room and not through the chimney.
- The structure is assembled by hand; the process is quite leisurely and will take time.
Despite the fact that brick models are larger in size than metal ones, they are preferred in cottages and country houses. The reasons are obvious: they are more convenient, comfortable and safe. Any project, regardless of whether you want to install a traditional stove or an advanced version with a fireplace, can be diversified with the help of modern materials.
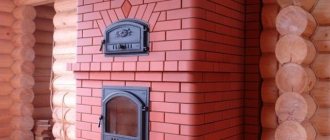
For example, you can equip the firebox with a door made of especially durable glass. It will reliably protect the surrounding area from flying sparks, and you will be able to admire the open fire in the evenings. For a brick stove with a stove, you can think about the appearance, for example, whitewash or plaster. If it should become an accent of the interior, the design can be made more sophisticated, in the form of tiling or tiles.
Exquisite tile decoration Source pinimg.com
We lay out the classic “Swedish”
The dimensions of this stove are 102 x 88.5 cm in plan, height - 2.03 m, heating power - 3.2 kW. Accordingly, the heating area is up to 40 m² of a country house, insulated according to the climate in the area of residence.
Oven heater can be used for baking and heating the kitchen
Comment. In the presented model there is no channel for the summer passage of gases, so it is more convenient to use the stove for cooking in winter. The heater device is shown in section in the picture below.
To fold a traditional “Swede” yourself, purchase the following materials:
- solid ceramic brick of standard sizes 250 x 120 x 65 mm – 553 pcs.;
- fireclay brick SHA-8, operating temperature – up to 1300 °C, size 230 x 114 x 65 mm – 33 pcs.;
- grate 30 x 20 cm;
- oven 45 x 25 x 29 cm;
- doors: firebox 21 x 25 cm, blower 14 x 25 cm, inspection 14 x 14 cm (3 pcs.);
- hob panel 2 burners made of cast iron 410 x 710 mm;
- valves: smoke 25 x 13 cm, exhaust 13 x 13 cm;
- equal-flange steel angle 45 x 45 mm total length 6.5 m;
- steel strip with a cross section of 50 x 5 mm and a length of 2 m;
- metal sheet 2 mm thick – 1 m².
Walls in contact with flames and hot gases are lined with fireproof materials.
According to fire safety requirements, a sheet of roofing steel 70 x 50 cm is laid on the floors on the side of the firebox. Building materials for the chimney and foundation are not included in the list.
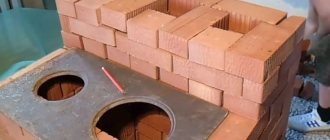
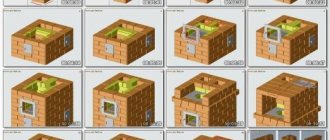
When the stove is ready, it is laid out according to the presented order:
- Rows 1, 2 are solid, on the third the outlines of the ash pan, the secondary chamber for the oven and the vertical shafts are laid out. We attach 3 cleaning doors and one ash door.
- The fourth tier is a continuation of the masonry according to the drawing, the fifth overlaps the installed doors. We begin to form the bottom of the firebox from fireclay bricks and install the grates, having previously made a depression in the stones with a grinder.
- Row 6 – lay out the walls of the combustion chamber, mount the oven and loading door. Between the firebox and the oven compartment we make a partition ¼ thick of fireclay stone. We build the 7th horizon according to the scheme, on the eighth we block the lower gas duct, the ninth tier covers the door of the main chamber.
- After the tenth row, a hob and a metal corner are installed on the front side. On the 11th, the walls of the niche begin to form; horizons 12–16 continue. Then we lay the support corners and the brick floor - row No. 17. On the left we leave an exhaust opening above a niche the size of half a brick.
- On the 18th tier we attach the second end corner and begin laying the walls of the drying chamber (rows 19-26). After the 22nd horizon, we cover the stove with a sheet of 34 x 19 cm, on the 26th row we place the next corners of the ceiling, and on top we place a metal plate measuring 905 x 800 mm.
- Tiers 27-29 are solid, leaving one chimney opening. Rows 30-31 - we form the beginning of a pipe with an internal channel 250 x 140 mm.
Further masonry is carried out using cement mortar, in compliance with fire safety rules. That is, in the wooden ceiling there is a stove groove with a thickness of one and a half bricks (38 cm), on the roof there is a setback of 130 mm, as is done in the diagram.
For the procedure for laying a Swedish classic stove, watch the video:
Note. Here and below, materials from the website “Heating Stoves and Fireplaces” by the Belarusian master Nikolai Zolotarev are used.
Design features
For the first time this unit came to Russia from Scandinavia, when the Swedish troops were defeated near Poltava. Even then it was popular due to the following characteristics:
- economical in operation;
- ability to retain heat for a long time.
These parameters were achieved by creating a unique system of several channels for gas removal.
Thanks to this, the stove simultaneously made it possible to heat the room, cook food, including baking bread, and dry things. The design of the Shvedka stove involves various designs with arches and other unusual shapes. In this case, simultaneous use is allowed:
- fireplace;
- beds;
- heating tank with water;
- drying chamber.
The Shvedka brick stove is equipped with the following elements:
- hob;
- hood;
- oven;
- heat shield.
When constructing a similar stove in a house, the rear surface of the structure should be placed in the living room. The front side of the unit with the firebox is usually installed in the kitchen. The device involves installing a chimney capable of functioning in the following two modes:
- winter: gases move through specially equipped channels, warming up the home;
- summer : combustion products are sent directly into the pipe.
An important advantage of the Shvedka is its small dimensions: 2.17x1.03x0.88 m (HxLxW). By design, the furnace can be combined or bell-type, with three or five channels.
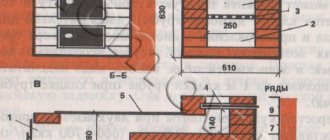
1 – fireplace hearth; 2 – two L-shaped pins; 3 – grid; 4 – fireplace walls; 5 – vent with a window; 6 – blower door; 7 – gas duct; 8 – cleaning window; 9 – transition window; 10 – cleaning window; 11 – grate; 12 – oven; 13 – combustion door; 14 – gas duct; 15 – jumper; 16 – ceiling above the fireplace portal; 17 – iron corner; 18 – plate; 19 – door for cleaning; 20 – overlap; 21 – overlap above the space of the stove and the side wall of the furnace; 22 – cooking chamber; 23 – fireplace shelf; 24 – displacement of the septum; 25 – gas collector; 26 – window for cleaning the gas collector; 27, 28, 29 – partitions; 30 – cleaning window; 31, 32 – valves; 33 – cleaning window; 34 – valve.
Project of a stove with a stove bench and stove
The design shown in the photo is an alternative to the bulky Russian stove, which requires more materials and skill for construction. Thermal power of the “Swedish” with a sunbed and a traditional stove is 3.5 kW, heated area is 40...45 m². The dimensions of the stove itself are 1245 x 765 mm, the stove bench is 1910 x 765 mm.
The bed is heated by gases passing through a horizontal channel in the lower zone of the stove
The heater has a summer operation mode - a straight channel is made to the left of the combustion chamber, closed for the winter with a valve. Combustion products penetrate inside the lounger through the lower horizontal channel, pass through a system of vertical flues, from there they return to the heating panel and fly out through the chimney pipe.
How many and what building materials will be needed for masonry:
- red solid brick (standard) – 870 pcs.;
- fireclay stone type ША-8 – 140 pcs.;
- grates measuring 415 x 240 mm;
- cast iron hob panel 65 x 31 cm;
- flap 13 x 25 cm – 2 pcs.;
- doors: loading 21 x 25 cm, ash 14 x 25 cm, inspection 7 x 13 mm (5 pcs.);
- corner No. 5 (50 x 50 x 5 mm) 1 m long;
- steel strip with a cross section of 50 x 5 mm - 7 m;
- metal plate 375 x 360 mm.
The vertical shaft to the right of the stove takes away part of the useful volume of the niche, but allows you to use the stove during the warm period.
We build a Swedish bed in the usual manner - first the foundation, then waterproofing and laying with non-flammable insulation. Next we go in order:
- We lay the first and second tier solid, then fasten 5 doors - one blower, 4 inspection doors. On the third, we lay the walls of the ash pit and horizontal channel from refractory bricks.
- Rows 4, 5 – we continue to build the walls according to the drawings. On the 5th horizon we install a grate and cover the technological opening formed in the middle with steel strips - it will not be used in any way. Tier No. 6 forms the vertical channels of the stove bench, and the laying of the firebox continues.
- On the 7th horizon we install the combustion chamber loading door, lay out rows 8-10 according to the diagram - we build the walls of the firebox and the deck to the end. We cover the bed with the eleventh continuous tier, and after the twelfth we install the stove.
- Row No. 13 completes the construction of the bench and begins the construction of the side walls of the cooking niche. Tiers 14-18 are a continuation of the masonry; on the eighteenth we install a support corner on the front side and an exhaust door. A steel strip is laid next to the corner to better support the stove facade.
- Horizon No. 19 forms the ceiling of the niche - first we put bricks, then we cover it with sheet metal, and on top we place stiffeners made of 5 steel strips. In the twentieth row, we completely cover the niche, and cut the summer shutter into the channel. Tiers 21-23 are built according to the order.
- On the 23rd row we place 3 stripes above the left vertical shaft, and with the 24th horizon we overlap it. Similarly, tiers No. 25, 26, 27 form the ceilings of the drying niche and stove.
- The last rows of the stove (28, 29) serve as the base for the pipe. After the 28th tier we install a smoke valve, then we begin construction of the pipe.
Since the text description of the masonry does not reflect the progress of the work in sufficient detail, we suggest watching the master’s step-by-step video instructions:
Preparing the base
Since the design of the furnace is quite massive, it is necessary to create a reliable foundation for its construction. Its depth must be determined from the regional characteristics of the area in terms of soil composition, the presence of moisture and its freezing. It is recommended to use deep foundation pits - at least 0.6-0.8 m.
When constructing the foundation, the following work algorithm must be observed:
- Dig a pit.
- Carefully compact its bottom.
- Place a 0.1-0.12 m layer of sand in the recess.
- Fill with crushed stone at 0.15-0.17 m.
- Install the formwork in that part of the foundation that will rise above the ground level.
- Build a monolithic foundation.
- Reinforce the entire thickness of the monolith being created using a mesh of reinforcement, which imparts rigidity to the foundation and reliability of its operation.
- Pour concrete solution into the pit. It is recommended to carry out this procedure in several stages, allowing the mixture to set. In this case, a cement-gravel composition should be used in the lower layers, and a sand-cement composition closer to the top.
- The elevation of the finished foundation above the floor level should be approximately 0.05-0.1 m.
- Roofing felt is laid on the base, providing the necessary waterproofing.
Stove for heating a two-story house
If the duct part of the “Swede” is increased in height, it is possible to organize heating of the rooms on the second floor, which is what is implemented in this project. The firebox with oven and stove remains unchanged. The dimensions of the stove near the base are 89 x 89 cm, the heating panel on the 2nd floor is 89 x 38 cm.
The total heat output of the furnace is approximately 4 kW. The distribution by floor looks like this: an area of up to 25 square meters is heated below, and 15 m² above. There is no summer mode, but there is the possibility of floor heating - valves block the channels of the lower or upper part.
Materials for construction:
- red clay brick (solid) – 950 pcs.;
- fireclay brick SHA-8 – 18 pcs.;
- grates 200 x 300 mm;
- 2-burner stove 71 x 41 cm;
- valve 130 x 130 mm – 3 pcs.;
- doors: firebox – 21 x 25 cm, others – 14 x 14 cm (7 pcs.);
- equal angle corner 40 x 5 mm – 2 m;
- strip 50 x 5 mm – 5 m;
- metal sheet 50 x 80 cm.
Considering the height and decent weight of the structure, it is recommended to pay special attention to the strength of the foundation and the alignment of each row during the masonry process, so that the result does not turn out to be the Leaning Tower of Pisa. Just follow construction technology and do your work responsibly.
Two dampers installed in the lower section switch heating between floors or open all 3 channels for simultaneous heating.
We begin the construction of the “Swedish” from the first floor, guided by the diagrams and cross-sectional drawings of the furnace:
- We lay out a solid zero tier, and on the first one we begin to build the ash compartment of the stove. On the second horizon we install the chamber door, we build the third according to the diagram, after the fourth we attach 2 inspection doors.
- Row No. 5 – we lay the bottom of the firebox with refractory material and install the grate bars. On the 6th tier we install the combustion door, form the walls of the wood chamber and smoke ducts. The seventh and eighth horizons are a continuation of the masonry according to the order, the ninth and tenth rows cover the loading opening. On the 10th row we make an opening connecting the firebox to the left channel.
- After the construction of the 11th tier, we install the slab and the front end corner. Horizons 12–17 form a niche for cooking. A ventilation door is installed on the 16th row, the seventeenth is covered with a metal plate and strips. Next we lay out two tiers of flooring - No. 18, 19.
- Horizon No. 20 begins to form a drying niche; a cleaning door is placed on the side. We make rows 21-24 according to the diagrams, then lay the strips of overlap of the upper chamber. We cover the dryer with tier No. 25, and attach the inspection door to the right.
- In rows 26-30 we continue laying and install 2 smoke dampers. The 27th horizon reduces the size of the stove, forming a ledge. The second “step” appears on the 31st tier, then we drive two smoke circuits without changes up to the 35th row inclusive. Horizons 36-38 expand the furnace again, and a fireproof cut is formed (passage through the ceiling of the 1st floor).
Comment. The height of the main section of the stove is 2.6 m. If the ceilings of the room are higher, add the required number of rows of bricks between tiers 32-35.
After laying the lower part of the two-story “Swede”, we proceed to the construction of the upper channel section:
- The first tier narrows the oven after cutting, on the second we fix the next inspection door.
- Then we continue to drive 3 channels in height according to the same type of schemes. Having reached the 27th horizon, we build in the main valve.
- Row No. 28 covers 2 vertical shafts, the remaining tiers 29-32 form the transition to the chimney.
The procedure for constructing the stove is demonstrated more clearly in the video:
Tools
A set of tools for laying a Swedish stove with your own hands, for both an experienced and a novice stove maker, should consist of:
- trowel (trowel) - the main tool used to take the masonry mixture from the container and apply it to the surface of the brick, as well as clean the rows of masonry from excess mortar that has protruded between the seams;
- hammer (pick) - the narrow nose of this hammer is used to trim and split bricks for laying corners and curved elements;
- jointing - used to design horizontal and vertical seams;
- plumb line - control the verticality of certain parts;
- rules - check the quality of fresh masonry and level the surface of the foundation;
- square - to check the right angles of the structure;
- cord - mooring or building level - to check the evenness of each row:
- rulers, tape measures;
- shovel;
- containers - for preparing masonry mortar;
To fill a monolithic support, you will need a tamper - it is compacted with concrete, as well as another container, a shovel, a probe and a metal sieve for sifting non-metallic materials: sand, crushed stone and clay.
Finally about drying and kindling
The final stage of construction is drying the furnace body and pre-heating. In this regard, the “Swedish” requires a careful approach:
- You cannot immediately light firewood in the firebox.
- First, the masonry must dry for 2 weeks. If the weather is cold and damp, use an electric fan heater.
- For 14 days, regularly heat the stove with small portions of dry firewood (3-4 kg per day). Use wood species that produce little soot - aspen, acacia, poplar.
Advice. During the first kindling, open the cleaning doors and insert crumpled newspapers into the openings. The paper will first become saturated with moisture, then begin to dry. When the newspaper stops getting damp, the drying process can be considered complete.
Make the first working fireboxes with a small amount of firewood, gradually increasing the load. Don’t forget to open the winter shutters so that the Swede warms up evenly.
Video description
About the Swede project with three firing modes in the following video:
The principle of order
It is most convenient to organize waterproofing for the bottom row using roofing felt. In this case, you can mark the first row on it (for example, with chalk or a construction marker). The markings should be approached responsibly: it determines the evenness of the future furnace body. Before starting work, you need to know the following nuances:
- Determine the places where the brick will be laid using the mortarless method.
- Know how to properly trim bricks.
- Know how the joints between brick and metal are sealed (filled with asbestos cord), plan and be able to make temperature gaps.
Order scheme of 16 rows Source terman-s.ru
Water circuit equipment
The hot water coil should be placed at the back of the oven. The storage tank can be installed in two ways:
- In the drying niche: the maximum possible volume is 120 l. The tank is located low, so it is convenient to fill it manually - important for houses without running water. But the pressure at such a height will be weak.
- On the roof of the stove: the tank is given an L-shape to increase the contact area with the chimney. Unlike the first option, it is oriented horizontally and has a height of only 400–450 mm.
Equipment of the Swedish oven with a water circuit
Thermal insulation is best made from foiled basalt cardboard 10 mm thick, but basalt wool with a density of 30–50 kg/m3 can also be used. The outside of the tank with thermal insulation must be lined with moisture-resistant plasterboard.
When connecting the tank to the water supply, it must be equipped with a float valve for the toilet cistern. In this case, it is important to ensure that cold water flows to the very bottom of the container, otherwise it will constantly mix with hot water, lowering its temperature. For this purpose, an oblique partition that does not reach the bottom is welded into the tank, along which cold water flows down.
In a vertically oriented tank (installation in a drying niche), you can use a simpler solution - put a vertical tube on the valve, the second end of which is located at the very bottom. But this technique is less effective: hot water will remain only in the upper two-thirds of the tank.
Bottom line
As you can see, creating a Swede is not a very complicated procedure, for which there are clear instructions. But if you doubt that you can do the job well, use the services of a specialist or buy a ready-made model. It’s better to spend money on a heating system in the first place than to freeze later in cold weather.
Average score of ratings is more than 0
Share link
Comments There are no comments yet, but you could be the first...
Calculation
As already mentioned, the performance of a Swedish stove largely depends on the dimensions of the elements of the chamber part and their ratios. Here are the parameters that should be considered optimal:
- Hob: 710x410 mm. It is important that its material has moderate thermal conductivity - special steel or cast iron is used. Otherwise, the burners will heat up too much, the stove will quickly burn out, and the combustion mode will be disrupted due to too intense heat extraction.
- Combustion chamber: height - from 280 to 330 mm; width - 305 to 355 mm; depth - from 405 to 505 mm.
- Oven: height - from 281 to 305 mm; width - from 330 to 380 mm; depth - from 455 to 505 mm.
- Oven wall thickness: 4–6 mm. With a smaller wall thickness, this element will be short-lived (it will burn out quickly), with a larger one, it will take longer to heat up, which will lead to a drop in efficiency.
- The distance between the oven and the edge of the grate closest to it: from ¾ to 1 brick. This size can be reduced by insulating the oven wall on the firebox side with vermiculite (the best option) or asbestos.
- Clearance between the back wall of the oven and the wall of the firebox: ¼ brick (necessary for the oven to be blown with hot gases from the back).
Now something about proportions:
- The depth of the firebox is selected in accordance with its other dimensions. If the height and width are accepted as the minimum acceptable, then the depth should also be the smallest;
- if the values of the first two sizes are taken from the middle of the permissible range, then the average depth should be assigned;
- the firebox with maximum height and width and depth should have maximum. If the depth of the firebox is increased disproportionately, underburning will occur; if you reduce it, the efficiency of the furnace will be reduced.
The depth of the oven is not so strictly tied to its height and width: it can be reduced by deviating from the proportion. But at the same time, this size should not be less than the specified minimum permissible value.
This article will discuss the procedure for constructing a “Swede” with a fireplace, having dimensions of 1020x890x2170 mm.
Working mechanism
In the process of laying a furnace, it is necessary to understand what operating principles the device is guided by. The practicality of the device is ensured by 2 caps. The hood is a specialized furnace chamber that has an outlet and an inlet for the corresponding gas flows. An important design element is that the stove is capable of quickly heating up, heating the room and at the same time storing the necessary home heat for a long period of time, even with the damper open. In addition, all products obtained during the combustion process freely leave the furnace structure on their own.
There are 2 options for the design: