The bathroom is a room where elevated temperatures are required. Firstly, it feels more comfortable, and secondly, warm air will quickly remove excess moisture after taking a shower or bath. Heating in the bathroom is done infrequently - it is not accepted. A more common method is to install a heated towel rail, which we’ll talk about next. For everything to work without problems, you need to choose the right connection diagram, and even implement it correctly. And you will have to figure everything out on your own. After all, even if you don’t do everything yourself, you’ll have to keep an eye on the plumbers. This is the only way to be sure that you will be left with a properly functioning dryer.
In order for everything not only to look good, but also to work without problems, you need to lay out the eyeliner correctly
What designs are there?
Heated towel rails come in different shapes. When choosing them, people are often guided solely by aesthetics, which is not entirely justified. These devices work normally with good water circulation, but not all models provide such circulation. With some you have to spend a long time trying to find the right connection diagram, otherwise they simply refuse to work.
So, all heated towel rails can be divided into four groups:
- U-shaped or U-shaped. The simplest models, basic connection (lateral). Ideally, when replacing the old one, you find a model with the same center distance. Then, if you're lucky, you won't even have to redo the bends.
- Ladder. Modern designs with a certain number of crossbars. Also a good option from a hydraulic point of view. The connection can be bottom, side or diagonal. But it is not chosen arbitrarily, but according to a set of conditions (where the supply comes from, location relative to the riser).
- Snake. Another classic model with side connection. Installing a heated towel rail of this type, as a rule, does not present any problems.
Types of heated towel rails - Complex shape. There are very unusual heated towel rails. They can even be an interior decoration, but their proper connection is a problem. As a rule, consultation with a competent specialist, a plumber who is well versed in hydraulics, is required. As you understand, finding one is not an easy task.
It often happens that after installing a heated towel rail it simply does not work. If the error is serious, the riser to which it is connected also stops working. Therefore, it is necessary to know and follow the connection rules.
Basic moments
To connect any equipment in the bathroom, you must have professional skills. Since errors in measurements of a few millimeters can lead to big troubles and problems with operation. If there is a need to install a heated towel rail, you should contact an experienced specialist.
It is important to take into account the features and subtleties of the work:
- Carrying out accurate measurements.
- Determining the location of the structure.
- Availability of couplings, fittings, brackets and other additional parts.
- Selecting a connection method.
Installing a heated towel rail in the bathroom is one of the most difficult plumbing jobs. Therefore, if you are not sure, there is no need to tempt fate and try to complete the installation yourself. The consequences can be very different: from banal leaks of pipelines covered with ceramic tiles to damage to the tiles during the process of hanging brackets.
Before starting work, it is important to decide whether you are capable of such work or not. Even if you decide not to do it yourself, you will at least know the installation sequence, which will allow you to control the quality of installation of hired specialists
Hiring professionals is the most correct and balanced decision, so you will not only save time and nerves, but also get an excellent result. Drying clothes quickly will become a pleasant reality, towels will be fresh and dry, and the bathroom will be comfortable.
Where to connect and where to hang
You can connect a water heated towel rail to both the hot water riser and the heating system. If both of these options are available, DHW is usually chosen. There are three reasons for this: there is less hassle with permission to connect, you can connect at any time of the year (agree with the management company to turn off the riser and that’s it) and, most importantly, such a heated towel rail heats up all year round.
If there is no hot water supply in the house, you will have to connect to the heating riser. This requires permission from the Criminal Code and a project. Buy a heated towel rail (preferably a simple design), go to the housing office with its passport (copy), write an application. If permission is given, order the project (you will also need a copy of the passport with connecting dimensions). Then, according to the project, you do it yourself or hire performers (plumbers from the housing office, as an option). Call representatives of the Housing Office for acceptance.
To ensure that the “towel” always warms up without problems, all connections are straight, without arcs or pockets
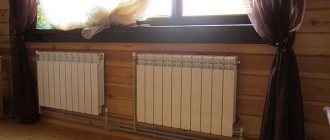
When determining where to install the heated towel rail, questions may still arise about what height it should be hung. If you have a choice, it is most convenient to place it so that it is at head level and below. This is if you install a U-shaped or snake. If we are talking about “ladders” of great height, the top bar is placed at the level of the heat of the raised hand (approximately 190-200 cm).
When choosing a location for installing a heated towel rail, you must also take into account the distance from the riser. In principle, the closer to the riser, the better - the greater the chance that it will work. But, it can be attributed to a meter or so only if the following conditions are met:
- low hydraulic resistance of the heated towel rail (simple shape and cross-section 1″ or 3/4″),
- sufficient pressure (2 atm or more)
- drain pipes of normal diameter (one step smaller than the riser).
At the same time, be sure to follow other connection rules. Then there will be chances that such a “remote” device will work normally.
Grounding a water heated towel rail
The phenomenon of electrocorrosion causes the pipe walls to become thinner. And so much so that over time they begin to “drip”, or even leak. Brass and copper products especially suffer from this. Stainless steel also wears thin, although much more slowly.
It is impossible to get rid of stray currents, since we are surrounded by magnetic fields, which provoke their occurrence. And connecting with plastic pipes does not completely solve the problem - currents are induced in the metal body of the heated towel rail. It is possible to neutralize the influence of these currents. You just need to ground the heated towel rail.
How to ground a water heated towel rail
To do this, screw/weld/solder an insulated wire (cross-section of at least 2.5 mm²) to the metal part of the heated towel rail. Connect its other end to the grounding block, grounding bus. Since grounding has low resistance, current will flow through the conductor and not through the pipes.
https://youtube.com/watch?v=ctpUlynSQTk
How to make bends and how to change the riser
If the riser is metal and you are not going to change it, then installing a heated towel rail is possible with steel or polypropylene pipes. If you change the riser (the best option) and install polypropylene, there is no choice - PPR pipes are also used for bends. Use polypropylene for hot water, preferably reinforced with fiberglass.
Why is metal-plastic not suitable? Because its fittings have a very narrow clearance. This has a very bad effect on circulation. As a result, even 100% efficient circuits do not provide normal heating.
Installation of a heated towel rail with polypropylene pipes
A little about why to change the riser. It makes sense to do this in old houses when renovating a bathroom or bathroom (depending on where your riser is located). Firstly, the pipes are usually already old and worn out. Even welding an outlet to them can be problematic, the metal is so worn out. Secondly, modern renovations involve hidden installation of communications and you will also want to cover the riser. Hiding an old pipe and then destroying everything again a few years later... is not a good solution.
A little about how to change. You need to come to an agreement with the neighbors below and above, as well as with the housing office (DEZ, UK). With your neighbors that you will cut off their riser and install a new one on the thread. Why do they have it? Because leaving an old pipe in the ceiling is dangerous: it will collapse and leak. It will flood you or your neighbors below. Therefore, it is better to pass through the ceilings with a new pipe.
With this connection, the dryer is part of the riser and there cannot be any taps
Having agreed or not with your neighbors (their riser may already be closed), you go to the housing office and agree on the date of replacement and the time for which the riser will be turned off. The work can be done by “local” mechanics, you yourself (if you have welding qualifications) or people you hire. After the connection, the water is turned on, you check the functionality of the heated towel rail and the system as a whole. If it doesn’t start to cool within 30 minutes, it means it’s set correctly. This completes the replacement or installation of the heated towel rail.
Installing a water heated towel rail with your own hands
To install a new device, you first need a connection diagram for the heated towel rail, indicating the dimensions of each section and the location of the fittings, then the assembly will be more accurate.
Installing a heated towel rail in the bathroom with your own hands now requires a soldering iron for welding plastic pipes. The kit should contain standard size nozzles. If you follow all the instructions correctly, the welding process is easy to master on your own. It is useful to watch a training video on this topic so as not to miss important points of the technology.
USEFUL INFORMATION: Selecting screens for the bathroom: description and installation features
You can extend the pipes to any place where the device will be installed. Just don’t hang a heated towel rail over the bathtub. There are several reasons for this:
- Dryers are never placed where there is excess moisture.
- Water entering hot pipes will cause increased humidity and the deposition of calcium salts on them.
- It is inconvenient to take a shower and reach for things on the pipes through the bathtub.
Pipe preparation
The progress of work will be as follows:
- A pipe cutter is used to cut sections of plastic pipes of the required sizes. The ends are chamfered with a slope of 150 and a length of 2–3 mm. Burrs and crumbs are removed from cut edges to obtain high-quality joints.
- It is necessary to turn off the hot water supply valve to the riser and cut off the old heated towel rail from the pipes.
- The riser may be worn out, then it is advisable to replace it partially or install a new one entirely. It is advisable not to leave old pipes in the ceilings, and the connection points of new ones should be accessible for repairs. The work of replacing the riser and installing branches from it should be entrusted to specialists.
- The next step is the installation of ball valves and a bypass - a section of the pipeline with connecting parts.
Securing the heated towel rail to the wall
How to hang a heated towel rail in the bathroom? Brackets are used for this. First they are screwed to the device, then they are leveled using a level and marks are made on the wall.
In the bathroom you have to drill holes in the tiles, for which a special drill is used. The device should be secured to the wall with plastic dowels.
It is important to decide at what height to hang the heated towel rail and choose the correct gap. The standard distance from the wall to the axis of the heated towel rail pipe is:
- from 5 to 5.5 cm with a diameter of up to 2″;
- 3.5 cm with a diameter of up to 1″.
The mount can be fixed or with an adjustable gap due to a pin screwed into the bracket. This way you can create the necessary air circulation, ensuring quick drying of the laundry. Too frequent adjustments are not recommended, since the pipes are constantly under pressure. They work reliably when permanently fixed.
How to install a heated towel rail correctly for ease of use? The standard stipulates that the installation height of a heated towel rail according to the rules is 120 cm. If it is not possible to maintain the size, the permissible lower limit is 95 cm, and the upper limit is 170 cm.
USEFUL INFORMATION: Modern bathrooms: design, photos
Pipe connection
Polypropylene pipes are welded to the couplings with a soldering iron. The pipes are cut to the required length. The ends are chamfered and the edges are cleaned. The pipe is inserted into the sleeve, and the coupling is pressed onto the pin, after which they are heated. The heating time is determined according to the table.
After removal from the soldering iron, the heated parts are immediately connected. They are positioned exactly relative to each other with slight pressure. After 3–5 seconds, the pipe connection sets.
The device should be mounted in such a way that water passes through it from top to bottom. To do this, the water heated towel rail is first connected with the upper inlet socket to the riser. Having connected and secured the device, the system is checked for leaks by opening the taps and turning on the hot water supply. There should be no leaks in installed devices.
With or without bypass
Let's start with what a bypass is. This is a jumper between the input and output of the device, which ensures water circulation when the device fails or is turned off.
The jumper between the input and output of the heated towel rail is the bypass
If the circuit has a bypass, shut-off ball valves can be installed at the inlet and outlet of the device. This is convenient - you can turn it off if necessary (during repair or replacement) and not block the entire riser.
If there is no such jumper, no taps can be installed. In this case, the heated towel rail is part of the riser; by closing the taps, you completely shut off the riser.
When connected without bypass, no taps
The bypass can be direct (as in the first photo in the chapter) or offset (in the photo below). An offset jumper is installed at the top supply of coolant for better performance (circulation improves). With bottom feed, the offset only gets in the way. If you don't know where the water is coming from, it's better to do a direct bypass.
Offset bypass with upper coolant supply improves circulation
Bypasses (straight or offset) are also made narrower. Tapering, as well as displacement, improves circulation, but only in the case of top feed. The narrowing is made with a pipe that is one step smaller than the main one (if the riser is inch, the bottleneck is made 3/4″). You can't do less. The insert size is at least 10 cm.
Once again: an offset and/or narrowed bypass only works with top water supply. At the bottom, it interferes with circulation. If you are not sure, make the bypass straight and untapered.
It is strictly forbidden to install taps on the bypass. Each tap is a loss of pressure, which means it worsens the circulation of the entire riser, the water flows no longer so hot. For all neighbors above or below (depending on the direction of supply), the pressure deteriorates noticeably. Sometimes it also falls on the owner of the bypass with the tap. In addition, this is an absolutely unnecessary detail that only causes harm, and no noticeable improvement in circulation in the heated towel rail is observed. Well, and besides, this is a violation of SNiP 01/31/2003 (clause 10.6) - interference with public communications, for which a (considerable) fine may be issued.
Specifics of installing a heated towel rail
The general principle of connecting any type of heated towel rail remains unchanged: water is supplied at one end, and it flows out at the other. Installation of a substation requires mandatory consideration of points dictated by the installation features.
When connected to a hot water or central heating system, it becomes part of the pipeline. If the connection is made incorrectly, then the problems that arise will affect not only the individual apartment, but also all the others located along this riser.
The heated towel rail is connected to centralized and autonomous heating or hot water supply systems, hung on the wall and/or installed on the floor
To avoid electrolytic corrosion, it is recommended to use parts made of the same material. The exception is plastic pipes; plumbing fixtures made of any material will fit them.
For our water supply system, it is better to choose a heated towel rail manufactured by domestic manufacturers and that complies with regulatory documents. You need to be careful with imported models - most of them are designed for different standards.
The range of heated towel rails includes rotating options, the connections of which are equipped with movable mechanisms with sealing seals. Models can be loaded up to 5 kg
A ladder-shaped heated towel rail is connected to the pipeline using several methods - vertical, diagonal, lateral. The main thing is to maintain an interaxial distance of 50 cm.
When connecting to an existing system, you need to take into account its parameters. The distance from the riser to the newly installed unit should not exceed 200 cm, otherwise significant heat loss cannot be avoided.
Ideally, the pipes of the system and the heated towel rail are the same in diameter, but if they still differ, then the connection is made through adapters.
The pipes of the device may be larger in diameter than the pipes of the existing circuit, but in no case smaller. This will prevent the creation of excess hydraulic pressure and ensure normal coolant circulation in the system.
A selection of photos will familiarize you with the features of connecting a substation to hot water systems:
Image gallery
Heated towel rails connected to the risers of centralized hot water supply networks are used as clothes dryers and bathroom heaters.
They are made from seamless steel pipes in the form of stairs with rungs or coil-shaped structures
The devices are made from materials that are resistant to standard operating conditions for bathtubs and showers. External coating protects pipes from rusting
Heated towel rail devices manufactured for connection to hot water risers can be used as radiator types and are allowed for connection to heating circuits.
To ensure that the device, if necessary, can be easily dismantled and moved to another wall, detachable couplings with American-type internal threads must be used to connect it to the riser. It is necessary to strive to reduce the number of adapters, because... Leaks may form at the places where they are installed.
The joints should be sealed with special compounds or winding, and you should not save on this. Connections with regular metric threads are sealed with flax winding. It is better to seal tapered threads using FUM tape. Tightening should be carried out with a slightly noticeable tension; excessive force is unacceptable.
When selecting taps and fittings, inquire about their electrochemical compatibility so that they do not create a galvanic couple upon contact. A connection made of steel and brass has this property. Rapid corrosion occurs and the unit becomes unusable.
The use of an adapter called American allows you to fix the structure when the diameters of the taps and pipes in the system do not match
If the plumbing fixture is part of the riser, then no shutoff devices can be installed on it. To make it possible to turn off the heated towel rail without shutting off the entire riser, it is necessary to include a bypass in the system - a jumper connecting the outlets from the riser towards the device.
Ball valves are installed after this jumper. When the connection pipes are embedded in the riser, it itself acts as a bypass.
In order for the device to be dismantled for repairs without turning off the system and draining water from it, it is better to include a bypass in the installation diagram of the heated towel rail
How to place taps (connection methods)
For lateral and diagonal connections, the outlets should be located at the same level as the heated towel rail inlets or slightly higher/lower. What definitely won’t work is installing a heated towel rail if the outlets are located at a distance less than the distance between the inputs. The photo below is an example of a non-working diagonal connection with closely spaced taps. The option for correcting it (top feed) is indicated in black.
With a side connection, the heated towel rail will only work if the outlets are located slightly above and slightly below its inputs or at least on the same level
When connecting, the taps must be positioned strictly horizontally or slightly at an angle. Slightly at an angle - this is from 2 cm per meter (2%) or maybe a little more. The direction of the slope depends on the connection diagram and which end this outlet will be connected to. To make it a little clearer, let’s look at several typical connection diagrams for heated towel rails.
Universal bottom connection for heated towel rail "ladder"
This circuit works regardless of the direction of hot water supply. Connection type - bottom, both outlets should be located lower than the bottom edge of the dryer. With top feed, an option is acceptable when the edge is located between the bends, but the work may not be so efficient (it may heat up worse).
Universal connection for heated towel rail (bottom)
In this scheme, you can install shut-off valves. For its normal operation you need:
- Mayevsky valves (air vents) installed on the upper outlets to release air accumulated in the upper part. They will need to be periodically opened and vented (as the heat begins to worsen). There is an option - install automatic air vents. They are also compact. This will make it easier to use.
- The bypass is straight and narrowed. The size of the narrowing is a pipe of one step smaller in diameter.
- Bends are made with a pipe of a step smaller in diameter than the main riser.
If this option suits your height, do it. The scheme works in any conditions, with ladder-type heated towel rails of any type.
Possible bottom connection for top supply
When pouring hot water from above, you can make the upper outlet higher than the bottom edge of the dryer. With the bypass displaced and narrowed, it should heat up normally. This method is not the best, but it works.
Working option for top spill of hot water
The presence of air vents and bleeding of air after the system is stopped are mandatory.
Universal side connection
You can connect the pipes from the side to the heated towel rail in any of the standard shapes - U-shaped, snake and ladder. The connection itself does not depend on the form. The standard version comes with a straight, unnarrowed bypass. Bends are either strictly horizontal or with a slight slope. There is a slope in the figure: the end of the upper branch is tilted slightly downwards (2 cm by 1 meter), the lower one is tilted slightly upwards. The diameter of the outlets is not less than the diameter of the heated towel rail.
Lateral universal connection for heated towel rail
This connection diagram is good because there is no need to install air vents on the “ladder” (they install plugs), since the air simply goes into the riser.
With the top supply on the bypass, you can narrow it and/or move the jumper towards the heated towel rail. This will improve circulation and the dryer will heat up better. But once again: such a scheme will only work with top water supply.
When supplying water from above, the bypass can be shifted and made into a pipe with a smaller diameter step
With this scheme, it is also possible to make bends at a slight angle or strictly horizontally.
Possible side connection option (not the best)
A lateral connection scheme with the top outlet located below the top edge of the heated towel rail is acceptable. But with such a connection, Mayevsky taps are needed, through which you will have to bleed the air after turning off the hot water supply for repairs/maintenance. It may also be necessary to periodically remove air during the process.
Not the best, but quite a workable option
Diagonal connection
There is no particular point in the diagonal connection of most heated towel rails: their efficiency is no different from the side one (in any case, there is no significant improvement), but the pipe consumption is greater, longer grooves are required, and this is labor-intensive. Although the scheme is workable.
The diagonal works fine if the water supply comes from above. Then the upper outlet is connected to the far edge of the “ladder”, and the lower one to the near one.
Diagonal connection with top feed
In this case, you can also make a narrowed and offset bypass, but even without this everything should work with a bang. With bottom supply, the bypass is not narrowed, exactly along the riser, connection
Heated towel rails with complex shapes: how to connect
In the case of connecting heated towel rails of complex shape, in addition to the usual means, it is also necessary to take into account the structural features of each specific model. They must be considered from the point of view of hydrodynamics - where water flows best, water is supplied there. For example, the popular model “Elegy” from Sunerge. This is not a ladder or a zig-zag.
A diagonal connection is chosen here, because anything else simply won’t work.
Installation of the Sunerzhi Elegy heated towel rail was chosen from the side, since with any other installation the circulation will be disrupted. There are no options at all.
Another model with a bottom connection and a complex design has three installation options. Provided water is supplied from above, the second one will work best, the first one will work a little worse, and the third one will be the most ineffective.
Bottom connection options with top spill
When feeding from below, options 1 and 3 remain, but only without narrowing the bypasses - it will interfere, not help. We exclude the second option completely.
Types of radiator connections for a two-pipe heating system
There are the following connection types.
With the accompanying movement of heat
It is also called the “Tichelman loop”.
This scheme provides for a two-pipe heating circuit, where the circulation of the coolant in the return line is co-directed with its movement in the supply pipeline.
The supply pipe to which all radiators are connected runs along the perimeter of the room or building. The end of this pipeline is considered to be the outermost battery in the branch.
Plus: it is suitable for heating premises of a fairly large area, and the lengths of the supply and return pipelines to each radiator are equal.
Disadvantage: complex installation and significant expense of finances and materials.
Dead-end circuit
It is considered the most common type of connection. Its main difference from the above scheme is that the direction of coolant circulation through the supply and return pipelines is opposite.
The heated liquid moves through the supply pipe from the boiler to the battery. After passing through the radiator and transferring heat to it, the liquid returns to the boiler through the return line.
Most often, to heat a private house, a circulation pump is included in such a scheme. This allows the use of small diameter pipes and the laying of a fairly long pipeline.
There are 2 types of dead-end circuit: horizontal and vertical.
In the first option, the supply and return pipelines are located horizontally, and in the second case - vertically. The last dead-end scheme is relevant for heating a two-story house.
Photo 1. Schematically shows options for a dead-end connection of a two-pipe heating system and a Tichelman loop.
Gravity
This scheme provides a design where two separate circuits are output for the circulation of hot coolant. The heated liquid moves along one, and the cooled liquid moves through the second.
What not to do
All the above schemes work stably. As you noticed, all bends go straight, without bends in the form of an arc or rings. This is not accidental - air accumulates in all irregularities, which interferes with, and sometimes completely blocks, circulation.
This scheme doesn't work
The installation of the heated towel rail in the photo is incorrect. At least two mistakes were made:
- the bends are made narrower than the center distance of the heated towel rail;
- They are made with a metal-plastic pipe with loops.
This connection simply cannot work. Metal-plastic pipes are an excellent material, but not for connecting heated towel rails. Their fittings have a very narrow lumen, which has a bad effect on circulation. Plus, air accumulates in the loops, and the flow along the upper loop, even when supplied from above, will not flow - too much hydraulic resistance to the water must be overcome.
Unstable circuits
The following two schemes may work, but not always. At the bottom of the heated towel rail, the water stagnates and, given any difference in height, cannot rise. No one can say specifically when it will work and when it won’t. Depends on the pressure in the riser, the diameter of the pipes and the design of the dryer itself.
Unstable connection schemes
With such a connection, even a working connection may suddenly (usually after stopping) stop working. Everything is simple: the pressure has changed, the pipes are clogged, the water from below is not “pressed”, the heated towel rail does not heat.
Another option for an unstable circuit is with a loop on top. Again, it will work under certain conditions. But sooner or later the highest point will become airy and block the circulation. The problem can be helped by installing an automatic air vent at the highest point, but if the pressure drops, it will not save you.
With loop on top
Not true at all
The photo below shows examples of what not to do. Schemes without a tap on the bypass are inoperative. What this threatens is known. In addition, after several years of use, they will stop functioning altogether. Most likely this will happen after the next shutdown - the system will become clogged with dirt. This is because the entire flow of hot water is directed through the heated towel rail. After repairs, the water carries a huge amount of dirt, which safely settles in the bends (in the lowest areas first). Within a few years everything becomes completely clogged. Fortunately, everything needs to be redone and connected correctly, but only flushing can help the fire.
Very bad idea
It is necessary to wash both the heated towel rail and the connections to it. To do this, remove the dryer and wash it in the bathroom, and wash the outlets one by one by connecting a hose to the free outlets, the other end of which is taken to the sewer. By manipulating the taps, pass a flow of hot water through one outlet, then through the other. After washing everything is put back in place. It may be possible to start the system after this.
Typical mistakes of independent craftsmen
When, with a side or bottom connection, the lower outlet is located above the extreme point of the PS, a stagnation zone is formed between the bottom of the device and the connection point of the lower outlet.
This is a consequence of the fact that the cooled liquid, having dropped down, cannot get back into the riser due to the pressure on it from a column of hot water with a lower specific gravity. As long as the permissible height difference between the bottom outlet and the bottom of the heated towel rail is not exceeded, the device works, and after that the circulation in it stops.
Circulation will also stop if there is a bend formed by the upper pipe. The only way to make such a scheme work is to insert a Mayevsky tap to periodically bleed off the accumulated air. Sometimes a loop is made in the upper pipe, laying it behind the ceiling trim, and the lower pipe is walled into the floor.
Air will accumulate at the top, and the cooled water in the unit will be blocked in the lower loop located in the floor. The movement of the coolant will stop completely.
In order to release the air formed when the coolant boils or brought into the heating system during its filling, air vents are installed (+)
GOST standards
The main document regulating the procedure for connecting the receiver to the hot water supply system is SNiP 2.04.01.85. Most of the standards were developed taking into account the old methods of manufacturing heated towel rails, but they are still in effect today. When installing devices, it is necessary to ensure:
- The distance from the axis of the pipe to the wall should be 35–55 mm (the norm is clearly outdated and does not take into account the size of modern devices).
- The direction of coolant circulation is from top to bottom.
- The diameter of the riser or supply pipeline must be less (at least equal) to the diameter of the heated towel rail pipe, so as not to create a narrowing of the clearance and a pressure drop in the system.
- Installation height: 120 cm from floor level. (This SNiP requirement also does not take into account the dimensions and design features of modern devices and is often ignored during installation).
- The connection between the device and the main pipe is made with one- or three-quarter-inch threaded couplings; special brackets are used for installation on walls.
The requirements of GOST and SNiP are aimed at ensuring efficient and economical operation of plumbing fixtures. They are often ignored at all levels - from professional builders to private home owners. The SNiP requirement to install shut-off valves that allow you to turn off the heated towel rail in the summer is extremely rarely observed. Owners consider the installation of taps or valves as a measure aimed at facilitating repair work in the event of leaks.
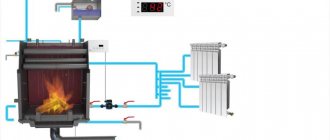
Pros and cons of underfloor heating from a heated towel rail
Heated floors in the bathroom are not expected to provide uniform heating of the air, like the same floors in other rooms of the apartment. Their main task is to make the floor surface more comfortable and drier, and so that splashes of water dry quickly. Otherwise, a microclimate will be created in the bath for fungal formations and mold.
Before you think about installing this heating structure in the bathroom, you should weigh the pros and cons.
Main advantages:
- The design does not take up space and is not visible, so it does not spoil the interior of the room;
- Stepping on a heated floor after taking water treatments is much more pleasant;
- The device is easy to install and safe;
- The maintenance process is simple;
- The system quickly pays for itself.
The disadvantages include the rather high cost of installation and the impossibility of laying some floor coverings on such a floor. But in the bathroom, mostly tiles are laid, and this is an ideal option for a heated floor.
In addition, in the event of an accident, the floor covering and concrete screed will have to be dismantled. In addition, it is worth saying that the quality of this coolant is not high, so scale and corrosion form inside the circuit.
Also, this device affects the heating of radiators in neighbors’ apartments, so it is recommended that they install a two-way valve.
The essence of the issue
Optional bypass installed
At its core, a heated towel rail is no different from a heating radiator, representing one of its varieties. Moreover, as a rule, it is connected to the riser of the general heating system. In turn, the bypass is a jumper between the inlet and outlet pipes before the coolant enters the consumption device. In this case, this is a jumper in front of the entrance to the heated towel rail.
What is such an element intended for, and is a bypass needed when installing a heated towel rail in the bathroom? The main purpose of such a jumper in any system is to provide a channel for the passage of liquid, bypassing the apparatus. In the case of a heated towel rail, installing a bypass allows you to solve problems such as directing the coolant flow around it during repair work and reducing the pressure in the dryer if necessary.
In addition, through the formed additional channel it is always possible to redistribute the hydraulic load, i.e., if necessary, reduce the pressure directly in the dryer parts. In particular, in the heating system (especially when carrying out pressure testing) the pressure sometimes exceeds 9-10 atmospheres, which not every dryer can withstand. One more advantage can be noted: the bypass makes it possible to maintain the required temperature to ensure drying and install automatic control circuits and maintain the drying mode.
Summarizing what has been said, we can draw certain conclusions. The jumper for a heated towel rail is not a mandatory element, the installation of which is regulated by standards, but from a practical point of view it is necessary to eliminate unnecessary problems, as well as increase the reliability and functionality of the device. However, you should also decide on the question of whether a jumper is always necessary.
If the heated towel rail is connected by sequential insertion into the main line, then a bypass is required. This option is the most common in practice. At the same time, when we assemble a parallel system, the riser itself plays the role of a jumper. In this case, the coolant moves through the main pipe, regardless of the presence of an additional parallel circuit, and the heated towel rail can be turned off without blocking the common line.
Cranes
To control the operation of the heated towel rail, two shut-off valves with a cross-section corresponding to the main pipes are installed in front of it. The design and arrangement of these valves is not particularly important - both two-position (open/closed) ball and multi-turn products are equally suitable. However, if an air lock accidentally forms in the towel dryer, leading to a sharp decrease in the efficiency of the heating device, it will not be possible to remove it using such taps. Initially, air can be released through the nuts, but if you twist them often, the seals will quickly become unusable.
The taps usually have a threaded connection - therefore, if there are no threads on the main pipes, it must be cut or a corresponding fitting must be welded.
We install the Mayevsky tap in this way if the system often airs out
Is shape important?
The type of connection of the device will depend on this characteristic, so it is considered to be a more or less important aspect
How to properly connect a ladder heated towel rail
Develop a plan and materials that will be useful to you. Read the instructions, which contain an individual approach. Despite this, there is a general phasing.
- Reproduction of dismantling a real dryer.
- Connection of pipes and equipment.
- Installation of taps.
- Jumper installation.
At the end of the work, you should remove all accumulated debris and check the capabilities of the updated device.
Connection diagram for a complex-shaped heated towel rail
In such a situation, you will have to take into account some features. The working pressure is 8 atm, however, it can experience up to 16 atm. For improved heating, there is a Mayevsky tap, then the air will leave the system. Installation occurs thanks to special bushings. They are mounted on the wall. When attaching the legs to the bushings, screws are used to securely fix the device.
Advantages of connecting to a hot water riser
Connecting a dryer to a domestic hot water system has a number of undeniable advantages:
- eliminating dampness in the bathroom;
- uninterrupted operation of the device;
- Constantly comfortable temperature in the room.
In addition, there is an opportunity to save on utility bills. Connecting the dryer to the hot water supply line allows you to not consider it a heating device. The thermal energy consumed will be taken into account as for heating water, and will not be transferred to the heating bill as gigacalories.