Making a fireplace out of brick is quite difficult. To create a high-quality and productive structure, you will first need a well-designed order or project. The design features of the equipment and the materials used for assembly play an equally important role.
A fireplace with your own hands can be placed both in a private country cottage and in a country house. First of all, this heating variation is suitable for those rooms in which there is no other source of receiving and generating thermal energy. Such a stove can be installed in a house made of brick or wood. Installation in a building made of logs or gas silicate block is also possible. A properly designed fireplace design allows you to efficiently heat not only a small house, but also a fairly large and even two-story house. The efficiency of such a design can reach about 80-90 percent. This is considered a high and good indicator.
Selecting the dimensions of the structure
A fireplace, the masonry of which is carried out according to a pre-selected order on the Internet or drawn up by a professional stove maker, can have not only a certain placement method, but also a size. The choice of this parameter depends on certain parameters and features:
- The size of the room chosen for installation of the heating unit plays a big role;
- Pay attention to the way the fireplace is located in the living room interior;
- Pay attention to the choice of equipment type;
- Take into account what material the frame of the house, foundation, walls, floor, ceilings are made of;
- What matters is what functionality the stove has.
Before you build a stove with your own hands, remember that the order should correctly reflect not only the amount of materials, the key features of the heating device, but also equally important details. For example, the overall dimensions of the firebox should be based on a proportion of 1/90 in relation to the total area of the selected room.
It is necessary to select the height and width of the combustion opening using the proportion 1.5/1. Also, the fireplace diagram is not complete without identifying the depth, which will be less than the width parameter on average by half. The chimney must also have a correctly selected cross-section. It can be determined by reducing the area of the combustion hole by 14-21 times.
For example, if the room area is 30 square meters, the following values will be suitable for such a unit:
- The combustion hole will have a size of 0.30 square meters;
- The firebox will have a width of 45 centimeters;
- With a height of 65 centimeters;
- Depth 25 centimeters;
- The round cross-section of the chimney will be equal to 0.030 square meters or 300 square centimeters.
Installation of free-standing fireplace inserts
Swiss island-type fireplace free-standing in the interior of one of the rooms for vacationers of the local resort of Gochna-Madrisa
- Firstly
, it’s worth conducting a small visual analysis of the free space in the room. An island fireplace (Swiss, see photo above) requires a fairly large area. The minimum parameters for distance from walls, furniture and other elements must be at least one meter. Otherwise, the system may not operate with maximum safety. - Secondly
, each individual design has its own installation features. They depend on the materials used for the firebox, smoke box and chimney; type of fireplace and other characteristics. For this reason, you should trust the installation process to competent specialists who can eliminate all errors at the fixation stage.
Choosing a location method
The arrangement of the fireplace plays a key role in the assembly and successful operation of the heating device. However, what is equally important is what type of location the stove will have in the interior.
Main placement methods:
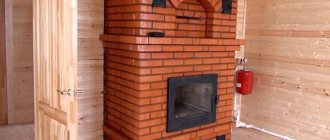
- Wall-mounted fireplaces are massive. To assemble such a structure you will need a fairly large amount of materials and cladding. This option is convenient to place, has a good viewing angle, and several people can sit near it at once. The advantages also include high efficiency and good, productive operation. The portal is symmetrical; the facade part is most often assembled in a U-shaped shape. A fireplace, for which both standard and refractory bricks are used, in a wall location has a chimney that is covered with bricks up to the ceiling;
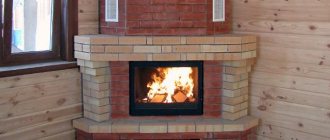
- If the room chosen for installation does not have a large area, we recommend installing a corner fireplace in it. This option, with a fairly good viewing angle, is small in size. The arrangement of a corner type oven does not require a large amount of brick. In this case, only the facade part will need to be clad, since the role of the sidewalls is played directly by the walls or partitions of the room themselves. Despite its small size, the corner hearth has a fairly high power and is suitable for heating rooms with an area of 15-35 square meters;
- The design of an island-type furnace is difficult to construct. To build such a structure will require a lot of time, large investments and experience. An island fireplace is installed in the center of the room and is not adjacent to walls or other ceilings. The portal can be equipped with small walls and a firewood rack. To remove smoke and combustion products from the room, the stove is supplemented with a suspended exhaust system or, in other words, a chimney. The base usually has a classic square or rectangular shape (profile). Structures of round, triangular, multifaceted shapes are more difficult to construct. Particularly popular are designs consisting of several levels. For additional functionality, you can equip the portal with a tabletop or mantelpiece.
The fireplace, the dimensions of which are selected individually, can be installed not only in the house, but also outside, in a gazebo. Such outdoor and garden barbecues and barbecues can be located either completely separately or built into gazebos and verandas. The advantages of such structures include the ability to make them quite large and bulky. This way you can add many different elements to the grill.
Due to their large dimensions, outdoor and garden stoves are heavy and require the construction of a solid concrete foundation. This will prevent the structure from sinking underground or losing its stability over time.
A barbecue or barbecue oven project also requires an individual approach, careful selection of placement and functionality. If you plan to combine an outdoor fireplace with a gazebo or veranda, you should not use only brick for construction, as it is very expensive. The materials most often chosen for gazebos are: plastic, metal profiles, wood, fire-resistant plastic. The stove itself, columns, various partitions, small walls, and the area near the combustion compartment are assembled from bricks.
Equipment classification
Before you build a Swedish stove or any other structure, you need to remember that any heating equipment consists of a portal, which serves as protection for the firebox and its decoration. Most often this element is assembled from brick. Can be lined with any heat-resistant materials. To place logs and burn them, the structure is equipped with a firebox or combustion compartment. To prevent smoke from immediately escaping into the street and creating heat, the stove is supplemented with a smoke collector. To remove smoke and combustion products, wood-burning stoves are equipped with a chimney.
An open firebox design means there is no door. In this case, special attention must be paid to the internal walls of the combustion chamber, making them as thick, durable and airtight as possible. For laying the walls, only fireclay bricks and an adhesive composition based on fireclay clay are used. Also, the fireplace insert can be of a closed type.
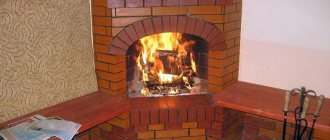
A closed firebox is safer to use. It prevents sparks and flames from entering the room. However, an open firebox looks more harmonious and allows you to contemplate the bright flame, enjoy its crackling and warmth to the fullest. In addition, by giving preference to an open design, you save your money, which could have been spent on purchasing a steel or cast iron chamber with a door.
In order to protect the room from fire, the space next to the firebox must be insulated with any fireproof material.
If you want to equip a stone portal with a purchased firebox, the walls of the stove can be assembled from simple brick, since additional protection will be provided by cast iron sidewalls.
A closed firebox is most often equipped with a door made of transparent tempered glass, which allows you to see the fire burning in the hearth in as much detail as possible. The method of opening such a door can be either the classic side or the top. Many modern fireboxes are equipped with a self-cleaning system - this prevents soot and soot from forming on the glass.
Wall- and corner-type fireplaces are equipped with steel pipes, which do not have a very presentable appearance. In order to hide and at the same time decorate such a chimney, it is enclosed in a box made of brick. The laying of the chimney is also carried out according to a previously drawn up order. Such a box not only improves the appearance of the structure, but also enhances, further insulates and accumulates accumulated heat.
Most often, stylish steel hoods that are hung directly above the hearth itself are purchased as a set for an island fireplace.
Arrangement of a traditional fireplace
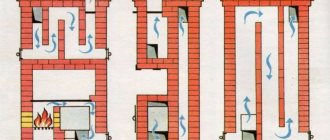
The classic design of a fireplace with a direct chimney that is not built into the wall to which the fireplace is adjacent is the simplest. However, such a structure is outwardly unsightly. You can achieve it to look, albeit not luxuriously, neatly through smooth masonry and subsequent finishing. For laying the body of the fireplace, it is better to use a type of solid ceramic brick, such as facing brick. It has a geometry close to ideal and allows you to make the rows of masonry as even as possible.
The ordering diagrams do not take into account the foundation, so we will not talk about it. But it is worth noting that its presence is mandatory for heavy brick structures. So, the 1st row of the classic fireplace masonry is made continuous. It plays the role of thermal insulation to protect the foundation from high temperatures. Its necessity is justified by the low heat resistance of cement mortar, the use of which predominates in the construction of foundations.
Starting from the 2nd row, an ash pan and a ash pit are laid, which are necessary to collect solid combustion products and unburned fuel residues, as well as to create draft that stimulates the combustion process. When laying the 3rd row, an ash pit cover is constructed. This row is made almost continuous, with the exception of the channel through which the ash will fall off and air will flow into the firebox.
The 4th row is similar in shape to the 3rd, but will have a different orientation of the bricks. This technique should be used throughout the entire masonry to increase the strength of the structure. Also, at the stage of laying the 4th row, a grate is installed.
Rows 5 through 7 will be identical except for the orientation of the bricks. They form the firebox of the fireplace. From the 8th to the 13th row, the formation of a fireplace tooth occurs, narrowing the space of the firebox upward.
On the 12th – 13th rows, an overlap of the firebox opening is formed. Cast iron corners can be used as supports; this material is less susceptible to thermal expansion than steel.
When laying the 14th - 15th rows, an opening is created on the back wall of the fireplace for installing the door. It serves to clean the internal walls of the fireplace from settling ash. In this regard, the required distance of the fireplace from the wall of the room should be taken into account.
From the 15th to the 16th row, the internal opening is narrowed on the inside of the front wall of the fireplace. Thus, a smoke collector is formed, which passes into the chimney.
From the 17th to the 20th row, a chimney is formed, the cross-sectional area of which is equal to the area of one brick.
A smoke damper is installed between the 20th and 21st rows to regulate the draft in the fireplace.
For laying the body of the fireplace, it is better to use solid-faced ceramic bricks
Digital symbols for figure “b”:
- Chimney damper
- Grate
- Ash pan
- Cast iron corners
- Chimney cleaning hole
Making calculations
The size of the fireplace directly depends on the size of the room, as well as your personal needs and preferences. The dimensions of the structure are indicated in detail in the diagram. The order of the fireplace indicates how much material is needed for construction. It is important to know how much cladding, standard and refractory bricks you will need and purchase all materials with a small margin.
It is equally important to know how much masonry mortar you will need. It is important to take into account not only the main masonry, but also the construction of an additional foundation. Mostly cement marked M 200 is used as masonry mortar. To obtain the required mass, it is necessary to mix cement and sand together based on a 1/3 ratio. Next, gradually add water until a thick, homogeneous composition is formed, without lumps or dirt. In order to lay one cubic meter of brick, on average 0.2-0.3 cubic meters of composition will be required.
You can calculate the dimensions of the fireplace in more detail using your own order. In order to find out how many bricks are needed, you need to multiply the volume of one unit by the total number of bricks in the scheme.
A professional and well-designed project has not only a frontal, but also a horizontal projection. This allows you to make all the calculations as simply and thoroughly as possible, to see the shape and outline of the fireplace on both sides. If the design of the furnace is more complex, you can separately calculate and draw the arch, shelf and other structural elements. This will allow you to determine the location and location of the smoke collector, ash pan, chimney, and identify the angle of inclination of the walls and niches.
In our online store you can buy a ready-made firebox for a corner, island or wall portal, from domestic and foreign brands.
Let's start from the foundation
The main rule when building a fireplace: the foundation must be made reliable. This means that it is erected separately from the building, otherwise uneven shrinkage will lead to cracks in the fireplace walls. There will be a safety hazard, as the combustion chamber and chimney duct may be damaged.
When the structure is placed next to a load-bearing wall, a layer of sand is poured between the foundations of the house and the fireplace. The upper level of the foundation is compared to the floor.
The digging into the ground is not made too deep. If the soil is mobile, you should make a sand and gravel layer at least 50 cm thick. It will play the role of a compensator during the capillary rise of groundwater. This is a kind of waterproofing of the base and fireplace walls.
M150 concrete is used for pouring. Reinforcement is required. The formwork will be strong if it is made of boards or plywood, fastened with self-tapping screws. According to the parameters, the foundation should be larger than the structure itself, at least 0.1 m on each side. The fireplace drawing usually indicates the required foundation parameters.
On a note. When the foundation is completely poured, you need to wait until the concrete “sets.” This happens within 6-7 days.
It is necessary to lay roofing material on top of the concrete, which will prevent moisture from being “pulled” from the soil. After this, you can make markings and begin laying, strictly adhering to the diagram.
Execution of work
After you have chosen a location for the fireplace, calculated the amount of materials, designed and made a detailed order, you will need to purchase the following materials and tools:
- A reservoir in which the adhesive base will be mixed. It should be large enough, at least 40 liters. For better mixing, it is best to get an electric mixer;
- In order to sift sand, you will need to buy a special sieve;
- Laying is carried out using a trowel;
- To check the evenness of the corners, a building level is required;
- Get a tape measure, a square and a ruler;
- Marks are made using a simple pencil or construction marker.
Additionally, you may need such items as: a hammer, rags, a knife, sandpaper and others.
Before you start work, prepare the room, cover all the furniture and interior items that are in it. To make it easier to connect the tool, take an extension cord.
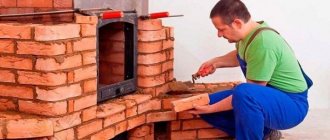
Do-it-yourself installation of a brick fireplace is carried out according to the following stages:
- Any massive structure begins to be erected only after the foundation is built. It can have either a strip or a concrete, block or brick base. If you are going to pour mortar into a pit, formwork is required. In this case, the construction of the furnace occurs only after the foundation is completely dry;
- Next, we begin laying the rows. Each row is pre-laid dry, the evenness and thickness of the seams between the bricks is checked. Periodically, to strengthen the structure, the rows are ligated. All adjustments are made before the adhesion composition dries;
- After the firebox and fireplace portal are erected, we proceed to laying the chimney. the hood is fixed to a horizontal partition. We provide surface insulation. If the pipe is metal, it is best to enclose it in a brick box;
- At the last stage, facing work is carried out, a damper, shelf, grille, and countertop are installed.
The Kuznetsov stove or any other heating device cannot be heated immediately after construction. It is necessary to allow it to shrink and dry well for 10-15 days. After which the furnace gradually begins to operate. Firewood is placed in the firebox exactly halfway, gradually increasing.
From this video you can learn how to make a brick fireplace with your own hands at home or in the country:
Necessary materials
Brick finishing of fireplaces and stoves
To make a small fireplace you will need:
- Brick. When calculating the amount of material, do not forget to take into account 10% waste and waste;
- Coarse sand. Before use, the sand is sieved and washed to remove small debris;
- Clay. To build a quality fireplace you will need a blue type of clay;
- Several buckets of crushed stone;
- Reinforcement 1 m long and 10 mm in diameter in the amount of 10 pieces.
Tip: before starting construction, draw a masonry diagram on paper. Try to strictly adhere to the dimensions of the brick and room in the drawing. Also, do not forget to take into account the layout of the dacha.