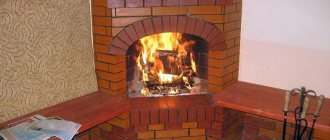
A fireplace is a stone or brick structure in the wall, resembling a niche, which has a chimney to release combustion products into the atmosphere.
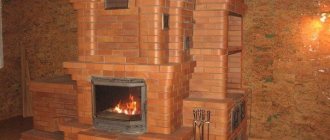
Corner fireplace
It is used as an element of the interior or for the purpose of heating a room (together with the main heat sources).
It is advisable to design and build a fireplace between two internal walls. When building a fireplace in the walls near the window, a draft (active air circulation) is formed, which contributes to the occurrence of drafts in the room.
Features of a corner fireplace
If you are the owner of a house outside the city, it will be nice to sit on a cold evening near a comfortable fireplace. In a small room it is difficult to fold a large structure. It’s easier to make a small corner version; even an inexperienced stove maker can do this work.
Some types are made of brick, others are assembled by combining brickwork and metal parts.
The choice of design depends on the financial capabilities and desires of the homeowner.
A combined fireplace is cheaper than one built from one brick.
Advantages of installing a corner fireplace:
- The main thing is to save money on the purchase of material; less of it is needed than when building an island or wall-mounted fireplace structure.
- The second is the reasonable use of the volume of the room; its compactness makes it possible to place it both in an average country house and in a country house;
- The design has a simple masonry scheme; even a novice stove maker can figure it out. Even uneven masonry will not deteriorate the appearance of the room - the folded structure can be covered with ceramic tiles.
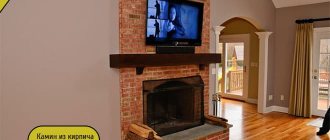
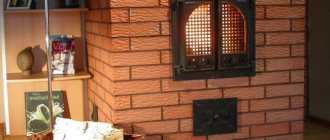
Corner fireplace
A corner fireplace will create coziness in the room and allow you to spend a stormy evening in comfort.
Working on the chimney
The classic channel has the shape of a cap, inside of which there is either a pipe or ceramic blocks. The rear wall of the structure is always vertical and perpendicular to the base. Sloping side elements (45-60 degrees) ensure uniform narrowing of the chimney. The walls of the channel should be quite thick to reduce heat loss.
The minimum pipe height is 5 m. This indicator depends on the height of the house. A smoke valve is attached 2 m above the base of the firebox using liquid cement mortar.
Thermal and thermal insulation of the pipe is of great importance: if the necessary measures are neglected, condensation may begin to accumulate in it or even a fire may occur. A spark catcher and deflector are installed at the outer edge of the pipe.
Design and dimensions of the hearth
These fireplaces are similar in design to wall-mounted products.
The hearth has a firebox, a cone-shaped smoke receiver and a straight chimney. Triangular structures differ only in their triangular cross-section, which complicates the masonry process.
The principle of its operation is no different from the usual one - dry wood burns in an open firebox, and the resulting smoke escapes through the chimney. Some of the heat is reflected into the room by the fireplace tooth (about 20%), and the rest is lost along with the escaping smoke.
If the draft is bad, smoke will penetrate into the room, and too strong a draft will cause large heat losses. For this reason, it is necessary to select the optimal cross-section of the smoke channel, taking into account the size of the combustion niche and the area of the room.
Burning wood sometimes shoots bits of heat through the front opening.
To prevent fire, place a metal sheet on the floor in front of the firebox.
A fireplace located close to wooden walls must be insulated with galvanized metal.
Corner fireplace saves space in the room
Calculations of the required dimensions will be simplified by the table, which shows the cross-section of the chimney and the dimensions of the portal, taking into account the volume and area of the room.
| Room | Portal | Firebox | Smoke channel cross section cm | ||||
| Area, m2 | Volume, m3 | Width cm | Height cm | Depth cm | Neck cm | Back wall width cm | |
| 12 | 42 | 50 | 45 | 30 | 12 | 30 | 14x14 |
| 16 | 50 | 60 | 50 | 32 | 12 | 40 | 14x27 |
| 22 | 60 | 70 | 56 | 35 | 12 | 45 | 14x27 |
| 30 | 80 | 80 | 60 | 38 | 13 | 50 | 27x27 |
| 35 | 100 | 90 | 70 | 42 | 13 | 60 | 27x27 |
| 40 | 120 | 100 | 75 | 45 | 14 | 70 | 27x27 |
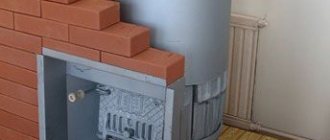
It will not be possible to make a massive brick fireplace in an apartment.
Often in private houses they use a simplified method of laying a brick hearth with a cast-iron firebox built into it.
Positive sides
Illustrators often turn to scenes with wall-mounted fireplaces that touch one wall in the room. In fact, it is much more profitable to install a corner fireplace, since it is more ergonomic and fits into the interior of any room.
So, among the advantages of a corner fireplace, the following are noted:
- Serves as a reliable source of heat. It has superior heating properties to stoves and heaters.
- It occupies a smaller area, although in terms of appearance it is not inferior to the wall one and looks just as massive and solid.
- Suitable for installation both in a residential building and in a country house.
- In one hour of operation, a corner fireplace can heat a room with a volume of up to 120 cubic meters. m from 0 to 20 °C.
- It not only decorates the interior and warms the room, but is also suitable for cooking.
- This type of fireplace is considered safer than a direct wall-mounted one, since the flame inside the unit can be observed from anywhere in the room, and it has a smaller front wall area.
How to build a brick structure
It is advisable to place this structure between 2 walls inside the house.
A stable draft is created in the walls of the fireplace located near the window, thanks to small drafts in the room.
Design like this:
- First, choose the room and corner in which the structure will be located;
- A general sketch is prepared on paper, allowing you to visually assess whether the structure fits the design of the room;
- Taking into account the location of the floors and parts of the rafter system, a working draft drawing is prepared.
Drawing of a corner fireplace
The firebox comes in different shapes, each model uses its own version. When choosing a fireplace design, they first decide what it will be like, since it will not be possible to remake it later. The corner one is made with a firebox made of cast iron or made of fireclay bricks.
Calculation of dimensions
Accurate calculation of the size of the firebox directly affects the efficiency of heating the room.
The calculation is made taking into account the total area of the room. In a simplified calculation, the area of the room is divided by 50 - this value will give the approximate dimensions of the firebox window. For example, in a small room, a fireplace with a firebox with an area of 0.32-0.54 m² will be enough.
Installation of a corner fireplace can be done after designing the house
The fireplace window should be made in a 3:2 ratio, and the width of the hearth should be greater than its height. The depth of the firebox is important - it directly affects the efficiency of the structure; it needs to be 1/2-2/3 of the height of the firebox. With a large firebox, heat transfer decreases - a lot of heat will fly directly into the chimney. If it is not deep enough, smoke will begin to enter the room and soot will appear on the ceiling and walls.
Chimney
For high-quality smoke removal, the characteristics of the chimney are important; they affect the combustion of wood and the draft in the chimney. It is necessary to correctly calculate the height of the pipe and the cross-section of the chimney. According to safety rules, the diameter of the chimney cannot be made less than 15-17 cm, the optimal proportion of the cross-section of the chimney duct is 1/10 of the firebox area.
The length of the chimney must be made at least 5 meters; if the residential building is high, then its length must be increased (the pipe must be higher than the roof of the building).
The chimney is also located in the corner of the room, without occupying the entire wall
Materials and tools
Having calculated and prepared the project, they prepare building materials and tools. First you need to decide whether the structure will be finished, or whether you will fold the fireplace under the jointing. This affects the choice of brick. Work and procurement of materials begin with preparing the foundation for the structure.
Foundation
The fireplace weighs less than a full-fledged stove, and it does not require a large base. If the house is built on a slab foundation, then it is suitable for a corner structure. If there is a strip foundation under the house, then additional work will be required.
It is necessary to prepare a waterproofing material to protect the foundation from moisture - use dense polyethylene or roofing felt.
Next they make the formwork, you will need inch boards. Sometimes steel sheets are used instead of boards for formwork; it is more convenient if you have a complex or semicircular foundation. A reinforcement frame made of metal rods 8-10 mm in diameter is assembled in the formwork. They are tied together with steel wire to form a mesh. To create a cushion under the base and mix the solution, you will need clean sand and medium-fraction crushed stone.
The base of the fireplace must be laid out in any case, regardless of what type of foundation the house has
Fireplace and chimney laying
The construction of the walls and chimney for the fireplace is made from the following materials:
- You will need to buy 2 types of bricks – fireclay and red solid;
- When decorating a fireplace with jointing, buy high-quality ceramic bricks. If there is external finishing, use ordinary ordinary red brick;
- Fireclay bricks can withstand high temperatures well; they are used to build the firebox and the bottom of the chimney.
The amount of brick depends on the order; it differs for each fireplace model.
For a small corner fireplace you need to buy 350-650 bricks. When purchasing material for masonry, they buy 10-12% more - it will be needed if defective specimens are discovered or in case of unexpected damage.
The solution is prepared from clay and sand; with insufficient experience, it is difficult to select clay of the appropriate fat content and mix the solution in the required proportion. Therefore, it is better for beginners in the baking business to use ready-made compositions, which only need to be mixed according to the instructions indicated on the package. These mixtures are sold in specialized stores.
To make a masonry of tools you will need:
- A pickaxe hammer is required to split bricks.
- Trowels of different sizes.
- Large trowel.
- Level.
- Plumb.
- Cord for even laying of rows.
- Mallet for leveling bricks.
- Rule.
- Dishes for preparing the solution.
- Joint for cutting seams.
Required Tools
Preparatory work
The first step is to build the foundation, on which the durability and reliability of the fireplace depends.
The foundation for the fireplace must be separate - the building shrinks to some extent, so the installed heating unit may become deformed. When creating a foundation in a house that is already in use, it is necessary to take into account all roofing elements that may interfere with the future structure or affect the installation process. It is much easier to equip the foundation before building the house - all work will be reduced to the following sequence of operations:
- First you need to dig a pit, the depth of which is equal to or greater than the freezing depth of the soil;
- Next, the formwork is installed, and the bottom of the pit is filled with a mixture of crushed stone and sand;
- The next step is laying the selected waterproofing material;
- The foundation is reinforced with metal rods and filled with mortar to a mark located at a height of two bricks below the floor level;
- The poured foundation must be left until it hardens completely (usually this takes about three weeks).
If the foundation is poured from scratch, then there will be no special problems with it. A completely different matter is creating a foundation in an already built house, which will require dismantling part of the floor in the place where the fireplace will be installed.
The work process looks like this: first you need to mark the base of the fireplace on the floor and make indentations of about 20 cm in each direction. Using a grinder, the floor covering is cut along the marked lines. When this operation is completed, you can begin to extract the bare soil and perform the algorithm described above.
When the base of the fireplace is brought to the floor level, the gap between the stone and the floor covering must be decorated. In addition, after each stage of work, it is advisable to carry out cleaning, and immediately before building a fireplace in the house, the room should be covered with plastic film to minimize the amount of contamination of the floor and furniture.
After creating the foundation, you can begin work to ensure fire safety. If we make a fireplace with our own hands, located near the walls, it is necessary to protect each of them from exposure to high temperatures. Asbestos sheets are usually used for these purposes, but ceramic tiles are also a good option.
The last stage of preparatory work is to bring the purchased bricks into working condition. The bricks used need to be collected, sorted by size, and a small number of bricks that will be used in the near future need to be moistened - this way they will not take moisture from the mortar.
Making a corner fireplace
If it is necessary to make a foundation, then the work is done according to the following scheme:
- First, they dig a hole in the ground 400-500 mm deep, 100-120 mm wider than the fireplace;
- The bottom of the recess is covered with sand, 100-120 mm thick. The sand layer is compacted by pouring water and compacting;
- A layer of crushed stone is poured onto the sand cushion; it is made the same thickness as the sand layer;
- A reinforcement frame is assembled on crushed stone;
- The walls of a wooden house are covered with asbestos sheets;
They install formwork from boards; if the foundation is figured or semicircular, then it is better to fence it with a metal sheet.
Masonry
Before starting laying, choose the best brick for laying the firebox (it’s great if you have fireclay brick).
After that, start laying the first row.
Laying is done as follows:
- From the edge of the base, retreating 5 cm, lay out the first row of bricks on a dry surface;
- Using a wooden plank and a square, level this row and set the angles at 90 degrees;
- Measure the diagonals with a tape measure, the deviation should not be more than 5 mm;
- After leveling, the bricks are placed on the mortar.
The laying of a corner fireplace made of bricks is carried out according to the order in the following sequence
When laying stones on corners and metal sheets of floors, there is no need to use mortar; it is enough to fill the side gaps between the bricks.
Then the rows are laid in the same way - fitting the masonry to dry, laying bricks on the mortar. All rows are checked using a level and plumb line.
There is a simple way to ensure the correctness of the masonry. When the first 2 rows are laid out, the corner points are transferred to the ceiling using a plumb line and nails are driven in in these places. Strings with weights are tied to them, which will serve as markers.
The covering of the firebox and other parts of the fireplace is made from metal corners.
The top row is placed without mortar on the metal. The vaults of the arches are made using wooden templates - circled.
Project of a terrace with a barbecue attached to the house, photo
Terraces are classified according to several criteria: open, closed and semi-closed, attached to the house and free-standing, single- and multi-level. They can be made in different forms, at the main or rear facade, or completely encircling the house.
There are several styles of terraces that require the use of different materials:
modern style - composite materials, stone, iron and PVC;
Photo 1. Terrace attached to the house, made in a modern style. Divided into several zones.
traditional style - stone and wood, most often red or cedar;
Photo 2. Terrace made in a traditional style. The base of the building is made of mahogany, the barbecue oven is made of brick.
- colonial-style terraces are designed like classical architecture;
- beach style - the structure is made of wood painted gray.
Photo 3. Beach-style terrace. Made from wood painted light gray.
Barbecue ovens are made of brick, stone or cast iron. They are usually located near the wall of the house, closer to the kitchen. Each type has its own advantages and disadvantages.
Photo 4. An open veranda attached to the house with a barbecue oven and a dining area.
Photo 5. Possible project of a veranda with a barbecue for a bathhouse, measurements are indicated in centimeters and square meters.
To choose the right one, proceed from the size of the veranda; remember that in addition to the grill, you will have to place furniture: tables, chairs, possibly swings and other decorative elements.
Important! Building a veranda yourself will require a lot of effort, but you can do everything exactly as your soul asks. This will take a lot of time, a large selection of materials will be fraught with uncertainty, and in the absence of construction experience, some stages of construction will be very difficult
There are many different projects on the Internet. As a rule, these are projects of wooden verandas; their width varies (depending on the width of the house) and height: at ground level or raised. Choose according to your taste.
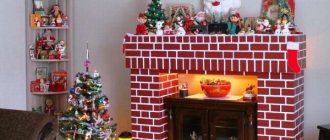
Interesting solutions in interior design
For a beginner, building a fireplace is a difficult job. First, practice on simple structures - make a barbecue, grill or grill in the yard. Try it in practice and feel all the subtleties of creating masonry.
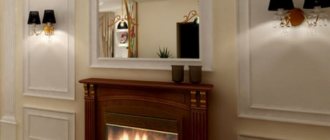
Corner fireplace in the interior of the living room Corner fireplace in the interior
Corner fireplace with insert
It’s a good idea to consult with an experienced stove maker.
Order of masonry
The order, façade and section are shown on separate pages. In order to arrange the corner fireplace, you will need to prepare a sheet of A4 paper in a box and a pencil.
This means using not only whole bricks, but also three-fours and halves. Accordingly, you will need to accept conventional images.
The base row of the fireplace is best made of brick, which will be placed on its edge - it will be more original, although this is not at all necessary. Next, the bricks (starting from the second row) are laid flat. The bottom of the stove firebox is often made 25-30 cm above the floor, which can be more comfortable.
Order of the corner fireplace:
From the sixth to the ninth rows, the laying of the firebox continues. Keep in mind that ceramic and fireclay bricks cannot be tied. Ideally, you should even leave a small gap between them so that the entire masonry is not damaged during operation of the fireplace due to the large temperature difference between the outside and inside of the fireplace.
- The first, second and third rows must be filled with bricks.
- The fourth row will be the hearth of the fireplace.
- In the fifth row, an ash pit is laid out. The support for the grate is formed using three steel strips (they are pressed against the masonry of the sixth row).
- A grate is placed in the sixth row.
- The bottom frame of the portal is placed in the seventh row.
- Rows from eight to thirteen will form the walls of the portal; the masonry is carried out with bandaging of the seams.
- In the eleventh row you need to start, and in the rest - continue to lay out the inclined mirror at the back wall.
- In the fourteenth and fifteenth rows it will be necessary to block the portal, continue laying and laying the mirror.
- In the sixteenth row the mirror laying ends. It is necessary to arrange the corner fireplace of the upper part of the tooth. On the chimney side, you will need to coat the tooth with a clay solution in order to provide protection against burnout.
- Next come the seventeenth to nineteenth rows, in which the façade is laid. The bricks need to be cut as shown in the section, towards the heil.
- The twentieth, twenty-first and twenty-second rows form a chimney 14x27 cm. The damper is installed in the 22nd row.
- The twenty-third row is next. The order shows that the smoke hole will be in the shape of a dovetail.
- In the twenty-fourth and all subsequent rows the chimney laying ends.
Chimney pipe
A fireplace, the firebox of which has already been selected or designed, needs to be correctly calculated and installed such an element as a chimney. It is through it that all harmful and hazardous products of combustion and decay are brought out into the street. In fact, this structural element is the key to your safety!
Before purchasing a chimney pipe, it is important to correctly calculate the size of its cross-section. This parameter is calculated based on the power of the combustion chamber itself, as well as the area of the room in which the installation will be carried out. The higher the power of the unit, the more smoke masses will be released during operation and the larger the cross-section of the chimney should be! An incorrectly selected cross-section can cause gases and smoke that are hazardous to life and health to fall into the room.
From this article you can find out what chimney pipes for stoves and fireplaces can be.
If you plan to assemble a chimney from brick, choose only fire-resistant fireclay material, since the chimney system becomes very hot during operation of the stove.
Design
Sketch
Before starting all work, you need to understand for yourself what kind of fireplace you want. To do this, you need to choose the place where the future structure will be built and, looking at it, draw an approximate appearance of the structure. At this stage, think about brick cabinets on the sides, if necessary, a place for drying firewood or a ash chamber, a form of fireplace insert that can be bought ready-made from metal. It will have fireproof glass doors built into it. In general, try to depict the most accurate sketch of the project. This will make further work much easier. It is not necessary to have the skills of an artist or draftsman for this. This drawing will make it easier for you to create a detailed project plan.
This is how you can roughly depict the appearance of the future fireplace by hand
Ideally, you should start building it at the stage of building a house, for a more convenient opportunity to prepare the foundation for a future structure. But you can do it in an already finished house.
Very important! The foundation of the house and the base of the fireplace should not be combined with each other!
Necessary calculations
There are some requirements for a fireplace to function properly.
One of the possible options for a fireplace design is a drawing
- Good traction in the design is very important. And it can be considered good if there is no smoke in the room, heat does not escape into the chimney and the fire in the firebox can be lit quickly and without problems.
- High heat transfer is another important element. The room should heat up quickly if done correctly.
- A fireplace that is not in use should not remove existing heat from the home.
- When creating it, remember that it will become one of the main prides of your home. Treat its appearance as responsibly as its interior.
Let's take a closer look at what sizes of fireplace elements are most acceptable during its construction.
Firebox (table)
The view of the burning flame and heat transfer will depend on the correct size of the firebox. You can correctly calculate its size using the following formula: total area of the room/50=size of the firebox. The following table shows approximate parameters of the furnace section for small rooms.
| Room area (sq.m.) | Firebox size (cm) | Pipe hole size | ||
| Height | Width | Depth | ||
| 10 | 38.5 (5 rows of masonry) | 53 (2 bricks) | 1 brick | 140 X 140 |
| 15 | 46 (6 rows of masonry) | 66 (2.5 bricks) | 1.5 bricks | 140 X 270 |
| 20 | 53.5 (7 rows of masonry) | 79 (3 bricks) | 1.5 – 1.75 bricks | 140 X 270 |
The aspect ratio of width to height should ideally be 3:2, i.e. the width is a fraction larger. The depth of the firebox should be equal to 2/3 of the height.
Finished metal firebox equipped with a fireproof glass door
All these measurements have been experimentally verified and give the best result of the functioning of the structure. You shouldn’t increase or decrease them, thinking that it will be better!
Chimney
The correct functioning of the fireplace largely depends on the calculation of the size of the chimney. According to all the rules, if this element is round, it should not be less than 15 centimeters in diameter. If it has the shape of a square, then its size should be 1/10 of the size of the firebox. Its height must be at least five meters.
Facing
The external decoration of the fireplace is responsible for its perception, place in the interior of the room, and compliance with the style. The need for such work is dictated by your needs and the quality of the masonry produced. The fact is that, provided that the masonry is neat, in which the seam sizes are the same everywhere and vertical and horizontal levels are maintained, a surface with a natural brick texture looks very original in any interior.
If necessary, various heat-resistant materials are used for finishing. The most popular are ceramic tiles, tiles and decorative stone. These three types of material are presented in many color and texture options.
Necessary materials
In order to build a corner fireplace with your own hands, you will need:
- Fireclay bricks – 100 pieces;
- Red solid brick – 200 pieces;
- Clay mixture for masonry or fatty red clay - 2-3 bags;
- Sifted coarse-grained river sand – 3 bags;
- Cement M400 – 50 kg;
- Metal corner with equal shelves 75x75 mm - 2 pieces of 750 mm each;
- Sandwich pipe for the chimney - along the length of the chimney.
In addition, if the fireplace is installed on a separate foundation, concrete, reinforcing bars and formwork boards will be needed, as well as sand for the sand bed.
First option: step-by-step instructions
The construction method of this structure was designed by V. Bykov. It has already proven its effectiveness more than a dozen, and maybe more than one hundred times. Ideal for small spaces.
Order diagram according to the project of V. Bykov
Among the additional materials for constructing a structure using this method, you will need a grate measuring 25x25 centimeters for the combustion part and strips of metal five millimeters thick measuring 30x50 for the ceiling in the niches.
- Mark the first row of masonry on the foundation very carefully to set the correct direction for the entire building.
- Place the first row of masonry on the markings, observing all the rules and dimensions of your diagrams and orders.
- Lay rows 2 and 3 according to the order.
- The base of the combustion part begins on the 4th row. Make the center of this row with fireclay bricks.
- 5th row - create an ash pan or blower hole. To do this, secure the metal strips well to the bricks around the chamber.
- The 6th row provides for the installation of a grate and is laid out with fireclay bricks according to the order scheme.
- 7th row - start decorating the firebox and the sides of the portal.
- 8-12 rows strictly according to the scheme, build the walls of the portal.
- 13th row - installation of metal strips or corners measuring 600x50x5 mm. Laying strictly according to the scheme.
- On the 14th and 15th rows a “mirror” is laid out, which retains heat and directs it into the room. Build the wall at an angle of 20°C.
- 16th row - build a flat area for the “tooth”. Cover it with a mixture of sand and clay.
- Rows 17, 18 and 19 will become the front wall of the fireplace. They need to be laid out in a shape that goes around the “tooth”.
- Rows 20–22 - a “hailo” (part of the chimney) measuring 14x27 centimeters is laid out. Install a smoke damper on top of the clay solution.
- A smoke hole of an unusual shape is formed above the valve (row 23).
- Rows 24 and 25 provide for the construction of a chimney with an internal channel size of 14x27 centimeters.
- The last stage is the installation of a metal pipe covered with an iron casing.
Interesting facts from the master
- The history of the fireplace dates back to Ancient Rome.
- This attribute was “moved” to the wall in the 15-16th century, at the same time it began to be decorated.
- The fireplace has always been considered a symbol of family and home.
- The first place when building a new house was given to the location of the fireplace.
- The Irish still treat Clurikon, the little fireplace spirit, with tenderness.
- In the 18th century, fireplaces began to be used in noble estates in Russia, but mainly for the purpose of ambience. Until today, we consider it a status item.