Home » Building a house » Headings » Heating
Alexander Korovaev 03/29/2020
6046 Views 1 comment
Reusing engine oil can save you a lot of money. To do this, it’s enough to do it yourself or buy a ready-made stove for testing. Such structures are used mainly in utility rooms that do not require constant heating.
Operating principle
If you just take the waste and set it on fire, it will immediately begin to smoke. Therefore, the fuel must be heated to a certain temperature at which it begins to evaporate. That is, only the volatile substances released from the oil should burn.
To do this, the design of the exhaust furnace (see video below) must include not one, but two chambers. Fuel will be poured into the first, lower one, through a small hole. To ignite, a set of rags or paper is thrown into the same hole.
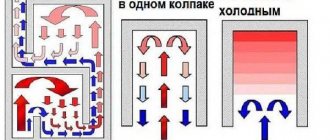
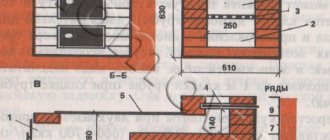
Drawing of a simple furnace
After the fuel boils (not combustion, but only boiling), the resulting volatile substances enter through the pipe into the second chamber. At the same time, when passing through it, the gases will be saturated with oxygen, which promotes combustion. For these purposes, perforation is provided in the pipe. The gases begin to ignite already in the pipe, and burn out in the second chamber. Moreover, the supply should be carried out in small doses.
To keep hot air in the pipe longer and not fly away into the chimney, a partition is made in the upper chamber. To ensure air supply in the first chamber, it is necessary to make a damper. After the oil boils, turn it off. The damper can be installed on the fuel filling hole.
Such stoves require a chimney of considerable length - from 4 m. In the heated room, reliable ventilation will also need to be provided to remove combustion waste.
Thanks to this design, smoke and soot are not generated when the waste is burned. If the calculations are carried out correctly, only a bluish-white flame appears during the combustion of gases. Fuel consumption in such structures is about 1-2 l/hour.
Exhaust furnaces require frequent cleaning. Therefore, it should be made collapsible, and the container for filling fuel in the lower chamber should be retractable.
Algorithm for the operation of a homemade stove
By their structure, oil stoves can be classified as pyrolysis. Petroleum products, nitrogen-carbon chains begin to disintegrate into elementary compounds. After this, further cooling occurs and decomposition into harmless elements - water and nitrogen gas. That is, in a small room, a potbelly stove using waste oil with your own hands does not harm your health. There is no need to install an additional purification filter.
If you make the calculations correctly and draw up a basic drawing, then the combustion products will completely disappear and you won’t even have to clean them.
In total, the design includes three main parts:
- The chamber in which combustion of the fuel mass occurs;
- Pyrolysis gas combustion element;
- Part of afterburning and cooling.
The lower part of the tank is a container with a flat bottom. This is where the oil is poured and boils when it reaches operating temperature. The evaporation process begins. Fuel does not enter the second chamber due to the turbulent process. That is, the simple design is self-regulating and does not require adjustment. In addition, the working Coriolis force creates a vortex flow.
To maintain the combustion process, an oil stove requires a constant supply of oxygen. Air enters through the installed damper. Depending on its location, the combustion strength and the intensity of fuel breakdown are regulated. If you close it completely, the equipment will begin to fade out.
After swirling into a vortex, the gases begin to move through the second chamber. The specificity of the process is that they are constantly moving and must mix with oxygen. To do this, many holes are drilled in the tube. It must be done on an ongoing basis. Due to the high speed of gas movement, it does not penetrate outside.
At the combustion site there is a sharp increase in temperature - almost up to a thousand degrees. It is important that in this case harmful oxides are formed that threaten health, so the oven must be cleaned periodically during do-it-yourself mining.
The last camera plays two roles at once. First of all, it is intended for final combustion of gas. In addition, it regulates the temperature jump. It is this that causes the breakdown of harmful oxidizing substances into harmless nitrogen, water vapor and soot. To be sure of safety, it is better to use proven drawings, diagrams and instructions.
What is mining
Waste oil is petroleum products obtained as a result of the operation of internal combustion engines. With constant heating and mixing with air, it begins to gradually change its properties and eventually becomes unusable.
Such a liquid contains a large amount of soot impurities, oxidation products, resins and salts. It needs to be drained so that the motor continues to function properly.
Draining oil into the soil is not recommended. There will be acute contamination of the soil with a whole galaxy of harmful substances. Therefore, it is convenient to use it to create a waste oil stove.
Flaws
Many people install a furnace for working with their own hands in garages. Low fuel consumption, safety and lightness are attractive. But you don’t need to assemble a unit for yourself until you know the shortcomings.
- Open flame. In fact, high temperatures within four walls are very dangerous. If you do not want to get a sudden fire, it is advisable to remove all petroleum products or collect them in a separate corner. In addition, organic solvents and alcohol-containing liquids should be kept away.
- Metal body. Since the flame is in direct contact with the metal body, it heats up. And temperatures around 900 degrees Celsius can cause inconvenience, in the form of 3rd degree burns. Since the second chamber is demanding on air, it is not possible to line it with asbestos or mineral wool.
- Difficult to control. Even when the damper is completely closed, air will still flow into the system for some time. Therefore, you will have to expect the fuel to burn out, albeit slowly.
- Requirements for safety precautions. If you are used to powder fire extinguishers, you will have to change it. The powder immediately explodes as soon as it comes into contact with hot metal. In case of fire, only use a carbon dioxide fire extinguisher.
How to avoid shortcomings
The most dangerous part of the entire structure is the tank, which can lead to an explosion. The safest way to solve deficiencies is considered to be the complete elimination of this part. Now in industrial production there are special models of boilers that run on fuel oil. When assembling a furnace for mining, you can use burners designed to work with pyrolysis gases. Some models combine a chamber and afterburning at once.
You can make a simple burner from a metal bowl. Steel with a high melting point is best. A dropper is connected to it, through which oil flows. When hit, it immediately boils.
Despite the low safety and good results, they do not burn the waste to the end. Here, use an additional pipe to mix the pyrolysis with oxygen.
Always follow the drawings. Having little idea about the design of heating devices, take drawings from the Internet. Experienced designers have already drawn up many diagrams for assembly.
Chimney installation
Stove chimney
For such structures, stable, powerful traction is very important. Otherwise, the fuel will begin to fade and smoke. Therefore, the chimney is made with a length of 4 m. An increase in draft helps remove combustion products from the room, which reduces the likelihood of poisoning from them.
The diameter of the pipe should be sufficient - on average about 100 mm. Soot in such structures collects much faster than in conventional furnaces, so bends, as well as tilts, are unacceptable - the pipe should be installed strictly vertically. Therefore, when choosing a place to install a potbelly stove, you should first find a convenient hole for the chimney.
The part of the pipe leading outside should be insulated. Otherwise, the oven will have to be cleaned more often - condensation, mixing with soot, will settle on the walls. The chimney in such devices is made collapsible so that it can be easily removed and carbon deposits removed.
Step-by-step technology for making a stove with your own hands
They start with choosing the material. Preference is given to metal that is not rusty, but is in good condition, without defects, holes or cracks. The algorithm for further actions is as follows:
- Cut out blanks for the furnace tanks. They are similar, only they differ in the lids. The bottom is solid, with a pipe coming out of the top end. In the other, accordingly, the afterburner is welded at the bottom in the center, and at the top is the chimney outlet (offset from the center).
- Select a piece of pipe for the afterburner. Holes are drilled in the walls for air intake.
- The tanks are being collected. The bottom has a solid bottom, it is important not to confuse this. An afterburner pipe is welded into the upper tank at the bottom, and a pipe for the stove chimney at the top. A damper is provided at the bottom, as in a regular potbelly stove (can be done later).
- The seams are checked for quality, the slag is removed and cleaned. The cooled furnace is ready for testing.
Types of furnaces for mining
Types of furnaces in production
There are quite a few drawings of furnaces undergoing testing. Let's talk only about the most popular of them:
- the simplest design consists of two chambers of equal size connected by a perforated pipe; for heating small rooms, a stove measuring 70x40x30 cm is sufficient; the size of the tanks should be 30x10 cm
- supercharged : a small fan installed separately and connected to the stove by an air duct; more often it is installed in place of the blower in the area where the lower tank is located; such a device allows you to increase the combustion temperature and the absence of smoke
- drip type : the lower tank for filling fuel is transferred in such furnaces to a separate chamber installed above the afterburning chamber; such furnaces are considered more stable and safe
- with an additional flue gas afterburner : to increase efficiency, the second chamber is rotated
- with an expansion tank for loading fuel and a valve for adjusting its supply
The disadvantage of such structures is uneven heating of the room. A more advanced version of modern furnaces is a waste furnace with a water circuit - a system in which heated water is mixed through pipes to a radiator. After heat is transferred, it returns to the boiler through the return water pipe.
A type of such stoves is a device with a water jacket - a pipe that goes around the stove, or a water container that surrounds the device on all sides. In this case, the liquid will heat up much faster.
Installing and testing the device
The stove is installed in a fire-safe place, not on a wooden (linoleum) floor. It is advisable to provide a container with sand in the garage in case of fire. Drafts and installation in cramped conditions (under hanging shelves, racks) are excluded. Pour oil into the lower tank. It is advisable to clean it before use and let it sit.
A chimney must be installed, otherwise the stove cannot be used in the garage. Water impurities are not allowed in the oil. First, pour in a small portion, a couple of liters. Then, using a paper wick, set fire to the oil in the tank. By opening or closing the damper, stable traction is achieved. After 2-3 minutes, the stove returns to operating mode and the oil begins to boil. The unit is ready for use.
Making a simple potbelly stove during mining
Potbelly stoves at work
In order for the furnace to last longer during testing, it is better to use thick-walled metal for its manufacture - 6 mm thick for the upper chamber, which heats up more strongly, and 4 mm sheets for the remaining parts. If you don’t have sheets of the appropriate size on hand, you can use old gas cylinders or barrels to assemble the stove.
- The dimensions of the product are arbitrary. For example, a stove measuring 75x35x50 cm will be able to heat a room up to 120-130 cubic meters. m
- The volume of both chambers must be equal. There is no need to make them too large, otherwise the hot gas will immediately cool down. 10-30 l is enough
- The standard width of the chambers is 30-40 cm. The height should be small - 10-15 cm
- The pipe connecting the chambers is made perforated. The distance between the holes is 7-10 cm. Their diameter should be 10-16 mm. Pipe length depending on the volume of the chambers 35-65 cm
- The number of holes directly depends on the length of the pipe. Their area should be equal to 10% of the total surface. The ratio of its length to diameter is 4:1
- To prevent the metal from deforming when overheated, it is better to connect the chambers together with a thick rod to reduce the load on the pipe
- The oven also includes a damper to regulate the air supply. When igniting it, open it completely, and after boiling the oil, turn it off. Most often, such a valve is combined with an oil filling hole.
- To ensure sufficient airflow, the stove is installed on legs. Floors in utility rooms are rarely too level, so it is better to make the legs adjustable. They can be replaced with bricks held together with mortar.
- To avoid fire hazards, there should be no distortions - the stove is installed strictly horizontally, checking its location with the building level
- Due to the small weight of the product (it is about 30 kg), there is a high probability of tipping over. Therefore, it is better to screw the legs to the floor
If the oven begins to smoke, try adjusting the air supply position. If this does not help, there may be a serious mistake in the design of the furnace.
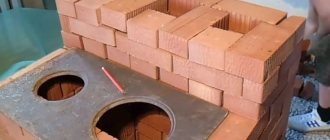
How to weld a simple stove
There is no point in explaining how to make the standard and most common design, shown below in the assembly drawing. Firstly, the diagram is very clear, and secondly, there is no shortage of information of this kind.
Let's move on to a more complex version of the heater with an afterburner bent at 90° (the angle of rotation can be made larger, but not sharper). The purpose of the event is simple - to organize the extraction of heat from hot flue gases, and not immediately throw them out into the street. The second difference is a drawer with oil instead of a traditional closed container, which is inconvenient to clean. The design of the furnace with dimensions is shown in the drawing.
The dimensions of the unit are arbitrary and may change when selecting pipes of a different section
Advice. Select the sizes of pipes for the firebox and body depending on the volume of the heated room. For a regular garage 6 x 3 m, a profile pipe of 80 x 80 x 4 mm is suitable; for a fuel box, take a size of 60 x 60 x 4 mm. Round rolled metal will also work, but it is more difficult to work with.
Step-by-step instructions for assembling a furnace for burning waste look like this:
- Cut blanks for the body, drawer and afterburner. For the latter, the pipes must be cut at an angle of 45°.
- In a profile with a smaller cross-section, cut out one wall with a grinder, and weld plugs on the sides to create an open container. Attach a handle to the front part protruding over the sides of the box.
- Weld the structure as shown in the drawing, drill an air hole on top of the fuel chamber and perforate your bent pipe. The heater is ready.
Here the master attached convection fins from a 40 mm steel strip for better heat transfer.
A few words about how to select the number and diameter of the afterburner holes. In our example, its cross-section is 80 x 80 = 6400 mm²; for the calculation you need to take half - 3200 mm². If you use an 8 mm drill, the area of each hole will be 50 mm². Divide 3200 by 50 and we get 64 pieces that need to be drilled during the assembly process; when setting up, their number will increase.
Important point. Before starting the heating unit, make sure that the total height of the chimney (calculated from the oil chamber to the pipe cut on the street) is at least 5 m, otherwise increase it to the required level.
One of the simplest ways to extract heat is to connect the stove to a horizontal pipe 3-4 m long, running at a slope along the wall of the room. Make sure that there are no wooden shelves or fuel cans placed above it and the heater. It is better to fence the walls near the stove with sheet iron.
Now all that remains is to ignite, warm up and configure the oven. Your task is to achieve minimal emissions of black smoke into the street, indicating a lack of air for combustion. It is necessary to drill 3-5 additional holes in the afterburner and check the operation of the unit again until the emission becomes as transparent as possible.
Advice. Do not overdo it and do not do a lot of drilling, which will cause the potbelly stove to smoke into the room. The video describes production, setup and maintenance in great detail:
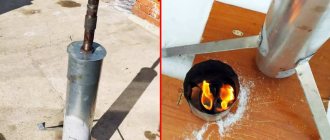
Potbelly stove from a cylinder
Potbelly stove from a cylinder
A waste stove, made from an old 50-liter cylinder, is capable of producing 11-12 kW at most, so it is suitable for heating small rooms. It is better to take not oxygen, but Soviet-style propane cylinders with a wall thickness of 5 mm. Oxygen ones, firstly, are too massive, and secondly, they have thick walls, which will make heating the furnace difficult.
- To cut metal, you must first unscrew the valve and fill the bottle with water.
- It will need to be cut into 2 parts - the bottom 1/3 will be used as an oil reservoir, and the top 2/3 will be used for the afterburner
- Using a grinder, first cut off the upper part, then prepare the holes for the chimney and afterburner. A hole will also need to be made in the lower part for the inspection hatch. It is then bolted on
- We make an afterburner from a thick-walled pipe by making holes in it
- The bowl for the drip furnace can be made from a car brake disc. It is mounted on the bottom of the firebox, slightly raised above the surface by 3-5 cm
- We put on the cylinder cap. We insert the oil line so that it is located exactly above the bowl
- We hang the expansion tank. We connect the chimney. Checking the operation of the oven
When making a furnace using an oxygen cylinder, it will need to be rinsed thoroughly, otherwise the container may explode during cutting.
Greenhouse heating methods
There are greenhouses that are made of polycarbonate (see Greenhouses made of polycarbonate). Such structures may not require a separate heating system, since they are heated by a natural source - the sun. But if they are used in winter or early spring, then care must be taken to ensure the structure is warm. There are several methods that are widely used for heating a greenhouse:
- Greenhouse heating by working out.
- Use of electric heaters.
- Application of subsoil heating.
- Heating the greenhouse with sawdust.
All of these heating systems for a greenhouse can be built with your own hands, only you must first obtain highly qualified advice from a specialist. But this is the case if electric heating is used.
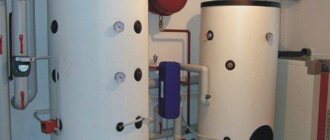
Oven with expansion tank
Oven with expansion tank
As we have already found out, adding oil while the stove is operating is prohibited. There is also no point in increasing the volume of the tank - it is unlikely that it will be able to warm up properly. Thus, continuous refueling can be ensured in only one way - by attaching an expansion tank.
The operation of such a device is based on the simplest principle of communicating vessels. As soon as the oil level drops, a new dose of fuel begins to flow into the chamber from the tank. To regulate its supply, a special valve is provided in the pipeline.
What is mining and how to use it
Essentially, it is used motor oil, lubricating the engine and chassis. During the operation of equipment, oil, an initially fairly pure petroleum product, becomes saturated with slag - metal particles (the result of friction and mechanical damage to parts), soot, salts, and resinous compounds. As a result of such saturation, the oil is no longer suitable for lubrication, but it burns well - which allows the product to be used as fuel.
The composition of the waste burns approximately 85%, and during the combustion process it produces about 11 kW/hour of thermal energy per liter. Thus, the product’s fuel qualities are comparable to diesel fuel.
Important: if the oil is heavily clogged with solids, it is advisable to filter it before use.
At the same time, an oil furnace using filtered exhaust will work longer and better; it will have to be cleaned less often to remove carbon deposits.
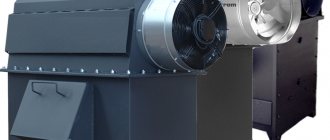
Supercharged furnace design
Supercharged furnace design drawing
Such a unit is considered safer - after all, the combustion zone in it is completely closed. The supercharging method helps reduce fuel consumption - it will no longer be needed two, but one and a half liters per hour. Plus, the power in such a furnace can be easily adjusted. The device is also less demanding on the height of the chimney. And you won’t have to clean it so often.
You can use an old VAZ 2108 from the furnace as a fan. The Chinese equivalent will also work. You can adjust the fan speed using an inexpensive PWM controller.
Perhaps the only drawback of a supercharged mining furnace is severe burning of the metal in the place where the flame jet is deflected. But for a collapsible structure this is not so important - a burnt sheet of metal can be easily replaced.
Example of calculating furnace dimensions
As mentioned above, fuel consumption is about 1...2 liters per hour. At the same time, the radiated heat is about 11 kW/hour per liter. Thus, the furnace can produce 11...22 kW per hour. To calculate the required volume of the firebox taking into account the burning time, we accept:
- volume of the room (garage) – 7x4x2.5=70 cubic meters, area 28 sq.m.;
- We believe that for every square meter of a garage-type room, at least 500 W are required (basic 100 W, we enter coefficients for all external walls, non-insulated roof and foundation, large entrance opening, metal structure);
- Accordingly, an area of 28 squares requires 14 kW of energy per hour.
By slightly increasing the minimum power of the stove (increasing the draft), we will obtain the required temperature in the room. But fuel consumption will increase to approximately 1.5...1.6 liters per hour. Therefore, for a burning time of at least 6 hours, the volume of the firebox should be 10 liters. This corresponds to 0.001 cubic meters, that is, the container should have a size, for example, 10x10x10 cm. In reality, the volume of the firebox exceeds the required volume of fuel by 1.5...2 times, that is, the dimensions should be 20x10x10 cm or more, this is suitable for a mini stove. Usually they take it with a substantial reserve, that is, 50x30x15 cm. This allows you not to add fuel every time you ignite.
Important: with large firebox sizes, it becomes necessary to extinguish the fire in the furnace during exhaust before the fuel burns out completely. The extinguishing process is shown in the video.
The length of the pipe is 40 cm, respectively, its diameter is 10 cm. The area of the lateral surface of the cylinder is equal to its height multiplied by the circumference of the base (diameter multiplied by the number π), in our case 40x3.14x10 = 1256 cm2. Accordingly, the area of all holes is one tenth of the total - 125.6 cm2. Considering that the area of one hole with a diameter of 10 mm is equal to πx0.52=3.14x0.25=0.78 sq.cm, such a pipe will require 125.6/0.78=160 holes.
Note! The accepted value is the area of the holes 10% of the total area of the side surface of the pipe - conditionally! The number of holes during manufacturing is taken, among other things, from the strength of the product and is usually noticeably less!
Considering that the unfolded cylinder is a 31x40 cm rectangle, and the holes should be placed in a checkerboard pattern, we will have to make 12 vertical rows of 13 or 14 holes each. Marking vertical rows is simple - divide the upper or lower circumference of the base of the pipe into 12 parts in any geometric way and draw vertical drilling lines.
The distance between the rows will be 3.3 cm. Marking the vertical rows is a little more difficult, since in every second row it is necessary to shift the upper (or lower) marking point by half the distance between the holes. Considering that we need to make holes not on the edge of the pipe, we add 1 to the planned number of holes and calculate the step: for 13 holes it will be 40/(13+1)=2.85 cm, for 14 – 40/(14+1) =2.6 cm.
Important: when drilling, the axis of the drill must be directed towards the axis of the pipe!
Furnace with afterburner
Furnace with afterburner
To prevent precious heat from quickly escaping into the chimney, you can organize its additional collection. To do this, the second chamber is bent at an angle of 90° or a little more (but it should not be sharp).
The principle of assembling such a device is usual. The only difference is that you will need two pipes. To connect them at an angle of 90° when cutting workpieces, they should be sawn at an angle of 45°.
If black smoke comes out of the chimney when the stove is ignited, this means that there is not enough oxygen to burn the fuel. This problem can be eliminated by making 3-5 additional holes in the afterburner.
Top drip fuel supply device
Oven with plasma bowl
An oil furnace with a fuel chamber located below is much simpler in design. In this case, the ratio of the sizes of the upper and lower chambers is also unimportant. However, the efficiency of such devices is low.
It can be increased by installing an upper fuel supply. Such furnaces for mining are called drip furnaces . Fuel supplied through a small stainless steel tube with a diameter of 8-10 mm enters the heated bowl and, when completely burned, releases much more heat. This can be determined by the color of the flame - in them it is not yellow, but white-blue. Drip furnaces also have another name – furnaces with a plasma bowl. To increase traction, it is better to provide the unit with a supercharger - a fan connected to the air duct.
There is a fundamental difference in the design of such drip-type mining furnaces - the perforated pipe in them is located inside the body. For this reason, the devices are considered more secure. The plasma bowl can be made from a piece of pipe or a thick-walled steel container. You should not make the tray too high - when cleaning the oven, the bowl should be easily removed.
Some craftsmen, without bothering, make the fuel supply single-stage. But such devices are very dangerous - the supply tube, located close to the stove, gets very hot. Plus, the fuel supply will be unstable - heated oil will liquefy and drip faster. And accidentally opening the valve all the way can cause a fire.
More advanced is two-stage supply , which provides a safety float valve. The capillator in such devices must be dosing.
Drip feed in oven
Drip furnaces also have the ability to more precisely regulate the air supply. To do this, the number of holes in the pipe and the diameter are gradually reduced in height. In the bottom row they can be replaced with vertical slits. In this case, oxygen will flow into the combustion chamber in precise portions in accordance with the needs of the burning gases.
To make a lightweight stove more stable, it can be welded to a frame made from a metal angle.
Disadvantages of the furnace during mining
Furnaces under development
Of course, such designs have a significant advantage - low cost of fuel. But there are also many disadvantages:
- To ensure uninterrupted combustion of the furnace, constant and sufficiently strong draft is required
- high fire hazard (we will discuss the rules for operating the furnace during mining below)
- frequent cleaning of soot: if you make the body one-piece, after a couple of months you simply will not be able to use the stove - it will begin to smoke mercilessly
- high fuel consumption - you will need at least 2 l/hour
- The heat transfer of devices is not that great; most of the energy, unfortunately, flies into the chimney
Most of these shortcomings can be smoothed out by improving the design - installing a fan to increase the combustion temperature, an expansion tank, etc. But due to these shortcomings, stoves are used mainly for temporary heating of utility rooms.
Even if you make a stove according to proven drawings, in any case you will have to bring it to perfection yourself: adjust the draft force, fan rotation speed and fuel dosing. It’s also not worth making all the holes in the afterburning pipe right away - do the first two bottom ones first, and drill the rest after full setup.
What you need to know when using POM
- Before turning on, check the draft; this can be done with a lit match. If the flame of a match brought to the injector draws inward, then there is a draft, everything is fine. If the flame pushes out or does not react at all, then the stove cannot be lit.
- There is no need to shake the oil before refueling - perhaps there is water in the composition, and after settling, it will sink to the bottom. Water entering the tank will cause oil to spray through the nozzles.
- The fuel tank cannot be filled to capacity; the best level is ¾ tank.
- The fire hazard is quite high - after all, it is an open fire. Therefore, carefully select the room for installation, and keep sand and a working fire extinguisher nearby.
Ignition
Filling oil
Before putting the stove into operation, you should check the integrity of all seams, the absence of blockages, and the cleanliness of the blower. To avoid a fire hazard, there should be no water residues on the walls of the chambers and pipes - when mixed with oil, fuel may splash out.
You need to get used to lighting a potbelly stove during testing. After filling the oil, you should not immediately throw a burning splinter or rag into the filling hole. It is necessary to wait some time so that the vapors are well saturated with oxygen.
The drip furnace starts up more smoothly. After opening the fuel supply valve, the torch with a rag wrapped around it or a piece of foam rubber attached should be ignited only when a small puddle has accumulated in the bowl. We emphasize once again that first it is not the oil that is set on fire, but the torch. You can simply throw a piece of toilet paper into the bowl. You can do this without fear - the paper will burn almost without a residue.
After 5 minutes, the oil will heat up, boil, and you will no longer need to maintain the combustion. All that remains is to adjust the air supply and fuel consumption.
To paint the stove, you can use a mixture of aluminum powder (200 g), silicate-based glue (0.5 l) and a small amount of chalk (20 g).
Advantages and disadvantages
Pros of stoves:
- A substance is used that would otherwise be discarded.
- There are almost no toxic emissions into the air.
- Relatively simple oven design.
- Greater efficiency.
- Low cost of installing the stove and the fuel itself.
- The stove is safe to use, since the combustion area is reliably covered by an iron casing.
- Low fuel consumption: a stove with a water circuit will burn up to 1.5 liters. of fuel per hour to heat 100 square meters of area.
- The fuel supply and oven power can be adjusted.
- Easy to clean.
- Up to 10% of polluting substances in the waste composition is acceptable.
Disadvantages of the stove:
- If conditions are violated, fuel combustion is not complete. And the vapors enter the room.
- To ensure proper draft, the straightness and high height of the chimney is important - at least 5 m.
- Mandatory daily cleaning of the pipe and bowl.
- Before feeding fuel into an oil furnace, the bowl must be heated.
- You need to independently design water heating options - as an option, you can install a water circuit on the chimney.
- The difficulty of building a stove for a beginner.
- The flame constantly hits one area of the stove body, and therefore it burns out pretty quickly, unless it is made of stainless steel or thick metal.
Operating rules
Furnace in production
Mining furnaces are devices with an increased fire hazard, therefore, when installing and operating them, the following rules must be observed:
- The potbelly stove should not be located in a draft
- In a furnace clogged with soot, the likelihood of boiling oil splashing is very high. Therefore, such structures require regular cleaning.
- Filling the chamber with oil completely to avoid splashing it out when heating is strictly prohibited - it is filled only 2/3, or even better, half of the tank, so that there is enough space for the formation of vapors
- Adding fuel while the stove is operating is also prohibited.
- Do not use oils containing other substances, as well as gasoline or diesel fuel. There may be an explosion
- The distance between the stove and the wall is at least 0.5 m
- It can only be installed on a metal sheet or concrete floor
- If the walls of the room are upholstered with flammable material, they must be additionally sheathed with sheet metal in the area where the stove is located. This will also help redirect the flow of warm air into the room and increase the efficiency of the device
- Do not store any flammable objects or substances in the stoker.
The author of the following video has studied the entire process of manufacturing such structures in detail and is happy to share his own developments with his subscribers.
A detailed video on the manufacture of a furnace during mining can be viewed at the link:
Factory options
Furnaces operating on waste oil are not only made by handicraft methods, they are also produced by industry. Moreover, there are both imported and Russian. But their type of construction is different.
European or American waste boilers belong to the category of liquid fuel furnaces. They use the supercharging principle: oil is sprayed into small droplets and connected to the air flow. And the fuel-air mixture is ignited. Imported factory stoves use the same principle, only a special burner is installed in which the fuel is heated before spraying.
To appreciate the difference in technology and structure, watch the following video. The device is completely different.
Most Russian-made furnaces use the first principle - there is a hot (plasma) bowl in which liquid fuel turns into gaseous fuel, mixes with air and is burned. The following units are built according to this principle:
- Gecko. Produced in Vladivostok. They make units with a capacity of 15, 30, 50 and 100 kW/hour. These are hot water boilers that are built into a water heating system. Prices from 70,000 rubles for a 15 kW boiler.
Russian-made Gekkon boilers undergoing testing - Typhoon. Produces them. These are heat generators: they heat the air. There are two options - Typhoon TM 15 and TGM 300, they produce 20-30 kW/hour (price: 45,000 rubles and 65,000 rubles, respectively).
- Herringbone-Turbo, available at 15 kW, available at 30 kW. These installations heat the air, but it is possible to make a water jacket.
- Teplamos furnaces with power from 5 kW/hour to 50 kW/hour. They belong to the category of heat guns (they heat the air). They begin work by electrically heating the plasma bowl; upon reaching the desired temperature, the fuel supply begins and the forced air supply to the combustion zone is turned on. The price of these installations is from 30,000 rubles for a unit with a capacity of 5-15 kW.