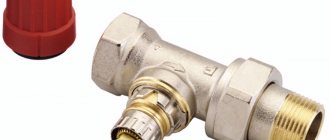
Threaded bracket.
A bracket for radiators is a specific fastening element that allows you to fix the heating element in the right place and in the right position. In this case, the position of the radiator should not change over time and under the influence of increased operating loads. Today you can find both specialized fasteners, for example, a bracket for a cast iron radiator, and a unified device.
The latter, according to manufacturers, allows you to correctly and firmly fix any type of heating device. In practice, experts still recommend buying devices that take into account the characteristics of each specific battery model and their construction material.
Choosing a bracket for a cast iron radiator
Adjustable floor bracket K 11.3.
The bracket for a cast iron radiator must be of increased strength and size. The design of the fastening element is influenced by the parameters of the heating element itself. Cast iron batteries (Konner and STI Nova) are heavy and massive among all types of radiators.
To fix cast iron heating devices, the following types of clamps are used:
- cast, cast iron;
- steel pins 300 mm long with dowel;
- steel with stripes;
- steel with the ability to adjust the horizontal position and distance from the wall.
The choice of fastener is also influenced by the structural material of the wall. So, for a brick and concrete wall, a pin fastening is suitable. Devices with up to 10 sections are mounted on the wall using two brackets at the top and one at the bottom. A heating device with more than 10 sections in size requires additional support using floor clamps and stands. For installation on soft wall materials (plasterboard and wood), only floor fasteners are suitable. It can have a height adjuster or be produced without it.
The bracket for a cast iron battery must be reinforced. This is evidenced by the corresponding inscription on the packaging with the mount - “reinforced”.
Fasteners for cast iron batteries
Since these are the heaviest heating devices, the holders for them are the most massive: they must hold considerable weight for years. These can be individual or curved pins attached to a bar. In any case, when making mounts for cast iron batteries, thicker metal is used. In price lists it usually comes with the addition of “reinforced”. Can be painted (standard color is white) or not. Some manufacturers paint it in the desired color upon request (when ordering a radiator, specify the type of fastener and its color).
The mount for a cast iron battery is made reinforced: made of thicker metal
When purchasing, you will need to take into account the dimensions: fastenings for sections of different depths are made specially, since it is necessary to ensure a distance to the wall of at least 3-5 cm.
Fixing bimetallic radiators
Floor plastic bracket for bimetallic batteries.
Brackets for bimetallic radiators are selected based on the dimensions of the equipment, the number of sections, installation options and features of the structural material of the walls. Compared to cast iron batteries, bimetallic counterparts weigh much less. This type can be mounted directly on a wall (brick or concrete) using universal brackets with dowels. For a plasterboard base, a floor option with adjustable and non-adjustable height (center distance 200, 350, 500) is more suitable.
If the room has a panoramic window and bimetallic radiators (Rifar, Sira, Global) are selected to heat the room, then they can be fixed in the desired position using either floor fasteners or a steel corner product. Brackets for bimetallic radiators must be made of steel.
Basic requirements for room insulation
Few people think about why heating radiators are most often installed under windows, and people would be even more surprised to learn that a deviation of 2-3 centimeters can affect the efficiency of their operation. Sometimes heat loss is 20% only because the heater installation parameters were not followed.
Bimetallic radiators today are not only the most expensive on the thermal technology market, but also the most durable, reliable and durable. Therefore, it will be doubly disappointing to invest a lot of money on their purchase and connection and end up with a cold room, the heating of which takes a lot of energy resources.
Since, according to their parameters, bimetallic batteries are ideal for a “not ideal” urban heating network, their positive qualities should be used to the maximum.
Before installing bimetallic heating radiators, heat loss should be minimized:
- Up to 50% of heat escapes through uninsulated walls.
- Windows “eat up” 20%.
- An unheated basement or attic adds 10% of heat loss.
If you do not carry out preliminary work to insulate the room, then even the best-quality heating radiators will not be able to withstand such losses, or the costs of heating it will be too high.
Not all consumers know that simply installing a foil screen behind the radiator will reduce heat loss by 30% . If it is not possible to fully insulate external walls, it is enough to make such a reflector to reduce damage.
Having carried out a complete “audit” of heat losses and eliminated at least some of them, you can begin to calculate how many sections will be required for the room, and where the installation of bimetallic radiators will be carried out.
Fixing the steel heater
Adjustable floor bracket K 11.9.
Although steel heating equipment is heavy, it is not as massive compared to cast iron counterparts. That is why the bracket for steel radiators (Korado) can have a welded structure. A U-shaped and K-shaped element made of steel is suitable here. It is attached to the wall and is used if the panel heater is equipped with special brackets.
In front of the panoramic window, a bracket for floor-mounted steel radiators would be relevant. But in this case it must have a reinforced structure. If the heating device is large in size, then additional fixation is used for its installation using an angle bracket. Two types of fasteners: wall (rod with dowel or steel with plate) and floor, adjustable stand are useful when the structural material of the wall is not durable. This could be wood or porous bricks.
How efficient should the heating of a frame house be and how the degree of insulation affects the efficiency of the heating circuit.
Read about what types of water heating schemes there are for a one-story house here.
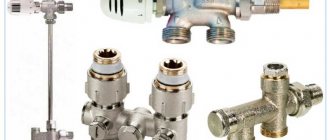
Types of brackets
There are 2 types of brackets based on the mounting location: wall-mounted and floor-mounted. Most often they are sold as a set.
If the battery is mounted near aerated concrete, plasterboard partitions or near a floor-high window (the wall does not allow the installation of brackets), only floor stands are used.
Depending on the type of battery, the fasteners are also divided into holders:
- for cast iron;
- steel;
- aluminum or bimetallic batteries.
Brackets for cast iron radiators
Brackets for heavy cast iron batteries are often marked “reinforced”; especially durable material is used for their manufacture, and the mounts themselves are massive.
Pin . Standard, used for small structures.
Appearance – individual pins or hooks installed on one strip. They are easy to install. To do this, a recess is drilled in the wall (more than 12 cm in depth). A dowel is driven in into which the fasteners for the battery are screwed. The recess itself is cemented.
Fastenings for “screws” . Used on large structures where conventional mounting on radiator pin holders is not possible.
Floor-standing . They are produced in two types: with height adjustment and non-adjustable.
The arcs that secure the battery can be made from solid steel wire or from dynamic links fastened together.
This type of fastener is used both in combination with wall brackets and as independent structures that are installed in places where wall mounting is impossible.
Brackets for steel radiators
Steel radiators differ in shape (tubular and panel). Fasteners for these types of radiators accordingly have their own characteristics.
Panel batteries have brackets on the back side:
When installing a standard bracket, precise markings are required; the brackets must be accurately placed on the hooks:
Therefore, another set of fasteners is more often used, including an upper hook and a lower stop. The lower stop is fixed with a hook on the battery bracket, but is not mounted on the wall, but only rests, which allows you to accurately set the vertical position of the radiator.
Fastening tubular radiators
For tubular heat exchangers, a similar kit is used, only the shape of the upper hook is adapted for hanging the upper pipe of the collector.
Another popular mount for lightweight tubular radiators (whose weight together with the coolant is no more than 100 kg) are strips that are fixed on the wall, and the battery is installed on the bottom shelf and secured with plastic grips. This fastener is designated as an SMB holder.
Another way to install steel batteries is with SVD fasteners. The holder consists of two parts. One is fixed on the wall, the second on the radiator. During installation, they are connected to each other with a loop:
Brackets for aluminum and bimetallic batteries
If you select fasteners for sectional heating radiators, their design is not much different from fasteners for cast iron radiators. Only the thickness of the metal can be less.
Aluminum and bimetallic radiators are not available in a floor-standing version, but if necessary, the conventional design can be mounted on racks (this is often used in buildings with glass walls):
Corner holders are also used for lightweight structures. The corner bracket can be mounted on the left or right thanks to the recesses on both sides.
As our brief review shows, there is a wide variety of mounting materials for radiators. However, many manufacturers produce batteries that come with a set of brackets. On the one hand, this makes installation easier, but in situations with non-standard walls, the user has to independently select the desired mounting option for the batteries.
Aluminum batteries and their fastening
Bracket for lightweight aluminum radiator.
This type of heating elements is the lightest. However, at the same time, its structural material has a high coefficient of thermal expansion. These parameters must be taken into account when choosing a bracket for an aluminum radiator.
Pay attention to the following types of fasteners:
- steel corner. Depending on the size of the heating equipment, it can have a simple or reinforced design;
- round or flat pin with dowel for batteries with different center distances;
- universal with plastic cover;
- floor adjustable fasteners.
In order not to disturb the design of the room, manufacturers of fasteners have developed special models that allow the battery to be fixed using brackets welded to its rear panel.
To organize a heating system along a panoramic window, floor stands or a corner bracket for an aluminum radiator would be suitable.
How to choose a battery holder?
When choosing a bracket for a heating radiator, you need to pay attention to:
- Alloy composition. It must be hard, durable, non-toxic;
- Product coating. To protect against corrosion and rust, the product must not only be painted, but also galvanized;
- Dimensions (length and thickness of the product) and maximum withstand load;
- The presence of a coating that softens noise arising from thermal expansion;
- Possibility of additional adjustment of distances to the floor and wall.
Features of the wall mounting system
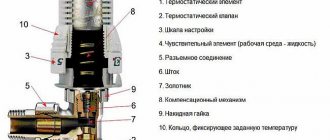
Any bracket for a wall-mounted radiator is a crescent-shaped hook. The loop itself can be made in the form of a semicircle or have a rectangular shape. At the end of the fixing device there can be either a fastening plate (it sits on self-tapping screws), or in the case of a pin fastener, it is a regular thread. With its help, the pin is screwed into the wall, where the dowel is previously inserted.
The bracket for attaching the radiator to the wall can be of the following types:
- cast iron (used only for fixing batteries made of similar structural material);
- steel, pin fixed (used for fixing cast iron, aluminum and steel heating elements);
- steel adjustable element (cast iron, steel, bimetallic heating devices);
- plate retainer made of steel (cast iron, steel batteries);
- corner regular or reinforced structures (for aluminum and bimetallic products).
The bracket for a panel radiator is often shaped like a hook. It secures the heating device through a special bracket that is welded to its rear panel. From a design point of view, this is the most successful installation method, as it is absolutely invisible.
Fasteners for steel heating devices
There are two different types in this group: tubular and panel radiators. They have different designs and, accordingly, different fastenings.
In panel radiators, brackets are welded on the rear wall, with the help of which they are hung on brackets. The shape of this type of fastener is different: it is designed specifically for staples.
In panel radiators, brackets are welded on the rear wall
When installing panel radiators, it is necessary to strictly monitor the vertical position of the brackets. High precision is required: four or six staples must fit exactly onto the hooks. It is also important that the wall is perfectly flat and smooth. In general, using conventional brackets, panel radiators are quite difficult to hang. It is easier to work with other types of holders.
Standard bracket for panel radiator
Since the mass of the heating device is small, it is quite enough to fix it on the upper brackets and install stops at the bottom that will give it direction in the horizontal plane. They are not attached to the wall, but are hooked onto a bracket and simply rest against the wall. For reliability, the part that faces the wall is expanded.
This is what a set of brackets for tubular steel batteries looks like: the upper collector is hung on the hooks, and plastic stops are placed below
There are also special mounting strips for easy installation. They are a strip of metal with plastic clips at the top and bottom. When using this fastener, there is no need for brackets on the rear panel. The slats are fixed to the wall, a radiator is inserted into them, which is held in place by plastic hooks.
Rail for quick installation of panel batteries
Fasteners for tubular radiators are similar to sectional ones: the same hooks, only of a different size, often equipped with plastic covers.
There is also a special fastener with SMB tube grips. This is a strip of steel with plastic clips and a shelf at the bottom that serves as a support for the radiator. This mounting plate can be used if the weight of the device filled with water does not exceed 100 kg. Installation is simple: place the battery on the shelf, bring the top edge closer to the latches. They grab the nearest tube and a click is heard. The radiator is installed, the supply pipes can be connected.
Bar for quick installation of a tubular radiator with shelf and clamps
There is a second option for quick installation: SVD fasteners. It consists of two parts. One is attached to the radiator, the second to the wall. Then they are connected to each other and secured with a steel loop.
Another type of holder for tubular models: two parts, one is attached to the wall, the second is attached to the pipe. They are held together with a wire fastener.
Floor mounting for tubular radiators can be of several types: tubular supports that are welded at the factory, or stands with hooks. Radiators are hung on such racks, and the racks themselves are attached to the floor.
Advantages of floor fasteners
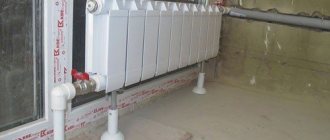
A bracket for floor mounting of a radiator will come to the rescue if the structural material of the wall is not able to withstand the weight of the battery, and therefore the wall clamp cannot be used. The above device is used when installing a heating element opposite a panoramic window. A floor clamp can be an excellent decorative element when decorating a room.
It is used to support particularly massive heating appliances made of cast iron, or to install very large radiators. Installing brackets for floor-mounted radiators will ensure reliable fixation of the equipment. During the work you will not need the help of a specialist, since the device is easy to use.
The following types of floor clamps for batteries are distinguished:
- fixed and adjustable, possibly with a plastic cover;
- combination product;
- specialized, the width of which ranges from 80 mm to 100 mm.
Everything you might be interested in about hydrogen heating can be found on our website.
Although solar convectors for heating a home are still very expensive, many are already introducing them as additional heat sources. Details here.
Marking the installation locations of the brackets
Since it is better to place the radiator strictly in the middle of the window opening, find the middle on the wall and draw a vertical line. After which there are two options: with the lower wiring, draw a horizontal line that will mark the upper edge of the installed radiator. When replacing a radiator with a side connection, the location of the supply pipes is important. Therefore, in this case, we draw a horizontal line that comes from the upper (usually supply) pipe.
Measure the distances between the fasteners on the battery, and set them aside relative to the marked lines. Sometimes you have to attach fasteners and measure it this way: it depends on the type of heating device and on the type of brackets or holders used.
How to install a radiator correctly, read the article “Installing batteries with your own hands: rules and technology”
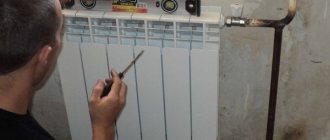
To securely fasten the radiator, it is important to choose the right fasteners. There are a large number of brackets designed for different types of radiators.
Professional installation of radiators
Rice. No. 1
Reliable installation of any heating element of a heating system depends on how correctly the bracket is selected and how competently and firmly it is fixed. All work must be carried out in strict accordance with the provisions of SNiP of 2003 on heating, ventilation systems and air conditioning of premises.
How to mark brackets for a heating radiator? To correctly answer this question, experts offer the following calculation scheme and detailed photos.
The following conventions are used in Figure 1:
Rice. No. 2
- segment A - indicates the length of the window sill under which the battery will be mounted;
- point 1 – marks the middle of the window sill. This mark is fixed on the wall above the position of the heating element itself. Purpose - the mark remains visible during installation;
- the segment that runs between marks 1 and 5 is the distance from the middle of the window sill to the outer section of the heating equipment. In this case, you need to pay attention to Figure 2;
- segment B - equals the distance from the window sill to the floor;
Rice. No. 3
- mark 2 – located in the middle of segment B;
- segment D is the distance from the bracket, which is attached to the radiator pipe, to the middle of the heating element;
- point 3 – is postponed from point 2 and is equal to the length of segment D;
- point 4 – located below point 3 by 500 mm;
- line B is drawn from point 3 using a level strictly horizontally;
- line D is drawn through point 4 strictly horizontally, also using a level"
- points 6 - they are performed using a load and are lowered from mark 5.
In a similar way, the location of the fasteners and the distance between the radiator brackets are established. Many people ask how many brackets are needed for a radiator? If we are talking about an aluminum heating element, then for 12 sections you need 3 wall fasteners. One below and two above. When the number of sections exceeds 10 pieces, 4 fasteners are used, two at the bottom and two at the top. Bimetallic radiators are heavier, and therefore for 10 sections you need 3 brackets, and if the number of sections is more than 10, then 4 clamps.
Cast iron radiators are considered the heaviest, and therefore require the most brackets to fix them. So, here floor brackets-stands must be used. The number of brackets per radiator increases with the size of the heating element.
Installation options and diagrams
Before starting installation, you need to decide on the connection diagram. There are several options: side, diagonal and bottom. One of the most used and effective methods is lateral. In this case, the connection of the supply pipe with the coolant is made to the upper branch pipe of the battery, and the outlet is made through the lower one. Thus, the inlet pipe is located above the outlet pipe on one side of the battery.
An increase in the number of sections (registers) with a lateral connection leads to a decrease in heating of the remote opposite section, which will lead to a significant reduction in heat transfer. This method makes it possible to add a limited number of additional sections.
Another connection method is diagonal, which is used when installing radiators with a large number of sections. It allows heating of the battery around the entire perimeter. The inlet pipe is connected to the upper radiator pipe, and the outlet pipe is attached diagonally from the top corner of the battery to the bottom. Thus, the connection is made from different sides.
The next type of connection is the least effective and is characterized by low efficiency. These are radiators with bottom connections. This method is used for heating systems located under the floor.
The main thing is to secure it correctly
Reliable fixation of the battery depends on correctly selected and installed brackets. Thus, today wall and floor clamps are used, which in terms of shape and strength take into account all the features of heating equipment. The dimensions of the brackets for radiators are selected according to the size of the sections of the heating device.
The structural material must correspond to the loads that will act on the fastener throughout its entire service life. For cast iron radiators, cast iron and reinforced steel clamps are suitable. For bimetallic and aluminum batteries, in addition to the above, corner fasteners are also used. Steel radiators also require reinforced fixation. This video will help you on how to properly mount brackets for radiators:
Optimal choice
Choosing the right mounts is easy and anyone can do it.
the operating efficiency and safety of heating equipment depends on the correct choice of fasteners .
To minimize possible risks, use the services of qualified specialists who can select suitable fasteners and perform installation work, taking into account all the nuances that are sometimes not obvious to non-professionals.
The procedure for installing radiators does not depend on their type: the rules remain the same, only the fasteners change. If installation under a window is intended, the following distances must be observed: from the floor should be at least 80-120 mm, to the window sill at least 60-100 mm, to the wall - 30-50 mm. It is also necessary to decide on the quantity and location of fasteners.
The number of brackets (hooks) per battery depends on its length. If there are few sections - up to 8-10 pieces - then two holders are required at the top, and at least one more at the bottom. If there are more than 10 sections, install three supports on top and two below. For each next five to seven sections of cast iron radiators and ten tubular and aluminum ones, the number of fasteners increases: one holder is added at the top and one at the bottom.
Methods of using various types of fasteners for sectional radiators