Installing a pipe on the roof is an operation that requires a special approach. In this article we will consider questions about how the chimney passage through the roof should be in order to comply with SNiP standards, as well as protect the structure from moisture penetration and the possibility of fire.
A well-made chimney passage through the roof is a guarantee of long service life of the stove and roof Source houseinform.ru
Chimney installation rules
If the house has a stove, then a chimney is also needed. Although instead of a stove there may be a special tank running on gas. In any case, the house is heated somehow, and combustion products need to be removed. There are several options for removing the pipe through the roof, related to determining the location. It is planned when a house project is being developed. The location is considered relative to the ridge of the roof - a horizontal edge that is located where two slopes meet. The pipe can be installed:
- directly in the ridge;
- at a distance from the ridge.
The first and second options have their pros and cons. On the one hand, it is easier to install a chimney in a ridge. But this is for someone who deals with this particular issue. But for arranging a rafter system, this is more difficult, because you will have to make a gap in the horizontal beam. On the other hand, when the pipe is in the ridge, this guarantees good traction. And the possibility of leakage under it is reduced to a minimum here. But still, most often the chimney is moved relative to the ridge.
Chimney offset relative to the roof ridge Source katlavan.ru
In this case, the following building regulations must be observed:
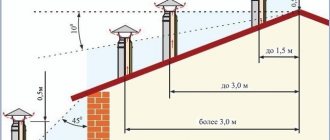
- If the chimney on the roof is installed at a distance of no more than 1.5 m from the ridge, then the pipe should be 0.5 m higher than it.
- When installed at a distance of 1.5 m to 3 m from the ridge, it is made on the same level with it.
- When the pipe is more than 3 m from the ridge, it can be lower than it, but no more than 10°.
The best option for locating the pipe relative to the ridge is not far from it. If you make the chimney much lower, the risk of damage from falling snow increases.
To ensure good traction, you must adhere to certain standards for placing the chimney relative to the roof ridge Source rekvartira.ru
There is a place where it is generally not recommended to install a pipe - the valley. This is the internal angle that two slopes of a complex roof form when connected. There is always an increased load on it, since precipitation flows there and snow is retained. With such an installation, the possibility of waterproofing damage is very high. This means that there will be leaks.
Let's sum it up
The removal of a ventilation pipe or chimney is an important part of the roofing installation. We looked at several options for how to put everything into practice. The main task is to ensure high-quality waterproofing of ondulin at the junction of the pipe. If this is not done, the area will become a weak point of the entire structure. Moisture will penetrate there, destroying the insulation layer, if any, and the entire structure as a whole. Therefore, following the instructions, it is important to carry out the work correctly so as not to shorten the service life of the roof.
Recommended Posts
Waterproofing roofing felt brand TG 350
How to lay corrugated sheets on the roof
Installing snow guards on a corrugated roof with your own...
Construction of a rafter system for a hipped roof
How to build a hip roof with your own hands
How to get rid of sparrows under the roof of a house
Protecting the roof from heat coming from the pipe
When organizing a pipe passage through the roof, it is important to insulate the roof from it. After all, the pipe gets very hot, which increases the fire hazard. The roof is protected using a separate box, the beams and rafters of which are located taking into account the requirements of SNiP. The minimum distance standard from the chimney to the load-bearing beams and rafters is from 130 to 250 mm. The inside of the box is filled with some material that does not burn. For example, it could be basalt or stone wool.
The chimney in no case directly touches the roofing Source barmanlive.ru
Further organization of the pipe outlet depends on what shape it is and what it is made of. The shape of the chimney can be made either as a regular square or round, or in the form of a rectangle or oval. And pipes can be brick, metal, asbestos-cement or ceramic. The material from which the roof is made is also taken into account. This can be slate, metal tiles, corrugated sheets, ondulin, roofing felt or bitumen shingles. Each case has its own characteristics.
Features of using ondulin for roofing
An ondulin roof has its own characteristics, among which there are both positive and negative aspects. Positive characteristics include:
- High technological and operational characteristics, which are ensured by the components included in the composition - bitumen, organic fibers, various fillers that increase strength and durability;
- In addition to the coating itself, the industry also produces ready-made solutions - ridges, valleys, seals, fasteners;
- Long service life;
- Environmental friendliness;
- Easy installation;
- Various colors.
Disadvantages include average strength and fading of colored elements in the sun.
On the roof, the pipe from the ondulin must be removed correctly, and it must also be ensured that the sealing is carried out accordingly.
Installation of a round pipe
Often in construction a circular chimney section is used. To pass a round pipe through the roof and seal it tightly, special flexible adapters are used. They are made from heat-resistant polymer with elastic properties. In appearance, such an adapter looks like a funnel, at the base of which there can be a circle or a square. The base is called an apron, it is made in the form of wide fields. Since the material is elastic, it easily takes on different configurations. Therefore it has a wide range of applications. Such adapters can be used on roofs with any covering and slope angle.
Exit of a round pipe through an ondulin roof Source nashaotdelka.ru
The main thing is to choose an adapter that will match the diameter of the pipe. Although there are universal options for such products. They are made in the form of a stepped pyramid. To adjust their size to the pipe, the excess is simply cut off with scissors. Elastic adapters are attached to the roof using bolts or metal studs. They are installed in holes on the flange, which presses the adapter to the roof. The space between the flange and the roof surface is lubricated with a sealant that can withstand temperature changes.
Universal adapter for passing a round pipe through the roof Source pinterest.it
What should be the basis for ondulin?
Let's start by debunking the myths. So, there is an opinion among people that the way ondulin looks on the roof primarily depends on its quality. What if you take Belgian or Russian ondulin, and not French, then within a year it will certainly go in waves, become discolored and begin to crumble.
Yes, of course, if we talk about fakes, it’s difficult to predict the result. But if we compare European-made ondulin with each other, we note that Belgian, French and Polish products are actually practically no different from each other. And recently, the French manufacturer of ondulin opened its factories in Russia.
Let's put it this way: the price of branded foreign and domestic ondulin is fully consistent with its service life and quality. Those. Such material is indeed not produced “to last,” but in practice it often turns out that it successfully outlasts more expensive coatings. And exactly how Euro slate will behave throughout the entire period of time largely depends on how high-quality the sheathing was made for it.
So, the most valuable point in this regard is the correctly calculated pitch of the sheathing and its evenness. If you take the step too wide (and in general you can’t go more than 65 cm), then over time the ondulin will really go in waves.
Firstly, the snow will put pressure on it, and secondly, under the hot rays of the sun it will soften too much and seem to sag. This will not have a critical effect on its functionality, except for unnecessary snow piles in such recesses, but in general all this is not good.
In addition, such waves run the risk of the joints coming apart, which will lead to leaks. And therefore, lathing with a pitch of 46 cm is considered ideal for a pitched roof, even if the slopes themselves are quite steep.
After all, accurately calculating the snow load in a region is not so easy. Therefore, if you have doubts, do this universal option. Moreover, the overuse of bars here will be small and this will not greatly affect the overall budget for the roof:
Of course, if you have doubts about whether ondulin will withstand snow, you can initially make a complete sheathing for it. But it is worth considering that the cost of roofing costs will increase significantly.
Therefore, for pitched roofs not with a minimum angle of inclination, it is more logical to make a sparse sheathing, and for the rest - a solid base:
And now we will tell you what the rules are for making sheathing for ondulin.
Features of a sandwich chimney
A type of round pipe is a sandwich chimney. It consists of two pipes of different diameters, between which there is a heat-resistant thermal insulation material. They are made of stainless steel. The sandwich chimney is in great demand because it provides stable draft, does not heat up, is easy to install and looks beautiful in appearance.
The passage through the roof of a sandwich chimney can also be done using an elastic adapter. However, it may not be in harmony with its mirror surface. In this case, a metal adapter is used, the material of which is also stainless steel. It is not flexible, so you must take into account the diameter of the pipe and the angle of the roof slope.
Workshops on making sheathing
Let's take a step-by-step look at the process of making roofing sheathing for modern euro slate. So, if the slope angle is within 10° to 15°, make the sheathing from wooden blocks 4x5 cm or 5x5 cm, with a distance between elements of up to 45 cm:
The higher the roof slope, the less often you can do lathing. So, for a roof with a slope of 15° to 30°, the step should be made up to 60 cm. But, if you live in a region with a significant snow load, still reduce this step to 45 cm.
This is what the correct sheathing of an insulated roof under ondulin with an inclination angle of 30° looks like:
Always fasten the sheathing itself strictly parallel to the roof ridge. Make sure that its joints are staggered:
Now we install a new 3D ondulin on the finished sheathing, effectively imitating tiles:
But a roof up to 60° is good for snow melting. This is where it is better to use boards rather than bars:
Passage through metal tiles
Metal tiles are sheets of steel, copper or aluminum, which are coated with a polymer layer. In appearance they resemble natural tiles, which are folded in even rows. This roofing material is very popular. If a round pipe is to be passed through the metal tile, flexible adapters are used, which we have already described. When using a square or rectangular brick pipe, a different method of installation is used. It is as follows:
- The connecting unit is being manufactured. It consists of two aprons - internal (main) and external (decorative). The material of manufacture is thin aluminum sheet or tin.
- Before the metal tiles are laid, an internal apron is installed on the sheathing. These are 4 strips located on 4 sides of the pipe. They simultaneously extend under the metal tile (no less than 250 mm) and onto the pipe (no less than 150 mm).
- The apron elements are installed in a groove - a groove that is cut along the perimeter of the pipe to a depth of 10 to 15 mm. The groove is cleaned and filled with fire-resistant sealant.
To install an apron, you need to make a special groove in the pipe Source experttrub.ru
- The apron is attached to the pipe using heat-resistant dowels. The joints between the four planks are soldered. On the slats that are located on the sides, sides are made, the purpose of which is to drain water down.
- The lower part of the apron is installed on the so-called tie - a sheet of metal with sides. This ensures water drainage from the chimney to the bottom of the roof. The width of the tie should be greater than that of the pipe by at least 0.5 m on both sides. Its length depends on the distance from the pipe to the edge of the roof.
- After installing the tie and interior apron, the metal tiles are laid.
- An external apron is installed on top. It is usually a corrugated sheet of lead or aluminum. There is a decorative strip in its upper part. It is attached to the pipe using self-tapping screws. The attachment point is slightly higher than parts of the inner apron. Before fixing the decorative strips, the fastening points are coated with sealant. To attach the corrugated sheet, its back side is provided with a self-adhesive coating.
Finished chimney pipe passed through a metal tile Source tproekt.com
Ondulin company methodology
The simplest way to remove the ventilation pipe and secure it to the roof is to use a proprietary PVC passage element, the so-called ondulin ventilation pipe, which can be purchased at construction supermarkets, for example, “U Petrovich”.
Removing the ventilation pipe when installing an ondulin roof
Before laying the last row of ondulin sheets, the exit point of the ventilation duct to the roof is determined. As a rule, air ducts are located in the last row of the covering. We install the passage element at the exit of the ventilation duct in such a way that the lower edge is secured with an overlap on the ondulin sheet of the previous row. The overlap of the element on the sheet of the bottom row must be at least 17 cm.
Fastening is done by driving nails into each wave of the element. Then we attach ondulin sheets to the sides of the passage element in such a way as to ensure an overlap of at least one wave. The upper edge of the transition element should be covered with a fabric with a minimum overlap of 17 cm. The upper edge is also fastened with nails into each wave.
Arrangement of the passage of the ventilation duct to the roof after completion of roofing work
Often it is necessary to install a ventilation pipe on the roof after the roofing has been laid. If it is impossible to dismantle the ondulin sheet and arrange the output in the manner described in the previous paragraph, you have to act in a radical way:
- At the first stage, we cut the ondulin roof with a cross-shaped cut. We bring the edges of the cut down, bend it and fix it on the inside of the roofing pie using tape or staples. Along the cut, it is necessary to treat with adhesive and film to prevent moisture from entering the heat-insulating layer;
- To install the air duct we use a special transition - an apron. We tuck the edges of the base of the apron under a sheet of ondulin, the gaps in the area where the roofing material adjoins the apron are best sealed with a special transition tape “Onduflesh”;
- We nail the apron through an ondulin sheet to the sheathing slats and reinforce it with a lining on the inside of the roof.
Arrangement of the area where the ondulin joins the chimney or chimney
In addition to ensuring high-quality waterproofing, in order to correctly route the chimney through the roof, it is necessary to take into account fire safety requirements. In this case, the chimney can be dressed in an additional outer casing made of steel; a layer of thermal insulation is placed inside, ensuring heating of the outer shell no higher than 40-50 o C. The result is a sandwich pipe through ondulin.
In addition, in places adjacent to the chimney, it is necessary to make a continuous additional sheathing that will support the edges of the canvas and the transition element. The sheathing beam must be removed from the side surface of the chimney walls at a distance of 3-4 cm, and from the top at a distance of at least 5-10 cm.
The connection from the bottom side is equipped with a covering apron, while the surface of the transition element must go over the ondulin sheet on the left and right by at least one wave. The apron cover is nailed over the ondulin coating into the additional sheathing, while the nails do not hit the outer waves. The corners of the laid element are sealed with Onduflesh tape.
To the left and right of the chimney, a “side connection” element is installed on the ondulin canvas. It must be measured similarly to the previous apron, cut and installed on the junction line and nailed.
The junction of the upper edge is sealed with Onduflesh tape; the same material is used to seal the upper edges of the aprons laid on the vertical surface of the pipe. The upper edge of the tape is fixed using an additional metal strip and self-tapping screws. The gap along the edge of the metal strip must be sealed with polyurethane sealant. The Onduflesh tape glued over the top edge of the chimney must be covered with an additional piece of ondulin and nailed down.
Installing a chimney through corrugated sheeting
Corrugated sheeting is a sheet of metal produced by cold rolling and then profiled. Mainly made of steel, but can be made of copper and aluminum. The sheet has ribs of oval, square, trapezoidal or polygonal shape. A special coating is made on top, which gives it anti-corrosion properties. Corrugated sheeting is often used as a roofing material.
To pass the chimney through the roof, in the case of a square or rectangular pipe, a device in the form of two aprons and a tie is used. The method is the same as for a metal roof. Installing round pipes in corrugated sheeting is not recommended, because it is difficult to cut the correct circular section into it. But if you still make a round chimney, the pipe is insulated using a universal elastic adapter.
Accessories for running round pipes Source metalsteel.com.pl
Sparse lathing: precisely calculated step
For roofs with a slope of 10 degrees or more, it is allowed to install sparse sheathing specifically under the ondulin. We will try to cover all the technical aspects of this process.
How to achieve precise pitch?
Let's start with the fact that in order for the step to be perfectly accurate, make a wooden template and apply it from block to block:
Make the same template as in the illustration, or just a flat piece of timber that will be convenient to place between the sheathing boards.
How to guess the length of the bars?
Second point. The eaves overhang itself is provided with a fillet - a special board that is nailed to the lower end of the rafter. And on gable roofs, using the overhang of the laths and the length of the filly, you can increase or decrease the size of the entire roof slope.
In this way, a minimum number of ondulin scraps is achieved. That's why make the slats and fillets a little longer, and then saw off all the excess:
How to avoid getting a nail stuck in a piece of wood?
Let's tell you one more secret: when laying sparse lathing, carefully ensure that there are not many knots on it. Because when the nail gets into such a place, then you have to tinker. After all, the wood at the knot has a completely different density.
In this case, some craftsmen act simpler: they fold a stack of sheets, simultaneously make a thin hole in all of them, and then hammer nails into the roof at precisely located points, as if using a stencil.
This has its advantages: you can insert a nail into the hole and immediately feel for a piece of sheathing there, and then punch it.
How to check the evenness of the sheathing surface?
The next important requirement: the sheathing itself must be level. Of course, ondulin is one of the few materials that perfectly hides all the unevenness of the roof.
But this does not mean that you can not worry about this and prepare the foundation somehow. Any such errors in the plane geometry always result in future deformation of the roofing sheets.
But checking the evenness of the mounted sheathing is quite easy - using a stretched thread. If unevenness is found in any place, then make special pads from plywood. For this, take pieces about 4 and 8 mm thick and stuff them in the right places. Very comfortably!
Passage through ondulin
Ondulin looks like regular slate, but its material is completely different. This is compressed cellulose, which is treated with bitumen impregnation. It comes in a variety of colors, is water resistant, but burns quite well. Therefore, when a passage through the roof is organized, maximum attention is paid to filling it with fire-resistant materials. The hole for the pipe in the ondulin is made large. To insulate the junction of the roof and the chimney, an apron is used, which is placed under the roof. In this case, elastic self-adhesive tape “Onduflesh” is used, made of bitumen with an aluminum insert.
Brick pipe passed through ondulin Source seaside-home.ru
Where does waterproofing begin?
Heating devices will operate in a safe mode only if the waterproofing is carried out correctly and taking into account all existing rules and recommendations. Waterproofing is carried out taking into account:
- must be maintained between the rafter system and the roof , which depends on the materials used. Flammable – 150-300 mm, non-flammable – 100-250 mm.
- The sequence of layers in a roofing pie cannot be disturbed. It is necessary to block the possibility of moisture penetrating inside the prepared cake, since any liquid will cause rapid destruction of the layers. The insulation must be separated from the pipe by a gap. Otherwise, there is a risk of fire, since most insulation materials are flammable.
- The box is the required device for separating the roof from the pipe. The distance should be approximately 150 mm. Inside, the created box is filled with any heat-insulating material that has non-flammable properties.
Films that perform insulation tasks must be cut “envelope”, and then pulled to the cross beam so that it can be attached with nails. Waterproofing must be fixed with lathing, vapor barrier - with a special frame. All joints of the box and insulation layers must be edged with special tapes.
Sealing a chimney is a difficult process and requires certain skills and knowledge Source stroy-krov.ru
Installation of a chimney in a soft roof
Soft roofing is a flammable material, so it is important here that there is a gap of 13 to 25 mm between the pipe and the covering. The passage of the chimney through the roof is organized depending on its shape - flat or pitched. The material from which the pipe is made also plays a role. If the roof is flat, consisting of a concrete slab and the pipe is not made of brick, the passage is made as follows:
- Around the pipe at a distance of about 15 cm along the perimeter, everything is removed, right down to the concrete.
- The formwork is being installed.
- Concrete is poured so that a side is formed, the height of which is 15 cm.
- The roofing covering is applied to the walls.
- Where the roofing material connects to the side, a metal strip is installed. Fastening is done using dowels.
- An ebb tide is installed on the side.
If the pipe is brick, there is no concrete side. In this case, roofing material is placed on it and a metal apron is installed on top. A groove is made in the wall of the pipe (depth 1.5 cm), into which the edge of the apron is inserted.
When passing a pipe through a soft roof, many nuances must be taken into account Source teplospec.com
The junction is filled with sealant. In the case of a pitched roof, waterproofing is carried out as on other coverings, that is, using aprons (for square and rectangular pipes), as well as flexible or metal adapters (for round ones).
Quality requirements: material of manufacture
The main point in making lathing is that the distance between the bars should not exceed 61 cm. But there are still other points that relate to the quality and thickness of the material itself.
Unfortunately, ondulin sheathing is often made from something and somehow. The coating is budget-friendly and appears to be quite durable – that’s what they’re saying at this point. In fact, a poor quality base can negate all the characteristics of a bitumen roof! Therefore, treat this issue with full responsibility.
So, both wooden lathing and a galvanized steel profile are suitable for ondulin. Metal is even more preferable here, because it is not spoiled by fungi and is not sharpened by insects:
But let's start with a review of the technical characteristics of wooden sheathing, because... This is exactly the type of base that is most often installed on the roofs of houses in Russia.
Type and type of wood
So, before installation, the timber and boards must be brought to the standard humidity level for the rafter system - 19-20%. This way you will be sure that during operation the sheathing will not become deformed. Additionally, all bars should be treated with deeply impregnated antiseptic compounds. This measure will at least double the service life of the roof.
By the way, if for the manufacture of the sheathing you received wood with insufficiently low humidity, then before attaching the ondulin to it, firmly fix each board with two screws at once, on both sides. You may ask why use such material at all and why can’t you purchase normal material in the first place?
The fact is that some craftsmen like to work with this type of material, because the fibers here are still elastic, and therefore driving nails or screwing in self-tapping screws does not lead to random cracks. Although this is wrong.
But in any case, if you have doubts whether the purchased wood is really dry enough, pay attention to high-quality fastening. After all, without a special device it is difficult to measure this parameter, and in case of an error, the entire sheathing, unfortunately, will “lead.”
As for the quality of wood, the lumber market today will offer you quite a wide choice. To order, the bars will be cut to the required size and impregnated directly at the factory with antiseptics and fire retardants. Specifically, spruce and pine are best suited for lathing, because have the required strength and flexibility.
The main thing when choosing is to ensure that the wood itself is of high quality, without fallen knots, rot or anything else incomprehensible. Wooden blocks are marked according to grade from 0 to 5.
Also, be sure to check the purchased bars and boards for evenness. And not only with the help of a level or a cord. Take the board in your hands with one end so that its surface along its length is parallel to the ground and look at the entire length of the board through its end - this way all the irregularities will immediately become noticeable.
In addition, if we are talking specifically about ondulin, in which all the elements of the wooden sheathing will be in contact with the coating, it is necessary to sharpen them, creating a perfectly flat surface.
Boards, bars or slabs?
So, for the manufacture of wooden sheathing, boards that are at least 25 mm thick, or timber with a thickness of 50 mm or more, are suitable. And the greater the distance between the main roof rafters, the greater the thickness of the sheathing should be.
And the type of lathing looks like this:
- Edged, which is a neat board, sawn on all sides.
- Unedged, with partially sawn or not sawn edges. Inferior to edged only in appearance.
- Tongue and groove boards are edged boards that have special grooves for joining.
If we talk about continuous sheathing, then plywood with increased moisture resistance and OSB boards made from pressed wood shavings are suitable.
For small buildings, such as gardens, utility rooms or garages, it is allowed to use 4x5 or 4x6 cm timber as sheathing:
This is what 5x5 cm bars look like:
Unedged lumber without wane is also suitable as boards. Here is an example of using a board in combination with the bars that were used to make the counter-lattice:
Summarize. Wood as a sheathing is good primarily because it lends itself well to cutting, installation and is generally unpretentious in processing. From this pliable material it is not difficult to build everything you need, of any shape and design.
But such lathing has noticeable disadvantages in the form of deformation over time if it is not prepared correctly, as well as destruction due to fungus or bugs and dampness in some cases.
Advantages of metal profiles
Metal sheathing does not have all of the above disadvantages. Its main advantage is that it creates a perfectly flat, millimeter-accurate surface. Then laying ondulin or any other roofing covering on such a roof is a real pleasure! Moreover, if you are concerned about the fire safety of ondulin, then a metal sheathing under it is much more appropriate than a wooden one.
Second point: ondulin is attached to the metal sheathing with roofing screws. There are even special ones with a wider cap. This way, the ondulin sheets are fixed to the rafter system much more firmly, and the wind cannot tear them off.
But welding such a sheathing is not difficult in ordinary home conditions. Just remember that all welds are susceptible to corrosion and will have to be additionally treated with a primer and special anti-corrosion paint.
Also, anyone can assemble a metal sheathing like a construction set, from ready-made corners and profiles - directly onto the bolts. U-shaped profiles made of anti-corrosion steel are especially suitable for this purpose.
Of course, in the case of installing metal sheathing, you will have to spend more time than usual cutting wooden blocks, but you will do without splinters!
Installing a chimney in a finished roof
If the chimney is not installed at the construction stage of the house, but in a finished roof, the following is done:
- There is a place for output taking into account the requirements of SNiP. This should be the space between the cross beam and the rafters.
- A box is made of beams, the cross-section of which is equal to the cross-section of the rafters. The box is made such that the width of its sides is 0.5 m greater than the diameter of the pipe.
- A hole is cut in the roof equal to the perimeter of the box. To comply with it, through holes are drilled from the inside in the corners of the box.
- The roofing material is bent outward, a pipe is inserted into the hole and secured.
- The box is sealed with fire-resistant material for thermal insulation.
- The junction of the pipe and the roof is sealed. The flange (adapter) is being installed.
The pipe must be routed only through an adapter Source rinnipool.ru
Instructions for removing the pipe when laying ondulin
If the removal is carried out at the roof installation stage, then the instructions are as follows:
- The passage element is installed with an overlap of 17 cm, and is nailed to the sheathing at the bottom in each wave, except for the waves for the overlap. Special nails for ondulin are used.
- The next sheet is measured so that the side overlap is equal to 1 wave, and on top, the same 17 cm. The excess is cut off with a jigsaw or saw, if we talk about cutting across, and the work is done along the assembly knife.
- The sheet is placed in place and secured with nails in each wave to the sheathing.
- Ventilation is being assembled. an ondulin pipe passes through the ondulin and is installed in the passage element.
- It remains to lay the last sheet in contact with the passage element, just like the previous one.
Job is done. The ventilation pipe is routed through the surface of the ondulin roof. Detailed video instructions will help you cope with the task:
What determines the method of arranging the pipe passage?
First of all, it depends on the type of pipe and the material of its manufacture. Each of the materials common in construction (brick, concrete, metal, etc.) has its own nuances for installing a passage.
Attention! When installing a passage and ensuring high-quality sealing, you should not look at some Petrovich neighbor and repeat everything after him. In this situation, an individual approach is advisable. If the stove installed in the house uses wood, coal or peat as fuel, then the chimney is not made of metal, as it will heat up too much
And this can be dangerous.
If the stove installed in the house uses wood, coal or peat as fuel, then the chimney is not made of metal, as it will heat up too much. And this can be dangerous.
Depending on the size of the pipe, in some cases it is possible to select standard standard elements produced specifically for such purposes, which can be included with the roofing material.
Attention! If the width of the chimney is more than 0.8 meters, then it is recommended to make a slope behind the pipe. The so-called small gable roof, which will prevent the accumulation of snow masses and rainwater behind the pipe
It is best to try to pass the pipe either in the place of the ridge itself, or almost immediately behind it.
A correctly installed passage for a chimney, taking into account fire safety rules and the operational characteristics of the coating (ondulin), can protect yourself for many years from problems with leaks in this section of the roof, as well as make home heating, regardless of the type of heating, safe and efficient . In addition, according to the recommendations of the roofing material manufacturer, specific building materials that are most suitable for these types of work should be used.
What else to read on the topic?
Sealing round multi-layer chimneys
It is much easier to install sealing on modern round chimneys. The simplicity of the process is due to the fact that no additional equipment is required, since the pipe is already equipped with everything necessary. Installation takes place in three stages:
- Prime the edge of the pipe where the waterproofing will be attached.
- Make a hole in the waterproofing, then glue it to the pipe using mastic.
- The sheet must be attached to the sheathing. The pipe is passed through a cap, between which a clamp with a heat-resistant gasket must be located.
Round metal chimneys Source pinterest.com
If there are no caps, then flexible elastic seals for pipes are used instead. The sealant can also be used anywhere else where roof insulation needs to be improved.
What materials and tools will be needed
To start covering the roof according to all standards, you need to prepare:
- Bitumen sheets measuring 2.05 * 0.95 m. The quantity should be 10% more so that there is a reserve taking into account overlaps and cutting.
- The profile is the length of the entire ridge. It is also necessary to take into account overlaps between parts of 10-25 cm.
- Timber for sheathing, impregnated with antiseptic. Recommended sizes: 40*40 mm, 60*40 mm.
- Thick polyethylene film (for waterproofing).
- Special nails to match the color of the sheets.
- Hammer, hacksaw.
- Pencil or chalk, tape measure for marking.
- To assemble the sheathing, use a screwdriver.
- Scaffolding or high ladder.
Moreover, the scaffolding should be of a comfortable height so that you can reach any corner of the slope without any problems.
Sealing a pipe on a bitumen roof
In this case, the chimney must be sealed using Wakaflex tape. In this case, the following procedure is observed:
- Creating a cutting from tape.
- The cutting is pressed using the case.
- Any gaps that appear must be sealed using bitumen mastic.
Bitumen mastic best protects against bad weather Source www.drive2.ru
Floor insulation
There is a certain procedure for how to insulate a chimney pipe in the ceiling:
- Holes are made in the ceilings and roof for laying the smoke exhaust structure so that there is a distance of at least 25-35 centimeters from their edge to the walls of the pipes (read: “How and with what to seal the gap between the pipe and the roof - different options for different materials”).
- The edges of the holes are covered with metal or asbestos-cement sheets or a thermal insulating box is installed.
- The space around the pipes is tightly filled with thermal insulation wool.
- Wooden structures located near the chimney passages are coated with special fire-retardant compounds.
Having figured out how to thermally insulate and how to wrap a pipe in a bathhouse or house, you can complete this work without much effort.
But even a well-insulated chimney should be operated correctly:
- remove soot at least 3 times throughout the year;
- remove ash from the stove in a timely manner;
- Do not burn foreign objects or materials in the unit.
Step-by-step instructions for carrying out the work of laying chimney pipes through floor slabs and roof structures - knowledge that will be useful to any man who decides to do the work with his own hands. The work is not easy and requires care and responsibility, because the safety of your home and its protection from fires depends on the quality.
Signs of high-quality ondulin
Unfortunately, there are quite a lot of low-quality fakes of ondulin on the construction products market.
The following tips will help you distinguish real material from fake:
- On the back of real ondulin there is always a black mesh.
- The number of waves of the original sheet is always fixed - 10 pieces.
- The waves have a stable height of 36 mm.
- The outer surface of the material has a characteristic roughness, like gauze.
- High-quality sheets are characterized by rich matte shades.
- The outermost wave is always supplied with a seal with the marking of the manufacturer.
- The material has an accompanying brand certificate and a warranty card for 15 years of operation.
How to extend the service life of ondulin
The material will last many times longer if you adhere to the following recommendations:
- Buy materials from recognized manufacturers with a product warranty.
- Adhere to temperature conditions during installation. Do not mount in extreme heat or cold.
- Do not try to stretch sheets in an attempt to save on material.
- Use special nails. Take as many fasteners as required.
- Protect gables and roof ends with wind slats.
- Pay attention to the correct installation of the ridge, valley, and tongs.
- Try not to walk on soft bitumen surfaces during hot weather.
Thanks to the lightness of the material and the simplicity of the installation technology, the entire process can be completed with your own hands, without the involvement of a team of workers. If you follow the step-by-step installation instructions, the quality of fastening will be at the proper level.
Sandwich pipe design
Everything related to heating equipment is associated with the risk of fires, especially in wooden houses. Statistics say that more than half of fires occur because homeowners did not install the chimney correctly with their own hands. To facilitate this task and protect the house from fire, sandwich chimney pipes are used. At first glance, they look like ordinary stainless steel products, but in fact they have a three-layer structure:
Sandwich pipe design
- Inner circuit. A round cylinder made of high-strength stainless steel with a thickness of at least 1 mm with the addition of zinc or molybdenum. The inner pipe is made of a sheet of metal, using welding to obtain a sealed seam. Due to its high anti-corrosion properties, alloy steel is not damaged by interaction with water.
- Insulating layer. Between the inner and outer contours there is an insulating layer that performs two important functions: it “locks” the heat inside the pipe, preventing it from heating the surrounding materials, and it does not allow the smoke to cool down while passing through the pipe, so that soot does not settle on its walls. As thermal insulation, fibrous materials with the highest fire resistance class with an operating temperature of up to 700 degrees are used, for example, basalt-based mineral wool. The insulation layer between the contours is 40-60 mm, and the insulation density is 12o kg per cubic m.
- External casing. The outer shell of a sandwich pipe is made of stainless steel or another type of metal. The seam of the casing is made using laser welding, which does not damage the galvanic layer of stainless steel, which protects it from corrosion. The cost of brass and copper pipes greatly increases the cost of laying a chimney, and the installation is justified by its spectacular appearance.
Additional elements of a double-circuit chimney
Sandwich pipes consist of additional elements: straight sections, bends, tees. The diameter of the products depends on the manufacturer, so it is necessary to buy all the parts of the chimney from the same company, which are ideally suited to each other.