In conditions of harsh winters and severe frosts, a wooden house needs insulation - without it it is difficult to create comfortable conditions inside during the cold season. Thermal insulation will also reduce heating costs. This article will tell you how to properly insulate a wooden house with mineral wool under siding.
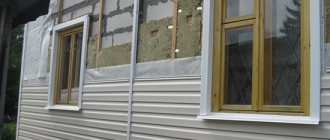
Insulation of a wooden house with mineral wool outside under siding
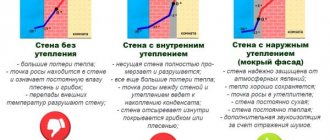
Increased humidity and its effect on the structure
Natural materials, unlike artificially created ones, require additional processing - this applies to wood. Untreated logs are susceptible to the formation of fungal and moldy lesions that occur due to high humidity, which together lead to rotting. If measures are not taken after a few years, the walls of the building will completely lose their thermal insulation qualities, become porous and turn into dust.
This situation can be avoided by carrying out thermal insulation work.
It is important to choose the insulating material wisely. Note!
The moisture level of the wood before the installation process should not exceed 35%, then natural drying after a year will lead to 18%, which is the norm. If the indicators are at the level of 22-25%, the log will necessarily be susceptible to the formation of fungus.
High humidity leads to the establishment and reproduction of wood-boring beetles, which can cause serious damage to the entire sheathing.
What you need to know about insulating a wooden house
Wood is different from all other natural and artificial building materials. In its natural state, it is a network of capillaries through which the “organs” of a living organism are nourished. After the tree is cut down, sanded, processed and during the shrinkage of the finished structure, the wood is dried to a moisture content level of 16-20%.
Drying is never complete. Moreover, it is reversible - when there is excess humidity, water vapor is absorbed from the air. In addition, wood is a “breathable” material, especially along the grain. This means that air is exchanged between the room and the street at the level of gas diffusion through the wall structure. This ability of a wooden house to self-regulate the microclimate is most valued.
What makes a house damp?
Temperature changes, rain, snow and any weather changes are not all the reasons for the formation of a humid environment. In winter, the external and internal temperature indicators of the structure vary greatly. Wood actively absorbs moisture, passing it through itself and releasing it outside. The higher the temperature inside the room, the greater the level of moisture that the structure has to pass through. The process is usually called “breathing”. Violation of the process leads to the accumulation of liquid inside the insulation. The result is waterlogging and the formation of a favorable environment for the formation of harmful microflora.
Correct installation - up to 100% savings
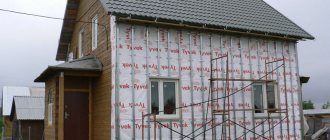
The easiest way to preserve the elegant appearance of a log house for a long time is to make a ventilated facade with insulation. This technology has been used in Russia for more than 15 years, and in Europe for much longer.
If you strictly follow the rules for installing such a facade, it will delight you for many years. But you shouldn’t try to buy “cheaper” materials. By saving pennies, you will lose much more. It’s better to save on workers and do everything yourself.
The technology is generally simple and, with minimal experience in construction work and the simplest tools - a construction stapler, a screwdriver, a level, a hammer - you can count on high-quality installation of the facade.
Before you start insulating the timber, you need to make sure that the structures of the wooden structure are strong enough, have not rotted or been damaged by woodworms.
A newly erected timber or log house cannot be insulated or covered. We'll have to wait a year. During this time, the settlement of a wooden house made of timber with a cross-section of 150x150 mm and a height of 18 links can be 10-12 cm.
Proper insulation of external walls
An important role in insulation is played by the correctly selected type of diffuse and windproof membrane.
ATTENTION! It is not recommended to use a vapor barrier film; its functions are not suitable for buildings intended for year-round use.
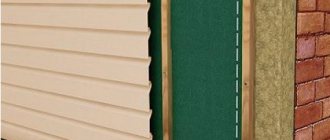
The membrane for wooden houses is attached to the front part of the insulation used. Diffuse windproof material has hydrophobic properties. When liquid hits its surface, it cannot be absorbed; it simply rolls off the surface. In other words, if moisture gets through the wall sheathing, the insulation and load-bearing walls will always remain dry.
Despite the impermeability of moisture, the membrane does not interfere with the “breathing” functions of the skin. Water vapor from the walls and the insulator used freely escapes into the atmosphere, and the moisture balance is automatically equalized.
The membrane has windproof functions, does not allow cold air to penetrate into the structure of the insulation and prevents the weathering of its fibers. The presence of a ventilation gap, left between the membrane and the insulating layer, allows air to circulate. As a result, the released drops of condensate will dry out on their own.
Video description
We will dwell in more detail on insulating a house with polystyrene foam.
Find out how safe polystyrene foam is in our video: The wrong choice of insulation or protective membranes in the design of a curtain wall disrupts both processes. But if the loss of “breathing” properties is compensated by a supply and exhaust ventilation device, then with moisture transfer everything is much more complicated. In winter, when the partial pressure of water vapor inside the house is greater than outside, it enters the walls of the house.
The wrong choice of technology and materials leads to the appearance of excess moisture in the thickness of the wall, which is poorly evaporated Source stroim-dom.radiomoon.ru
Of course, some of the excess moisture from the air will go into the ventilation system, but the rest will penetrate into the capillary structure of wooden structures. And if they are not dried, the tree is literally saturated with water. In addition, where there is dampness, favorable conditions are created for the growth of fungus and mold.
For reference! Moisture transfer is the movement of moisture in capillary-porous bodies from a saturated zone to an unsaturated one.
High-quality insulation is the key to reliability and durability
The range of insulating insulation materials is varied. Practice shows that mineral wool is relevant for wooden house construction, but it also varies not only in its technical characteristics, but also in composition.
ATTENTION! It is unacceptable to use synthetic heat-insulating materials such as polyethylene foam, polystyrene foam and the like for external insulation. Experts also do not recommend choosing foil types; all the described types have vapor barrier properties that negatively affect wooden buildings.
Remember! Sealing sprayed insulation, just like vapor barrier insulation, disrupts the natural function of air exchange. The result of such insulation is not long in coming, and after a couple of years the structure not only rots, but also molds from the inside of the structure; it is almost impossible to stop this process.
Requirements for insulation under siding
For façade insulation, synthetic materials (sprayed sealants, polystyrene foam, etc.) should not be used. Their porous structure with cells has thermal insulating properties, but blocks the circulation of air and steam. As a result, condensation accumulates on the inside of the wall, and the structure gradually becomes unusable.
For facade insulation, cotton wool materials are used.
Cotton materials are considered optimal for insulating a wooden house, because... they do not violate the conditions for moisture evaporation.
More about mineral wool
According to GOST, thermal insulators of the mineral wool class are:
Slag - fiber - is produced from blast furnace type slag. It has excellent absorbent properties, and therefore is not recommended for external insulation of a building. The material has residual acidity and in a humid environment has a negative effect on metal elements. It also cannot be used as insulation for pipes, but slag wool can be recommended for insulating the inside of a living space. Slag - fiber has increased hygroscopicity and can withstand up to +300 degrees Celsius . When heated to the above temperature, the wool fibers sinter and lose their heat-insulating functions.
Fiberglass is a well-known rather dangerous type of insulation. It is based on glass fibers whose length reaches 50 mm and width 15 microns. This is an elastic and reliable protective material. It is resistant to temperature changes and can withstand from -60 to +500 degrees Celsius . You should work with it in a protective suit, including gloves, a mask and safety glasses.
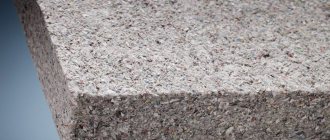
Stone wool is the best option for external insulation. It has a number of advantages in comparison with its counterparts. The heating temperature can be 600 degrees Celsius. The most popular type is the basalt type, which, like other types, contains components such as diabase or gabbro, but additionally mineral components such as dolomite, clay and limestone, as well as blast furnace type slag and charge may be present. The amount of impurities is 35%, while the average amount of binding components is about 5%.
A small amount of the latter makes it possible to produce a less moisture-resistant material, in which the amount of evaporated phenol is reduced, which makes basalt wool safe for human health. The advantage of this insulation is the absence of additional components; it is able to withstand temperature conditions from -190 to +1000 degrees Celsius . Sudden changes in temperature do not affect the structure of the material in any way. Stone and basalt wool are not subject to combustion even when exposed to the above temperatures, and therefore these materials are fireproof.
Semi-rigid stone wool mats are recommended as an external insulator for a wooden house. Their density can range from 80 to 150 kg per 1 cubic meter. The dimensions of such mats are 600x1200 mm; there are also rolled types, but they are prone to subsidence even with proper installation, since their strength and density are much lower than those of mats.
Selection of materials
Selection of stone wool
Companies that insulate low-rise buildings usually work with a specific brand of stone wool, but the customer has the right to change the insulation used for the construction of the facility.
Now many “experts” suggest choosing insulation based on density, limiting yourself only to this parameter. In particular, to insulate the outside of a house with stone wool under siding using curtain-wall facade technology, it is proposed to use semi-rigid mats with a density ranging from 45 kg/m3 to 125 kg/m3. Insulation in this range is not elastic and will be poorly mounted into the frame, and often simply break during installation. Therefore, when choosing stone wool, you need to pay attention to the following parameters:
- Thermal conductivity . The lower this figure, the better, since the insulation conducts less heat, and the home owner will pay less for the operation of the house (not only in winter but also in summer, when the house needs to be cooled)
- Thickness _ It is selected based on the thickness of the original wall and the climatic conditions of the region in which the house is located.
- Elasticity . The insulation will be installed in the spacer between the studs of the wall frame. Therefore, only elastic insulation can be installed efficiently, without using additional fasteners and eliminating air / non-insulated “pockets”.
What should be the thickness of the insulation?
The insulation density of external walls is calculated individually for each building. Here they take into account the material from which the structure is constructed and its thickness. The average temperature indicators of the region where the house is built are also important. Typically, mineral wool is laid in 2 layers so that the average thickness is 15 cm. It is permissible to increase the heat-insulating layer, but in most cases this may require additional lathing of the structure.
Installation of insulation from the outside using polystyrene foam as an example
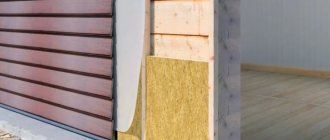
Expanded polystyrene sheets begin to be fixed in the frame from the bottom up , using glue specially designed for this purpose. If some sheets don't stay in place well, you can use foam wedges or regular nails to secure them.
Next, the foam is covered with a diffusion membrane . It must be laid in horizontal strips from the bottom of the wall to the top, while the resulting polystyrene foam joints must be overlapped by 10 - 15 cm.
The membrane is fastened with a stapler, and the joints are taped with adhesive tape.
After attaching the membrane, the structure is covered. For these purposes, lining, thin-layer plaster or siding are used.
NOTE!
Gaps should not be left between the sheets to avoid the formation of cold “bridges”.
Insulation with polystyrene foam
Laying foam
Preparation of frame elements
The frame for external insulation can be made of a galvanized metal profile or timber. The first one tends to freeze strongly during the cold season; subsequently, condensation can form on it, negatively affecting not only the mineral wool, but also the main structure of the house.
A metal frame, unlike timber, has less rigidity, and therefore wood building experts recommend giving preference to the latter type of material.
The section for the future sheathing is easiest to select in accordance with the thickness of the mats used, but it is permissible to install the frame at the required distance from the main structure and with the help of racks also made of wood.
ATTENTION! Take into account the distance of the ventilation gap, on average it is 5 cm, which means that for the counter-lattice you should purchase a beam with a cross-section of 5x5 cm.
If necessary, use metal type holders; both the sheathing itself and the insulation can be attached to them. We recommend choosing a straight type of hangers used for installation of plasterboard structures.
Comparative characteristics of insulation materials
| Characteristics | Basalt wool | Glass wool | Ecowool |
| Thermal conductivity | 0.032 to 0.048 W/m*K | 0.030-0.052 W/m*K | 0.032-0.041 W/m*K |
| Vapor permeability | about 0.3 mg/m∙h∙Pa. | 0–0.6 mg/mh*Pa | 0.3 mg/(m*h*Pa) |
| Fire hazard | Non-flammable (class G1) | Moderately fire hazardous (class G2) | |
| Sound absorption | High | ||
| Environmental friendliness | The binder - phenol-formaldehyde resins - is hazardous to health. There is a line of basalt slabs with a safe acrylic binder | Possible allergen | Safely |
| Easy to install | Plates are dense and brittle | Easy to shape | To apply it to the facade, you need to call a team |
| High temperature resistance | Up to 1000°C | Up to 450°C | Up to 232°C |
| Hygroscopicity | < 1% | 0,2-2% | 14% |
| Life time | 15-20 years (up to 40 in ideal conditions) | 4-6 years (settles over time) | 10-15 years |
All these insulation materials allow the facade to be thermally insulated using a dry method. It is not advisable to cover the outside walls of a wooden house with plaster: the coating will constantly crack, and living in constant repairs is a below-average pleasure. This technology is more justified for stone buildings.
Treatment of a wooden structure before insulation
First of all, explore all the walls.
Clean all crevices and existing cracks from accumulated dust.
Treat the damaged areas with an antiseptic primer solution, if necessary, in 2 layers. Wait until it dries completely.
Seal all cracks and crevices. This work should be carried out carefully, since the presence of flaws allows cold air to penetrate into the living space, creating discomfort. It is better to carry out the work with a latex-based sealant intended for external types of wooden work. The paste helps maintain temperature balance and does not allow wind currents to penetrate into the living space through the walls.
A properly selected sealant can easily be applied to a thoroughly cleaned and pre-primed surface. Due to its elasticity, the seal will be able to deform, adapting to changes in the size of existing gaps. If there are large cracks, it is additionally recommended to use an acrylic type of tourniquet, which is placed into the crack as tightly as possible and only then covered with a layer of sealant.
Know! Repairing a wooden structure can be carried out using materials used as inter-crown insulation such as tow, felt and moss.
Differences between external and internal insulation
External insulation allows:
- protect wooden walls from temperature changes that lead to deformation;
- prevent exposure to moisture and mold formation;
- reduce heat loss and heating costs.
External insulation allows you to protect wooden walls from temperature changes.
Internal insulation in the absence of external insulation is ineffective. In this case, the cold penetrates through the walls, but does not enter the room. The negative impact on wood (freezing, condensation, moisture accumulation) remains. The walls will gradually collapse, become deformed, and under the layer of mineral wool, fungus and mold will form on wooden surfaces.
It is necessary to insulate the building from the inside if it is not physically possible to carry out installation work from the outside: the proximity of other buildings, a house for several owners. In most cases, the installation of insulating material on the inside is carried out as an addition to the exterior finishing.
For example, if the external insulation turned out to be insufficient due to the wrong choice of wool thickness.
Installation of a metal frame
The metal type of lathing, despite its durability, has increased thermal conductivity. You can avoid freezing of the metal and the formation of condensation by placing mineral wool in the grooves of the sheathing. Thus, the structure will also be insulated.
Instructions for installing a metal frame:
Make vertical markings around the house. It is important that it matches the placement of the guide elements of the sheathing.
Along the entire vertical, in increments of 25 to 35 cm, attach straight hangers that have the function of metal holders. Profiles are subsequently installed on them. These elements are necessary to level the frame using a level, at the distance that is necessary to retreat from the main structure for natural ventilation. The presence of numerous holes allows for fastening at the required level with self-tapping screws.
Interesting Metal holders can be used to fasten a wooden frame made of timber.
Additionally, horizontal frame elements should be installed. They make the structure more rigid and stable.
Proper wood and metal lathing
The sheathing in the area of window and door openings must be solid and rigid; be sure to integrate it into the overall structure.
When the work is completed, proceed to laying the mineral wool.
The timber frame is made according to the same principle, and in most cases the guides are attached directly to the main structure. Before starting work, it is important to treat the frame elements with an antiseptic solution and wait for it to dry completely.
Preparatory work
Before you start insulating the walls of your house, you need to prepare them:
- Clean from dirt and dust.
- Inspect surfaces to detect problems (destruction of timber, presence of cracks, large gaps).
- Treat the walls with an antifungal solution.
- Caulk the cracks and seal the cracks with wood sealant.
- Take measurements.
Before you start insulating the walls, you need to treat them with an antifungal solution.
Preparatory work includes calculation of materials and choice of installation method. The latter depends on the chosen option for facade finishing: plaster, siding, lining, panels.
When determining the type of mineral wool and its thickness, it is worth taking into account the features of the frame. For example, if it is made from 50 mm timber, you can use the same insulation. Otherwise, you will need to make more cuts or lay it in several layers. And if you determine the distance between the vertical bars of the frame with a size that is a multiple of the parameters of the wool, you can simplify and speed up the cutting and installation process.
Required materials and tools
To insulate the facade, you will need to prepare materials according to the chosen installation method:
- mineral wool;
- timber, ud and cd profiles for the frame;
- self-tapping screws, nails for fastening the sheathing;
- umbrella dowels for fixing mineral wool;
- antiseptic;
- hydro-, vapor barrier;
- tape for connecting the insulating film;
- brackets for attaching the film.
The tools you will need are a drill, a screwdriver, and a hammer drill for installing the sheathing and wool.
To cut timber for the frame you need a jigsaw or a hacksaw, for the profile - metal scissors or a grinder. The accompanying tools will require a stapler, tape measure, level, and pencil.
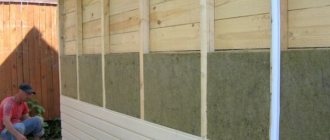
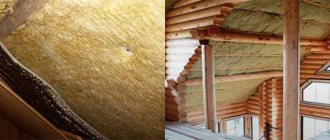
How to lay mineral wool correctly?
First of all, a solid beam should be installed at the bottom of the frame. The installation process should begin from the bottom up. The mats are laid tightly against the wall, eliminating the possibility of gaps forming. When laying several layers of stone wool, first lay out a thicker layer and then a thinner layer. Make sure that the top layer overlaps the joints of the inner layer, this way you will be sure that all gaps are completely closed.
For the area of windows and entrance doors, strips are required that are cut from the mat. Their width must correspond to the width of the sheathing; it is unacceptable to leave gaps, so be careful. If there is a gap between the wall and the frame, then first of all it is necessary to close all the voids; if necessary, you can cut the mats in the places where metal hangers are installed, but there should be no gaps left. Once you are sure that your work is done correctly, you can proceed to the next stage.
Methods for installing mineral wool
The choice of installation method depends on the type of facade finishing. If panels, siding, or lining are used for cladding, it is better to lay mineral wool into the frame. It will also serve as the basis for creating a ventilation façade or securing finishing materials. If you decide to plaster the walls outside, then you need to attach the insulation to the walls without a frame. Both options are suitable for finishing with siding.
Frame
The frame method involves building a sheathing into which insulation will be laid.
The frame method reduces installation time.
The disadvantage of this option is the high costs associated with the purchase of timber. Advantages of the method:
- ease of laying and fixing mineral wool;
- reduction of installation time (if the sheathing cells are multiples of the slab sizes);
- ease of fastening finishing materials;
- the ability to equip a ventilated façade;
- All work can be done by 1 person.
Frameless
If there is no frame, the insulation is glued to the wall and secured with umbrellas. The use of this method will allow you to save on the purchase of materials (timber, profiles) and their installation. Instead, you will need a reinforcing mesh and a mixture to create a protective layer, onto which plaster is then applied. If you plan to finish with siding, it is necessary to install a sheathing to secure it.
You can lay mineral wool in whole slabs, without cutting. This will speed up the process. The inconvenience is the need to carefully seal the joints and the inability to work alone (due to the large size of the sheets).
Windproof membrane
When the main work of laying the mats is completed, they should be sheathed with a membrane, the sheets of which are glued together using specialized tape. Regardless of the point at which you connect them, the canvases must be laid with an overlap, the width of which should be at least 10 cm.
Additionally, the heat-insulating structure is stitched with “fungi” - these are special fasteners made of plastic and having a wide cap.
To install them, you will need to drill holes through all layers of insulation and into the wall. Next, the “fungus” is installed in the hole and driven in like dowels, opening up inside the wall. “Fungi” promote better adhesion of mineral wool to the wall surface and hold it. When the work is completed, your home should look like a quilted mattress.
Before you begin cladding the facade, you should install a counter batten on the frame, with the help of which a ventilation gap will be formed; it is on these beams that the façade trim, in our case, will be attached - this will be siding.
What is mineral wool and how to make the right choice
Mineral wool
Mineral wool belongs to the category of insulation materials that are obtained by blowing solid material into fibers. This insulation has three varieties:
- stone wool;
- glass wool;
- slag wool.
Stone wool
Stone wool
It is customary to use basalt for its production. According to experts, this type of insulation incorporates the best characteristics:
- Basalt as the main raw material in the manufacture of insulation.
- The substances it contains prevent the material from taking on a pointed shape.
- When compressed, the slab remains rigid.
The simplicity of the technological process is due to the use of only additives and dolomite (basalt) in production. It is a residual product of production, which significantly affects its cost.
Glass wool
Glass wool
*
To produce the material, waste glass and some rocks, which are rich in silicates (silicon), are used. The characteristic features of the insulation include an elongated type of particles, which are 0.04-0.3 cm.
Peculiarities:
- If you use a microscope, it will show that the shape of the particles is slightly pointed, which leads to small scratches and irritation of the respiratory tract when working with the material.
- Excellent adhesion between individual fibers.
The parameters of this material are at the optimal level and when using it you will not need protective equipment.
Slag
Slag blast
furnace slag is usually used as the main raw material. The particle size of this material is small due to the technology used for its production. The rigidity indicator (in compression) is 0.015 MPa, which is the lowest among similar slabs and mats. In terms of thermal conductivity, slag wool is not inferior to other insulation materials. The installation technology is relatively simple, and therefore the popularity of this product among developers is extremely high. Often used in industry in the construction of steel smelting plants, mines, factories and pipelines. With its help, you can insulate a plane with a slight slope or a horizontal surface.
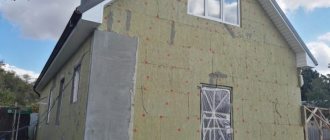
Siding
When insulating a wooden house from the outside with mineral wool under the siding, installation of the latter should begin with the protruding part of the base, if any. An ebb tide is installed on it.
If the structure is solid and has no protrusions, then first of all apply starting markings along the lower border of the building, to which the starting profile should be attached.
Different manufacturers offer completely different types of starting bars, and therefore they may have a number of differences not only in configuration, but also in external parameters. The upper part of the panel must necessarily have a locking type of connection, with which the remaining panels will subsequently be fastened. Know! Regardless of what siding elements you are attaching, the screws should not be screwed in tightly. It is necessary to leave a small gap, enough 1 mm. In this case, the fasteners are screwed into the central part of the holes on the panels.
Install corner profiles with a small gap from the end strip; its size should not exceed 6 mm. The installation of any elements must be clear so that the final structure is not skewed. At each stage, use a building level to maintain clear horizontal and vertical directions. When installing a vertical profile, start fastening it from the top so that the bar can sag on the fasteners; the remaining screws should be fastened according to the principle described above.
Finishing panels are attached in the area of window frames and doorways; platbands will subsequently be attached to them to mask the ends of the main planks.
Now you need to install connecting strips that resemble the letter H. Its installation is carried out on the beam strictly vertically and loosely, so that the profile itself can “move” up and down.
You can begin installing the first strip of siding. Fasten it to the lock of the initial (bottom) bar, placing the ends into the grooves on one side, and the H profile on the other - angular. Take your time and make sure that all the locking connections click well. Strengthen the panels using self-tapping screws according to the above principle and proceed to the next row.
ATTENTION! To make the structure smooth and beautiful, try to check yourself as often as possible using a building level.
The remaining elements are mounted according to the same principle from bottom to top, fastened with loosely screwed screws.
Having reached the top, you have to connect the last panel with the finishing profile. Here, in most cases, adjustment of the material in width is required. You should cut off the top part of the strip (on which the mounting holes are located). Only the front part of the siding with internal fasteners remains. On a narrow profile you should make hooks; for this you will need a punch. The hooks are made in increments of 20 cm from each other and curved. Now the prepared plank is fastened to the bottom one using an internal lock and thrown onto the upper finishing profile where it is also snapped in place; as a result, you get a solid siding covering of a wooden house insulated with mineral wool.
Some useful tips from a specialist:
- Before you start working with siding, lay out the panels and use a tape measure to mark the locking part of the material. This way, you will attach the profiles in the same place, resulting in a solid, even and reliable structure.
- Install the panels at a distance of 5 mm from each other, while making sure that they are not tightly twisted. If this rule is followed, the material will expand freely at the time of temperature changes and other weather phenomena.
Watch the videos below, in which you can clearly see and understand how to properly carry out the insulation process and install siding yourself.
Video description
In simple words, the calculation of insulation thickness is described in the following video:
Frame materials
Both types of materials are used for lathing: galvanized metal profile and wooden beams.
The use of metal profiles is provided for in all factory-made hinged facade systems. Dimensional stability, clear geometry of unified forms - all this is ideal for industrial replication and development of installation flow sheets. But they have one drawback - the metal serves as a “bridge” of cold and reduces the thermal insulation properties of the curtain wall. Even the standard for thermal protection of buildings has an unambiguous recommendation for minimizing metallic inclusions in insulation. And if you can’t do without fasteners, then the sheathing can be made of wood.
Wood is more “capricious” and heterogeneous in its structure. Lumber may “lead” during storage, which leads to a change in shape. There are knots, resin pockets, cracks and almost a dozen other defects specified at the standard level. But despite this, timber sheathing is often used for cladding wooden houses. Although this requires certain selection and pre-processing of the material.
Wooden beams are often used as a frame for insulation. Source pro-uteplenie.ru
Protection of insulation from moisture
To prevent mineral wool from getting wet and losing its properties, it must be protected from moisture by water vapor penetrating through the wood from the interior, as well as from rain and condensation from the outside.
To protect against internal vapors, it is important to use a vapor barrier membrane, for example ISOVER Paranet. The need for it must be checked using a design calculator, which allows you to calculate the process of possible accumulation of moisture and its concentration in the wall structure. The membrane is fastened using a construction stapler over the entire surface of the wooden facade before installing the insulation. The vapor barrier must be continuous and continuous, so the membrane material is installed with an overlap of 100–150 mm and the joints are sealed with special adhesive tape.
Protection from rain and atmospheric moisture is provided by the ISOVER Vetranet hydro-windproof membrane, mounted on top of the insulation. The need for its use is also determined by calculation.
When using hydro- and vapor barrier, it is important to install the membrane with a certain side (with logos) facing outward, since the properties of its surfaces are different: membrane materials prevent the penetration of moisture in the form of drops and condensation into the insulation, but are at the same time vapor-permeable so that the thermal insulation can evaporate excess moisture into the ventilated gap under the outer skin.