Every home should be warm and cozy. Agree, without the first point it is impossible to comply with the second. Considering the complexity of modern architectural solutions and the uniqueness of the interior, radiator batteries may not be suitable for heating a room everywhere. Therefore, modern technologies offer heating using elements installed in the floor. The topic of this article is installing a heated floor with your own hands.
Where can it be mounted?
Warm floors can be used almost everywhere. The electric version is installed in private houses, apartments, loggias, bathhouses and even garages. The water type takes up a lot of space, so it is not applicable in small apartments with low ceilings, but in large houses it is superior in ease of use to its electric counterpart.
A floor with heating elements can be used as the only or additional source of maintaining room temperature. However, it should be remembered that such a heating system is not a cheap pleasure. Be prepared for your electricity bills to skyrocket.
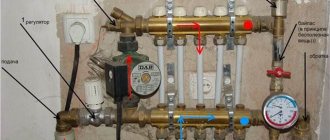
Unit #2 - collector
The collector is a device responsible for distributing hot water through heating circuits, as well as setting up and adjusting heated floors. The device must have a sufficient number of terminals to connect all circuits to them.
The simplest models are equipped only with shut-off valves. They are extremely cheap, but do not provide even a minimal opportunity to customize the system. Devices with control valves allow you to adjust the water flow for each circuit, which allows you to adjust the heated floor for the most uniform heating of the premises.
The manifold of any model must be equipped with a drain outlet and a special air vent valve. The most convenient to use are devices with servo drives on valves, equipped with pre-mixers that mix the heated water supplied to the system with the cooled water returning and thereby regulate its temperature.
Such a device fully automates the functioning of a heated floor, but its cost is very high.
Manifold with servomotors on valves and pre-mixer. Necessary system adjustments are made automatically
Classification
Water
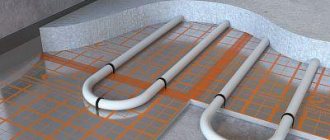
Floor heating using hot water pipes was known to mankind even before the beginning of our era. The main condition for the use of such a design: the ability to connect to a central heating system or install a separate boiler room. In standard apartment buildings, the installation of such heating devices is prohibited, because the water pressure in the pipes is designed only for radiators.
For installation, metal-plastic or polymer heat-resistant pipes are used. They are highly reliable, their minimum service life is forty years. However, due to the thick layer of insulation, it will not be possible to significantly increase the air temperature, so the system is used for additional heating. The pipes themselves, layers of insulation and overlying material take up a lot of space. Please note that the floor level will be increased by at least ten centimeters.
The design consists of a heating circuit and a distribution unit, including a manifold, pump and mixing unit. The standard heating area when installing one circuit is 10-15 square meters. For spacious rooms, several circuits are installed with the possibility of individual connection and control of each of them.
Advantages of this type:
- long service life;
- low power consumption;
- safety;
- There are no restrictions on furniture installation.
However, there are also disadvantages that significantly limit the scope of application of the system.
The main ones:
- design complexity;
- complexity of installation;
- high load on the floor due to the thickness of the structure;
- in case of breakdown, a major repair is required with a complete opening of the entire floor.
A water floor is less common than the next subtype - electric. It will be discussed in more detail in the article.
Electric
In this case, the system produces heat through a variety of electrical heating elements. Below are the main subtypes depending on the components. In this case, the installation process and the type of decorative finish change slightly.
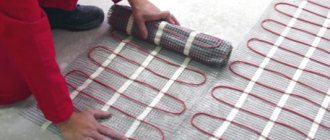
Cable
The most common and accessible type. The device is simple. Mounted on a screed or in a layer of tile adhesive. Very convenient for installation in small spaces. The cable is supplied completely ready-made: it is convenient to install, but cannot be shortened. To avoid overheating, massive furniture should not be installed above floor elements.
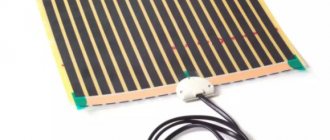
Film
Special heating films are produced on an industrial scale. They are strips of heat-resistant polyester with sealed thread-like heating elements. Heating occurs in the form of infrared radiation, it is very fast, uniform and of high quality. Installation is incredibly simple and quick: the film is laid directly under the floor covering. There is also a minus: film sections cannot be placed in screed and tile adhesive, because an alkaline environment will damage the polyester.
Thermomat
They are considered an improved variation of the cable system. The product has the form of fiberglass rolls with attached cables. During installation, part of the coating can be cut off to adjust the area of the heating coating. The use of mats simplifies the installation of heating cables.
System design features
A water heated floor is a complex structure consisting of the following layers:
- base;
- hydro and heat layers;
- reinforcing elements;
- pipes;
- concrete screed.
The finishing floor covering is laid on the top concrete screed.
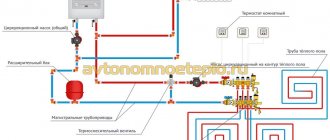
The coolant is supplied to the pipes from a gas boiler. It is also possible to connect pipes to a solid fuel boiler, but economically this option will be less profitable. Purified water or antifreeze is used as a coolant. In addition to pipes in the floor, radiators are installed in the room. But in most cases, with high-quality thermal insulation of the house, they are rarely used.
General diagram of a water heated floor
A distribution unit is connected to the boiler, which consists of a circulation pump, a mixing unit and a manifold group. It “routes” various heating circuits and allows you to regulate their heating.
Principle of operation
The operation of electric underfloor heating varies slightly depending on the type of heating element. When using mats and cables, the temperature rises due to heating of the conductor as a result of the passage of electric current through it. The wire heats the screed, which then transfers heat to the floor covering. Heating of the room occurs due to convection processes.
The film with infrared elements heats up due to the radiation of heat from the carbon layer, which occurs under the influence of current. This radiation, as in the previous version, transfers to the finishing coating and to objects located close to the floor surface.
In both cases, the temperature can be adjusted by installing temperature sensors and controllers that are attached to the floor.
Advantages and disadvantages of the electric option
The design is very simple, so it has earned wide popularity in all countries.
Advantages:
- ease of installation (can be carried out even by a non-professional);
- high autonomy (no connection to water supply or even electrical network required - can be powered by an electric generator);
- versatility - can be installed in any room, even with extremely high humidity (for example, in a bathroom or bathhouse).
There are also disadvantages, but they are insignificant when compared with the water version of the floor.
Main disadvantages:
- relatively high price of materials;
- high inertia - the air heats up very slowly;
- heating elements must not be installed under massive furniture.
A lot depends on the features of use and purpose of the elements. Let's look at this in detail in the next subsection.
Main or additional heating
If you are installing the floor in an apartment where there is central heating, you can use cable heaters of the lowest power. If such a heat source will be the main one, you need to increase the number of elements and make a very thick screed - at least five centimeters. Also, the frequency of the cable will affect the power of the entire system.
The principle of operation in such cases does not change. However, with high power, it is necessary to additionally install systems that protect against overheating, short circuits and other problems with the general electrical wiring.
Types and design, as well as features of heating elements
A single-core wire or a two-core cable is most often used as an electric floor heating element.
The first option is notable for its low cost, but the increased background EMR imposes restrictions on its use in residential premises. The heating cable has two cores, one of which plays the role of a regular conductor, and the second - a heating element. This design can significantly reduce electromagnetic radiation, but increases the cost of the product.
More detailed information about the above heating elements can be found on the pages of our website.
Installation can be greatly simplified if you use a heating mat. This design is nothing more than an ordinary thermal cable laid with a certain step width on a reinforcing mesh.
As a rule, the width of the mats is about 0.45-0.5 m, and the length can vary from 0.5 to 12.0 m (accordingly, the maximum heating area for one segment is limited). There is no standard for mat sizes, so they may vary slightly from one manufacturer to another. The electromat, like the thermal cable, is a solid structure, the footage of which cannot be changed arbitrarily.
Rod structures are considered a subtype of electric mats. They use special carbon rods with the addition of copper and silver as heating elements. Heating elements are connected in parallel with a certain step.
The main advantage of this design is self-regulation. That is, if the temperature on any rod has increased due to poor heat transfer (for example, furniture has been placed), then the heat release is reduced. Thanks to this property, you can lay the mat over the entire area of the room.
Infrared film. This heating element became widely available relatively recently, literally at the beginning of the century.
The term “infrared” used in the name is a marketing ploy aimed at distinguishing this product from a number of other heating elements.
As you know from a school physics course, infrared emitters are also called thermal, therefore, any heating device can be classified in this category. The design of the film infrared heating element for a heated floor is shown in the figure below.
Methods for installing heated electric floors
Laying methods depend on the type of elements and purpose of the room.
Main options:
- Mounting into a screed layer. Suitable for living rooms, bathrooms, kitchens and loggias. Cable elements, waterproofing, and insulation are used. The final touch is decorative flooring.
- On top of the screed under the tile. A very economical method, but suitable only for residential apartments, when the room on the floor below is fully heated.
- Directly under the floor covering. Film options are used; they are placed directly on the screed. In some cases, waterproofing is done.
It must be borne in mind that floor screed is required in any case if you want beautiful, smooth and durable floors.
Installation of circuits on profile heat-insulating mats
This option for arranging a floor heating system is the easiest.
Polystyrene insulation boards are used here as the basis for the water floor. These laying mats have dimensions of 30x100x3 cm. They are equipped with grooves and low posts. The heated floor pipes are snapped into these fasteners with your own hands. The finishing coating is laid on them. This method does not necessarily require the use of a concrete screed. When floor tiles or linoleum are used as a finishing coating, GVL slabs must first be laid on the base. The thickness of the sheets must be at least 2 cm.
What you need
It is very important to plan your budget correctly so as not to save not only on the heating elements themselves, but also on all building materials. High-quality waterproofing is especially important; in some cases it is a decisive factor.
To lay the floor you will need the following materials:
- the flooring system itself (heating elements and reinforcing mesh included);
- connecting wires;
- fastenings;
- temperature controller;
- temperature sensor;
- RCD protection system (residual current device);
- cement with sand;
- copper cable for grounding.
It is also necessary to purchase the flooring in advance in order to determine its thickness, texture and other aesthetic characteristics.
Material selection
The heating cable can have various designs.
Main types of cables:
- Self-regulating. The element is a polymer matrix. When overheating occurs in the fault zone, the current flow is reduced to prevent breakdown. The remaining areas are operating normally. Thanks to this property, a cable of this type has durability and high reliability, but is characterized by high cost.
- Resistant. Consists of one or two wires that have very high resistance. Passing through them, the current is converted into thermal energy. The heating core is protected by a layer of insulation and a metal braid responsible for grounding. However, if one section of the core fails, the entire system breaks down irreversibly.
Installation of the heating branch cable is carried out in a layer of cement fill, which will additionally redistribute heat and perform the function of insulation from cold from external sources.
How can water floors be installed?
Warm water floors can be laid in different ways - by laying and using concreting. Let's take a closer look at each of them.
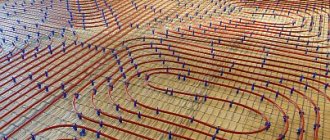
Concreting. The pipes through which the coolant circulates are laid as required on the prepared base and filled with concrete screed. The main disadvantages: labor-intensive “wet” work, the heavy weight of the system and the complexity of its dismantling.
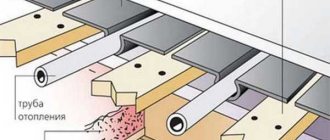
Layered method. It involves laying pipes in a specially assembled deck.
It can consist of plastic modules or wooden blocks with grooves prepared in them for installing pipes. Wooden mounting modules can also be found on sale. The main disadvantage is that the system takes longer to warm up than a concrete one.
Power calculation
To determine the power, you need to know the characteristics of all wiring and heating devices. Key indicators: length and power factor.
There is a special formula: P1 = P2 * S * K.
K – safety factor equal to 1.3...1.6. P1 is the power of the purchased cable, and P2 is the required heating power of one square meter of room.
However, classical norms are most often used. So, in a living room the power does not exceed 150-180 Watts, and on balconies and loggias - 180-230 Watts per square meter. It is not recommended to increase the power without a good reason, so as not to overload the system and not lead to wasted heat, which will be generated in excess.
Also, the power varies depending on the purpose: is it primary heating or additional heating. For example, if such a structure is the main source, the element should cover 70% of the floor surface. If the heating is additional, fill only the center of the room or areas not occupied by heavy furniture and household appliances.
For non-standard premises and in other cases requiring accurate calculations, special calculators were created. Let's take a closer look at them.
Calculator
A calculator for calculating the length and cable laying diagram can be found freely available on the Internet. The most important indicator is the cable pitch (the width of the stripes between adjacent wires in a loop). To calculate all parameters, you need to indicate the basic initial data.
We will need:
- total area of wire laying areas;
- specific power of the cable indicated in the passport;
- functional purpose of the floor (main or additional source, whether there are other heated rooms nearby).
The calculated value will help you make the right choice when purchasing a cable and calculating the insulation thickness. Knowing the length, you can calculate the step, which is on average ten centimeters.
Insulation and heat reflector
The optimal insulation thickness is 5 cm.
When laying on the ground or if increased protection from the cold is needed, when the level below is an unheated room, the thickness of the thermal insulation can be increased to 10 cm. To reduce heat losses, it is recommended to lay a heat-reflecting screen made of metallized film over the insulation. It could be:
The metallized layer is quickly destroyed by the aggressive action of concrete, so the screen itself also needs protection. Such protection is provided by polyethylene film, which is used for greenhouses and in greenhouse farming. The film thickness should be 75-100 microns.
In addition, it provides the necessary moisture for the maturing concrete screed throughout the entire period of its hardening. The pieces of film must be overlapped, and the joint must be sealed with tape.
Brief description step by step
Let's look at the step-by-step process of laying the floor.
Main stages:
- preparation of the base;
- laying out elements;
- sensor installation;
- system connection;
- filling with screed.
Let's look at each step in detail to know all the details of such an important but simple process.
Which way is better?
The choice of the best method is influenced by the quality of fastening and the price of the issue. For professional craftsmen who perform large volumes, convenience and speed of installation play an important role.
Fastening to reinforcing mesh has been used for a long time, its advantages are ease of installation and minimal costs. However, it is difficult to call the method convenient: you have to work all the time bent over, tying nylon ties with your hands. And the use of a grid does not cause unanimous approval. There is an opinion that it gradually cuts the plastic and over time the pipes begin to leak.
More and more craftsmen are resorting to working with a tucker, which allows them to produce large volumes of work in a short time. At the same time, the quality does not suffer compared to other methods.
The same can be said about the use of polystyrene foam mats with fixation. Time will tell which method will become the most common.
This video shows common installation methods
Surface preparation and features of base insulation
It is best to remove the entire old floor along with the screed down to the base to increase overall reliability. All material is completely cleaned, any elements are dismantled.
Then a layer of waterproofing is laid with a margin so that it extends onto the wall by about 10-12 centimeters. The perimeter is marked with a special tape; this damper tape helps regulate the processes of thermal expansion of the floor surface. Excess tape and waterproofing can always be trimmed.
The floors are also thermally insulated to prevent heat from escaping down the floors or into the ground. To do this, choose insulation depending on the desired result, budget, purpose of the room and the characteristics of the heating system itself.
Basic recommendations:
- If the floor serves as an additional source of heat, you can get by with foamed polyethylene with a foil coating - penofol.
- If the floors below are heated, use polystyrene foam with a thickness of 20-55 millimeters, or similar insulation.
- If there is a lot of unheated space around, and the risks of energy loss are high, it makes sense to insulate the floor with a layer of 10 centimeters of polystyrene foam or mineral wool.
A reinforced mesh is placed on top of the insulation, most often sold as a complex with heating parts of the floors.
Preliminary cement-sand screed and fixing the mounting tape
Before laying the heating cable, a cement-sand screed is poured onto the thermally insulated surface. The screed layer will help prevent overheating of the heating cable, and will also create a solid base for laying the heating cable.
If for some reason it is not possible to organize a preliminary screed, you can lay the cable on a metal mesh laid out on top of the thermal insulation (with a fine mesh of 1-2.5 cm). The mesh, in this case, together with the heating cable laid on top of it, is filled with the finishing screed in one step. Due to the metal mesh, the screed is strong and monolithic.
After the cement-sand screed has sufficiently hardened, the floor is covered with special foil-coated thermal insulation (installation foil). The entire surface of the floor is covered with foil, it is laid with a reserve at the joints, and the edges are glued with foil tape so that they do not wrap during the installation of the cable.
Such a heat-leveling screen in the form of foil will promote uniform heat distribution over the entire surface of the heated floor.
To securely fix the heating cable, use mounting tape. Lay the mounting tape on the floor surface every 50 cm and secure it with ordinary nails or self-tapping screws.
To fix the cable on the mounting tape, special brackets are provided, located at equal intervals from each other along its entire length (usually 25 mm). Using these brackets, it is easy to maintain the required cable laying spacing.
Installation process
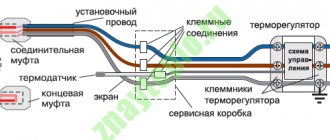
Before laying an electric heated floor, a thermostat is first installed. It is placed at a height of at least thirty centimeters from the floor, at the same distance between the heating cable lines. It is recommended to first make a recess in the wall for the device and place a groove for its wire. The sensor should be located in a well-heated area of the room. Therefore, the corrugated pipe with the sensor must be located above the floor level and be equipped with a plug.
This stage of direct installation of heaters varies slightly depending on the type of element used. Let's consider all the nuances.
With heating cable
In order not to confuse the order, we will analyze the process into steps.
Stages of work:
- Supplying phase, neutral and ground from the distribution box to the installation site.
- Formation of a groove in the wall in which two pipes will pass. The water one will contain the power wires of the heating cable, the other will contain the floor sensor wiring. The second one should be one meter longer than the first one.
- Leveling the floor surface, then installing thermal insulation. We place mounting tape on top in half-meter increments and lay the cable. You can do this using any type, but most often the “snake” is used.
- Pulling power wires to the thermostat box, the coupling should be located in the tie. The correct step in laying the cable is the distance between the tape fastenings. The cables are laid parallel.
- Installation of a temperature sensor, which must be wrapped with electrical tape to protect it from mortar.
- Checking the quality of work. It is necessary to measure the resistance of the heating cable with a tester, the permissible error is 10%.
- Screed. This stage will be discussed in detail in a separate section.
As you can see, everything is very simple. Even a beginner can cope with this task.
Application of thermal mats
Technologically, the mat is the same cable connected to an insulating underlying material that facilitates the laying of rolls. Installation in this case is very simplified. The process is similar to laying conventional cables, however there are a number of features that must be taken into account.
The most significant of them:
- The groove for placing the sensor must be made in the wall and on the surface. A protective plastic pipe will lie below the mat itself.
- After the basic preparation, you should immediately proceed to laying the mats. The roll width reaches half a meter. You can cut some parts of the mat to change the direction of the cables. You cannot cut by wire - only the mesh itself, which has a special reserve for changing the width.
- Having measured the desired area, you need to tear off the protective tape on the underside of the mat and unwind the roll, laying it on a clean floor surface.
- The laid mat must be covered with a layer of tile adhesive. The heating cable must not rise above the floor. The glue takes a long time to dry - 3-5 days.
- Once the glue has dried, you can immediately install masonry or other flooring. However, most often the mats are placed under ceramic tiles.
In this case, the cost of heated floors is sharply reduced, because when installing mats, no additional thermal insulation materials are required. Installation is very simple and takes only 7-8 days from start to finish. However, mats have the only drawback - such an element cannot be the only source of heat in the room.
With heating film
The film is incredibly thin - 0.2-0.5 millimeters. Heating occurs due to the presence of copper conductors and carbon inserts, which generate heat when current passes through them.
Film floors are laid according to the same principles as mats, only the power of the system depends on the finishing coating: 150 Watt is enough for laminate, 200-220 Watt is enough for tiles.
Sequence of work:
- The temperature sensor can be placed in a plastic pipe or directly on the surface of the film - this is not important.
- Laying thermal insulation. It is advisable to use foil that will reflect the IR radiation emitted by this type of heater.
- Film decomposition. It can be cut anywhere - it is very convenient.
- Insulation of copper wires at the cut site and at the edges of the film. They are insulated at one end, and power wires will be connected to the other.
- Laying decorative covering.
This material is considered the best option, but is distinguished by the considerable cost of the film itself.
Questions about the installation and operation of heated floors
Is it possible to install a pumping and mixing unit for a heated floor separately from the manifold block?
If we are talking about VT.COMBI (COMBIMIX), then this arrangement of the mixing unit is acceptable.
A neighbor advised adding fine gravel to the cement mortar under the heated floor screed to save material. Is this acceptable?
No. The solution is mixed only from sand, cement and plasticizer.
The craftsmen from the team I hired claim that the pipes must be 100% in a protective corrugation. Won't this reduce heat transfer?
Your doubts are fair. The corrugated casing should only be in the places where the pipes are connected to the manifold and at the intersections of the damper joint in the screed.
The temperature at the heated floor supply does not rise above 38 degrees, although on the boiler it is 60, before entering the COMBIMIX it is about 58, and on the thermal head it is set to 40 - 50. Why does the temperature of the pipes not rise?
In the VT.COMBI (COMBIMIX) pumping and mixing unit, two flows are mixed - supply from the boiler and return from the heated floor. Use a balancing valve to set the correct ratio. Most likely, too much cooled coolant is supplied.
If all installation recommendations are followed and the correct choice of materials, the water heated floor will function perfectly for a long time and will make the room cozy and comfortable.
Connection
The heating element with a wire and sensors are connected to the thermostat according to the diagram specified in the instructions. Then it is necessary to connect the entire system to a residual current circuit breaker, the leakage current value is maximum 30 mA.
The check is carried out in various ways depending on the element:
- Cable and mats - the resistance of wires and elements is measured and compared with the passport characteristics (usually about 10%).
- You can simply touch the IR film. If it is warm, it means everything was connected correctly.
When installing a heated floor in a bathroom or bathhouse, you should connect the braid of the heating wire and the grounding wire. The use of grounding minimizes the risk of electric shock in the event of a malfunction.
Observe safety precautions: it is strictly forbidden to apply tension to the floor structure with screed or glue that is not completely dry!
Important nuances of arranging a heating system in concrete
The water heating network must be walled up correctly in concrete. Therefore, some subtleties should be taken into account.
Before installing the system on the first, basement floor, it is necessary to waterproof the floors. This way the room will be protected from capillary suction of moisture from the soil. On subsequent floors, waterproofing will be insurance in case of emergency situations.
In most cases, special polyethylene films with a thickness of 150-200 microns are used as waterproofing. Mandatory rule: their panels on the floor should be laid with an overlap of 10 cm. The joints should be sealed with special tape. The panels are also placed on the walls with an overlap of at least 10 cm.
Extruded polystyrene foam is best suited for thermal insulation of concrete floors. It has the necessary strength and rigidity. In addition, it is moisture resistant, so it does not need protection with a vapor barrier.
For indoor use, polystyrene foam boards 5 cm thick will be sufficient. Only in regions with a very harsh climate is the thermal insulation layer brought to a thickness of 10 cm. The thermal insulation material must be laid out close to each other, and the joints between them must be blown with polyurethane foam.
Before pouring the screed, the perimeter walls of the room, as well as all obstacles (for example, columns, protrusions) and the boundaries of the contours must be covered with damper tape. It prevents cracking of the solution as it dries, shrinks and expands due to temperature. This happens due to the fact that the material forms compensation areas. The damper tape is made of polyethylene foam, has a thickness of 0.5-1 cm, a width of 10 cm, and a roll can range from 15 to 50 m.
Methods for fixing contours
Water heating systems can be mounted using several methods:
- Polyamide clamps. They are used to fix contours to the reinforcing mesh. The cost of fasteners is two pieces per 1 linear meter.
- Steel wire. With it, the network elements are fixed to the grid, the consumption is the same.
- Construction stapler and staples. This method is suitable for quickly attaching circuits to insulation.
- Fixing track. This U-shaped PVC fixture snaps the system elements into place as they are installed.
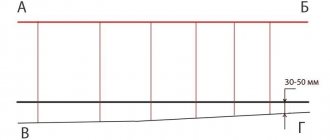
Installation of beacons
To simplify the work, a screed laying device such as beacons is used. They are planks mounted at the same exactly horizontal level and with the same step from each other. The beacons are a flat metal profile, along the top of which the screed will be poured. The bars determine its future level.
To find level 0, a laser or water level is used. With their help, control points are drawn along the perimeter of the room, on the walls at a height of 30 cm. There are two of them in each corner and 3-4 along the walls. The marks are connected to each other using a bevel, forming a line of precise horizontal level.
Then the height from the floor to the axis of the level is measured in the corners. Its minimum value is laid down from the level line and marked along the perimeter of the room. The marks are then connected by tapping. The highest point is called zero. From there, beacons begin to be installed. This is done using self-tapping screws or mortar.
Heated floor screed solution
The screed mortar is made from Portland cement grade M-400 and coarse quartz sand (0.8 mm) in a ratio of 1:3. Water is added to the dry mixture until it reaches a consistency convenient for easy leveling of the mixture. To increase plasticity, liquid soap can be added to the solution.
It is better to mix the components of the screed for water heated floors not with your own hands, but in a concrete mixer. To increase the strength of the coating, polymer fiber can be added to the liquid solution.
Crimping
Pressure testing is carried out after the circuits have been installed and they have been connected to the manifold. The screed cannot be filled until the end of this procedure.
Pressure testing allows you to make sure that the entire system is working properly, its connections are sealed, and the circuits have no defects. If any problems are identified during the inspection, they are promptly corrected before the screed is poured.
The system is filled with coolant and maximum pressure is applied to it. When tested, the network expands to its working size. This allows you to avoid strong pressure on the screed during operation.
Connecting circuits to collectors
The collectors are placed in a special cabinet:
- the width and height of the box can be 0.5×0.5 or 0.4×0.6 m;
- thickness - 0.12-0.15 m.
When the cabinet is installed, supply (with heated water) and return (with cooled coolant) tubes should be connected to it:
- A manifold supplying hot coolant is connected to the supply branch using a fitting or adapter (for different sections of elements).
- A collector for a branch with cooled water is screwed to the return line.
A shut-off valve should be installed between the pipeline and the collectors in case of accidents and repairs. A drain valve must be connected to the opposite part of the comb. To accurately control the floor temperature, a control valve and a mixing device must be installed on the collectors.
Where can it be mounted?
When installing an underfloor heating system, you should not make common mistakes.
In most cases, underfloor heating is installed in your own home. Heating networks of multi-apartment buildings from Soviet times are not designed for this heating method. There is a technical possibility to implement it, but the risk that you or your neighbors will be cold is great.
Often the entire riser remains cold, because... The hydraulic resistance of the floor network is much higher than that of radiator heating. It stops the coolant flow.
Therefore, management companies do not give permission to install underfloor heating pipes in old houses. If you do this without approval, you will have to pay a fine and dismantle the system.
However, in new buildings, underfloor water heating can be installed and you do not need to take permission for this. Their heating networks are initially designed for higher hydraulic resistance.
Adjusting the coolant temperature
To make your feet comfortable, the water temperature should not be higher than +45º. In this case, the floor covering will heat up to the optimal +28 degrees. Almost all heating equipment cannot produce such temperatures (minimum +60º). The exception is gas-fired condensing boilers.
When using any other type of equipment, you need to install a mixing unit. In it, cool water from the return line is added to the heated coolant from the boiler.
Operating principle of the device:
- Heated water from the boiler flows to the thermal valve. If the set temperature is exceeded, it opens to add coolant from the return.
- There is a jumper with a two-way valve in front of the circulation pump.
- When it is opened, water is added from the return line.
- The mixed coolant flows through the pump to the thermostat. It regulates the operation of the thermal valve. As soon as a certain temperature is reached, the return flow is shut off.
Contour distribution
From the mixing unit, water flows to the distribution comb or collector. It's one thing when underfloor heating is installed in a small room (for example, in a bathroom). Only one turn of the network can be laid in it. Then the instructions recommend not making this node.
When there are several turns, you have to somehow redistribute the water between them. Then collect it and send it back. These functions are assigned to the collector. It consists of a pair of pipes on the supply and return branches. The outputs/inputs of the circuits are connected to them.
When there is underfloor heating in several rooms, the best option is to install a comb with control of the heating of the coolant. Often different rooms do not need the same temperature.
Filling with screed
Decorative floor screed is the final stage. The screed is poured from a mixture of sand and cement, the height of this layer is from five to nine centimeters. The entire mass should be distributed evenly, without the slightest irregularities or voids. To do this, initially the screed is made more liquid and pliable by adding a plasticizer, and then, when the level is established, the resulting mass is thoroughly dried. Only after complete drying can you begin to apply the decorative finish.
Finish coating
The best coating option for installation over heated floors is absolutely non-combustible materials. For example, ceramic tiles, granite, brickwork. Also, such rigid materials interact perfectly with the screed, which ensures reliability and high strength of the entire coating. Once warmed up, such layers will be able to maintain the required temperature regime longer.
All finishes must be installed using standard technology for the specific material. You can install laminate, parquet and even linoleum or carpet. It is possible to choose any option depending on the budget and interior design solution. Before purchasing, make sure that the parquet material and linoleum are intended for installation on heated floors. To do this, consult with an experienced sales consultant.
What material is best to choose pipe rolling materials from?
To install water floors, you can use products from the following materials:
- copper;
- cross-linked or linear polyethylene;
- combinations of aluminum and polyethylene or polypropylene;
- composite of polyethylene and polyvinylethylene (fiberglass).
Copper pipeline has the best characteristics. It has the highest level of thermal output, is very durable and does not corrode. However, copper products are expensive and additional equipment is required for their installation. In addition, such a system must be protected from alkali.
The best option is to choose polyethylene products for installing heated floors. It can be cross-linked (PE-X) or linear (PE-RT).
Product advantages:
- High level of thermal conductivity.
- Long wear resistance.
- Increased flexibility.
- The inner walls are smooth, so they become clogged with deposits very slowly.
- The material does not corrode.
- It can withstand repeated freezing of the coolant.
- Self-installation of such network elements is simple, since their proper installation does not require the use of special tools and devices.
PE-XA is the most reliable. This material has the highest cross-linking density (85%). Thanks to this, it has a pronounced “memory” effect. In other words, after thermal expansion, network elements always return to their original state. This makes it possible to use the axial type of fittings with sliding rings; they can be embedded in the screed without any problems.
PE-RT analogues do not have the “memory” phenomenon. Because of this, only collet-type fittings are used with them. It is forbidden to wall them up. However, when the contours of the system are laid in solid sections, then all connections will be only on the collector. In this case, the use of PE-RT is justified.
Manufacturers also make pipes for water floors from composites. In this case, the top and bottom layers are made of polyethylene, with aluminum foil (PE-X-Al-PE-X or PE-RT-Al-PE-RT) glued between them. The metal reinforces the elements of a warm water floor and serves as a barrier to oxygen.
The disadvantage of aluminum plastic is that it is heterogeneous. Different degrees of thermal expansion of metal and polymer can lead to delamination of the material.
Based on this, the best choice would be polyvinylethylene reinforced polyethylene (EVOH) products. It significantly reduces the penetration of oxygen into the water coolant through the pipe walls. This reinforcement can be a top covering or located between layers of polyethylene. The second option is more preferable.
Water heated floors can be laid from pipes of the following sizes:
- 16×2;
- 17×2;
- 20x2 mm.
What are the consequences of incorrect installation?
Installation errors or improper operation can lead to multiple problems. However, there is no need to worry - they do not pose a danger to human health and life. But it’s still a pity to spend money, so it’s better to start installing heated floors with your own hands when you have the proper level of skill and experience.
The most common negative consequences:
- incorrect thermal conditions (for example, overheating under massive furniture);
- failure of the entire system due to breakdown of the sensor, wires or other elements,
- insulation failure leading to overheating of wires;
- “leakage” of heat due to improper thermal insulation;
- curvature of laminate and other finishing coating.
To avoid such troubles, you should follow all the rules when installing a heated floor.
Advantages and disadvantages of the system
Water heated floors in private households are rapidly gaining popularity. This is explained by the advantages of this system:
- high energy efficiency;
- reliability;
- long, at least 50 years, service life.
The VHP may be the only source of heating in the room. This allows you to eliminate radiators and use room space more efficiently. This point is especially important in small rooms.
Along with the advantages, the system has a number of disadvantages. The most significant is the impossibility of using it in apartment buildings with central heating.
Theoretically, you can submit an application to the organization servicing the apartment building, go through an endless cycle of checks and approvals, and get the go-ahead to install the system. In practice, a positive solution to this issue is rather an exception to general practice.
Illegal tapping into the heating system is an administrative offense for which a fine will be issued and an order will be received to return everything to its original position.
The refusal of the management company to install a heated floor in an apartment building is quite justified. The pressure and temperature in the centralized heating system are high, so even the slightest error during installation can result in the most unpleasant consequences for the apartment owners and neighbors below. In the event of an accident, the neighbors above will be left without heating for a long time. In this regard, in apartment buildings it is worth choosing to install electric heated floors.
When choosing a solid floor, it is important that the house has good thermal insulation
The disadvantages also include the high cost of the equipment and the duration of the installation process. It takes at least 30 days to lay all the layers of the pie.
Expert opinion
Grebnev Vadim Savelievich
Heating system installer
One of the main conditions for the high-quality functioning of a heated floor system is high-quality thermal insulation of the building. Heat losses over 100 W/m2 will make the operation of this type of OS ineffective.
Common Mistakes
Beginners with little experience in laying floors can make many mistakes. However, some common flaws can be common even for a professional if low-quality components and elements are used. Therefore, you always need to take into account two factors: not only the qualifications of the worker, but also the quality of the purchased building materials.
Possible misfires:
- It is strictly forbidden to cut the cable. It must be purchased at a strictly suitable length. Any attempt to shorten it will lead to inevitable damage to the element.
- Do not lay cable or film on a contaminated surface. To remove dust, you must use a special vacuum cleaner.
- It is best not to step on the heating cable during installation, especially when wearing hard-soled shoes.
- If any liquid, glue or cement gets into the corrugated tube containing the sensor, it will be damaged and will not be able to measure the media.
- Air pockets should not be left in the tie, especially if they are located close to the cable or even in contact with it.
If you are not confident in your abilities, you can turn to a professional. However, we recommend that you study in detail all the materials given in the article and try to make at least one section of the floor in a small room yourself.
Fastening connections for water heating pipes
Pipe fasteners are installed on the thermal insulation.
Its purpose is to secure adjacent pipe branches and position it along the floor in strict accordance with the preliminary plan. The fastener holds the pipe until the concrete screed reaches the desired degree of hardness. The use of fasteners facilitates the installation of the floor and ensures correct placement of the pipe in the thickness of the concrete pad.
Fasteners can be special metal strips, metal welded mesh, plastic brackets that pin the pipe to the foam base.
Metal strips are used when the thickness of the concrete pad is increased.
They slightly raise the pipe relative to the heat insulator, due to which it is closer to the upper surface of the concrete pad. The pipe simply snaps into the shaped recesses of the planks. The metal mesh not only secures the pipe, but also reinforces the layer of concrete pad. The pipe is tied to the mesh with pieces of wire or plastic clamps.
Fastener consumption is 2 pcs. per linear meter. Additional fasteners can be used in places where there are curves. Plastic brackets are installed manually.
They pin the pipe to the polystyrene foam as it is laid. Do-it-yourself semi-industrial heated floors are made using a special stapler. But its purchase is justified only with intensive professional use.
In recent years, manufacturers of underfloor heating systems have begun to offer another very convenient solution. We are talking about special sheets of dense polystyrene foam with a profiled surface. Typically, the surface of such sheets consists of intersections of grooves or rows of protruding elements, between which heating pipes are easily laid.
The surface of the sheets is smooth, extruded, all pores are closed and no additional waterproofing film is required. Having a special thermal cutter, you can cut grooves in polystyrene foam yourself. But to carry out this work you need at least minimal experience.
Important! Metal-plastic pipes are supplied in coils. When laying, the coil rolls out along the pipe placement path. Do not pull the pipe from a lying coil, as this will cause it to twist and may lead to delamination of the internal layers.
Types of heated floors
Today there are three main types of underfloor heating systems:
- water;
- electric;
- infrared.
A water heated floor operates on the basis of water pipes, which are laid directly under the finished floor covering. The source of the coolant is hot water from the heating system (less often, from a separate heating device - boiler and boiler). For installation and connection of pipes, metal-plastic and plastic pipes are used, which are connected to the heating outlet pipeline.
Electric underfloor heating is based on the so-called. heating cable. By passing current through itself, the wire converts its energy into heat due to the high resistivity of the conductor. Any cable is not suitable for installing an electric heated floor - you need a special wire with a conductor of the required thickness, as well as with good insulation.
Infrared heated floors are the rarest variety. It is installed on the basis of special roll films, in which special heating elements are built-in. When exposed to current, they produce infrared radiation, generating heat.
Next, we will talk specifically about the water type of heated floor, which is most often preferred, because... it is much easier to connect pipes to an existing heating system in a house or apartment.
We recommend that you read: How to choose a pipe cutter for installing copper pipes
Features of cross-linked polyethylene
Cross-linked polyethylene is produced either physically or chemically. When it is created, units of ethylene molecules form a spatial (three-dimensional) network with cells through cross-links. Cross-linked polyethylene as a material is designated PE-X. According to the production method, they are distinguished: PE-Ha, PE-Xb, PE-Xc, PE-Xd.
PE-Ha is a polymer that is formed when heated using peroxides. PE-Xb polyethylene is obtained by moisture treatment with a catalytic agent and implanted silane. PE-Xc is a material formed after electron bombardment of polymer molecules. PE-Xd is extremely rare and is produced using nitrogen technology.
PE-Ha cross-linked polyethylene pipes are best suited for underfloor heating.
There are several types of cross-linked polyethylene pipes, they differ in the manufacturing method
Advantages and disadvantages
Pipes made of cross-linked polyethylene for heated floors have a number of advantages:
- Elasticity. This allows you to use the most optimal level of bending when laying, without the risk of subsequent cracking and fractures. Rehau products are considered to be especially high quality in this regard.
- Environmentally friendly. Cross-linked polyethylene contains no harmful components that would be released during heating. This guarantees safety in laying heated floors inside residential premises.
- High combustion temperature. The material begins to melt only after reaching a temperature of +400 degrees. As a result of the breakdown of the substance, water and carbon dioxide are formed, which are completely non-toxic.
- Excellent performance characteristics. The system, made of cross-linked polyethylene, is not afraid of rotting, corrosion and chemical influences. All this is the key to long-term and flawless operation of the water heated floor.
- Frost resistance. In the event of a significant drop in temperature, polyethylene products are not deformed.
- Sound-absorbing abilities. Thanks to this, there is no noise from the coolant circulating inside the circuit.
As for the weaknesses of polyethylene, they usually indicate the need for competent installation work. For example, it is recommended to securely fix turning areas, because this material does not hold the curved configuration given to it very well. In addition, the resistance of polyethylene products to direct sunlight is not very good.
Laying the contour must be done as carefully as possible, avoiding any damage to the protective layer
Cross-linked polyethylene or metal-plastic
Cross-linked polyethylene pipes and metal-plastic pipes are the main competitors when it comes to installing plumbing, heating systems or heated floors. They have a lot in common. Both types of pipes are quite flexible, durable, resistant to corrosion and relatively easy to install - you certainly don’t have to weld anything. True, it is still easier to install metal-plastic pipes than PEX pipes, with which you need to be extremely careful
Metal-plastic pipes have a slightly higher thermal conductivity coefficient (0.45 versus 0.38), but they will not survive freezing inside the coolant. PEX pipes, after the water in the system has melted, can be used as before. Moreover, some types of PEX pipes easily regain their shape. Resistance to high temperatures and pressure is high for both types of pipes: metal-plastic can withstand pressure up to 25 atm at a temperature of 250C, can be operated at coolant temperatures up to +950C with a short-term increase to +1200C, however, the maximum pressure is 10 atm. Thus, the performance characteristics are quite comparable with the similar parameters of cross-linked polyethylene pipes, which we cited above.
The choice depends mainly on the operating characteristics of the water supply system and the budget. The range of prices among pipes, even within the same group, is significant, but PEX pipes are often cheaper than metal-plastic pipes.
Features of cross-linked polyethylene
Cross-linked polyethylene is produced either physically or chemically. When it is created, units of ethylene molecules form a spatial (three-dimensional) network with cells through cross-links. Cross-linked polyethylene as a material is designated PE-X. According to the production method, they are distinguished: PE-Ha, PE-Xb, PE-Xc, PE-Xd.
PE-Ha is a polymer that is formed when heated using peroxides. PE-Xb polyethylene is obtained by moisture treatment with a catalytic agent and implanted silane. PE-Xc is a material formed after electron bombardment of polymer molecules. PE-Xd is extremely rare and is produced using nitrogen technology.
PE-Ha cross-linked polyethylene pipes are best suited for underfloor heating.
There are several types of cross-linked polyethylene pipes, they differ in the manufacturing method
Advantages and disadvantages
Pipes made of cross-linked polyethylene for heated floors have a number of advantages:
- Elasticity. This allows you to use the most optimal level of bending when laying, without the risk of subsequent cracking and fractures. Rehau products are considered to be especially high quality in this regard.
- Environmentally friendly. Cross-linked polyethylene contains no harmful components that would be released during heating. This guarantees safety in laying heated floors inside residential premises.
- High combustion temperature. The material begins to melt only after reaching a temperature of +400 degrees. As a result of the breakdown of the substance, water and carbon dioxide are formed, which are completely non-toxic.
- Excellent performance characteristics. The system, made of cross-linked polyethylene, is not afraid of rotting, corrosion and chemical influences. All this is the key to long-term and flawless operation of the water heated floor.
- Frost resistance. In the event of a significant drop in temperature, polyethylene products are not deformed.
- Sound-absorbing abilities. Thanks to this, there is no noise from the coolant circulating inside the circuit.
As for the weaknesses of polyethylene, they usually indicate the need for competent installation work. For example, it is recommended to securely fix turning areas, because this material does not hold the curved configuration given to it very well. In addition, the resistance of polyethylene products to direct sunlight is not very good.
Laying the contour must be done as carefully as possible, avoiding any damage to the protective layer
Cross-linked polyethylene or metal-plastic
Cross-linked polyethylene pipes and metal-plastic pipes are the main competitors when it comes to installing plumbing, heating systems or heated floors. They have a lot in common. Both types of pipes are quite flexible, durable, resistant to corrosion and relatively easy to install - you certainly don’t have to weld anything. True, it is still easier to install metal-plastic pipes than PEX pipes, with which you need to be extremely careful
Metal-plastic pipes have a slightly higher thermal conductivity coefficient (0.45 versus 0.38), but they will not survive freezing inside the coolant. PEX pipes, after the water in the system has melted, can be used as before. Moreover, some types of PEX pipes easily regain their shape. Resistance to high temperatures and pressure is high for both types of pipes: metal-plastic can withstand pressure up to 25 atm at a temperature of 250C, can be operated at coolant temperatures up to +950C with a short-term increase to +1200C, however, the maximum pressure is 10 atm. Thus, the performance characteristics are quite comparable with the similar parameters of cross-linked polyethylene pipes, which we cited above.
The choice depends mainly on the operating characteristics of the water supply system and the budget.
The range of prices among pipes, even within the same group, is significant, but PEX pipes are often cheaper than metal-plastic pipes. Date: September 25, 2022