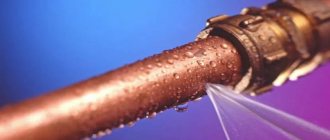
If properly arranged, there should be no condensation in the ventilation system: warm air, according to the laws of aerodynamics, moves from the room to the outside, taking with it droplets of moisture. But often during operation of the ventilation system, a certain amount of moisture accumulates on the inner surface of the air ducts.
Condensation in the ventilation system is the result of increased air humidity combined with a malfunction of the system, as well as improper operation of residential premises.
This is far from a harmless phenomenon. In addition to violating sanitary and hygienic standards and the risk of respiratory and allergic diseases, condensation has a destructive effect on the internal surfaces of engineering structures, so it is better to get rid of moisture in the ventilation duct.
Where and how to insulate correctly
Moving on to the question of how to properly insulate ventilation, you need to understand that much will depend on the insulation used and its thickness.
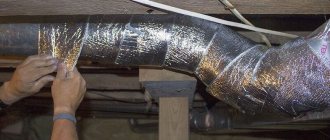
Traditionally, ventilation insulation was carried out with glass wool or mineral wool. Today, the range has expanded due to the appearance on the market of so-called shells. These are cylindrical pipes consisting of two or more segments. They are simply placed on the air ducts and secured with tape or wire. Shells are made from the same mineral wool, polystyrene foam, polyurethane foam and other foamed polymers. It is necessary to combat condensation in ventilation from the position of accurately identifying areas. If we talk about a private house, then this is an unheated attic. At the same time, the shortcomings can be eliminated very simply - completely thermally insulate air ducts, valves and other equipment, if provided for by the system design. If the ventilation wiring is located under the ceiling, and it, in turn, is insulated along the attic floor, then thermal insulation of this area is not necessary.
There is a way to remove condensate from ventilation when non-insulated areas are equipped with special devices called condensate drains. That is, the condensate formed in the system is collected in this device and removed outside. This option is effective in terms of protecting interior spaces from damp smudges on the walls and drops from ventilation grilles.
Troubleshooting
What to do if the ventilation is leaking? First of all, you need to look for places where the thermal insulation layer does not fulfill its duties. This is where condensation forms. The outside of the pipes become damp, which immediately affects the insulation. It is covered with perspiration and drops of water, so it is not difficult to find this place. The solution to this problem is to remove the old thermal insulation coating on the site and install a new one.
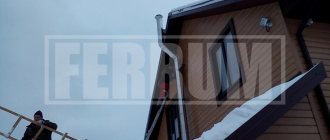
One of the problem areas for condensation on an air duct is the area from the roofing material to the top edge of the pipe. It is not always insulated, but in vain. It is worth listening to the advice of experts and carrying out insulation along the entire length of the ventilation system.
Most expensive method
In the event that the methods described above do not lead to positive results, you can resort to making a new ventilation system with muffling of the old ventilation system. Typically the biggest source of evaporation is in the kitchen, so this is where it is recommended to install an exhaust fan. To carry it out, you can disturb the load-bearing walls or use a window, which is the easiest installation method.
Such a fan extracts air from the kitchen and other rooms, but it is worth taking care in advance to solve the problem of the influx of air mass in order to avoid disrupting the air circulation. You can open the windows in all rooms or use special supply valves for the walls. Since they can be installed behind heating equipment, they are not only practical, but also completely invisible.
The most expensive method is a new ventilation system
The cost of all the necessary equipment is not high, and you can buy it in virtually any specialized store. However, installation work, plugging the existing ventilation system, and punching through load-bearing structures and walls are currently expensive. To calculate the cross-section and count the required number of holes, you need to contact an organization that carries out such work at a professional level.
Condensation in the ventilation system can create a huge number of problems, so to get rid of it in multi-storey buildings, collective coordinated actions of all residents are required. Only in this case can positive results be achieved, because the ventilation system is a single organism, the failure of any section of which can negatively affect the operation of the rest.
Solving the problem of odors in the kitchen with the help of a hood
Are there strange odors that appear out of nowhere? No problem with the hood. They have several types and have their own competitive functional features. To equip high-quality ventilation in the kitchen, you first need to decide which hood is right for you?
Kinds:
- Wall hung - one of the most popular models, installed between a wall cabinet and a gas stove;
- Island - ideal for a kitchen with an island. Suspended from the ceiling. Can be installed in any room;
- Corner – mounted in the corner of the room;
- Wall-mounted – mounted on the wall above the stove. The models have a variety of colors and designs. You can choose an option for any interior design;
- Built-in – placed in a table or cabinet. Visually does not spoil the full design of the room. Easily fits into any interior design and does not stand out.
Types of work:
- Flow hood removes contaminated air masses into the ventilation shaft. This is the choice of most buyers, since, according to experts, it is the safest and most effective;
- The circulation hood draws air into its own structure and cleans it with the help of filters. The clean air is then released back into the room. An air duct is not required for installation.
Hood power calculation
Having decided to make proper ventilation in the kitchen, each person resorts to the issue of choosing the power and installation technology of the structure. For proper operation, you must calculate the required power for the hood. It depends on the area of the room and has a simple formula:
Power = area * room height.
Using this formula, you can easily obtain the required data and choose the right ventilation device.
Hood installation
For quality work, it is recommended to go a long way, but in this case the operation of the device will be correct and effective:
- Mount the case on a cabinet for comfort. It is good to secure it in the cabinet, and fill the remaining openings with polyurethane foam;
- Place the cabinet under the hole;
- Remove the cabinet from the wall to cut the hole;
- For high-quality work, it is recommended to take a modern foreign-made tool. With its help you can carefully make holes.
Next, you need to connect the equipment and start working:
- Install the corrugation and holes. At the top of the cabinet its shape should be square;
- Trim the corrugation without leaving large reserves;
- Hang the cabinet in its place on the wall;
- Treat the joints with a sealant;
- Connect the corrugation to the ventilation shaft;
- Secure the hood;
- Connect the ventilation shaft to the air duct.
It is important to perform each step in accordance with safety precautions. If you have never encountered such questions, we recommend that you contact professionals who can competently calculate and install ventilation in any room of your apartment.
Remember, the slightest inaccuracy can lead to improper operation of the hood.
It is important to ensure a normal level of electrical safety. During cooking, grease splashes may enter the hood, which may cause a short circuit and fire.
Safety is in your hands and should never be neglected! Otherwise, you risk harming the health of not only yourself, but also all residents of the apartment building.
Removing condensation in a plastic ventilation pipe
Currently, the construction market is replete with various materials from which ventilation ducts can be made. The difference between them is in the convenience and speed of installation, in price, etc.
In this experiment we will talk about such a material as a plastic pipe, and specifically a sewer pipe. Yes, these pipes can be safely used as ventilation ducts and for ventilation.
This type of pipe allows for easy ventilation. Cheap, fast. One problem is that if the pipe goes out into “fresh air”, then condensation forms in it, which easily flows down. This is problem. Serious problem.
Insulation, in my personal experience, does not give 100% effect. Moisture will appear. Something needs to be done... At the time of writing, there were no ready-made solutions for draining condensate from a plastic pipe. I had to “collective farm”.
The solution is relatively simple. You need a “tee” of 90 degrees (45 will not work, because condensate may not be completely collected). Two “ends” will work for ventilation, and one will collect and drain condensate.
Condensate flows down the pipe. This means that it must be collected at the lowest point. The ventilation duct outlet will be at an angle of 90 degrees. This, of course, is not good, but I personally don’t see any other way out. With this approach, we lose some “power” in ventilation, but it works, albeit with losses.
Further. You need a flexible hose 10 mm, corrugated 20 mm. We insert the hose tightly enough into the corrugation. The hose will be a kind of vein for draining condensate, and the corrugation will give rigidity to the hose from fractures and clamps during installation and its further wiring to the sewer.
We mount a condensate collector on the bottom of the tee. To reassure myself, I also coated everything with silicone.
We hang the hose on the fitting and secure it with a clamp.
All. The condensate flows into the condensate trap. It enters the hose through the fitting. From the hose, water flows into the sewer through a tee and an elastic seal.
Condensation problem solved.
I placed this entire structure in a homemade box and covered it with sawdust. That is, the entire structure is warm. Condensation does not collect below. Everything that collects above is discharged directly into the sewer through a hose.
For those who say that ventilation ducts cannot be connected into one, 90 degrees is not allowed, etc. Everything works for me (yes, there is a loss in performance). Nevertheless, there is a natural craving. And when it is necessary to remove additional and increased humidity, forced ventilation is activated. Everything blows out with a bang.
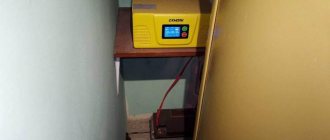
Additionally, I installed forced ventilation in the bathroom (fan in the ventilation duct). It works simultaneously with the light (you can also connect it via a “timer” with a start/shutdown delay or via a separate switch). Let me explain why. If at normal times your natural ventilation works and the house does not cool through it, then on a “bath day” this natural exhaust power is not enough and moisture condenses on the walls and mirrors. And this is mold and mildew. If natural ventilation copes with moisture even on a “bath day”, it means that in normal times your house suffers heat losses. So either heat loss, or humidity and fungus on the walls. Forced ventilation solves this problem and dilemma. That is, when we need to increase traction, we increase it. A standard ventilation mode is needed - the “forced ventilation” is silent.
And further. Use a ventilation fungus (separate nozzle, placed at the highest point of the pipe) with maximum capacity. I even made extra holes in the “standard (diamond-shaped)” fungus - I removed the extra jumpers. Because if the holes are small, then ice may form, which will plug the ventilator.
Post navigation
You must be logged in to post a comment.
Why does the check valve sometimes not work and close?
On the kitchen side, a check valve is mounted on the tee. In the factory version it will be quite long. In this case, it is better to shorten it so that this “gun” does not stick out too much.
The valve is inserted inside a section of a standard air duct d-125mm, and this air duct is put on and siliconized onto the tee.
If this whole structure seems too cumbersome to you, and the protruding pipe with the valve is not very aesthetically pleasing, you can do it a little differently. You make the air duct not with a round pipe, but with rectangular channels.
In this case, you install the above check valve on a straight section, as close as possible to the turn.
You can't achieve a factory connection here, so you'll have to farm collectively. Buy a rectangular tee with a round outlet on one side. Next, this round timber is cut off and a check valve is glued in its place.
The valve is placed strictly at an angle (2 degrees). Otherwise, it will open every once in a while or not open at all.
Many people have encountered this problem and easily solved it this way.
The damper itself is also mounted with a vertical deviation. The upper turning point, based on the hour dial, is at 13.00 (1 o'clock), and the lower one is at 17.00 (5 o'clock). This is if your flow direction is from right to left.
Otherwise, the circle is placed at the 11 o'clock - 7 o'clock position.
For more reliable operation and stable opening of the damper, you can stick some kind of weighting material (no more than 2 grams) on one side. Glue it close to the edge.
By the way, do not throw away the previously cut round pipe. It is tightly inserted onto the valve from above, after which a decorative grille diffuser is mounted on it.
What nuances might there be with this method? If your hood stands exactly above the entrance to the ventilation shaft, and the duct pipe goes straight, without any turns in the horizontal plane, then the valve installed on such a straight section does not work normally, at least at 1st speed.
You will simply have nowhere to get the increased pressure to close it. The air will fly through this “turn” in a straight line. You definitely need an angle.
The valve cover and its rotating mechanisms are easy to clean and do not be afraid of them becoming overgrown with grease. For this to happen, you will have to fry huge wild boars on the stove and stew them in your oven for several hours a day, no less.
If you don’t want to see a protruding “hollow” under the ceiling at all, then, as an option, you can install a tee so that the middle elbow rests against the wall, otherwise, where the valve is located, it would look to the side. In this case, also close the hole with a decorative cover.
Everything will look much nicer. However, due to the additional rotation, the performance of natural ventilation will deteriorate slightly. And the grill will reduce it by another twenty percent.
In addition, it will no longer be possible to clean the channel by hand or with a vacuum cleaner. But many do this deliberately and even hide the entire structure in a wooden or plastic box.
As they say, beauty requires sacrifice.
Causes of condensation
There are several main reasons for the appearance of condensation in the ventilation system.
- In unheated rooms, the air ducts were not insulated, or the insulation lost its qualities and properties over time.
- Poor quality insulation was used, or it was laid in a thin layer.
- If there is water in the basement of the house, this is most often the cause of condensation.
- The internal cavities of ventilation air ducts have decreased in size due to the ingress of debris, small rodents and tiles into them.
- Lack of fresh air ventilation.
- A strong temperature difference causes ice to form inside the pipes.
- The system was designed incorrectly.
In principle, there are not many reasons, therefore, when answering the question of why it drips from the ventilation, you need to understand that these are mostly purely technical problems.
Design errors
The main mistake when designing exhaust ventilation is that the air duct cross-section was chosen incorrectly. Because it is this size that is responsible for the intensity of air exchange. And this indicator is strictly designated by SNiPs. Essentially, this is a certain amount of complete change of air in a room in one hour.
- In living rooms, air exchange is 3 m³/h per 1 m² of room area.
- In kitchens - 6-8.
- In the bathroom - 7-9.
- In the toilet 8-10.
- Basement – 4-6.
If you do not adhere to these values, then an increase in humidity cannot be avoided, and in winter this will lead to icing of the air ducts.
Defective material
It cannot be said that condensation may appear in the ventilation from a defective pipe. This mainly applies to thermal insulation materials. Of course, if before your eyes the insulation has fallen apart, cracked or crumbled into small pieces, then no one will use it. But often, out of ignorance, a material is purchased that seems to be intact, but it has a different color, which differs from its analogue, is less thick, and has a lower density. And this is impossible to determine by eye. Such insulation wrapped around ventilation pipes is not the best protection against low temperatures.
Lack of insulation
In unheated rooms, according to SNiP requirements, ventilation in a private house must be thermally insulated. Without it, there is a sharp drop in the temperature of the air that leaves the heated rooms through the air ducts. Reaching the dew point temperature, condensation forms on the internal surfaces of the pipes.
Water in the basement
Regardless of the time of year, the temperature in the basement of a private house is always positive. This means that if there is water in it, it will evaporate. Ventilation begins precisely from this room, and the main intake and exhaust of air occurs from the basement. Humid air rises through the pipes and when it comes into contact with a negative temperature at the outlet, it immediately turns into condensate.
Poor air exchange in the ventilation shaft
This applies to city apartments, when ventilation ducts are reduced in cross-section due to debris, cobwebs, oil and grease deposits. It is impossible to solve this problem on your own. This requires an integrated approach involving cleaning the shaft from the basement to the roof. The reduced cross-section is the reason for the accumulation of moisture, which gradually settles on the walls in the form of condensation.
Incorrect installation
Improper installation of ventilation can only be linked to the appearance of condensation by the fact that there are rules based on two positions:
- The ventilation system should be as straight as possible. That is, as few branches and branches as possible.
- The diameter of the air ducts used is clearly calculated.
If at least one of these requirements is violated, condensation will definitely appear.
Severe temperature changes
Even in the case of 100% correct installation work using high-quality materials, if the temperature outside is low, ventilation at the outlet cannot be avoided. And since the warm air still rises, the ice begins to melt and penetrate down the pipes. We cannot say that this is condensation, but the consequences of water are exactly the same.
Requirements for thermal insulation materials
To insulate air ducts in a ventilation system, materials with the following properties are required:
- low thermal conductivity;
- vapor tightness;
- fire resistance;
- noise absorption capacity;
- biostability.
Thermal conductivity coefficient is the most important parameter of a thermal insulation material.
Even with proper installation of all elements of the ventilation system, condensate removal is not always effective, since it may freeze and form an ice plug.
The second most important indicator is vapor permeability. Many materials used for ventilation insulation have the ability to release moisture accumulated underneath them when the voltage limit for them is exceeded.
By filling the pores of the material, moisture increases its thermal conductivity, thereby reducing the effectiveness of insulation. To prevent this from happening, a waterproofing coating is mounted on top of the heat insulator - a membrane that can allow steam to pass out, blocking its access inside.
Fire resistance determines how fireproof the insulation will be. There are 6 fire resistance classes in total.
For air ducts, zero class insulation is required, that is, it has the highest fire resistance, and therefore the most fireproof. With multi-layer thermal insulation and a number of additional conditions are met, the use of materials of the first fire resistance class is allowed
As the air flows through the ducts, it creates noise. In forced ventilation systems, the operating fan also makes noise and vibrates. To prevent noise and vibrations from being transmitted through rigid structures and spreading throughout residential premises, damping devices and gaskets are used.
But most heat-insulating materials also have sound-proofing properties and, in addition to their main function, help protect the house from unpleasant acoustic effects.
Mineral wool is one of the most popular thermal insulation materials in low-rise construction and is also used for insulation of air ducts
The materials used should not be a favorable environment for the life of insects, molds, rotting bacteria and other harmful microorganisms.
Penetrating through air ducts into living spaces, they can cause diseases and also damage the material itself, which may require its premature replacement. There are microorganisms whose waste products are so aggressive that they can burn through steel sheets 1.5 mm thick.
The materials used in the installation of ventilation communications must comply with sanitary and hygienic standards. The insulation should not emit substances hazardous to humans and the environment. Environmental friendliness means the absence of a threat of contamination of the natural environment during disposal.
Ways to get rid of condensation
There are several ways to get rid of condensation in the ventilation system:
Insulate air ducts or eliminate defects in existing thermal insulation (if any). For thermal insulation, you can choose one of the following types of insulation:
- glass wool The most inexpensive and fire-safe material, but labor-intensive to install, cakes over time and loses its thermal insulation properties under the influence of moisture. When working with glass wool, it is necessary to use protective equipment for the eyes and breathing; upon completion of installation, cover the insulation with foil or galvanization and secure it with a bandage,
- basalt wool. This insulation is similar in characteristics to glass wool, but is more resistant to moisture,
- detachable foam shells. The two halves are installed on the air duct and connected by tongue and groove edges. Polystyrene foam provides good thermal protection, is not afraid of moisture, but is easily flammable under the influence of an open fire and, when burned, releases toxic substances,
- shells made of polyurethane foam or polypropylene foam. They are more expensive, but have higher mechanical strength. During installation they are secured with binding wire,
- tubes with a notch along the entire length made of foamed polyethylene. The insulation is available in different sizes and diameters, is not difficult to install, simply fits onto the air duct, and is resistant to high humidity and mechanical stress.
- Organize condensate drainage. To do this, you need to determine the lowest point in the system; if it is a horizontal channel, then any section of this pipe can be used to connect the condensate trap. If the air duct is located vertically or in an inclined position, then the lower end is taken to install the exhaust system. A tee is installed in its hole, the side outlet of which is directed downwards and a condensate drain is connected.
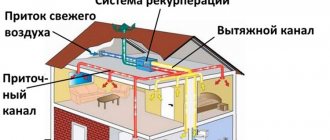
- Install a supply and exhaust ventilation system. If the previous methods did not give the desired result, then you will have to shut down the old ventilation system and build a new, more efficient forced-type ventilation. The biggest source of fumes is the kitchen, so this is where the exhaust fan should be placed in the duct or in the window. It will facilitate the outflow of used air from the room. The influx of fresh air masses will be provided by wall supply valves located behind the heating devices.
Conducting a test
How do you know if your exhaust pipe is working properly? Can we hope that she will save her household from troubles? It's simple, do the following test. Close windows and doors tightly. “Arm yourself” with toilet paper, you will need a small piece. Bring the paper close to the hood. Observe what happens to the leaf. He fell? This means the system has failed.
In apartment buildings, this test can also be used to check ventilation communications. It happens that the paper flies off the grid with force during the test. This means the following: it is not fresh air that enters your apartment, but exhaust air from your neighbors.
This is important to know! Some homeowners think the best ventilation is air conditioning. They are mistaken, because the “device” will not provide you with a flow of air from the street, but will only cool the existing air, which may not be entirely healthy. This is not to say that air conditioning is evil; on the contrary, this unit is useful, but it cannot become an alternative to ventilation: these systems have completely different functions.
Questions and answers
Let's answer a few typical questions cellar owners ask.
What humidity should be in the cellar?
If you're storing canned food in it, the answer is simple: less is more. But when storing vegetables, the optimal range is 80-95%: they should not only not become moldy, but also dry out.
What temperature should the cellar be in summer?
No higher than 12 degrees. If on hot days the thermometer creeps up from this mark, it makes sense to take care of the thermal insulation of the upper part of the room.
What should be the temperature in the cellar in winter?
Steadily above zero. The reason is obvious: jars of home canning can burst with ice, and crystallization of water in fresh vegetables, to put it mildly, will not improve their taste.
How deep should the cellar be?
Ideally, its ceiling should be below the freezing level. With proper thermal insulation of the entrance, the temperature in it will always be equal to the ground temperature, and the problem of condensation simply will not arise.
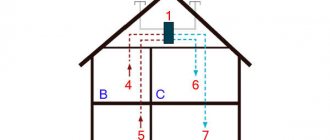
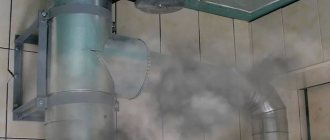
Ventilation device for the attic of a private house, vents, dormer windows, grilles
Owners are often afraid to install cold attic ventilation in their private homes, guided by the following assumptions.
Heat escapes from the house through attic ventilation grilles. There is an opinion that the building will cool down faster. But most often the problem lies in poor thermal insulation of walls or ceilings. By the way, moist warm air penetrates into the attic through a poorly insulated ceiling. We will tell you what its danger is in the next chapter; Ventilation of a cold attic with a hip or hip roof is only necessary in summer. According to many, ventilation grilles and windows in the attic are needed only for ventilation into the stuffiness
In fact, in winter, the ceiling of an unheated and unventilated attic will turn into a cave overgrown with ice stalactites; It doesn't matter what size the vents are. The area of ventilation windows and vents in the attic must be carefully calculated
How to do it right - read on.
Attic ventilation in a private home is an essential element of thermoregulation. Properly organized, it allows you to save money on heating or cooling the living space and keep the building itself intact. Attic ventilation above the attic is especially important.
Attic ventilation
The attic in a private house needs ventilation both in winter and in summer.
So, in the hot season, a hot roof heats the air in the attic to 150 degrees. Most of this heat is transferred to the ceiling of the upper floor, forcing the air conditioner to work harder to eliminate the excess heat. If there is no air conditioning, the owners languish in the heat and stuffiness.
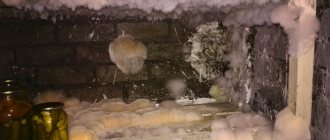
In winter, air exchange is necessary to remove excess moisture. According to technical requirements, the temperature difference between the street and the attic should be 4 degrees or less. Temperature changes between the residential floor and the street contribute to the accumulation of condensation on the roof rafters. The moisture gradually freezes, creating entire cascades of icicles. When it thaws, they melt and moisture drips onto the attic floor. The supporting structures of the roof and ceiling are destroyed. Mold develops on wooden rafters.
By the way, high-quality ventilation of a cold attic prevents accumulation of snow and ice on the roof of the house.
Insulation of pipes: work procedure
When insulating ventilation with polystyrene foam shells, the following is carried out:
- clarification of the dimensions of the ventilation pipe, in particular the internal diameter;
- making cuts with a knife (or a saw);
- covering the pipe cylinder (shell) with fragments, displacing them by a couple of centimeters;
- closing with force the tongue-and-groove locking joint of the parts on the sides.
The structure (shell) is easy to install and dismantle in case of work on the pipe.
As an option, you can use structural elements with factory insulation when installing ventilation.
Work on insulation with foamed polyethylene in the form of a finished shell of a ventilation pipe comes down to the following:
- taking the necessary measurements of the pipe: so that the insulation fits tightly onto the surface of the air duct;
- finding a special seam on the capsule and separating it along this seam;
- fixing the shell on the insulated pipe;
- insulating joints and seams with adhesive or tape.
Protection made from fire-resistant polypropylene or polyurethane foam is performed as follows:
- dimensions are determined;
- Semi-cylindrical sections are cut from a solid workpiece with a reserve for the covering layer;
- a capsule is formed from cut fragments around the pipe;
- the resulting joints are hermetically fastened with bandages.
If the ventilation opening in the house is in the shape of a rectangle:
- select the required thickness of roll or slab insulation (for example, basalt fiber);
- cut and cut to size into fragments that are convenient to arrange for cladding;
- with the help of pre-calcined steel wire, the pieces are held together;
- the seams are hermetically sealed with strips of foil with an adhesive layer applied to it.
Thermal insulation for ventilation using any of these methods, despite all the positive aspects, has one weak point - “cold bridges”
It is important to prevent violations of the work technology and the prerequisites for their formation during the installation process. To do this, the joints between ventilation ducts and house structures are especially carefully insulated, otherwise the expected effect of insulation will be reduced
Condensation in pipes
The physics of this process consists in the precipitation of moisture, which is in a dissolved state in the air, on surfaces that have a lower temperature. It is necessary to get rid of such a harmful factor immediately after its appearance, since water leaks can damage finishing materials, cause the development of fungus, destroy building structures or cause corrosion of metals. Prolonged exposure to mold spores that are aggressive to the body can lead to the development of respiratory diseases, pneumonia, and allergic reactions.
The causes of condensation are:
- Absence or insufficient thermal insulation of ventilation ducts in the room;
- Significant temperature difference in the room and in the places where the ducts are laid. This can be observed especially often in winter, in attics.
- Operational disturbances in the operation of the ventilation system. Blockages, deformation, and failure of equipment can cause a decrease in air exchange flow.
- Miscalculations at the design stage of the ventilation system, improperly installed ventilation or low quality equipment that is not capable of delivering the required performance.
- Problems with the building itself - close groundwater, flooded basements, constantly wet foundation, poor quality of insulation of the entire house.
Construction of a new ventilation system
Due to errors in design and installation, if low-quality pipes are used, all measures to combat condensate may be in vain.
In this case, it is economically feasible to shut down the old one and install a new ventilation system that would cope with its functions of removing contaminated air and supplying fresh air masses.
Design is carried out only after analysis of air exchange processes and calculations in accordance with the standards specified in SNiP, based on the characteristics of the ventilated premises and the number of residents. It may be necessary to abandon natural ventilation in favor of forced ventilation by changing the configuration of ventilation ducts and installing equipment for heating the supply air.
An ancient but effective way
It is better to prevent a problem than to solve it later. Condensation is an unpleasant thing. Vapors settle on the walls of the ventilation pipe, and the wind blows raindrops inside. Even the cap is not a hindrance to him. The temperature difference between inside and outside leads to the formation of moisture. What to do?
Please note that water droplets collect at the end of the ventilation duct. There the steam cools, condenses and begins to flow down
To avoid this problem, it is enough to perform some steps during installation:
- The part of the pipe that goes out onto the street is joined to each other, against the “wool”.
- Place a tee at the bottom with a conical plug with a hole made.
Moisture will flow out through this hole.
Expert advice
What should I do to prevent condensation from occurring?
Experts in this field give some useful advice:
- when installing horizontal sections, it is necessary to observe the slope of the air ducts towards the street, otherwise water collects there and flows into the room;
- be sure to install a condensate drain;
- the upper end of the ventilation pipe must be protected by a visor or deflector;
- it is necessary to insulate all sections of ventilation ducts passing through unheated rooms and the street, as well as the additional devices and accessories included in them.
Condensation in ventilation
People, trying to make their homes more comfortable and less energy-intensive, began to use new technologies everywhere (from waterproofing ceilings to installing metal-plastic windows), without even thinking about the ventilation problems that this could lead to. The most common of them is condensation in the ventilation system.
Causes of condensation
Condensation in ventilation can occur due to several reasons:
- Large difference between indoor and outdoor air temperatures.
- Failure to keep the air duct clean, which led to its clogging.
- Insufficient air exchange, which led to increased humidity in the room.
- Insufficient insulation of ventilation ducts.
- Various operational defects.
There can be several reasons for the appearance of condensation in the ventilation system at the same time. By identifying the cause of condensation in ventilation systems, you can correct the error. For example, insulate the air duct (for more details, see the article insulating air ducts), clean the ventilation ducts (article cleaning air ducts) or install a supply valve on a plastic window.
Often, these actions help get rid of condensation in the ventilation systems of a private house or apartment. If for some reason the source of condensation is identified and destroyed, all that remains is to remove the condensate from the ventilation system.
How to remove condensate from ventilation?
People remove condensate from the ventilation of a private house in a simple, low-cost way in every sense - they disconnect the ventilation pipe passing through the attic and drain it at an angle of 90°. A cone-shaped plug is inserted into the condensate drainage tee, through which the condensate is drained.
Popularly, such a tee with a plug is called a valve for condensate in ventilation.
Condensation in ventilation in an apartment is produced in a slightly more complicated manner using this method: First, you need to find the air duct in which condensation forms. Then extend it by turning it 90° and repeat all the above steps. A prerequisite for this method is high-quality insulation of all sections of condensate drain pipes.
The second, more expensive method of removing condensate from the ventilation system of a private house is the installation of a new forced ventilation system. In the kitchen, or other room where there is the most fumes, a fan is mounted in the wall or window, which will draw air from all rooms, preventing the formation of condensation. For proper air exchange with this scheme, it is also necessary to install a supply valve. The calculation of such a system should be carried out by a design organization, which, based on the air exchange rate, will calculate the size of the holes in the wall, their number, fan power, and more. This method is more expensive, and you should not do it yourself. After all, if the section or fan is incorrectly selected, you will simply waste money without getting any results.
There is also an absorption method. In this case, special cassettes made of material capable of absorbing moisture are placed in the ventilation duct. After some time has passed, it is necessary to remove the cassettes and dry them, and then reuse them.
What is needed to prevent condensation?
To prevent condensation from forming in the ventilation, you must:
- Provide a flow of fresh air into the room.
- Insulate air ducts.
- Clean air ducts in a timely manner to prevent contamination.
- Carry out periodic checks of the operation of the exhaust system.
If your system is designed correctly by professionals, such issues as condensation in ventilation systems should not arise.
Tags
the appearance of condensate in the Condensate in the appearance of condensate elimination of condensate Removal of condensate the appearance of condensate the appearance of condensation. But condensation is formed in the ventilation system non-operation of the ventilation system Supply ventilation clogging of ventilation ducts in the ventilation. where the ventilation system of pipes section of the pipe or operation of the ventilation system clogging of ventilation ducts where the ventilation system to the ventilation ducts.
insulate the wrong ventilation channel outside heating
Arguments for internal and external insulation
Insulated pipes for ventilation are either internal lining or external insulation. Each method is characterized differently.
Insulation on top of the ventilation duct will also protect the structure from external influences
Interior finishing:
- It is more difficult to carry out work inside the air duct, but the insulation itself is protected from external temperature and mechanical influences;
- laying the layer inside will lead to a reduction in the useful working cross-section of the air duct, which requires preliminary work to increase it;
- the interior decoration must be sealed and vapor-tight so as not to absorb moisture from the air;
- the surface of the insulation should not be rough, so as not to interfere with the movement of air through the pipe.
It is easier to install external pipe protection, but also only in a vapor-tight design. At the same time, it is necessary to consider how to insulate the exhaust ventilation pipe rising above the living space, and what kind of water barrier to construct. The outer protective shell should protect exhaust structures from mechanical damage
An important requirement for insulation is non-flammability, because When there is an open fire and contact with air oxygen, the degree of ignition of the insulation increases significantly
External insulation does not affect the size of the internal cross-section of the ventilation duct and does not require its expansion. And pathogenic organisms (viruses, bacteria), which often occupy the inside of the walls of air ducts and, being insulated, are protected from unfavorable conditions, do not take root in the insulation layer on the outside.
Recommendations from professionals
And, finally, some important tips for those who are interested in how to properly ventilate an attic:
All ventilation elements must be resistant to any weather conditions; Be very careful about the location of the ridge vents. They are installed as close as possible to the ridge; Continuous soffits work effectively as cornice vents. The best materials for them are non-rusting aluminum or plastic. The surface of the spotlights is covered with a fine mesh; When installing attic ventilation without dormer windows, special attention should be paid to the vents between the rafters
It is important that during operation they do not become clogged with debris and dust; Hire a professional to calculate attic ventilation above the attic; Install decorative ventilation windows in the attic that will add charm and special style to your home; Equip the supply ventilation outlet to the attic in accordance with all the rules. The supply unit should be installed in the cleanest place, no closer than 8 meters from the exhaust pipe.