Today you can count more than a dozen different types and designs of stone ovens for cooking, but the Pompeian oven occupies a special place among them.
Pompeii oven
Compact, efficient and beautiful - it will not only allow you to cook delicious food, but will also look stylish on any country plot. How to lay out a Pompeian oven with your own hands, and what technical nuances should be taken into account, we will discuss in this article.
A standard Pompeii stove is characterized by certain proportions that must be observed regardless of the shape and size of the structure. Thus, the height of the entrance is approximately equal to 50% of the total height of the dome. This allows you to optimize the work process as much as possible, create normal traction and reduce heat losses.
Design Features
Thanks to the special internal structure of the oven, it heats up quickly and retains heat for a long time. Historians claim that the Pompeian oven appeared on the Iberian Peninsula and was initially used specifically for preparing an open cheese pie, where the structure was not needed to heat the room.
Decoration of a Pompeii oven
Later it spread throughout the world. It is also called Neapolitan, Italian oven, tandoor.
The Pompeian oven will not only be an ideal design for preparing pizza, pies and bread, but will also decorate any countryside area. In combination with a gazebo or barbecue, it becomes a real landscape decoration, becoming a favorite vacation spot for the whole family.
Stove in the yard
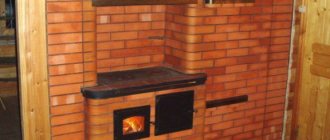
Basically, such a stove is installed in suburban areas on the street, in a barbecue area, in an outdoor garden, but if desired and some technical modifications are made, a Pompeii stove can be built in the house. To do this, of course, you will have to provide not only a reliable, solid foundation, but also a chimney.
In this article we will look at the classic option for building an Italian oven in the open air. Before proceeding with the step-by-step instructions, I would like to warn you that laying a Pompeian stove is a very difficult and expensive undertaking.
But if you do everything correctly, then such an oven will delight you for decades, giving you an authentic look to your dacha and helping you prepare delicious homemade baked goods. Thanks to our clear and simple instructions, even a beginner can master the laying of a Pompeian stove with his own hands.
The structure of the Pompeian stove is somewhat similar to the design of the ancient Slavic stove.
Construction of a Pompeii furnace
But, unlike a traditional Russian stove, it heats up much faster. You can cook pies in it literally 30 minutes after heating, while a Russian oven will take at least 3-4 hours before reaching the optimal temperature for cooking.
This heating rate in the Pompeii furnace is achieved due to the lower thermal mass. The layer of brick that is heated is only 12 cm. Within 45 minutes after kindling, the temperature in this oven reaches 260 degrees, and after an hour - 370 degrees.
How is the temperature distributed in a Pompeian oven?
| In 30 minutes | In 45 minutes | In 60 minutes | In 90 minutes | |
| Outer part of the vault | 150 | 260 | 370 | 370 |
| Inner part of the vault | 315 | 370 | 370 | 370 |
The peculiarity and main advantage of the Pompeian oven is that you can cook almost any dish in it in a short time. Thanks to the high temperature that is reached inside the vault, pizza and bread are perfectly baked in it. Smoke adds a special piquancy to baked goods.
Trial
The final stage of building a Pompeii oven with your own hands is testing after the structure has completely dried and hardened. After construction, you should wait at least 2-3 weeks. The furnace accelerates to normal mode in several stages over 5-6 days.
- Heat with paper (1.5 kg) or straw (2.5 kg).
- Burn 2.5 kg of straw with wood chips.
- Heat 4 kg of wood chips or branches.
- Burn one dry log.
- Lay 3-4 logs and burn.
- Heat with 4-5 logs.
The final stage of the Pompeian furnace
Operating principle of the Pompeii furnace
The efficiency of the Italian pizza oven is due to the technical design features.
Principle of operation
When solid fuel burns, two streams of hot gases arise inside the dome:
- Convection flow that comes from the firebox itself.
- The reflected flow comes from the walls of the dome.
It is also noteworthy that the temperature in the Pompeii oven is self-regulating.
Movement of cold and hot flows
The hotter the wood burns in the stove, the greater the amount of gases released. Rushing upward in a powerful stream, they block the flow of oxygen in the section of the pipe mouth. Consequently, the intensity of combustion decreases, and hence the temperature decreases.
When the temperature drops, the flow of hot gases also weakens, again opening up access to oxygen.
This cyclical process helps regulate the optimal temperature in the oven necessary for cooking bread, pies, pizza and any other food.
As can be seen from the figure, it is the dome that is the main element of the furnace, accumulating thermal energy from the fire.
Having analyzed the operating principle and design of the furnace, we can summarize and highlight the main pros and cons of the Pompeii furnace design.
Benefits include:
- Fast heating. Already 30 minutes after kindling, raw food can be loaded into such an oven for cooking. While the heating time of a classic Russian stove is at least 2 hours.
- Good heat dissipation. Even after the wood has burned, the heat in the Pompeii stove continues to be maintained for several hours, allowing food to be “stewed.”
- The compact dimensions of the unit allow the stove to fit seamlessly into almost any summer cottage.
- Stylish appearance.
Stylish appearance
The disadvantages of the Pompeian stove include:
- Complexity of design. Unlike the traditional laying of a brick stove for a summer residence, skill will be required here to correctly lay out the dome, which is an integral attribute of the unit.
- High cost of materials.
- The need to build a strong foundation, since the stove is not light in weight.
Operating principle
Pompeian stoves of all types work on the following principle: cold air enters from below and is drawn towards the fire. When heated, it rises from the horizontal hearth, goes around the arch and, reflecting from it, falls into the central zone, exactly where the cooking takes place.
How does a Pompeii oven work?
After this, it is pulled out into the chimney. The entire surface of the inner chamber is used for heating. Convection flow, uniform combustion and distribution of thermal energy occur due to the structural design and position of the chimney.
It is recommended to fire a Pompeii stove with non-smoking wood, such as cherry, alder or olive. Coniferous species negatively affect the condition of the dome and the quality of food.
Financial and economic aspect of building a Pompeian oven with your own hands
What is the reason for the relatively high price of such a stove?
- The Pompeian stove is made of fireclay bricks, which cost an order of magnitude more than usual.
- The design of the stove is quite heavy, and for ease of use it must be raised to a height of 80-100 cm. To do this, you will have to lay out a brick stand on which the stove itself will be built, which means you need to think about a good foundation.
To slightly reduce the cost of building a stove, any materials available on the farm are suitable for the stand: blocks, ceilings, old bricks, etc.
Building a pizza oven
Another disadvantage is the lengthy process of laying a Pompeian stove. A rather complex design, which requires the presence of a foundation, a pedestal, the stove itself, and a large countertop, indicates that the whole process will take at least a month.
In addition, you will need significant technological breaks to harden the concrete for the foundation, etc.
If you come to the dacha only for the weekend, then the entire masonry process can be rationally distributed into several stages, calculating that the technological break for “setting” the materials occurs during your absence.
Traditionally, the Pompeian oven has the following layout:
- solid foundation;
- pedestal for the stove;
- bake.
Pompeian pizza oven
The oven itself, in turn, consists of four parts:
- base (furnace bottom);
- dome (vault);
- entrance arch;
- chimney.
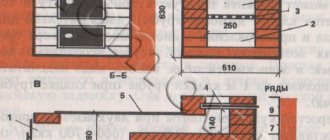
The base (pedestal) is made of small cinder blocks, 20*20*40 cm each.
The tabletop is a monolithic slab made of reinforced concrete 10 cm thick.
Tabletop
Unlike a traditional stone stove, here the chimney is located at the front. This determines one of the main differences in the design. The fire rises up along the dome, heating the vault. Thanks to this, heating is carried out simultaneously from above and below, which contributes to fast cooking.
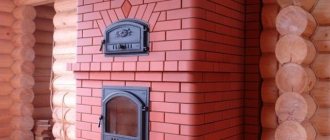
The Pompeian stove has undergone many changes over the many years of its existence, and today you can find several of its varieties.
Neapolitan oven
There are Tuscan and Neapolitan ovens. The Tuscan stove has a higher arch and is more versatile in use. You can bake not only pies in it, but also cook stews, meat, and soups.
The Neapolitan oven is traditionally used for baking pizza and has a small dome that is approximately 80% of the total dome height.
Tuscan oven with a higher arch
As for the shape and size of the stove, the most optimal design is the one with an internal diameter of 80-110 cm. It is not recommended to make the stove smaller than this.
The spherical arch of the oven serves for maximum heating and heat accumulation, and the arched entrance is used for storing firewood and the food itself.
The size of the oven may vary, but in any case, strict proportions should be adhered to: the height of the arch should be approximately equal to 60% of the total height of the dome.
The width of the entrance for storing firewood should be equal to the total height of the dome.
Multilayer dome of a Pompeii oven
The vault itself has several layers:
- the internal surface is made of fireclay bricks;
- clay coating;
- 1st layer of basalt wool (thermal insulating);
- 2nd layer of perlite;
- Facing layer made of cement mortar.
In this case, the thickness of each layer should be approximately the same size, 5-10 cm. The more heat-insulating layer is laid, the longer the oven will cool down.
The facing layer can be made from any moisture-proof and water-repellent materials, since its main purpose is protection from precipitation. If the stove is being baked in the house, then this protection can be omitted.
In addition, the facing layer also performs a decorative function, so you can make it to your taste: decorative plaster, painting, mosaic, etc.
Foundation
The Pompeian oven, due to its massiveness, requires a reliable foundation. If the structure has dimensions of 150×150 cm, then the size of the foundation should be 160×160 cm
To make it, you need to do the following:
- A square is marked on the ground and a pit 35 cm deep is dug
- The formwork is knocked down along the edges of the boards
- Waterproofing is attached to the boards from polyethylene
- Crushed stone is laid down and covered with sand. Layer -15 cm
- Polyethylene waterproofing is placed on top
- The diluted cement mortar is laid to the entire height of the formwork
- There is a metal mesh on top
- The foundation is dried for 3 weeks
Basic rules for arranging a Pompeian oven
Following step-by-step instructions and a diagram for laying a Pompeian stove, even a beginner can handle the work. But in order to avoid mistakes, it is necessary to adhere to the following basic rules when performing work:
- The furnace inlet must have a spherical shape. In this case, the width of this entrance should be equal to the height of the dome. Whatever shape and size you plan to make the stove, be sure to adhere to these proportions.
- Thanks to the spherical design of the inlet, maximum heat is maintained in the furnace and smoke is collected.
Maintain the proportions of the entrance and dome
- For the Pompeian stove, use only straw or firewood (pellets are allowed only during the first test firing). Quite high demands are placed on firewood. It is better not to use coniferous wood, as the resins released during the combustion process can negatively affect the further operation of the stove, and even the taste of food.
- You can only build the base and chimney from ordinary bricks. And the dome itself must be made exclusively from fireclay (fireproof) bricks. If the Pompeii oven is being built outdoors, then it would not be a bad idea to build a small canopy. Although it is lined with hydrophobic material, constant precipitation can negatively affect its technical characteristics and strength.
- The chimney is located on the front of the stove, especially in cold climates.
Materials and tools
Cinder blocks will be needed to build a pedestal.
You can make a Pompeian oven with your own hands from clay and brick. The last option is somewhat simpler, and most importantly, more durable. It requires:
- fireclay brick;
- cinder block or other building brick for constructing a pedestal;
- fire-resistant composition for masonry;
- insulation for thermal insulation;
- waterproofing material - usually polyethylene film;
- sand, cement, crushed stone for the foundation.
Tools you will need:
- trowel, mallet;
- grinder with a disc for stone;
- spatula, chisel, protractor;
- measuring instruments.
You will also need containers for mixing solutions.
First firing
Before lighting the stove for the first time, you must make sure that all materials are completely dry and the concrete or mortar has set. The longer you let the concrete dry, the stronger it becomes. You can wrap the structure in salophan or a damp cloth to prolong drying time.
During the first ignition, the water remaining in the masonry turns into steam, and can lead to cracks at this stage
For this reason, it is important to let the oven sit until it is completely dry. Heating of the oven itself must be done gradually
This also applies to brick and stone ovens. When starting the fire for the first time, you need to light a small fire and gradually increase the load of wood. Try not to use large firewood as this can cause the heat to build up quickly. The initial kindling should be spread over a 6 hour period. After you first fire up the fireplace, it should be carefully inspected for signs of cracks in weak points. In subsequent burns, you can use larger logs and heat the oven to its full potential.
Tabletop
The tabletop is installed on the base, this is an important part of the Pompeii oven.
Manufacturing procedure:
- The formwork is knocked down according to the size of the base
- The boards are taken 20 cm high and fastened at the corners with metal brackets
- At the bottom there is foil, polyethylene or roofing felt
- Metal mesh is laid
- Concrete solution is poured
- The horizontal plane is carefully leveled
- Cover with polyethylene and dry for 3 weeks
Base
The base of the structure is laid with cinder blocks, the average height of which is 80 cm. When the foundation is raised above ground level, the height can be reduced. The base is laid out in the form of the letters H or P. The width of the sides is 120 cm.
Operating procedure:
- The blocks are stacked one on top of the other and fastened together with reinforcement through holes. No cement layer is required.
- The level controls the horizontal and vertical planes.
- Cement mortar is poured into the holes of the blocks. Drying time - 3 days.
Points to pay attention to before starting construction
Before you begin to study the step-by-step instructions, it is important that you have a clear idea of the end result. The article describes the technology for manufacturing a small portable pizza oven that will move on a small cart
This option is ideal for those who do not have construction experience, but really want to bake pizza at home in a wood-burning oven.
How much free space do you have for your oven? Would you like to be able to move it or should it be stationary? Be sure to answer these questions before starting assembly. Ovens designed for restaurants can have a total hearth area of 1,900 to 2,700 inches. We recommend that you first measure the area where construction is planned.
You need to determine the size of your stove in advance. Depending on where you live, make sure you don't need a building permit.
Cost: Of course, the larger the oven, the higher the cost. If this is your first time undertaking this type of construction, then using our instructions you can build a stove from reclaimed wood and recycled materials for less than $100. But if your oven is for a restaurant or commercial use, the price could rise to $10,000.
Tools and Materials: Our build plan requires a minimum set of tools and materials. If you plan to build a more substantial brick kiln, you will already need firebricks, fireclay, fireproof fabric and other materials.
It’s worth preparing all the tools and materials in advance - if you plan to make the oven small, you won’t have to spend a lot
A small oven will require these tools.
- Hammer.
- Nails or screws (for cart).
- Wheels/rollers (for trolley).
- Gloves.
- Bag or bucket.
- Plywood.
- A bag of cement.
- A bag of vermiculite.
- Water.
Required skills: Before starting work, you need to objectively assess your skills. With the proper patience, anyone can master the skills necessary to make such a stove. But if you do not have independent experience in making such products, then it is better to start with a simple stove design, which we describe in our instructions. If your plans are for a more ambitious project, then you should consider bringing in an experienced friend or relative who can help if problems arise.
This stove allows you to cook different dishes. So, if you decide to build your own stove in your yard, great! Follow our instructions carefully and get started!
Chimney
The manufacture of a chimney can be made from bricks or by installing a pipe. The material used is ceramic or metal. When using bricks, it is not necessary to use fire-resistant material. Due to the low temperature, the use of ordinary bricks is allowed.
The shape of the chimney does not matter, and the height depends on the location of the stove. If it is located under a canopy, then the pipe is led outside it. If there is open space, the length of the pipe can be reduced.
Device
The design of the Neapolitan stove is easy. Making a Pompeii stove yourself is not difficult. The components of this stove are:
- The base of the Pompeian furnace (foundation).
- A table that is necessary for comfortable cooking of any dish.
- A hemispherical vault or otherwise called a dome. Another component of the furnace is the under. Under (the bottom of the oven or its floor) is the place where the fire is lit and the pizza or other dish is cooked.
- The fourth part is the chimney pipe.
- Outer casing.
- Thermally insulated layer.
These are the main components of a Pompeian oven that do not require professional intervention for their construction.
What is real pizza?
Nowadays, pizza has become popular in many countries. Each contributed to the creation of the recipe, which is why such varieties as American pizza and French pizza are known. Italy is considered the birthplace of this masterpiece.
There is no single history of the creation of the recipe, since the prototype was created back in the Middle Ages, but the funniest is the version that states that pizza was invented by contemporaries in order to “empty” the refrigerator.
Products that had been lying on the refrigerator shelves for quite a long time were laid out on a flatbread made of unleavened dough: cheese, salami, mushrooms, lettuce, tomatoes. Naturally, with this approach there cannot be a real single recipe. This explains the variety of types of pizza, differing in composition.
Pizza making process
Gas, electricity or wood?
Some experts say that only a wood-fired pizza oven produces the real product, and this is true. The design of a wood-burning pizza oven is such (see below) that the combustion of fuel in it is rather sluggish, and only pizza cooked with a little smoke is considered noble.
But there is another point of view. Its supporters, apparently, proceed from the principles of English and Japanese cuisine and believe that in a piping hot pizza, the taste of each of its components should be distinguishable. Simply put, the former believe that the flavor bouquet should develop during baking, while the latter prefer to form it themselves with taste buds. They even say that an electric pizza oven is preferable because... does not add the slightest additional flavor to the semi-finished product.
We adhere to the first point of view as more democratic: yummy food should be yummy for everyone, and only they know what the organs of perception of taste of the elite actually perceive. Therefore, further emphasis will be placed on wood-burning stoves. A gas oven does not produce a haze, and can give off an aftertaste, so we will touch on them in passing, simply as the most economical ones.