Oil-filled electric heaters are popular units in everyday life, characterized by high durability, since their production is carried out in an industrial environment using modern technologies. However, these electrical appliances are not designed to withstand all emergency situations in everyday life and still fail.
The design of even the most modern unit allows, in some cases, to repair oil heaters yourself.
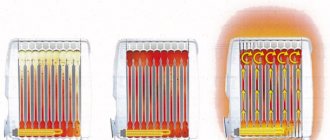
Household oil-filled heating electrical appliances: on the left - flat, on the right - ribbed.
Let's consider this popular household heater from the perspective of assessing the possibility of restoring it after failure, since an oil heater needs to be repaired with a guarantee of the safety of its further operation.
Common oil heater malfunctions, their symptoms and repair methods
Troubleshooting an oil-filled electric heater, like repairing an infrared heater of any other type, requires certain skills and compliance with a number of rules.
Important! If any of the structural elements of the oil heater fail, operation of the heater must be stopped until the malfunction is eliminated.
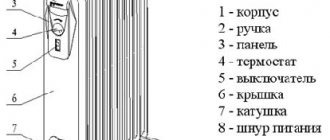
Actual image of one of the models of oil heaters with a list of external equipment
First of all, you should be aware that restoring the functionality of most of the components of this heating device at home is impossible or requires professional knowledge and skills. Experimenting with failed electrical components is fraught with unpredictable consequences (electrical injury, thermal injury, fire, explosion), so repairing an oil heater with your own hands, without professional training, in most cases should only be done by replacing the part that has become unusable.
In addition, when repairing an electric heater, the following rules must be followed:
- the device must be unplugged from the outlet;
- the heater must be cooled to room temperature;
- equipping the device with homemade components is prohibited;
- Avoid contact of transformer oil with the body, as well as with the wiring insulation;
- Replacing a standard power supply cable with a grounding conductor with a wire without grounding is prohibited.
Oil leak
A leak in the oil cooler usually occurs due to mechanical damage or as a result of corrosion caused by a defect in the protective paint coating.
When a long-used, familiar oil radiator leaks, a natural question arises: what to do, why not try to restore its tightness with your own hands?
However, repairing an infrared heater on your own in the event of a leak is only possible if the device is an old-style domestically produced unit with a flat steel radiator and a removable heating element.
Flat oil electric heaters of domestic production with steel radiators
*
To carry out repairs, the control unit, under which the heating element is located, is disconnected from the device body. Then, after disconnecting the contacts, the heater is unscrewed and the oil is drained through the mounting socket into a clean container. The remaining oil is allowed to drain, after which the radiator is filled with water to prevent the oil inside from igniting.
The wall thickness of such radiators is 1-1.2 mm, which allows the use of electric welding. The leakage area on the body is cleaned with a grinder with a grinding disc or manually with coarse sandpaper. Depending on the location and size of the damage, a patch of steel of appropriate thickness is cut out, applied to the hole and scalded using a Kemppi semi-automatic machine.
Kemppi machines of various models for semi-automatic electric welding in domestic conditions
The welding seam is cleaned and ground, after which, if necessary, it is welded again. After degreasing, the repair area is painted with heat-resistant paint, for example, Rustins High Heat Black Pain.
Important! If the heater is painted using powder technology, then when carrying out repair work you need to strive for minimal damage to the coating - it is impossible to restore it under domestic conditions.
Heat-resistant paint Rustins High Heat Black Pain in small volume packaging
After the paint has dried, the radiator is filled 80% with oil, and the heater is assembled in the reverse order.
If the oil heater clicked when heating before the repair, you should not expect that the clicks will disappear after the seal is restored - the mating parts of the housing are deformed when the temperature rises and at the same time crack.
Repairing radiators of finned oil heaters is not advisable, since they are made of thin sheet steel using laser welding. Restoring the tightness of such tanks is technically difficult, does not guarantee success in domestic conditions, or is comparable in cost to the cost of a new heater. In addition, if the heating element is non-removable, then the oil can be drained through damage, but it will no longer be possible to fill it back.
No heating
*
A technically sound oil-filled household heater makes a quiet noise when plugged in. This factor is not dangerous, as it is caused only by the expansion of the assembled body of the unit, which clicks when heated.
If, after turning on the unit and setting the required power and temperature values, the heater is silent, it means that the radiator is not heating, and the fault should be looked for in the electrical part.
First of all, visually inspect the integrity of the electrical cable. If there is no visible damage, you must first remove the racks with wheels from the bottom of the unit body.
Then you need to disconnect the control unit from the radiator, for which purpose, using a screwdriver, pry up and remove the standard plate on top of it with the inscription Do not cover, under which there are fastening screws.
Placement of fastening screws of the control unit to the housing
Having unscrewed the fasteners from above, the screws in the lower part of the control unit are also released or the fixing springs are unfastened (depending on the model), the shell is removed from the edge of the junction of the block with the radiator, and the dismantled unit is laid with the inside out.
Sequence of removing the control unit from the oil heater housing
Perform a visual inspection of the integrity of the wiring and insulation, as well as the quality of contacts at the junctions of the wires, paying attention to areas with kinks and oxidation. A wire with obvious internal damage is replaced with a new one, the oxidized contacts are disassembled, cleaned with sandpaper and reassembled.
Upon completion of the visual inspection, they begin to “test” the components using a tester - a multimeter, which begins with testing the cores of the wire section from the plug to the nearest connection. The operation is simplified by the different colors of the cores in the cable of the electrical appliance, which makes it easy to track the direction of the wiring.
The sound signal from the tester indicates the integrity of the area being called, while the absence of a signal indicates damage.
The initial stage of testing an oil heater using a multimeter is the section from the plug to the heating element
Replacing the Tubular Heater
*
The heating element, in addition to heating elements, is equipped externally with current and temperature fuses, the presence of which must be taken into account when dialing. It is possible that, with a working heating element, one of these fuses burned out, or even both failed.
Heating element fuses: on the left - by temperature, on the right - by current
If testing nevertheless reveals a failure of the tubular heater, then further actions depend on the method of installing the heating element in the radiator. The threaded fastening of the heater in the absence of rolling allows its replacement. In this case, the heating element is unscrewed from the radiator, and in its place, with the replacement of the sealing gasket, a heater with identical parameters in terms of power and shutdown temperature is installed.
Tubular electric heater with a threaded installation method in a heating unit
With a non-removable installation option, the heater is rolled into the radiator socket. In domestic conditions, it is very difficult to flare an old heating element and install a new heating element by sealing it, so you should think about buying a new oil heater.
Temperature controller malfunction
Testing this node is done as follows:
- ring the section of the chain from the plug to the thermostat;
- the regulator is set to the minimum temperature value and tested - the circuit must be open;
- when turning on each of the heaters individually, as well as two heating elements simultaneously, when setting the temperature regulator to a value other than zero, the circuit must be closed.
View from the inside of the thermostat of a Sinbo household oil heater with a power of 2 kW.
If a test of the thermostat shows its malfunction, that is, the oil heater does not respond to switching power modes or changing the temperature by turning the flywheel, the device must be replaced, since diagnostics of its technical characteristics with subsequent repairs based on the test results in industrial conditions are not advisable, and it is extremely difficult to do this in domestic conditions.
If there are no malfunctions, the regulator is cleaned of dust and the contacts are tightened.
Failure of the bimetallic strip
*
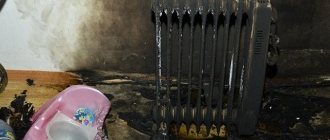
The question of whether an oil heater can explode is relevant, since the oil pressure in the radiator reaches high values, and the air “cushion” in the form of 20% of its volume still has limited potential. To prevent this from happening, the heater design contains a thermal relay, which should turn off the heater if it overheats.
Under normal conditions, this relay, which is a bimetallic strip, should complete an electrical circuit. If the multimeter detects an open circuit in this thermal fuse, then it should also be replaced with a new one with identical characteristics.
Continuity of the thermorelay of an oil-filled heater and appearance of the thermorelay
Oil heaters explode extremely rarely precisely because they have several degrees of protection that duplicate each other, and the likelihood of simultaneous failure of all safety devices is low.
No heater shutdown when tipping over
Opening the electrical circuit when the oil heater is tilted or tipped over is ensured by a device whose operating principle is based on the presence in its design of a suspended weight, which retains its position when the unit deviates from the vertical.
An option for equipping the oil heater with a circuit-breaking device when the device overturns is a plumb line with a metal weight
Testing of this device is carried out by manually deflecting the heater from the vertical. If the device does not turn off, the element must be cleaned of dust and removed, or better yet, replaced with a new one, the installation of which is not difficult.
It should be noted that if the protective switch fails, the oil heater does not explode - if heating elements that are not covered with oil overheat, the thermal protection of the tubular heater is triggered, or the thermal relay opens the electrical circuit.
Making a heater from improvised materials
How to make a homemade oil heater? Many video reviews on social networks are devoted to this topic. The principle of collection is identical everywhere, only the external indicators and the purpose of the heater differ.
The article presents an average option that is suitable for both a garage and a cottage or home. The appearance of the radiator and its functionality will depend on your capabilities, skill and availability of materials.
Preparation of material
A set of necessary materials will probably be found in the garage of every car enthusiast or skilled home craftsman. What you will need to create a heater:
- metal pipes or cast iron battery,
- heating element,
- new or used oil,
- wire with plug,
- welding machine if you plan to form the required dimensions of the structure.
Let us dwell in more detail on the principles of material selection.
The battery can be used, the main requirements are integrity, absence of external and internal contamination. For remodeling, time-tested cast iron samples are usually used.
Metal pipes can be used in different diameters, shapes and lengths; the thickness is also chosen at your discretion. The more area you need to heat, the larger your design should be. Radiators from cars and sealed metal containers are also actively used for the body.
Characteristics of the heating element for a homemade heater:
- 220V voltage is sufficient for connection,
- power 1.5–5 kW.
These parameters will be sufficient to heat a garage area and an average room.
You can use used car oil for the radiator or purchase new one. Before adding used oil, it is recommended to filter it and remove impurities and dirt.
Heater stand
Craftsmen offer two options for installing an oil heater: floor-mounted and wall-mounted. The most advantageous and convenient is wall-mounted; it takes up little space and is quickly hung in the chosen location on hooks deeply and firmly planted in the load-bearing wall.
Making a floor stand is not difficult. To do this you will need a metal corner or profile. Dimensions are selected based on the overall dimensions of the structure. We arm ourselves with a welding machine, a grinder and get to work.
- We draw a diagram of the structure of the legs and calculate the dimensions of the elements. It is recommended to provide for the possibility of disassembling and removing the stand in the future. It is possible that you will want to remove it during the warmer months.
- According to calculations, we cut all the parts of the future stand and sand the edges.
- We weld all the workpieces according to the diagram.
- We clean the welds and paint.
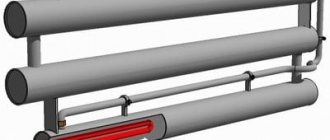
Working with pipes
Let's move on to more complex work - forming a body from metal pipes. First of all, we draw a drawing and determine the main parameters of the elements. Only after careful calculations can you start working with the grinder.
- We cut the pipes according to the diagram and carefully clean the ends.
- We weld the structural elements and install plugs; the tightness and operation of the entire radiator as a whole will depend on the quality of work.
- One of the lower ends must be left free. In the future, a heating element will be installed there. In the upper part it is required to provide a safety valve and a filler plug; it is made in the form of a welded squeegee with a coupling. The valve will allow you to control the pressure and secure the structure.
- We carry out piping using pipes of smaller diameter.
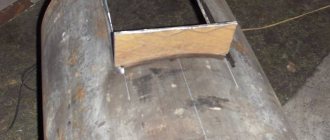
Installation of heating elements
The part of the homemade body responsible for working with electricity is easy to do and does not require special knowledge. You will need a heater radiator, a heating element, a gasket made of thermo-oil-resistant material and a wire with a plug.
The step-by-step steps for installing the heating element are as follows.
- We cut out the metal plate to which the heating element will be attached.
- A hole is drilled or cut out by electric welding in the plate to install the heater fasteners.
- We weld the plate to the end of the lower pipe. Previously, this place was specially left for installing a heating element.
- We process the seams after welding and install the heating element.
Now you can begin laying the gasket made of special heat-resistant rubber and attaching the electrical wire. At this point, you can complete the assembly and start filling in the coolant, namely oil.
Important: according to safety rules and technical standards, the amount of oil per total internal volume should be 80–85%.
Device structure
When starting to repair any electrical appliance, you need to know two things - how it works and how it works. The oil heater consists of:
- metal case;
- heating element (heating element);
- control unit;
- connecting wires.
The heater body is filled with oil, which is heated by a heating element when turned on. Heat is transferred to the walls of the housing, and from them to the heated room. When a certain temperature is reached, the control unit is activated and heating stops. The cycle is repeated as long as the heater is connected to the mains. As a result, a constant temperature is maintained in the heated room.
Preparation of the workplace
To repair a heater, you first need to create the conditions for this. One of the main prerequisites for successful repairs will be preparation for it. First of all, you need to choose a place where you will disassemble the heater. It should be spacious enough and well lit. A garage or a separate room is best suited for this.
Then the tool and accessories are prepared. Since the design of the heater is not difficult at all, the instrument will be very ordinary. A set of screwdrivers, pliers and side cutters, a small hammer and an awl - this will be enough for repairs. Before repairing, you need to have a soldering iron, a tester, WD-40 liquid, lubricant (Graphite or Litol-24) and a little alcohol on hand to wipe the contacts. There must be clean rags. If the cause of the breakdown is determined in advance, then spare parts are needed to replace the failed parts.
Repairing oil leaks
Loss of seal in the main part of the radiator and oil leakage are the most common problems with these heaters. Oil may leak out through an accidental hole or a wall that is rusted. If the second option occurs, then it is better to purchase another radiator, since corrosion can destroy a larger area than is visible. Therefore, after some time, oil will flow near the brewed or sealed area.
Holes or small holes, cracks can be:
- solder;
- brew.
The first option should be avoided. Soldering cannot provide a reliable connection, and with constant heating/cooling, the strong contact between the solder and the metal of the tank will begin to turn into a crack. Therefore, it is better to weld the hole.
Preparing the heater for soldering or welding is the same:
- Draining oil from the tank.
- Cleaning the problem area from dirt and rust. This can be done with sandpaper.
- Pouring water into the tank. This will avoid a possible fire (there was oil inside, and its remains were definitely preserved).
- Turning the radiator over to a position in which water will not flow out of the hole.
How to disassemble a radiator
To repair the heater, you need to identify the cause of the breakdown. To do this, it is recommended to disassemble the device. First you need to prepare everything you need:
- an object for prying off the plastic panel - it is desirable that it has a wedge-shaped shape;
- screwdriver;
- alcohol or cologne;
- tester;
- sandpaper;
- soft napkin;
- brush;
- needle file
Before starting disassembly, the device must be disconnected from the power supply. Connecting a disassembled device is strictly prohibited. All heater models are different, so there is no standard algorithm for carrying out the procedure. However, there are several options for solving the problems.
First of all, you should carefully study the device control panel. If there are screws or mounting brackets, it is recommended to remove them.
But most often a spring latch is used to secure the plastic panel. In this case, you should touch the surface with a plastic object or a product made of another material. This must be done very carefully to avoid damage to the case. By touch you will be able to determine the area where the latch is located. If you press harder on this area, you will be able to bend it.
See also
How to repair different parts of a zipper with your own hands and the necessary tools
If you have little skill in disassembling equipment, it is worth photographing the entire shooting process. It is recommended to lay out the bolts and nuts as disassembly progresses. This will help to reassemble the device after the process is completed. Experts advise not to rush into disassembling the device. Some problems can be identified without looking inside the device.
Recommendations and precautions
Repairing an electric oil heating radiator always involves certain risks. In the process you need to follow a number of rules:
- Before diagnosing and repairing the heater with your own hands, it is completely disconnected from the network.
- When repairing the device, do not smoke or light open flame sources near it.
- After performing complex work with your own hands, for example, welding housing defects, the radiator is first turned on at minimum temperatures.
- If there are uncharacteristic sounds after repairs, new leaks or unusual odors, the device is sent for service.
Diagnosing and repairing a home heater can be time-consuming. But if leaks and signs of other faults appear, you need to start repairs as soon as possible. If the appliance is malfunctioning and leaking oil, but is still heating, it still should not be used due to the risk of explosion, fire, or electric shock.
Prerequisites for breakdowns
A significant number of manufacturers supply cheap products of low quality to the markets. An early breakdown of a water heater in this group does not come as a surprise, since even the warranty obligations for the products are minimal. However, even high-quality products, distinguished by their quality and reliability, may end up being repaired soon after purchase due to a number of factors, which are not at all difficult to avoid.
The main causes of water heater malfunction
hiding in our everyday life. Hard water and unstable power supply have a detrimental effect on equipment. Our water contains various salts in large quantities. It is they that lead to the formation of scale inside devices and operating circuits. Installing flow filters at the inlet of the heaters will help to significantly reduce the salt content. In the supply networks of most regions, voltage and frequency can vary significantly in a short period of time. Connecting network filters or uninterruptible power supplies will solve the problem.
It is important to install and connect the device correctly. Many breakdowns occur precisely due to errors at this stage.
Even ignoring conventional grounding can not only lead to electrical shock, but will also contribute to the accelerated destruction of the magnesium anode and severe corrosion of all elements inside the tank. The optimal heating temperature is set to 60-70 C.
Is it possible to repair it yourself?
It is important to understand that, unlike a trivial malfunction, it is not possible to restore the functionality of the bulk of components without special experience and professional knowledge.
It is especially dangerous to use homemade spare parts, or similar ones, but with different electrical parameters.
It is not advisable for a non-specialist in the field of repair to experiment with faulty equipment or use a gas burner. Such “amateur activity” is fraught with serious consequences in the form of electric shock, injuries, explosions and fires.
Therefore, in the absence of the necessary training, it is best to replace an element that has become unusable in a repair shop.
Price for repair work
The cost of repairs depends on the cost of purchasing spare parts (original / non-original) and labor costs to eliminate the malfunction. The most expensive, but also reliable, are licensed components obtained directly from the product manufacturer. The price is significantly affected by the category of repair:
- small does not require disassembling the unit;
- medium complexity includes partial disassembly;
- complex with complete disassembly and element-by-element inspection.
The most inexpensive is equipment diagnostics, and the most expensive is the replacement of the electronic control module in “sophisticated” models from world brands.
It is not justified to replace the thermal element in models with a non-removable heating element, which requires additional pressing out of the body and subsequent sealing of the new thermoelement. Coupled with the cost of heating elements, draining and filling oil, such repairs will cost a pretty penny, comparable to the price of purchasing a new unit.
Despite the absence of complex technical solutions in the design of oil radiators, they, like any complex household appliances, tend to break sooner or later. While it is quite easy to independently identify the cause of the problem, making repairs at home without a special component base is problematic.
A simple procedure of filling oil to capacity without creating a 20% air cushion is fraught with an explosion due to increased coolant pressure. Often, the cause of incidents involving the Ministry of Emergency Situations is the independent restoration of electrical components or short-circuiting of the terminals of faulty thermal protection. It is easier to deliver the unit to a trusted service center or a heating equipment repair facility, where specialists will carry out high-quality repairs of the device with a guarantee.
What to do if the heater does not turn off when tipped over
Most modern oil heaters automatically turn off when changing position. The role of the sensor is performed by a special plumb line with a weight, which is sensitive to deviations from the vertical.
The element is simple and quite reliable, but in an old heater it can turn sour in one position. Do-it-yourself repairs are carried out as follows:
- Remove the cover of the device to gain access to the internal parts.
- Manually test the heater again, tilting it to the sides, and monitor the position of the plumb line.
- If there is no reaction, clean the mechanical sensor from accumulated dust, and then develop it with careful movements.
If the weight moves too tightly even after repair, it is better to change it.
The plumb line with the load should be located at the top of the device next to the thermostat
Device structure
The components of an oil heater are:
- A sealed accordion-shaped housing consisting of two panels welded to each other. Technical oil is pumped inside, and in almost all models air remains in small quantities. But this does not harm the device, because oil in contact with air does not create conditions for corrosion. If there was water instead, the probability of rupture of metal structures would be very high.
- A heating element is inserted into the device in the lower part on the side. It is with its help that the oil and the radiator itself are heated.
- A control and safety unit is installed next to the heating element. Its main and important element is a thermostat with a fuse. The first is responsible for setting the required temperature conditions, and the second is for operational safety. If for any reason oil begins to leak out of the housing, the fuse will trip and stop the supply of electricity to the heating element.
Today, manufacturers use disposable wire-type fuses or reusable bimetallic fuses in the form of tablets. As for the control relays, in oil heaters they are similar to an electric kettle, and not to irons. In the design, the relay hangs in the air without contacting the device body.
- Each device has two switches. Each has three wires - phase, neutral from the heating element and a wire from the thermal relay. Three wires are needed for the switch illumination to work.
The electrical circuit of an oil heater is almost the same as in irons, electric kettles and other heating devices. It is simple and yet reliable. Typically, all these heaters have two heating elements installed, and when both are turned on at once, electricity consumption increases greatly. But at the same time, the time to reach the operating temperature increases. If the temperature in the rooms is low, then even with two heating elements turned on, the device can operate without turning off.
The metal case, which covers the power and safety unit of the device, has ventilation slots at the top and bottom. If you close them, the device will not suffer from this, but it will work with difficulty. It will turn off faster, but turn on less quickly. Therefore, it is recommended not to hang things on the radiator to dry. If this happens, try not to close the ventilation gaps.
Let's start the renovation
The question of how to repair an oil heater with your own hands arises for everyone when the device stops working. Meanwhile, there is absolutely no difficulty in this issue. First of all, it is necessary to disassemble in order to get to the repair object. To do this, you need to disconnect the control panel from the case. As a rule, it is secured with latches. But there is another kind of fastening. For example, screws or staples.
Therefore, you must first carefully inspect the heater to determine how the panel is attached. Then carefully, without making much effort, remove it. Disassembly should be done without using brute force, since all fasteners are made of plastic.
Before starting repairs, you must turn off the power to the heater.
Checking the power cord and switch. From this it is necessary to begin work on restoring the functionality of the oil heater. The fact is that during long-term operation, the wires usually burn out at the junction points, and the contact is broken. In this case, it is enough to disconnect the wire and strip it, and at the same time the connection point. After that, put everything back together. Contact has been restored. We use a tester to check whether this is really the case. At the same time, you need to check the power cord for broken wires. Rarely, but such a malfunction occurs. This is done simply, using the same tester.
The next step is to inspect all contact connections in the control unit. It is necessary to very carefully inspect each contact for burning, oxidation and loosening. A screwdriver, fine-grained sandpaper and cotton wool moistened with alcohol will be sufficient for repairs. It is possible that somewhere you will need a soldering iron to solder the torn wiring.
It may happen that there is a malfunction in the thermal relay or temperature controller. In this case, you need to carefully remove it and disassemble it. After disassembly, the bimetallic plate located inside is removed and replaced with a new one. The whole point is that there can be no more faults there. After replacing the plate, the relay will restore its potential.
Repair of thermal fuses will consist of checking their performance and replacing them, if necessary, with serviceable ones. Checking is a simple tester. There may be several thermal fuses, or they are also called thermostats. We check everyone.
It remains to check the condition of the heating elements. To do this, it is enough to measure their resistance with a tester. It should be less than 1 kOhm. One connection checks for open circuit. Thus, if the tester shows a lot of resistance or shows nothing at all, then it’s time to change the heating element.
At this point, the check of the electrical part of the heater can be considered complete. Let's move on to mechanical problems.
Of these, only one is relevant - oil leakage. In this case, the heater will have to be disassembled to drain the remaining oil inside.
If there is damage to the body, it is important to determine exactly where it happened. Then you need to thoroughly clean the found area with sandpaper.
This is done to determine the repair method. If it turns out that the hole is small and there are no signs of corrosion around it, then one of the repair options would be to screw a self-tapping screw or a screw of a suitable diameter into the hole. Another option would be to use a special sealant called “cold welding”. Before use, it is kneaded in your hands until it becomes plasticine.
A rolled ball of sealant is applied to the hole and carefully leveled on the surface. After 15-20 minutes it hardens enough that you can use the heater. It will be somewhat more difficult to eliminate the hole that has formed due to rust. In this case, you will need to sand the entire rusty spot down to “living” metal. Then again you need to carefully inspect and evaluate the size of the hole. If it is not very large, then it can be soldered. If the hole is large, then you need to use welding, that is, apply a patch and scald it. In this case, repairing an oil heater will be more serious and will require not only special tools, but also skills.