One of the most important stages in the construction of any building is thermal insulation, so the choice of material is very important. It should provide comfort in the home, be safe and energy efficient. The process of insulating walls with penoplex is simple, so you can do it yourself.
How to insulate a facade, popular technologies
To insulate a house, you can use the “wet facade” technology. It bears this name because during the work process liquid construction compounds are used that require drying.
How insulation is performed:
- Cleaning and surface preparation.
- Applying an adhesive layer (maximum 3 cm).
- Installation of thermal insulation.
- Applying a second adhesive layer.
- Installation of reinforcing mesh.
- Applying plaster.
- Padding.
- Painting.
Another popular technology is the ventilated facade. Its peculiarity is that work is carried out much faster than with previous technology. This is due to the fact that installation does not involve the use of so-called “wet” compounds, between the application of which a certain time must pass. When choosing a ventilated facade, you can begin subsequent installation stages immediately after completing the previous one.
For fastening, not glue is used, but disc-shaped dowels and anchors. This technology is durable and has good resistance to external influences. You can choose any materials for exterior finishing.
Required materials
To insulate the outside of a house with penoplex, you need to select the necessary consumables. In this case, the work will go smoothly. For insulation you need:
- Penoplex boards. Their number is calculated depending on the area of the base, as well as adding a 10% margin for cutting.
- Primer liquid. It improves the adhesion of sheets to the base. The type of substance depends on the material used to make the walls: for brick surfaces , plastered surfaces made of gas silicate blocks, a deep penetration primer (300 ml/sq.m.) is suitable, and for concrete surfaces, Concrete Contact containing quartz sand (400 ml/sq.m.).
- To insulate external walls with penoplex, a starting profile is required. It is needed for proper fastening of the first row of slabs. The element is installed around the perimeter of the entire building. Included with it are spacer washers that allow you to correct minor unevenness in the base. The number of profiles is calculated depending on the length of the walls, and fasteners - 1-2 per joint. To fasten the supporting elements, dowels are used, the distance between which is 30 cm.
- To insulate walls with extruded polystyrene foam, you need special glue. The average material consumption at the first stage is 5 kg/sq.m. An additional layer will be required to secure the layer of reinforcing mesh. In general, it will take up to 10 kg/sq.m. material.
- Dowels are “fungi”. They can be hammered or screwed. It is better to choose products with a thermal head or a plastic expansion nail. For each square meter of area you will need 6 elements.
- Reinforcing mesh. It is better to purchase fiberglass-based material. For finishing you will need up to 1.1 sq.m/sq.m.
For the decorative plaster layer, materials with different textures are used, so the consumption is calculated after external insulation.
Installation features
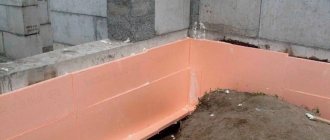
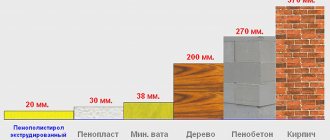
In this article we will tell you how to insulate a house made of aerated concrete on your own. Penoplex insulation 50 mm thick will help eliminate cold bridges, prevent the appearance of dampness and mold in the room, create a comfortable microclimate and save on heating costs in the winter.
1
2
3
1 – Penoplex boards are fastened using Penoplex Fastfix adhesive foam. It is specially designed for such work. In addition, it has low expansion.
2 – You will also need umbrellas or strong ones. Everyone calls them differently. You can see what they look like in the photo below.
3 – Mechanical fixation of the insulation is carried out using black self-tapping screws 120.
Making a plaster solution
Do not use a standard cement-based mortar with sand, as it will not give a good quality plaster composition. The store is full of mixtures with a composition suitable for laying on penoplex.
Experienced finishers advise using:
- "Stolit"
- "Ceresit"
- "Ecomix".
When mixing, strictly follow the instructions left by the manufacturer on the packaging. Experienced craftsmen make a mixture that is similar in thickness to sour cream. To glue fiberglass mesh, the consistency of the mixture should be slightly thinner than required by the manufacturer. In the case of a leveling layer, the solution should be so liquid that it flows freely from the spatula. Hence the different consumption of the composition: gluing the mesh will require 4 kg per 1 sq. meter, for a leveling layer - 6 kg of mixture per square meter. meter.
Preparation of plaster mortar
The compositions of different manufacturers, despite being very similar, have different components. Therefore, it is better to use products from the same manufacturer at the same facility to avoid unnecessary problems.
Use formulations that are universal in application, and you won’t have to think about additional nuances associated with limitations in the scope of application.
Prices for popular types of plaster
Plaster
Preparatory work
Installation work begins with preparation:
- Inspect the entire house, check for unevenness and protruding elements. Remove all excess using a spatula and a hammer, so that later during the work it does not cause unnecessary trouble.
- Wash the walls of the house using a hose or Karcher. This will help remove dust and dirt from the surface.
- If the walls of the house are made of reinforced concrete, then treat them on the surface with a primer. Plaster is applied to the brickwork to level the surface as much as possible and eliminate air gaps that may form when laying insulation. Penoplex slabs can only be mounted on a flat and durable surface. This will guarantee the durability of such insulation. For example, if the wall was previously plastered and painted on top, then you should get rid of the paint and check the plaster layer everywhere for evenness.
- Prime the plaster after drying. This allows you to strengthen its surface and improve adhesion with the adhesive used to fix the insulation to the wall. Thanks to this, the plaster will not crumble as the load from the applied materials increases.
- Draw a line using a laser level, since thermal insulation of the walls will not insulate the foundation. This will happen separately, together with the blind area. Back off 10 cm to cover the seam later.
- Use a coated thread to mark the starting line. Before insulating the wall, you should install embedded parts and fasteners, with the help of which the drainage system, external lamps, antenna and other accessories placed on the facade of the building will be fixed in the future. If the fastener passes through the insulation and is located within its thickness, then it is worth treating it with a protective compound. For example, any paint for exterior use, but not oil-based, is suitable.
- Along the coated line below, where the installation of insulation will begin, mount the starting profile. It must be made of stainless steel. It is fixed to brickwork or a concrete wall using self-tapping screws and dowels. First, their locations are marked, holes are drilled according to the markings, where fasteners are then inserted. The starting profile will be a reliable support for the first row of insulation boards.
It allows you to align them horizontally. Plus, this is additional protection for the lower part of the thermal insulation from moisture, mechanical damage and rodent pests. The starting profile clamps are fixed at a distance of 30-50 cm from each other. At the point of contact with the wall, the elements must fit tightly together. If a gap has formed, it should be eliminated using spacers. A gap of 3 mm is left horizontally between the individual profiles and a special fastening is installed.
It is important to know!
The level of placement of the lower part of the insulation is set 20-30 cm higher than the floors inside the house. This allows you to improve the thermal protection of rooms and avoid dampness. It should also be ensured that the width of the stainless steel profile is equal to the thickness of the foam board.
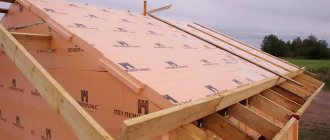
Advantages and disadvantages of roof insulation
Penoplex is the most suitable material for roof insulation. Moreover, the number of roof slopes and the angle of inclination do not matter. You can effectively sheathe any roof, as the slabs have a number of advantages:
- Polystyrene has a cellular structure, where each cell is insulated from the inside. Thanks to this, moisture is not absorbed into the material, swelling or deformation does not occur.
- Docking grooves facilitate installation work at heights where ease of installation is important.
- The material does not change shape from heat or cold.
- It is used for roof repairs or additional insulation of the under-roof space without changing the design.
The light weight of the slabs is convenient when cladding small or light structures, and also allows even beginners to insulate the walls outside with penoplex with their own hands.
Penoplex has some disadvantages that you should be aware of:
- It cannot be used to create a facing layer where it is necessary to remove wet vapors to the outside, since the insulation does not allow moisture to pass through itself and does not absorb it.
- When repairing the roof, it is necessary to cut the material to actual dimensions at the installation site, which lengthens the installation time.
- On the outer layer of penoplex, which will be exposed to ultraviolet radiation, a protective film is necessary. Models without protection are subject to rapid destruction from sunlight, so it is better to choose products with a protective layer
Installation of insulation using “wet technology”
Step by step steps:
- Installation of penoplex outside the house should begin from its corners. But in the locations of door or window openings, they start from them, first filling the opening around the perimeter. Of course, some of the insulation boards will have to be cut to give the desired shape. But this is not difficult to do with a hacksaw or even a regular saw.
- Lightly moisten the area on the wall for better adhesion. Along the marked line, proceed with the installation of heat-insulating boards, fixing them with adhesive foam. Gluing will take no more than 3 minutes. There are types of adhesives that can only be applied to a dry surface, this is indicated on the packaging. In this case, you need to wait until the wall surface is completely dry.
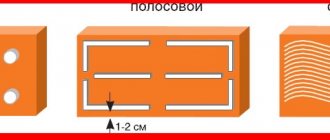
The adhesives are mixed according to the instructions on the pack. If a dry mixture is used, then it is diluted with water and stirred for 5 minutes, then set aside for another 10 minutes and thoroughly stirred again until a homogeneous consistency is obtained. You can use this glue for 2 hours, after which the composition loses the necessary characteristics. The glue is applied along the perimeter of the slabs in a strip of 10 cm. The thickness of the adhesive layer should not exceed 2.5 cm. The area of the foam sheet is filled with glue by 40%.
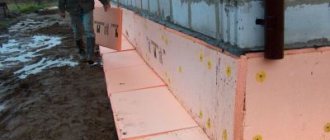
- Perform mechanical fixation with 5 fasteners. It is advisable to do this 2-3 days after gluing the slabs. This will ensure a tight fit of the slab and will not disturb the plane. The second row of insulation is placed offset by half the slab. So the seams will not match vertically. This not only improves thermal insulation parameters, but also increases the strength of the wall finish.
- Apply a second layer of glue - more than 0.2 cm thick. It will fix the reinforcing mesh. It is necessary to improve the adhesion of the plaster to the surface of the insulation. Additionally, the mesh is secured using staples with a stapler or small self-tapping screws. The strips of reinforcing mesh have dimensions of 30x100 cm. They begin to be fixed from corners and slopes. Adjacent strips are laid overlapping, 10 cm wide. On the sides, the mesh is fixed with metal corners, which are attached to self-tapping screws.
- Perform plastering. It is important that the reinforcing mesh is completely covered with plaster and does not protrude from it anywhere. After hardening, the top plaster is primed and painted in the desired color.
- Close all walls in the same way.
Work can also be carried out during light rain. This is only to your advantage, because... The adhesive foam will be moistened naturally, which will ensure better adhesion. Penoplex itself is not afraid of moisture, as it has zero water absorption. At the same time, it is characterized by low thermal conductivity and high strength; during work, you can safely rest a ladder on it. The insulation has a long service life, is environmentally friendly and easy to install.
It is important to know!
Insulation scraps can also be used, but it is better when they are large solid slabs. Very often, cuttings are placed in places where there are fastenings on the façade for the drainage system, external lamps or CCTV cameras. But keep in mind that insulation boards less than 20 cm wide cannot be laid at the corners of walls. This will reduce the level of thermal insulation and can lead to the formation of “cold bridges”.
Algorithm for installing insulating material on the walls of a house
For proper thermal insulation of walls from the outside, a hybrid method of attaching sheets of material to the facade of the building is used:
- The insulated surface must be cleaned of dust, dirt, chipped plaster and traces of the old coating. All defects in the wall must be thoroughly rubbed using the repair mixture, and then wait for it to dry completely.
- A deep penetration primer solution suitable for use with the building material is applied to the surface of the walls. For concrete walls, Betonkontakt is used. For brick and wooden surfaces, it is recommended to use Ceresit ST17 or similar compositions.
- At the bottom of the base you need to install the so-called starting strip - a wooden guide that will set the position of the heat insulator fragments on the wall surface.
- To lay extruded polystyrene foam on the wall, you need to apply a special adhesive composition. Then the heat insulation sheets are installed in rows in a horizontal plane. The laying pattern is similar to the formation of brickwork; it is also called “chessboard”. In this case, the seams of the first row do not coincide with the next one.
The rows of insulation are aligned without waiting for the adhesive mass to completely harden. It is produced using a horizontal level, this helps to minimize gaps at the joints of the plates. The final stage is carried out no earlier than three days after applying the insulator to the glue. Sheets of material are additionally secured using special mushroom-shaped dowels. When the glue is completely dry, all cracks and slab joints are closed by blowing in mounting foam or aerosol material under the Fastfix brand.
Installation of insulation using “ventilated facade” technology
The ventilated facade is a lattice structure, which is lined with slab or panel materials. The peculiarity of this finish is the presence of a gap between the finish and the wall. It is necessary for air circulation and free removal of moisture from the wall surface.
The insulation of a ventilated facade with penoplex differs slightly in technology and is carried out in several successive stages:
- Preparing the walls. If necessary, putty for leveling. Cracks and chips are repaired. The top is treated with a primer.
- Drawing vertical lines under straight hangers. Marking the horizontal position of the profile.
- Installation of stainless steel profiles. This structure will serve to accommodate the facing material. It is important that the distance between the frame and the wall is 5-7 cm greater than the thickness of the insulation boards. This space will become a ventilated gap.
- Penoplex boards are laid on a layer of glue. Additionally, they are fixed to the wall with disc-shaped dowels - 5 pieces each. for 1 plate. When installing in penoplex, slots are made for fastening the profile. They will need to be sealed with foam sealant after laying the slabs.
- A layer of waterproofing is laid on top of the insulation. Its role is played by a windproof membrane made of multilayer insulating materials. It is attached to the insulation using a stapler and staples. At the joints of the canvas, an overlap of 10-15 cm is made.
- The frame of the profile system is assembled and the facing material is installed on it. These can be decorative wood panels, aluminum or steel cassettes, porcelain stoneware.
Curtain facade
Insulation of the walls of a house can be done in the form of a curtain wall. First you need to prepare the base. All areas with crumbling finishing material are cleaned. The destroyed brickwork is being restored. Since the panels can be installed correctly only after marking, maximum attention is paid to this process. The distance between the brackets is taken into account: 40-60 cm horizontally and 80-140 cm vertically.
Frame installation and wall insulation
Before attaching the penoplex to the wall, you need to mount the sheathing. It is fixed with screws on the base. However, it is worth remembering that if the masonry was carried out with hollow bricks, then holes for fasteners should not be drilled using a hammer drill. After installation, the brackets need to be aligned so that they are in the same plane.
Next, you can insulate the base, but do not forget about waterproofing. Penoplex boards are attached with glue and additionally secured with dowels. They need to be laid from bottom to top in two layers with bandaging of the seams. A waterproofing film is attached over the material.
Finishing
Decorative panels imitating wood, porcelain stoneware, and brick are used as finishing materials. Natural stone is often used for cladding.
How to determine the thickness of insulation
To calculate the thickness of the thermal insulation material, you can use special online calculators.
In this case it will be necessary to take into account:
- thickness of external walls;
- the degree of their thermal resistance;
- climatic features in the region;
- seasonal temperature;
- thermal conductivity of insulation.
It is important to know!
The resulting value will only be an approximate value. For an accurate calculation, it is recommended to contact specialists.
Finishing mixture
The second layer is necessary to complete the alignment of the wall and hide all auxiliary elements, such as reinforcement. The third layer is possible if the quality of the second for some reason does not please the master. But this is only a “rough” finishing before the final stage - the final surface design. The last stage is usually performed using decorative plaster. If the surface was made uneven, then normal installation of the “decoration” is out of the question.
Facade plaster using penoplex
Table. Necessary tools and materials.
| № | Name |
| 1 | Vessel for preparing the mixture |
| 2 | Water container |
| 3 | Spatulas of various sizes |
| 4 | PVC mesh for making a reinforced layer |
| 5 | Oil brush |
| 6 | Paint roller |
| 7 | Penoplex trowel |
| 8 | The plaster composition is either “Ceresit”, or “Ecomix”, or “Stolit” |
| 9 | Polyurethane foam Ceresit CT-84 (850ml) |
| 10 | Primer "Betonkontakt" |
| 11 | Glue CeresitCT 83, or KREISEL 210, or Glims KF, etc. |
Recommendations for insulating walls made of various materials
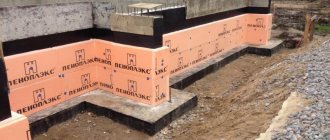
Rules for insulating concrete walls:
- before proceeding with the installation of thermal insulation, you need to treat the surface with antiseptic compounds;
- You cannot lay insulation in a specific area, this must be done over the entire area of the building;
- concrete is not resistant to moisture, so the installation of a waterproofing membrane is necessary.
Rules for insulating a wooden house:
It is important to know!
The most important rule for thermal insulation of a building made of any material is compliance with the stages and installation technology. The work is quite difficult, so it is better to entrust this task to professionals.
As it became clear, there are many types of insulation for facades. Penoplex is considered one of the most modern and effective. It has impressive performance characteristics and a long service life. However, it is important to consider that this can only be achieved if the installation work is carried out in accordance with all rules, regulations and requirements.
How to choose penoplex?
Before insulating with penoplex, you should choose the right material. The following characteristics are taken into account:
- density and thickness of the product (to insulate a wooden house from the outside with penoplex, sheets with an index of PBS-15 are required, for a concrete house - PBS-25);
- weight and dimensions of sheets;
- coefficient of moisture absorption, thermal conductivity, compressive strength;
- climate zone;
- cost of the material ( prices depend on the manufacturing company, technical parameters ).
The manufacturer is also an important criterion for choosing penoplex. It is better to give preference to those companies that have earned positive user reviews and a good reputation.
Pros and cons of penoplex
Penoplex is high-quality foamed polystyrene. Manufactured using extrusion technology. The material was developed more than 50 years ago in an American laboratory. Penoplex is sold in a special packaging film. This is necessary to protect it from ultraviolet rays, since it is not resistant to them. Thanks to this, the insulation can be stored outdoors. However, if possible, it should be additionally protected from the sun to reduce the risk of sun exposure. Under the influence of rays, the integrity of the top layer of the heat insulator can be damaged.
The advantages include:
- Low thermal conductivity. This makes it possible to insulate the façade walls with penoplex foam with a minimum layer thickness. In this case, the thermal insulation will be high.
- Good resistance to moisture. Thanks to this, the insulation does not deteriorate under the influence of precipitation and condensation.
- High strength. Insulation of the facade with penoplex under plaster and any other cladding is not subject to mechanical damage.
- Long service life. If the thermal insulation layer is installed correctly, the operational period will be at least 50 years. To do this, it is better to entrust the insulation of the facade to specialists, and not to do it yourself in the absence of experience.
- Environmental Safety. The insulation is absolutely safe for human health, so it can also be used for internal insulation, including in educational and medical institutions.
- Resistance to chemical environments . Low probability of mold and mildew.
- High speed and ease of installation work.
- Non-flammability.
The disadvantages include:
- If a fire occurs, the material does not ignite, but melts;
- Rodents love to spoil Penoplex;
- When exposed to ultraviolet rays, it loses its performance characteristics, therefore, during installation in sunny weather, additional protection of the walls is required;
- High price.
The advantages of thermal insulation material are much greater. They cover all the shortcomings. For example, the high cost of insulating a façade with Penoplex will pay off due to its long service life.
What is important to know about Penoplex
To choose the right insulation for walls, you need to consider the properties, advantages and disadvantages of the materials offered on the market. Penoplex is extruded polystyrene foam with high density and strength. During production, the initial granular raw material is melted and mixed with gasifiers. Next, the foamed mass is pressed through the nozzles of the extruder and hardens, turning into a long white tape of a given thickness.
After this, the material is cut into standard size pieces. As a result of a chemical reaction, air bubbles isolated from each other are formed inside the sheets. The material is used to insulate floors, walls, and ceilings. It has the following advantages:
- low thermal conductivity coefficient;
- resistance to moisture (its absorption is only 0.5% of the total volume);
- high level of mechanical strength (the product does not deform over time);
- simplicity of installation work and low cost;
- the ability to provide good insulating properties with minimal material thickness;
- fire resistance;
- long service life;
- no need to use expensive or bulky installation equipment;
- resistance to rotting, development of fungal pathologies and mold.
There are no restrictions for insulating the outside of a house with penoplex. It is even allowed to be installed in rooms characterized by high humidity. However, the product has disadvantages: it does not burn, but melts, emitting toxic smoke.
The slabs do not allow steam to pass through, so the insulation is suitable for finishing a brick house, and not a wooden one (from the inside) or a frame one. Moreover, it can be installed both under plaster and under siding.
Varieties of Penoplex for insulation
There are several types of penoplex for insulating facades. They differ in flammability class and strength. Each type is intended for thermal insulation of various objects.
Main line:
- Penoplex “Facade”
Designed for thermal insulation of internal and external enclosing structures, that is, walls, partitions and facade systems. It is a slab with a milled surface. Thanks to this characteristic, insulating the facade of a house with Penoplex under plaster has better adhesion with glue and cladding, which reduces the time required for the work. - “Base”
It is considered a universal material. Used for thermal insulation of floors, walls, roofs that will experience high loads. Penoplex "Osnova" is used in industrial and civil construction. - “Wall”
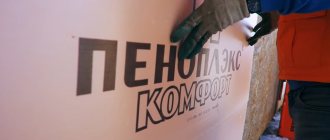
is an analogue of Penoplex “Facade”. However, this variety does not have a milled surface. Used to insulate external and internal enclosing structures (walls, partitions, facade systems). - “Comfort”
is the most popular thermal insulation material in private housing construction. It is used for insulation of country houses and city apartments. The material is used for walls, extensions, loggias, balconies.
It is important to know!
There are also other types of insulation, but they are not intended for facades: Penoplex “Foundation”, “Roof”, “45” (for road construction), “Pitched Roof”, “Geo”.
Primary layer sketch
Penoplex is prepared for plastering by laying the primary layer. For this purpose, alkali-resistant PVC mesh should be used. By using PVC, you will insure yourself against the aggressive influence of cement on the exposed mesh. Cement is known to react with many materials.
Cut strips the length of which should be slightly greater than the height of the wall. Please note that installation is done from top to bottom. Apply the strip to the fiberglass with one hand, and apply the solution to the mesh exclusively along the top edge with the other. Thus, the mesh is, as it were, “welded” to the penoplex. As a result, the primary layer should be up to 5 mm thick.
Penoplex insulation scheme: 1 - penoplex slabs, 2 - glue, 3 - dowels, 4 - reinforcing mesh, 5 - primer, 6 - plaster coating
When the top edge is fixed to the plane, apply the solution to the mesh so that it is evenly distributed across the entire width. Every movement comes from top to bottom. Be sure to leave a vertical “tape” clean of the plaster mixture on the right side, because each subsequent strip will overlap the edge of the previous one by almost 1 cm.
As a result, it turns out that the wall will be strip by strip covered over the entire surface with a mesh. Look at all the places on the wall where the geometry of the plane changes (door openings, slopes, window openings) - this is where you should first start laying the mesh.
Reinforcing mesh for foam plastic
Prices for reinforcing mesh for foam plastic
Reinforcing mesh for foam plastic
Expert advice
Trimming standard size insulation boards results in the need to remove the connecting ends. Because of this, gaps and cracks may appear at the joints. In the future, they will become “cold bridges”, increasing the level of heat loss from the wall. To avoid this, such joints are “blown in” with a foam type sealant. It resembles polyurethane foam, but at the same time has even higher performance characteristics - it is not afraid of moisture, temperature changes, exposure to sunlight or freezing. It is important that it does not expand in air.
When fixing penoplex with an adhesive composition, only 1 fastening in the form of a disc-shaped dowel can be used for each of the plates. But this approach is usually chosen only when insulating one-story buildings with concrete walls. They are less susceptible to wind loads. To ensure reliable fixation of the insulation board, the fastening must go into the concrete wall by at least 40-50 mm. This number must be added to the thickness of the selected foam when purchasing fasteners.
If the facade of the house, after insulation with penoplex, is planned to be covered with siding, then a sheathing made of metal or wood should be mounted on top of the insulation. It is attached to the penoplex itself with long screws or dowels. Of course, the insulation board must be fixed not only with adhesive, but also with fasteners with a disc head. This will reduce the risk of the thermal insulation collapsing when installing the sheathing and avoid tearing off the facing material during strong gusts of wind. There remains a ventilated gap of 2-3 cm wide between the siding and the penoplex. But there is no need to use a vapor barrier with such cladding.
Penoplex: characteristics and scope
Penoplex is an effective insulation made from extruded polystyrene foam. Compared to traditional foam, it has a high density and low vapor permeability. Thanks to these qualities, the material is widely used for insulating surfaces in the construction of buildings.
"Penoplex" is a trade name from - a variant that also exists in everyday life. Both names can be considered correct.
Advantages and disadvantages
The advantages of insulation include the following parameters:
- high thermal insulation properties;
- a light weight;
- ease of installation;
- environmental friendliness;
- low cost.
Penoplex has some disadvantages that are worth mentioning:
- Vapor permeability is virtually zero, which does not allow it to be used for insulating an apartment.
- Subject to destruction when exposed to sunlight.
- Requires the use of additional fasteners during installation due to poor adhesion to the surface.
There is one more quality of insulation that indicates its disadvantage - relative flammability.
Penoplex itself cannot ignite under the influence of high temperature, but if there is an open flame near it, a short-term ignition with self-extinguishing is possible. When burning, acrid smoke is released.
Production of Penoplex insulation
Specifications
Typically, the following information is listed:
- The thermal conductivity index is 0.03 W/m×°C, which does not decrease even when the material gets wet.
- Moisture resistance not exceeding 0.4% per day with excess humidity allows the use of Penoplex for insulation of attics, roofs, and subfloors. This property makes it possible to use the material as a moisture-proof layer. This is especially true for a wooden structure that needs to be insulated from atmospheric moisture.
- The vapor permeability of penoplex has parameters from 0.007 to 0.008 mg/mh·Pa, which indicates a high degree of protection against wet vapors.
- A specific heat capacity of 1.45 kJ/kg °C means a quick gain and retention of heat in the house after prolonged cooling.
- The service life exceeds 50 years, under installation conditions in full compliance with technology and proper operation.
- The sound insulation ability of the slabs will help dampen shock and vibration sounds from the outside.
- The fire safety class ranges from G1 to G4, which indicates conditional flammability if the rules of installation and operation are observed. When exposed to fire, penoplex can smolder.
The environmental friendliness of a material can be judged by studying the composition and method of its manufacture. The manufacturer refused to use phenol and freon in the work, which allowed the use of insulation for interior finishing work in attics and basements.
The color of penoplex does not affect its effectiveness in any way. The traditional color is orange.
Some handicraft manufacturers, in pursuit of profit, mislead buyers with the “special” color of the product, and in fact, add cheap soot to the composition instead of dyes and get gray-colored products.
Extruded polystyrene foam XPS TECHNOPLEX
How to paint penoplex
It’s time to resolve the questions: is it possible to paint plastered foam sheets? What composition can be applied outside the house?
For painting, varnishes and paints containing:
- benzene;
- kerosene or gasoline;
- toluene;
- acetone;
- oolif;
- coal tar;
- xylene;
- polyester resins.
All these substances, penetrating through a thin layer of reinforced plaster coating, destroy polystyrene foam. It is better to choose paints with mineral fillers, as well as water-based and silicate ones. All of them are suitable for interior and exterior decoration.
Preparing the penoplex plane
- Before plastering polystyrene foam, the surface of the penoplex cladding is inspected.
- The evenness of the entire surface is checked by the rule. The protrusions must be cut off, otherwise they will show through under the thin layer of plaster. And large differences will have to be leveled with a plaster compound, which will increase its consumption.
- All open seams (even narrow ones) must be filled with polyurethane foam, otherwise freezing spots will form in these places - cold bridges. Seams that are too wide are sealed with cut strips of penoplex of the required width and sealed with foam. Excess foam is carefully cut off flush with the surface.
- Remove dirt from the surface, sweep away dust or remove with a damp cloth.
- The heads of the dowels that attach the sheets are sunk below the surface. The solution is applied on top of them (level with the surface).
- It is advisable to make the surface of the thermal insulation rough. To do this, it is scratched with a brush, sandpaper or rolled with special needle rollers.