The cellar is intended for long-term storage of vegetables and fruits, canned goods, juices and dairy products. If there is sufficient free space, this structure, unlike the basement, is located separately from residential buildings. To store food supplies, it is necessary to create special conditions. High and low temperatures lead to their rapid deterioration. Therefore, it is imperative to insulate the walls of a concrete grounded cellar. This process is simple enough to do it yourself without the involvement of professionals.
General characteristics of the premises
A cellar is a storage area for workpieces. This is a free-standing object or buried in the ground. It can be located on the site or in the basement of a house, garage or barn. Usually, its construction is planned in advance or a house is purchased with a ready-made storage facility.
The walls of the storage area can be soil, cement or brick. Floors made of compacted soil or concrete. The ceiling can be wooden or concrete.
The temperature in such a room is constant, but in the cold season it can freeze. This will lead to crop loss.
Styrofoam
This insulation is the most popular among consumers. It has been used in the construction industry for a long time and is valued for its quality, ease of installation and affordable cost. But all these advantages do not allow the use of polystyrene foam for thermal insulation of basements, since it is not able to properly protect underground storage facilities from moisture and cold.
You need to know that water that gets on this insulation freezes on its surface and, as a result, destroys it. For this reason, the use of foam plastic in underground storage rooms is impossible without the use of hydro- and vapor barrier films. Taking into account the above, it is clear that as a thermal insulation material it can be used exclusively when solving the problem of how to insulate the ceiling in the basement.
Types of cellars for a private home
There are three main types of cellars in a house or on a summer cottage:
- Ground. The cellar is located on the plot. It is a separate building or an extension to a garage or utility room. The base is buried 0.5 m.
- Recessed. It is located in the ground at a depth of no more than 1.5 m. Usually this is a structure in the form of a caisson or a pit with a hatch.
- Underground. Located at a depth of no more than 3 meters. Maintains above-zero temperatures all year round.
Each type of object requires that the cellar be insulated according to separate rules.
Ventilation and waterproofing layer
Insulating the basement of a private house requires the provision of high-quality waterproofing and ventilation. They help prevent premature wear of almost any insulation.
Waterproofing
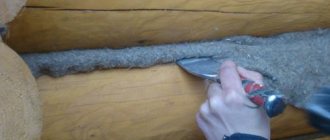
There are many methods and materials for waterproofing a basement from the inside. The simplest and most reliable is surface treatment with liquid rubber. This is a water-based polymer-bitumen mass. The material is quite easily applied to the surface in any way: brush, roller or spatula.
Before starting work, it is necessary to ensure good ventilation of the room. Then a primer is applied to the entire surface, which is usually sold complete with bitumen paste. The mastic is mixed with a construction mixer and applied to the walls, floor and ceiling in any convenient way.
After drying, a homogeneous rubber layer is obtained. Despite the fact that the adhesion of waterproofing to the surface is very strong, it is necessary to additionally press it against the walls and floor so that even after several years, leaking water cannot tear off the rubber layer. To do this, a screed is made on the floor, and the walls are plastered, lined with brick or tile.
Ventilation
One of the simplest ways to ensure cellar ventilation is to install special vents in the foundation or two supply and exhaust ducts made of PVC pipes with a diameter of 1 to 5 centimeters. The operation of such a system is based on the temperature difference between the air coming from the street and the basement air.
Drainage
Additional protection is provided by drainage channels dug around the foundation, forming a single system. A drainage ditch is dug outside the building, and its depth is 0.2–0.3 meters. Next, geofabric is laid and crushed stone is backfilled. After laying the drainage pipe, cover it with geotextiles and fill it with sand or carefully compacted soil. The arrangement of a drainage system is necessary when the groundwater level is high.
Indications for insulation
Deep cellars freeze due to melt or groundwater. Outdoor buildings due to exposure to low temperatures.
Indications for insulation are:
- lack of insulation in the finished cellar;
- new building;
- damage to thermal insulation;
- freezing of walls, floors, ceilings - accumulation of condensation and frost;
- the appearance of mold.
Also, an indication for insulation is product damage, even if there are no other visible signs.
Freezing of the walls is an indication for insulating the cellar
Thermal insulation of a cellar has many advantages, the main ones:
- frost protection;
- protection against condensation and mold;
- maintaining a stable temperature, optimal for storing supplies;
- protection from groundwater exposure.
Carrying out insulation work works as insulation and protection from water.
Ventilation device
The first stage of insulation is the installation of a ventilation system in the underground, which will ensure air circulation inside the room and prevent the formation of condensation on surfaces.
Underfloor ventilation consists of installing two pipes on different sides of the room. The optimal location of pipes is on the south and north sides of the house. The installation of pipes is carried out in accordance with the laws of physics, cold air tends downward, and after warming up it rises.
The supply pipe is located at a height of 20-30 centimeters from the basement floor, and the inlet pipe - 40 cm from the ground. The outer opening of the pipe is covered with a fine mesh - protection against rodents entering the basement.
The outlet pipe is placed 30 centimeters below the basement ceiling. And its upper end is brought out onto the roof of the house. The top of the pipe is covered with a protective cap. This arrangement of pipes will ensure optimal air movement in the underground and protect the room from mold.
Materials for thermal insulation of cellars and their characteristics
A variety of insulation materials can be used as heat-insulating materials:
- Expanded polystyrene can be in the form of regular polystyrene foam or penoplex. The material is durable, insulates any surface well, and is safe – it does not emit harmful substances. The disadvantages of polystyrene foam are that it is flammable and does not allow air to pass through. Penoplex retains moisture well and is easy to install. The thickness of the foam varies from 20 to 150 mm, it does not wrinkle.
- Penofol. High-quality thin insulation with a foil layer. The environmentally friendly material is resistant to temperature fluctuations, does not allow moisture to pass through and is easy to install. Thanks to its reflective properties, it retains heat perfectly. Its thickness is from 2 to 10 mm.
- Liquid PPU insulation. A two-component mixture of isocyanate and polyol. Pros: adheres well to any surface, applied in a layer of any thickness, moisture resistant. Disadvantages - Requires a pressurized installation.
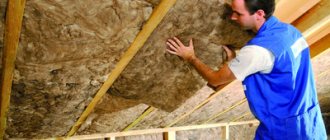
- Mineral wool. Available in the form of roll material, slabs of different thicknesses. The density of mineral felt is 100-150 kg/m3, slabs - from 100 to 400 kg/m3. Depending on the manufacturer, there are different thermal conductivity options. From Isover - from 0.032 to 0.044 W/mK, URSA - from 0.032-0.044 W/mK, Knauf - from 0.032 to 0.047 W/mK, Rockwool - from 0.035 to 0.045 W/mK.
Mineral wool adheres well to any surface, repeating design features, wear-resistant and non-flammable.
- Basalt wool. It has high resistance to heat and moisture retention, and is fireproof. Shelf-life Unlimited. It is stronger than mineral insulation.
Sand and expanded clay are traditionally used to insulate floors.
Polyurethane foam
A frequently used thermal insulation material is polyurethane foam (abbreviated PUF). Its popularity is explained by such advantages as biological neutrality, ensuring the tightness of the furnished premises, and high-quality protection from moisture.
Since polyurethane foam is applied to the surface in a monolithic layer, the resulting coating hardens quickly and has no visible joints or seams. Even in the case of direct contact with moisture, this insulation does not succumb to mold and is resistant to rotting processes.
Polyurethane foam can be used for interior and exterior work. PU foam has one drawback, which is the method of its application. The fact is that its installation requires expensive equipment operating under high pressure. Construction companies can afford to purchase it. But this minus is insignificant compared to the effective result obtained.
Features of insulation
Absolutely all structural elements in the cellar are insulated. Penetration of cold through even one element threatens freezing.
Ventilation
Before carrying out work, you need to assess the condition of the old insulation. If it is partially missing, it should be removed and the ventilation duct should be cleaned of dirt.
Thermal insulation is produced with mineral wool, wrapping it around the structure. It is advisable to lay foil material on top. Can be secured with steel clamps.
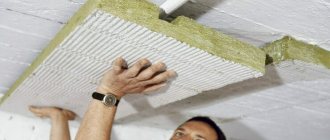
Ceiling insulation
The ceiling in the cellar is most often made of concrete; in some buildings it can be wooden. Insulation of the cellar ceiling has a special procedure:
- Clean the surface from cobwebs, drips, dirt and loose particles.
- Cracks are sealed with cement mortar.
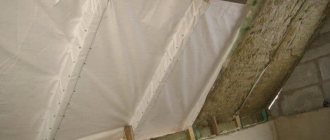
- The vapor barrier membrane is fixed to metal profiles or frost-resistant and moisture-resistant glue. This is a polymer material with perforation. Protects the surface from moisture.
- It is preferable to fasten the vapor barrier with galvanized profiles, as they will serve as lathing for the next step.
- The profiles are adjusted to the ceiling with dowels in increments equal to the width of the selected heat insulator.
- Attach sheets of polystyrene foam, penofol, and mineral mats to glue or screws.
- Seal the cracks with foam.
- After drying, cut off any protruding parts.
- Secure the finishing. It can be chipboard, plywood, plastic panels. Wood materials must be oiled 3 times, allowing each layer to dry. The top can be painted.
If the ceiling is wooden, then it is cleaned of mold and treated with an antiseptic. After this, the process is similar to the previous one. A vapor barrier, sheathing, and insulation layer are also secured.
We insulate the floor
Warming the cellar floor begins with preparing the base. It should be smooth, clean and dry.
The general procedure for working in the presence of a soil base:
- The soil base is further deepened by 20-30 cm and leveled.
- A drainage layer of crushed stone or expanded clay is poured.
- Lay 10 cm of sand on top and compact it thoroughly.
- Make a layer of bitumen mastic for waterproofing.
- Fill with expanded clay.
- Lay the reinforcing mesh.
- The concrete layer is poured.
- Leave to fully set depending on the brand.
- Finishing does not need to be done.
Insulation of the floor in the cellar
If the floors are concrete, then the order of work begins with pouring expanded clay. The result will be a double layer of concrete with insulation between them.
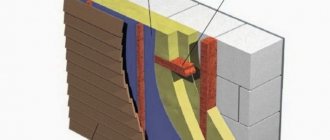
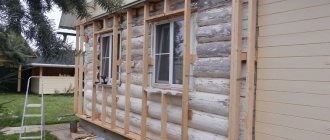
Wall insulation
Insulation of cellar walls is carried out as follows:
- The walls are cleaned of dirt. If they are wooden, then they will also protect against mold, followed by antiseptic impregnation.
- The cracks are sealed with foam (for wood) or cement mortar (for concrete cellars).
- Galvanized profiles are fixed along the entire perimeter in increments equal to the width of mineral mats and foam plastic.
- Thermal insulation is laid between the metal slats.
- Lay a layer of penofol on top of it and shoot the entire structure with dowels to the wall.
- Install the finishing material from particle boards or plastic.
Wooden surfaces are dried and painted several times.
Preparatory stage
Insulating a cellar with polystyrene foam or penoplex can be done even with your own hands. You just need to familiarize yourself with the features of the process and its stages.
Before installing thermal insulation, it is very important to familiarize yourself with the characteristics of the soil on which the basement is located. If the humidity is too high, it is strongly recommended to think through and install a drainage system in advance. This will help save significant time and money in the future.
Also, when installing PPS, it is necessary to carefully examine the walls of the insulated room. The wall can be finished only after it has been cleaned of dirt, soil and the previous layer of insulation, if one was used. All chips and cracks must be carefully processed to obtain a smooth surface.
In addition, it is necessary to provide a layer of waterproofing in advance; for this, film or roofing felt is usually used.
basement sectional diagram
Basement insulation with polyurethane foam
Polyurethane foam is applied to any surface using spraying, so only professionals should work with it. Moreover, it does not require additional fastening due to its good adhesive properties.
Polyurethane foam has the following properties:
- high thermal insulation;
- after application it forms a continuous, seamless surface;
- high vapor and waterproofing properties;
- eliminates the formation of condensation and mold;
- odorless and environmentally friendly;
- quickly applied;
- full service life is 30–50 years.
Polyurethane foam can be applied to any surface by spraying
Anyone can insulate a basement in a house with their own hands. The exception is polyurethane insulation - here you will need both a specialist and equipment. As for insulating the basement of a private house, it is very important to ensure good ventilation of the room. Most often, a two-pipe basement ventilation system is used for these purposes.
Helpful advice! In unheated basement rooms, care must also be taken to insulate the inner surface of the door.
Gone are the days when basements were a haven for the homeless or a place to store various equipment. Increasingly, they are being equipped with gyms, billiard rooms, workshops and even shops. Therefore, those people who still doubt whether it is necessary to insulate the basement are becoming fewer and fewer.
Principles and procedures for cellar insulation
Cellar insulation is divided into external and internal.
External insulation
An external insulation option is necessary for detached rooms. It has many advantages: it protects against moisture penetration and freezing, and does not affect changes in the cellar area. Procedure:
- Perform waterproofing using bitumen mastic or upholstery with roofing felt.
- Apply a special composition for gluing walls with slab material. Usually this is cold mastic. It is applied to a layer of stone wool and polystyrene foam. Pressed tightly against the wall.
- The voids are sealed with polyurethane foam, the remains of which are then cut off.
- Lay a layer of penofol, securing it to the mastic.
- The top is covered with a galvanized profile or clapboard.
Insulation slabs must be laid from below, retreating from the ground.
External insulation should be carried out during construction. If the cellar is already ready, then the work is more difficult to complete, since you will have to remove the old lining. In this case, it is advisable to entrust the work to specialists.
Internal insulation
How to insulate a cellar from the inside against freezing largely depends on its type. In general, the work procedure includes thermal insulation of the ceiling, walls, floor, ventilation and entrance area. All work includes the preliminary stage of cleaning the base, laying the frame for the ceiling and horizontal surfaces. Next comes laying out the insulation and finishing.
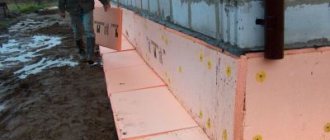
Waterproofing basement walls and installing insulation
The first stage is waterproofing the basement walls with penoplex installed on it (waterproofing layer). Insulation can be carried out earlier than 5-7 days after completion of waterproofing work. This time is more than enough for the evaporation of the solvents in their composition. Only in this case the waterproofing of the basement walls will not corrode the penoplex.
For water-saturated soils, experts recommend installing drainage to drain water away from the thermal insulation. Drainage pipes are laid slightly below floor level on a so-called gravel bed with a slope of 3-5%. Then they are covered with a layer of gravel. And only after completing the above steps, insulation is carried out on the basement soil using penoplex.
Insulation technology depending on the type of cellar
Insulation of the cellar from the inside is carried out for all types of cellars, and external insulation is carried out for detached buildings.
Insulation of a ground cellar
Insulation of this type of cellar is carried out mainly from the outside. It is important to insulate the roof and walls. To insulate walls, follow the following stages of work:
- The soil is sampled to a depth of 200 to 300 mm and the roof is cleaned. For finished buildings, this stage is complicated by the fact that the walls are already finished with brick or other material. It is not advisable to touch it. You will have to carefully make a recess to the possible depth.
- At the site of excavation, a drainage cushion is made from a layer of crushed stone and sand.
- Waterproofing is made from bitumen mastic (this stage is carried out only on new walls).
- Thermal insulation is laid on the wall, slightly retreating from the sand and crushed stone cushion. Coat the slabs with cold mastic and glue them to the wall.
- Penofol or film is attached to the top with screws or dowels.
- Cover the wall with a profile or other finishing material.
Insulation of a ground cellar
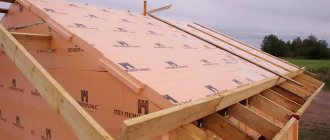
The roof of a ground structure is insulated using rolled materials. Penofol is laid on the roofing material and roofing material is placed on top again. The final layer can be corrugated board or slate.
Insulation of a recessed room
In this type of cellar, the walls are half in the ground. To produce thermal insulation, you need to excavate the soil as much as possible to protect the wall from freezing. In the recess, drainage is made from a cement-sand cushion. Roofing felt is laid on top. The walls can be waterproofed with mastic, onto which slab insulation is glued. It is covered with roofing felt, shooting it with dowels.
When insulating a cellar roof, work is carried out as follows:
- The roof is covered with a clay-straw mixture to a height of 0.5 m. The components are first thoroughly mixed until homogeneous.
- Tamping is carried out. To ensure its quality there is a special manual roller.
- Cover with thick polyethylene, wrapping it on the wall with an overlap of up to 20 cm.
- Cover the roof with roofing felt or coat it with a mixture of bitumen and diesel fuel in a ratio of 1 to 3.
- Cover this layer with fertile soil 15 cm high. Then the roots of the plants will act as an additional reinforcement for the roof.
As a result, the structure will be a semi-buried hill, which is reliably protected from the sun and frost. The temperature in such a cellar optimally meets all the requirements for storing vegetables and preparations.
We insulate the underground cellar
Insulation of a cellar in a garage, basement or outdoors is carried out outside and inside. Performed both externally and internally. The hatch is insulated from the outside; the description is given below. From the inside, circular insulation of the floor and walls is carried out as described above.
What is the best way to insulate a basement?
The material for basement insulation should be well preserved over a long period, and its thermal insulation ability should not suffer. The construction market offers many types of materials that differ in composition and price.
Basement insulation with foam plastic
Polystyrene foam does not absorb moisture, retains heat, and is not afraid of mold. It is very quick to install, durable and inexpensive. But there is one significant drawback. Rodents love this material. There are cases when they almost completely destroyed the heat-insulating material. And the basement is precisely the room where rodents live most often. Therefore, before insulating the basement with polystyrene foam, you need to not only get rid of pests, but also take care that they do not appear in the future.
Insulating a basement with polystyrene foam also has disadvantages; the material harbors rodents
Insulating the basement from the inside with penoplex
Penoplex is a more advanced analogue of polystyrene foam. It has a high density, so it can withstand high loads. The slabs are equipped with a tongue-and-groove system, which allows them to be connected without gaps. Penoplex is more convenient to process, as it does not crumble. Insulating a basement with penoplex has the advantage that this material is suitable for insulating walls, floors, and ceilings. In addition, it can also be used for external insulation.
Nuances of thermal insulation of cellar doors and hatches
If the entrance to the cellar is located indoors, it is possible not to insulate it or to lay a thin insulator. You can stick penofol under the finishing coat.
The entrance from the street or the hatch must be insulated. The work is carried out as follows:
- Sheets of stone wool or expanded polystyrene, cut to size, are glued to the door. The top is finished with any material. The gaps between the frame and the wall are sealed with polyurethane foam.
- The hatch cover is covered with insulation on the outside and inside. A sheet of iron is fixed on top. If the lid is made for a new cellar, then a special frame is made to insert thermal insulation.
It is necessary to check the quality of the connection between the hatch and the door; there should be no gaps.
Insulation of a caisson for a cellar
The caisson can be made of polymer, reinforced concrete or metal. The shape of concrete and steel is most often cube-shaped, and plastic is cylinder-shaped.
This design is a modern version of an underground cellar and its insulation is carried out in a similar way. Before installing the caisson, the walls are insulated by pasting them with a heat insulator. Spraying polyurethane foam works best. It is easier to insulate a cylindrical caisson with liquid polymer.
Steel structures need to be insulated in several layers. They freeze more than others. When insulating, you can combine a layer of polyurethane foam with the laying of mineral wool or slab mats.
After the heat conservation work is completed, the structure is placed in the ground. The distance between the walls of the pit and the cellar is covered with crushed stone. The crushed stone is laid on top with roofing felt or filled with bitumen. The final step is to pour the soil.
The modern market offers caissons with insulation, but they are quite expensive. Therefore, it is easier to do the work yourself.
It is better to insulate any variant of the cellar during the construction of the house. But most often, ready-made properties are purchased, equipped with all outbuildings. The instructions given above are suitable for all possible types of cellars.