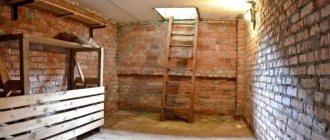
Insulating the basement with high-quality thermal insulation will allow you to create a cozy underground room for household needs (workshop, storage of garden tools, installation of a boiler room, water filtration system, etc.), or for leisure (billiards room, sauna, home gym, etc.) .
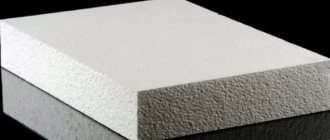
Insulating the basement with high-quality PENOPLEX® slabs, which have a very low thermal conductivity coefficient (0.034 W/m∙K), will not only reduce heat loss through the basement, but will also prevent the development of fungus and mold. The biostability and unchanged properties of the material are due to its zero water absorption, i.e. your basement will retain its heat-insulating properties throughout its entire service life.
Features of insulating the basement ceiling of an apartment building
All of the above is true for a private cottage.
How realistic is it to insulate the floor from the basement side of an apartment, so as not to spoil the newly renovated floor and not limit yourself in the thickness of the insulation layer (especially important for apartments with low ceilings)? A basement in an apartment building is not your personal property. In some cases, even entering there is problematic: it is locked with a key, and the technician-caretaker has the key. To carry out work there, you will need permission from the housing administration. Responsible housing and communal services officials will tell you which documents to collect.
The list will likely include a permit from the fire inspector.
note
Therefore, do not rush to purchase PPS or PPU - they are flammable, the likelihood of getting the go-ahead from firefighters is minimal.
Pay attention to basalt wool and foam glass in slabs: both materials belong to the NG group. Serious disadvantages of mineral wool:
Serious disadvantages of mineral wool:
- hygroscopicity;
- when wet, cotton wool loses more than half of its heat-shielding properties;
- vapor permeability.
This is not critical if the basement is dry and well ventilated.
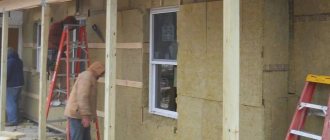
Mineral wool insulation of a basement ceiling from the inside can be done in two ways, frameless and framed. In the first case, installation is carried out similarly to the PPS:
secure the slabs to the ceiling with glue;
secure with “umbrellas”;
plaster with façade plaster reinforced with fiberglass mesh.
This option is feasible only with rigid facade slabs and only in a dry basement. In other cases, a frame one is used:
1. The ceiling is sheathed with plasterboard profiles.
2. Cotton wool is placed between the profiles.
3. Cover with a vapor barrier membrane.
4. Sew up with waterproof plasterboard, fiberboard sheets or other similar material.
Sometimes mineral wool blanks are hermetically packaged in plastic or vapor-proof film before being placed in the frame and the seams are sealed with mounting tape.
The option is energy-intensive, but provides 100% protection of the insulation from getting wet.
Another option is to insulate the ceiling in the basement of the house with foam glass slabs.
This material does not absorb moisture and is alkali-resistant - an important property when used in combination with plaster.
Its disadvantages:
- the weight is on average three times greater than that of mineral wool;
- much higher price.
The maximum permissible thickness of thermal insulation is 10 cm. Within these limits, you can fasten the slabs with glue and dowels with nails in increments of 20 cm. If it is more, you will need a frame, but it should be taken into account that foam glass will create a large load on the floor.
When installing with glue, the slabs are treated from the outside with plaster and fiberglass mesh; when using the frame method, they are sewn up with waterproof sheets.
The process of laying foam plastic indoors
Insulation procedures are often carried out after the construction of the structure. Therefore, insulation from the outside is problematic due to increased budget costs and time. The best option is to insulate from the inside.
- Use sheets with maximum thickness. For example, when calculating 200 mm of foam, it is necessary to purchase not four 50 mm tiles, but 2 100 mm each. This will reduce the number of seams. Accordingly, the surface will be insulated from moisture and freezing.
- Installation of expanded polystyrene is carried out at intervals at the seams and is at least 100 mm. The shift is carried out both vertically and horizontally. Multilayer installation involves overlapping the seams with a subsequent layer.
- Preparing the surface for insulation is a mandatory procedure. For this purpose, antiseptics and primers are used. After 100% drying of the products, waterproofing work is carried out. The materials must be continuous and laid tightly to the surface.
- The foam boards should be installed against the frame. Frame slats are mounted with a pitch equivalent to the finishing panels. Two sheets are installed on one rail.
- The joints of the sheets and the junction points with the frame are sealed with foam for installation. This is an additional waterproofing measure.
When calculating the thermal indicators of the thickness of the material, the dew point should not be recessed into the body of the wall. Due to this, condensation will not form, which means that the insulation will not be destroyed.
Useful tips
If you decide on external thermal insulation of the basement, a few tips will be useful for you that will help increase the efficiency of the measures taken:
It is better to carry out insulation in dry and clear weather. Especially if instead of EPS you use regular foam, which is less resistant to moisture. Never neglect waterproofing
This operation not only prevents damage to the insulating material, but also protects the foundation and walls of the basement from destruction. When choosing a mastic with which you are going to glue foam or EPS, pay special attention to its hydrophobic properties. And do not apply it pointwise (as I described for interior work), but in a continuous layer
Then it will play the role of another waterproofing agent. The edge of the glued insulation material must rise above the ground level (after backfilling) by at least 50 cm.
A basement like this is everyone’s dream.
Preparatory stage
Insulating a cellar with polystyrene foam or penoplex can be done even with your own hands. You just need to familiarize yourself with the features of the process and its stages.
Before installing thermal insulation, it is very important to familiarize yourself with the characteristics of the soil on which the basement is located. If the humidity is too high, it is strongly recommended to think through and install a drainage system in advance. This will help save significant time and money in the future.
Also, when installing PPS, it is necessary to carefully examine the walls of the insulated room. The wall can be finished only after it has been cleaned of dirt, soil and the previous layer of insulation, if one was used. All chips and cracks must be carefully processed to obtain a smooth surface.
In addition, it is necessary to provide a layer of waterproofing in advance; for this, film or roofing felt is usually used.
basement sectional diagram
Preparing the ceiling surface for insulation
First of all, you need to prepare the base ceiling. The surface is cleaned of dust and cobwebs, cracks are covered, unevenness and other defects are eliminated. Since foam plastic can only be glued to a flat surface, it is worth checking the height difference on the ceiling. If it is significant, then foam plastics are also mounted on a supporting frame.
To eliminate defects and unevenness on a wooden base ceiling, wood putty is used, and when working with concrete surfaces, cement-based leveling mixtures are used. When the repair mixture has dried, the surface is sanded and impregnated with antiseptic primers, as well as deep penetration compounds if an adhesive installation method is used.
Do-it-yourself penoplex installation
To carry out proper installation of polystyrene foam boards on the ceiling surface, you will need to prepare a certain list of consumables and tools. In addition, the insulated surface must also be prepared. This will allow you to install the thermal insulation layer quickly, without downtime.
You will need:
- building level;
- construction or stationery knife;
- hammer;
- perforator;
- ladder or stepladder.
It is worth dwelling on the process of preparing the foundation. It includes the thorough removal of all kinds of debris, dirt and dust. In addition, the surface of the ceiling should be as smooth as possible. Irregularities and gaps must be eliminated by applying a layer of plaster. Minor defects can be eliminated using putty.
List of materials required for DIY installation:
- deep penetration primer with an antifungal component;
- dry adhesive composition compatible with polystyrene foam;
- foam for installation;
- fastening tools (so-called mushrooms).
Remove any debris and dust from the surface. If it has been leveled, you will need to remove all excess solution. After this, the ceiling is primed. After the surface has dried, you can begin the main work.
Insulation of the ceiling base from the attic side
This method consists of the following sequence of actions:
Footer care rules
As mentioned above, footer is a fabric that is not at all fancy in everyday life. But still, I advise you to follow a few simple rules in order to extend the life of your favorite things:
- When washing, use the delicate cycle;
- The optimal water temperature for washing items made from footer is 30 degrees;
- To avoid damage to the fabric by the fittings, it is better to turn the product inside out before washing, while fastening all the buttons or zipper;
- Do not use high speeds when spinning;
- Do not leave clothes to dry in the sun for a long time, otherwise the fabric may be damaged by sunlight;
- It is recommended to wash children's clothing with soft, gentle powders;
- Iron the footer from the inside out.
Practical tips for creating high-quality insulation
The quality indicator of the insulation work performed will depend not only on the type of insulator used, but also on the technique of its installation. The maximum effect when laying mineral wool can only be achieved if the following conditions are met:
- The rough coating layer, consisting of a mixture of sand and cement, must be laid as evenly as possible and compacted thoroughly.
- The material for waterproofing can be roofing felt or polyethylene film.
- If the insulation boards are located in the same horizontal plane, without noticeable gaps between them, additional sealing of the joints will not be necessary.
- It is necessary to place a thin layer of screed on top, reinforce it with a galvanized mesh and fill it again with concrete mixture. You can use foam concrete, since it has less weight compared to the standard composition.
- Laying the flooring can only be done after the concrete has completely gained strength and dried.
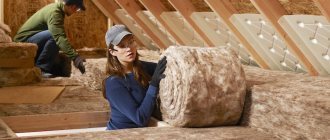
Types of thermal insulation materials
Insulation of the ceiling in the basement can be done using mineral wool, polystyrene foam or extruded polystyrene foam, which differ in technical characteristics and installation nuances.
Mineral wool
Mineral wool
is compressed fibers of inorganic material, the layers of which are molten rocks, blast furnace slag and fiberglass. Mineral wool based on sedimentary rocks is used to insulate basement ceilings. It is different:
- good insulating properties;
- low thermal conductivity;
- resistance to fire and chemicals.
The lifespan of the material is about 30-40 years.
Polystyrene foam and extruded polystyrene foam
Styrofoam
Insulation materials are made from polystyrene using different technologies, so some of their parameters have significant differences. Common benefits include:
- light weight;
- low thermal conductivity coefficient;
- ease of installation and maintenance.
Extruded polystyrene foam is more effective as thermal insulation than polystyrene foam, but is more expensive. The main disadvantage of these materials is the disruption of the natural balance of temperature and humidity in the premises, which occurs due to the lack of circulation of moisture and air. To maintain a comfortable microclimate, it is necessary to ensure good ventilation.
Thermal insulation of flat roofs
Flat roofs are usually insulated with polystyrene foam due to its resistance to mechanical stress.
The material is also applicable to pitched roof types, but for them experts often recommend the use of fiber insulation. Mineral wool and glass wool better fill the under-roof space, which eliminates the appearance of cold bridges.
Preparatory work and waterproofing
Before installing thermal insulation, it is necessary to prepare the insulated surface. It should be dry and clean. The old backfill is removed. Then the waterproofing film is laid.
This is necessary to ensure that moisture does not accumulate between the insulation and the roof, which can lead to mold, rotting of wooden structures and corrosion of metal elements.
It is important to install the film so that there is a gap of 2 cm between it and the sheathing to remove moisture
Installation of insulation
Foam boards are laid on top of the waterproofing. They can be secured using glue, liquid nails, anchors, dowels, or flooring. For additional reliability, mounting in several ways is possible.
When laying insulation, care must be taken to ensure that there are no voids and that the slabs are tightly adjacent to each other.
The resulting cracks must be filled with foam.
Covering with geotextile material and gravel
Geotextiles are laid on top of foam boards. It protects the roof from the negative effects of the sun and reduces the effect of mechanical loads. As a result, the service life of the roof is increased.
Following the geotextile is backfilling with gravel, the fraction of which is 16/32. The thickness of the layer should be at least 5 cm. A cement-sand screed is made on top of the gravel.
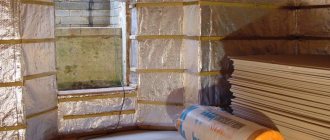
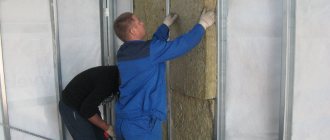
Insulating the basement of a house from the inside
If the foundation is not insulated during construction, then external insulation becomes a very labor-intensive task. Therefore, insulation is most often done from the inside. In an insulated and unheated basement, the temperature remains within +10 degrees even during frosty periods. Accordingly, heat is better retained in the house itself. There is also a minus - interior decoration with heat-insulating materials reduces the usable area of the room.
Insulation of basement walls from the inside
Insulating the basement from the inside in a private house or apartment building can fully provide adequate protection from humidity and cold. But we must remember that the use of waterproofing material is mandatory, otherwise condensation will penetrate into the insulation and not only worsen its thermal insulation characteristics, but also completely destroy it.
The order of work is as follows:
- existing damage on the walls is covered with sealant or blown out with foam;
- the surface of the walls is leveled as much as possible so that the insulation boards lie flat;
- the walls are treated with waterproofing material (mastic or liquid rubber);
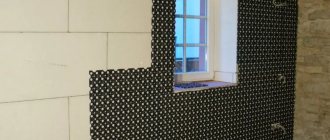
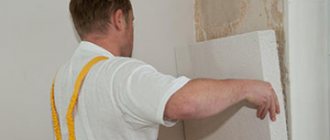
- lay the insulation boards using an adhesive mixture;
- laying begins from the bottom, tightly joining the slabs;
- all cracks are filled with polyurethane foam;
- the slabs are secured with dowels for reliability (5 pieces for each slab);
- after the glue has dried, a screed is made using a mesh and a cement mixture;
- Finally, the wall is covered with finishing material.
Proper insulation of an unheated basement from the inside will provide protection from moisture and cold
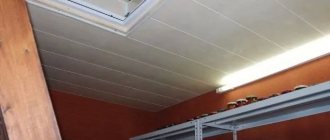
Insulating the basement ceiling from the inside
The ceiling in the basement is a concrete floor, which conducts both heat and cold well. The insulated ceiling of the basement will always ensure a warm floor in the house.
Stages of work on insulating the ceiling in the basement:
- the concrete ceiling is covered with a water-repellent layer (mastic, rubber), which at the same time closes all cracks in the concrete;
- after the waterproofing has dried, insulation boards are glued and secured with dowels;
- a special mesh is applied to the fixed insulation using a cement mixture;
- final decorative finishing is carried out.
How to insulate a ceiling in a basement and what material is best suited for this will be discussed below.
It is not recommended to insulate the ceiling without waterproofing
How to properly insulate the floor in the basement of a house
The process of insulating a basement floor is easier than insulating walls or ceilings. If it is not yet equipped, then insulation of the basement floor is carried out directly on the ground in the following order:
- the soil surface is leveled;
- a layer of sand is poured and compacted;
- a layer of crushed stone is poured and also compacted;
- filled with liquid concrete;
- after drying, a waterproofing layer is laid overlapping;
- insulation boards are being laid;
- You can lay a layer of penofol (thin rolled material) on the insulation with the foil surface up so that this film reflects heat;
- the reinforcing mesh is laid and everything is filled with concrete;
- After drying, you can install the floor covering.
If the floor has already been concreted, then the task is easier, and the work begins with laying waterproofing.
A waterproofing layer is laid on top of the screed
In cases where the floor is built on joists, the first step is to remove the top finishing coating. Considering that the waterproofing should already be laid under the joists, you can pour expanded clay or lay insulation boards between them. Then the entire structure is covered with another layer of vapor barrier (simple film, for example) and a final floor covering is installed.
Related article:
If there is a utility room in the basement, then floor insulation is not necessary. In the case when the basement is insulated in order to equip a functional room in it, then the question of whether to insulate the floor in the basement requires a positive answer.
Why do you need to insulate a cellar?
Insulating the cellar will help prevent food from freezing in winter.
The storage facility is built at a distance from buildings equipped with heating appliances and communications. This means that the internal space is less influenced from the outside and is relatively stable. However, temperature differences in winter and summer reach serious values, which cannot but affect the microclimate of the underground warehouse. Sometimes construction is done under sheds and garages in co-ops. These buildings do not have any impact on the underground premises, but protect them from precipitation.
Basement insulation is carried out for the following reasons:
- In the summer heat, the earth becomes so hot that the heat penetrates deep underground, heating the walls of the cellar and its contents. This causes vegetables to sprout, preserves to explode, and pickles to become moldy.
- In cold, snowless winters, the soil freezes heavily. This also affects the microclimate in the underground storage facility. Vegetables and fruits spoil, jars crack, and smoked products quickly disappear after thawing.
- When temperature changes, condensation forms. Dampness promotes the development of pathogenic microorganisms, metal corrosion and the destruction of wooden products.
- Contact with the ground causes gradual destruction of the walls of the structure. Insulating the cellar from the outside protects it from the effects of an acidic environment and the depletion of freezing-thawing material.
Thermal insulation is selected so that it can last for decades. This especially applies to materials that are planned to be used for outdoor installation. Replacing them involves a lot of time and labor.
Which insulation materials to choose for insulation
An important stage in the internal insulation of a basement, especially when it comes to walls and ceilings, is the selection of insulation. The final result will depend on how high quality it is (we are talking about the coefficient of thermal conductivity and resistance to moisture).
There are many options for insulation on the market, including those suitable for internal insulation. Below are the most proven and accessible of them.
Polystyrene foam is the most budget option, but has a serious drawback - lack of resistance to mechanical damage and extremely low or high temperatures. The material has been used for thermal insulation for several decades, being preferred primarily due to its affordable price.
To insulate the basement, polystyrene foam is used only if there are no other options. The insulation will not be able to reliably protect surfaces from cold and moisture, and therefore will require additional vapor-waterproofing to avoid premature wear.
Another option is penoplex. The material is more convenient and effective for a private home than the foam described above, but will cost more. They install penoplex in the form of slabs according to the described algorithm, not forgetting about the cold “bridges” that are inevitable with a careless approach to the processing of joints.
To achieve maximum results, penoplex for internal insulation is used in conjunction with more advanced thermal insulation for insulating walls outside, for example, polyurethane foam.
This material is resistant to mechanical damage and proves itself to be a modern insulation worthy of respect and trust. The disadvantage of the material is the complexity of installation. To apply insulation you will need a special installation operating under high pressure.
Among the advantages, it is worth highlighting persistent protection from moisture without the need to install an additional layer, room tightness, and biological neutrality.
Expanded polystyrene, an example of modern thermal insulation with properties similar to penoplex, can also be a suitable option for insulating a private home.
Insulation thickness
In order for the insulation of the basement from the inside to be sufficient for the minimum level of heat loss, the thickness of the insulation should be:
- 10 centimeters for polystyrene foam;
- 8 centimeters for polyurethane foam.
But it is recommended to increase this value by 40 - 50% if the basement is supposed to be heated and maintain a temperature of 20 - 25 degrees in order to reach the recommended level of thermal insulation.
How to insulate a basement yourself
To insulate the basement from the inside yourself, you can only choose extruded polystyrene foam. This insulation is relatively expensive. But cheap polystyrene foam is not applicable in the basement, due to the fact that it can gradually become saturated with moisture. Processes for insulating a basement from the inside:
- the existing plaster is removed, the wall is cleaned of dust;
- the wall is impregnated with a water repellent;
- the wall is leveled, if necessary, with foam glue or strong (comparable to concrete) cement-sand mortar; Expanded polystyrene sheets are glued to the wall. The glue is applied to the wall with a notched trowel, the sheets are applied and tapped with a mallet, and when joining, the seams between the sheets are coated with sealant.
Only sheets of expanded polystyrene butted into a groove are used. The surface of the glued sheets is leveled with a float if necessary. Decorative plaster is applied on top of the polystyrene foam or a false wall is built on top of the insulation.
Bottom line
Let's summarize and consider additional tips. Using penoplex-35 is the best option for thermal insulation of your floor. This material has “poor contact” with substances such as gasoline, ether, acetone, kerosene and others. Bright sunlight should not fall on the foam boards.
If you store the material outdoors, you should make a barrier for the sun's rays to prevent them from entering. It is imperative to make a cement screed, and only then apply the floor covering. The cement screed ensures uniform load distribution.
Floor screed with penoplex is the best option. Insulating the floor with penoplex without a screed does not give the desired result. Penoplex screeds have heating elements.
A self-leveling floor on penoplex is installed if the material has a thickness of 20 millimeters. Extruded polystyrene foam is the most common and durable material. Do not forget to inspect the floor slabs and make sure that they are not damaged in any way.
As we have seen, absolutely anyone can carry out floor insulation with penoplex. It is only necessary to take into account some features of the base on which the penoplex will be installed. Do-it-yourself insulation material for the floor under the screed is a necessary technology.
Properties and types
kulirka-s-laykroy-2 kulirka-s-laykroy-1
A cooler with lycra has the same hygienic and physical properties as a classic one made of pure cotton:
- hygroscopicity. Capable of absorbing an amount of moisture equal to 15-20% of its own weight;
- breathability. In products made from this material, the body “breathes”;
- hypoallergenic. The material is made from environmentally friendly raw materials and does not cause allergies.
kulirka-s-laykroy-3 kulirka-s-laykroy-4
Physical properties:
- softness. Very pleasant to the touch and does not cause skin irritation;
- strength and durability. Products made from it do not tear and last a long time;
- firmness and elasticity. It stretches well and returns to its original shape, practically does not wrinkle.
Thanks to the addition of elastane fibers, the mechanical strength and elasticity of the fabric increases; items made from it are shape-resistant: they stretch and completely restore their shape without stretching, and do not shrink after washing.
The disadvantages of the material include a strongly curled edge, which usually causes inconvenience when cutting and sewing; the edges of thin knitwear need to be processed in a special way.
Sometimes a certain percentage of polyester is added to cotton and elastane fibers, which reduces the hygroscopicity and softness of the fabric, adding strength and wear resistance to it. This material is cheaper than natural material. When choosing products, it is recommended to take into account the composition and choose those in which the polyester content does not exceed 20%.
The canvas fabric lends itself well to dyeing, prints perfectly on it, and can be plain-dyed or printed.
Depending on the length and quality of the threads used, there are several types:
- singing - made from threads 35-70 mm long and is the most expensive and high-quality. This material does not form pills, it does not shrink, and printed designs fit perfectly on it;
- cardier or ring - has a coarser texture than pene, made of threads of shorter length (up to 35 mm);
- Open end knitwear is made from the shortest threads and is considered the lowest in quality. Pellets may form on the surface.
Types of polystyrene
As already mentioned, penoplex and polystyrene foam are types of polystyrene, which differ slightly in characteristics and production technology. Very often you can find the terms foamed and extruded polystyrene foam, where the first means foam plastic, and the second penoplex.
Foamed polystyrene foam is produced without forced pressure injection. The resulting material is quite fragile and is able to absorb moisture. In addition, when using it in basements, there is a possibility of encountering vermin such as rats and mice. However, the material has a wide range of applications due to its low cost.
To create penoplex it is necessary to use high pressure and temperature. This material has low vapor permeability, but is characterized by high density, which allows it to be used as insulation in structures that are subject to high mechanical loads. Despite its density, penoplex is very easy to process, which greatly simplifies the installation process.
Options for basement insulation with polystyrene foam and penoplex are considered the most acceptable and common; the choice will depend solely on the customer’s budget.
polystyrene type
Insulating the floor with foam plastic - an overview of the simplest methods of carrying out the work
If you decide to insulate the floor with foam plastic on your own, then this review is for you. In it we will look at the simplest workflow technologies that anyone can do. You just need to follow simple recommendations to get results no worse than those of the professionals.
In the photo: polystyrene foam is one of the most popular insulation options.
Polystyrene foam is an excellent base for floor screed
Features when working with acrylic paints
Acrylic paints are an inexpensive material that is easy to work with and dries relatively quickly. But the disadvantage is the narrow palette of colors, so you need to create the desired shade manually. You can get burgundy, lilac, turquoise, sand, wenge, lilac, and others by mixing colors.
Mixing colors
There are some rules when working with acrylic:
- The surface to be painted must be smooth, clean, free of oil and grease stains. It must first be cleaned of the previous finish. It is not recommended to apply a new coat of paint over an old one;
- Before painting, the walls need to be leveled with putty, and then several layers of primer must be applied. The primer is used for better adhesion of paint and for less paint consumption;
- Before use, acrylic must be diluted with water or special solvents, but it is better to do this in a separate container with a portion of paint. This is necessary in order not to spoil the entire volume at once, but to use only as much as needed.
- After use, used rollers and brushes must be rinsed thoroughly with water, otherwise they will become unsuitable for further work. You also need to wash other tools that were used. The top of the paint bucket needs to be wiped down so that the lid can be opened in the future.
- Most often, painting occurs in 2-3 stages, and for an effective result, this must be done in one direction. To simplify and speed up the work, you can take a spray bottle.
Important! Also, do not forget about precautions; before work, it is better to cover or seal all places and objects that will not be painted. You can work with the material at a temperature not lower than 5 degrees and not higher than 27 degrees
Another main rule of application is to use paint first on a small area or a completely separate surface. When creating the desired shade, it is better to try it on a draft. You also need to wait until it dries completely, as after that the color becomes a little darker or lighter, depending on the type of paint. And if the color matches the expected desired result, then you can start painting the surface or decorating objects.