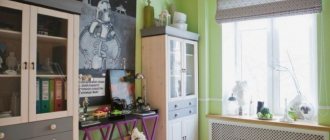
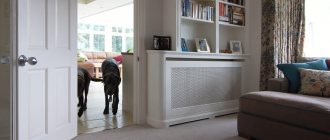
In order for the interior of the room to be perceived holistically and to evoke admiration, it is necessary to take care of all the nuances. An old radiator, like modern new radiators, can significantly worsen the appearance of a room. By hiding them from prying eyes, using a radiator grille on the radiator, you will make your home even more comfortable and beautiful.
Hanging grilles are characterized by a wide variety, so everyone can purchase the right option for themselves, depending on the features of the interior and their own taste.
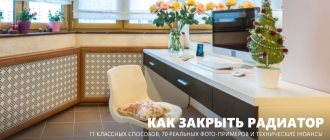
The grille for the heating radiator can be made with your own hands. How to hide elements of the heating system will be discussed further.
Types of screens for radiators
Decorative grilles for heating radiators, made according to all the rules, not only hide unattractive radiators, but also protect them from dust, dirt and damage. Such designs will protect children from burns and prevent individual parts of the body from getting stuck between the bars. After heating, warm air from the radiator rushes upward, and cold air comes in its place. Don't forget this during installation.
The protective panel can be made from:
- Wooden panels;
- Metal;
- Polyvinyl chloride;
- MDF;
- Glass panels, etc.
See photos of 6 types of protective screens below.
The price of a radiator grill depends on the material chosen, so you can always find a suitable option. The location of the battery is also taken into account. If it is located on the wall, install a floor box to provide comprehensive protection.
Tasks and materials
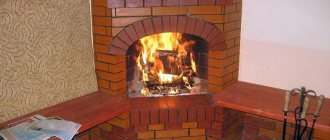
Most often, grilles on heating radiators are installed for decoration: not all heating devices look attractive, but grilles are sometimes very beautiful. The second job that battery shields often perform is to cover sharp and hard edges. This is relevant in families with children, especially if old cast iron accordion-type radiators are installed. Their shape is thermally dangerous and their appearance is unattractive; they are appropriate only in loft-style rooms.
Grilles for heating radiators are made from different materials:
- Metal battery panels are produced in large quantities. They are made of thin steel sheet, which is then coated with paint. For the most part, they are inexpensive, but they also look mediocre. The duration of the operation depends on the quality of the paint. Powder glazes are preferred. They last longer and remain attractive for decades. From the point of view of the effect on heating, metal screens for heating radiators are the best choice. The metal heats up quickly and then begins to radiate heat. So the option is cheap (usually) and does not greatly affect the ambient temperature (if there is perforation). The most common shape and design can be anything
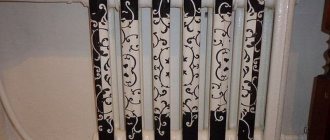
- Forged grilles are very beautiful. But the forging is too thin, so some kind of background is needed, and it is often done in contrast to highlight the brighter forged elements. To ensure normal air circulation, it makes sense to create a “backdrop” from a perforated sheet.
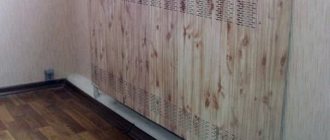
The forging is very beautiful - Wooden gratings and screens. Wood has always been and remains a premium material. The high plasticity of the material allows it to be produced in various styles and shapes. And although there are inexpensive wood products, they look great. But, as mentioned above, a radiator covered on all sides with wood transfers little heat into the room. The tree always looks solid
- MDF and HDF. Laminated sheet materials are used for production. It must be said that binders are not used in the production of MDF and HDF. The softened wood fibers are pressed, which releases lignin, a natural binder found in wood. Lignin and adhesive fibers. So both of these materials are completely safe. If we are more or less familiar with products made from MDF, then HDF is an unknown material for many. It differs from MDF only in the pressing. It is molded at higher pressure, resulting in a very thin (3-4 mm) but more dense and uniform material. HDF holds its shape well, because perforated grilles for heating radiators are often made from HDF. From the point of view of their effect on heating, they are slightly better than wooden ones: the layer is thinner, the perforation is usually larger.
Decorative perforated grids for batteries are usually made of MDF and HDF - Plastic. Plastic products are most often used in bathrooms and toilets. This material is the most hygienic; it can be washed an unlimited number of times. For production, heat-resistant plastic is used, which is not afraid of heating up to 60-80 ° C. If the grill slats are installed at an angle, as in the photo, the heating will work efficiently. Air flows freely through the cracks. It all depends on how the coating is made.
Plastic washes well, is durable and unpretentious - Glass screens for heating radiators appeared several years ago. They are not ideal in terms of heating, but they look attractive. They are made from special tempered glass, opaque or with a printed pattern. Glass radiator shield
Used in the manufacture of decorative grilles for heating radiators and from more exotic materials. For example, bamboo and rattan. Such products are more demanding on the interior and are rare.
Rattan screen on wooden frame
There are also combo grids. Most often there is a wooden frame on which some kind of decorative mesh is stretched. Bamboo and rattan braids are often attached to such a frame. MDF and HDF panels are usually mounted on a wooden frame.
Radiator measurements
When planning the installation of the grille, you should take measurements. You need to add 10 cm to the resulting width of the battery. Add about 5 cm to the distance from the floor to the top of the radiator. The depth of the screen should be 3 cm greater than the distance from the front of the radiator to the wall.
The radiator grille screen must cover the radiator. The grille itself is attached to the floor and wall, and the radiator is covered with a window sill on top.
How to install correctly?
Any work related to the installation of devices requires the preparation of the necessary tools: tape measure, hammer, drill, ruler and pencil.
You may also need accessories:
- hardware fastening;
- screw nails;
- regular nails;
- special corners;
- gusset;
- special glue.
The classic grille looks like a three-sided box with legs at the bottom. All parts are attached according to the pattern that the manufacturer usually supplies with its products. According to the diagram, it is more convenient to fix the products, and then hang the finished version on the battery.
Integrating the structure with corners will give it greater rigidity. You can also use plain wood glue.
Curtain wall fasteners are installed in the wall - usually two holes into which dowels are inserted are sufficient. Self-tapping screws are needed to fasten the side walls, which often do not have the necessary holes for pipes. If necessary, they can be measured with a ruler and marked with a pencil. It is more convenient to cut holes with a jigsaw. But if you don’t have a power tool, you can use a regular hacksaw.
Dowels or special hook-shaped anchors are inserted into wall anchors. It is more convenient to attach the screen with the box to hooks.
The front panel is fixed with small nails. Sometimes, to improve the appearance, the frame includes a framing frame that is secured to the frame with adhesive. Sometimes homemade screens are covered with wallpaper to match the main one.
A removable battery screen is considered an excellent solution. This makes it easier to clean the radiator if necessary, and also makes it easier to access the valves with which you can regulate the temperature. Before drilling holes for hangers on the screen, it is better to mark their position with a pencil: only after determining the exact location should you hang the screen in a permanent place and screw in the mounting screws.
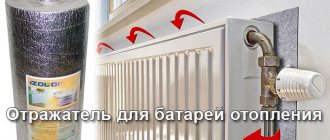
It is worth considering that the heat-reflecting screen behind the radiator must exactly match the dimensions of the box or external screen hanging in front of the battery.
The heat-reflecting substrate is glued to the wall with the film facing out. Other tips and tricks may be helpful for screen installation work.
For example, you can make the simplest version of a radiator grill yourself. For this, chipboard is useful, which can be painted and varnished. For the screen itself you will need a grid of sheets. To make it, you need to measure both sides of the insulation, then add about 5 cm to the resulting height and about 10 cm to the width. The front frame can be cut from a prepared chipboard sheet.
To build the side walls, you need to measure the depth of the radiator and add about three centimeters to the resulting distance. It is necessary to take into account the height of the structure, also taking into account the overlap. The top must correspond to the floor depth measurements.
Parts should be cut only after all measurements have been taken. The prepared parts are easily connected with furniture nails or wood glue. The mesh façade should be similar in size to the frame.
Unsightly edges of MDF can be decorated with a plastic profile. In some cases, ordinary bars are suitable as the side walls of the screen - they do not require additional fastenings. For frameless screens, anchor pliers are more suitable.
It is even easier to install a screen made on special legs. During further operations, this design will not seem reliable. However, this option will be produced faster, and the costs of its implementation will be low.
Due to the fact that the structure on legs will not affect the air circulation inside the structure, this option is often recommended for installation in rooms with insufficiently heated radiators.
Wooden grilles for heating radiators
Wooden grilles fit perfectly into a classic interior. They look luxurious and rich.
It is difficult to make such gratings yourself, so it is better to order them from a professional. Without any special skills, you can create simple screens; for this you will need:
- Thin slats made of wood;
- Several blocks for the frame;
- Jigsaw;
- Set of nails;
- Varnish coating.
Before installation, the slats are sanded and their width is adjusted to the same size. You should not make a cell larger than 5*5 cm. When the lattice is woven, cut off the protruding parts of the slats. The grille can be made both on the front and on the side walls of the radiator. The bars are polished and a frame is made from them. After fixing the frame, the grille is attached to it. The resulting screen is varnished.
Factory fixtures
Almost all modern cars have fairly large holes in the protective grilles installed between the headlights and in the bumper. This leads to both damage to the radiator and rapid clogging of the free space between the cooling plates.
Numerous manufacturers of car accessories have not ignored such a tuning element as the manufacture of a protective mesh for the radiator. Nowadays, finished products can be purchased (or pre-ordered) for almost any brand of car.
Advantages of a finished factory product:
Easy to install on a car, since the fasteners are designed for a specific model. Designers and manufacturers take into account all design features. As a rule, installing such products does not require dismantling the standard grille and bumper. These products are designed for do-it-yourself installation, so no special skills or special tools are required.
For anti-corrosion protection and, as a result, to increase durability, manufacturers apply a special polymer powder coating.
On a note! For some cars, additional nets are produced only for installation in the bumper. It is this part that is most vulnerable, since it is closest to the road surface.
An additional protective mesh for installation in the bumper from the outside for Renault Duster, Nissan Almera or Hyundai IX35 today costs 2200–2500 rubles. The cost of a set of two nets (the upper one for installation on the grille, the lower one for installation in the bumper) for Mazda CX-5, Mitsubishi Outlander or Kia Ceed will be 4400÷4800 rubles.
Metal grilles for heating radiators
The battery grill can also be made of metal. This is quite a painstaking job that requires the following materials:
- Expanded mesh;
- Aluminum corner;
- Bulgarians;
- Shurupov;
- Screwdrivers.
The corners are marked and cut. The components of the frame are fastened with screws. The mesh is used to create a shield that is attached to the frame. Finally, fasteners are installed to help secure the grille to the wall.
Key Features and Benefits
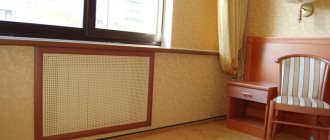
Decorative screens have become a practical and elegant solution to the problem of how to hide bulky heating radiators. Such simple at first glance designs can perform more than one useful function:
- They protect radiators of complex shapes from the accumulation of debris and dust, greatly simplifying the cleaning process
- They provide an additional barrier for small children who could accidentally touch a hot radiator and get burned.
- Promotes better distribution of warm air flow throughout the room and more uniform heating
But the most important function of radiator grilles is decorative. With their help you can decorate and even complement the most sophisticated interiors. They ennoble and emphasize the stylistic direction.
Decorative grilles for heating radiators are divided according to the following criteria:
- Project characteristics
- Material of manufacture
Project characteristics
Depending on the design features, decorative screens are divided into a number of subtypes:
- Mounting box: completely hides heating equipment from view
- Hanging screens with a lid - designed for heating devices protruding from under the window sill
- Hanging screens without a cover - designed for heating devices that do not protrude from under the window sill
- Flat screens are an excellent solution for shielding a radiator installed in a niche
The front surface of the screens can be semi-open or completely closed.
Plastic grilles for heating radiators
PVC is considered an inexpensive material, which is also often used to create gratings. Its main disadvantage is considered to be instability to mechanical damage. When using PVC, measurements are taken especially clearly; a box located close to the battery will very quickly deform and lose its decorative properties.
During the manufacture of plastic gratings you will need:
- PVC;
- Cutter;
- Drill;
- Set of screws;
- Corners for fastening.
Adhering to the rules stated above, take measurements and cut out the necessary parts from plastic. Using a drill, make holes in the plastic panel. The more holes you make, the better the air will circulate. Connect all structural elements with corners and screws, attach the grille to the wall.
Design
Screen design is an important factor. But in order for the chosen option not to reduce the functions of the radiator battery, it is necessary to take into account some conditions:
- the base at the front should conduct heat well;
- infrared rays should not remain in a confined space, but should effectively penetrate the room;
- the internal surface of the structure should be dark, since heat absorption and heat removal will be better in this case;
- the color of the outside does not affect the quality of heat transfer - you can choose the most suitable shade in the interior of the room;
- A special screen with film will facilitate the high-quality redirection of heat inside.
This accessory has foam insulation. This element eliminates heating of the external wall at the radiator mounting points. Without heat redirection, heat transfer is significantly reduced in some designs. It is recommended to place heat-reflective pads on the wall itself behind the battery. Decorative grilles are installed in front of the battery.
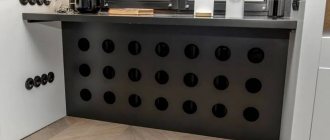
From an efficiency and design standpoint, a solid panel with small vents at the bottom and top is a bad option.
The small openings of such a hinged lid will restrict the flow of convection currents. If this protection option is installed, heat losses will increase, which means the cost of heating the medium for heating the room will increase.
An accordion-type protective frame would be acceptable, but also not a very effective option. Despite the fact that it is made with wide slats, it is closed at the top and sides with large shelves. There will be good heat dissipation only on one side - direct infrared rays will not help block the cold coming from the window.
From a design point of view, the model looks aesthetically pleasing if it is made of wood. The top of the shelf is convenient for placing indoor flowers. But the option with a grill is no better due to the poorly organized flow of hot air.
The optimal radiator is one that simultaneously directs heat upward and dissipates it into holes around the edges. As a result, the cold from the window will be blocked, and the flows passing through straight slits will heat the room.
Sometimes radiator grille options are complemented by a visor. It is convenient when the radiator is located under the window sill. A thin strip of steel or MDF option will prevent heat buildup and redirect it inside.
Another impressive improvement is the thermal injection device. This helps redirect the heat accumulated between the installed furniture and the appliance. The effect of the device is especially noticeable when the devices are operating in winter mode.
The ideal element grid includes the following improvements:
- foil thermal insulation fixed from the inside;
- special visor on top;
- special devices are installed on the sides;
- carved grilles with large perforations in the form of a front panel.
The structural properties of screens and grilles are related to their design characteristics.
There are several types:
- Box. Used when it is necessary to close pipes as well as the radiator.
- Hinged screen with top visor. Perfectly camouflages a battery that does not have a window sill, if the radiators are not recessed in a niche.
- a folding open screen is required for radiators installed in a wall or placed under a window.
- Flat grilles are needed for radiators that are located inside niches or simply mounted on the wall.
Grills for heating radiators made of plasterboard
Drywall is one of the easiest to work with. A sheet of drywall is marked and elements of the required sizes are cut out. Rectangular holes should be made on the grating surfaces.
Using corners and screws, connect all parts of the structure. Next, the structure is mounted above the radiator. Irregularities and corners are puttied and sanded. The grille is painted in a pre-selected color.
DIY installation
Knowing the principle of operation of a radiator and the elementary laws of thermophysics, you can independently make a design that improves room heating. The best material would be metal. But to work with it you will need quite a lot of tools, and certain skills.
You can build a screen from a sheet of fiberboard and metal mesh. The grille will be made in the form of a box with a lid at the top and legs at the bottom. The facade and sides are assembled on the basis of fiberboard frames. Air circulation on all sides will be ensured by a metal mesh filling the frame core.
MDF heating radiator grilles
In stores you can find a wide variety of shaped MDF grilles. It is possible to choose the appropriate pattern and hole size. The MDF panel is inserted into a wooden frame. If the radiator is located in a niche, an MDF grille will also be a good solution. You can make loops on one of its sides, and fasteners on the opposite side. This will make it easier to access the radiator.
You can buy an MDF screen in the form of a box. Such products are fixed to the wall and floor.
Installation of a decorative MDF grille on video:
Recommendations for selection
The main factor when purchasing a decorative grille is the type of heating system. For example, when using a convector system, wooden screens will not be suitable, as they will block the path to heat and the room will not warm up.
You should also take into account the price of the product itself. It would be reasonable to choose screens made of metal and based on MDF. They have high performance, and the quality and cost are justified by time.
When purchasing plastic products, there is no need to be tempted by the huge selection. It is worth remembering that cheap products are made from lower quality raw materials, which when heated will release toxic substances, which, in turn, can be harmful to health.
Recommendations for selection:
- In bedrooms and rooms for children, it is best to decorate radiators with grilles made from natural raw materials.
- When choosing a design, attention should be paid to the speed of disassembly and its reliability.
- In the event of an accident, removing the guard should take seconds.
- The rooms where such grilles are located should be ventilated more often, since the material from which they are made releases toxins when exposed to heat for a long time.
- The radiator grille should not be covered with furniture - heat transfer will be poor, and the beautiful view will go unnoticed.
Glass radiator apron
Glass screens are becoming increasingly popular as they look stylish and unusual. The idea that glass is fragile can be refuted. For such screens, tempered glass up to 8 mm thick is used, which is particularly durable.
It is especially important to use such glass grilles in bathrooms; they are highly resistant to moisture. When ordering glass, you must specify the dimensions of the parts in advance and provide for the presence of holes for fastening.
Small gaps are left at the top and bottom for air circulation. Glass can be decorated by making the surface matte or by applying a design to it. There are also special requirements for fittings for fastening: it must be chrome plated and have a remote fastening. Attach glass grilles directly to the wall.
Choose the appropriate radiator grille option for your radiator and enjoy the beauty of your home!
Don't be greedy, share with your friends;)
Branded or homemade?
And this is up to anyone. My good friend, Kulibin from God, made himself a whole set of universal nets, which he adjusted to his Chevrolet. But he is a hands-on fan with a lot of free time. He tried both rigidly fixed and removable structures, securing his crafts with screws or clips. Material: aluminum or plastic. Aluminum is light and durable, but a friend says that over time it quickly fades. Plastic is easy to process, but its strength is not so great. That's why his latest craft is made entirely of stainless steel! It looks decent, but it’s better not to ask about the cost and fuss...
As for the type of fastening, the removable screens are easy to remove for cleaning, but on the road they like to rattle obnoxiously. On the contrary, the tightly fixed structure does not make any sounds when driving, but, frankly, it is inconvenient to clean it.
As for me, I prefer ready-made solutions in such cases. To be honest, I have no desire to remove either the bumper or the headlights myself - and I evaluate my handicraft abilities quite soberly. In terms of tools, there are also problems: I don’t have metal scissors or any pullers. Therefore, I understand perfectly well that such a grille will ultimately cost me personally much more than a ready-made one. And how long it will ultimately last is a dark matter.
In short, I began to study the model options offered to me. Unlike homemade products, they are already tailored specifically to your car, and they are usually equipped with an installation kit. For some models, exclusive design options are provided - with an unusual pattern, reinforced structure, etc.
Toyota Avalon
photo: autoguide.com
The Avalon is an extremely popular car in the United States, proving that big grilles are in demand today. Some may think the grille is ugly, but the US sales numbers speak for themselves. Unfortunately, this is the most expensive sedan offered by Japanese automakers, and it costs more than many of its competitors. In Russia it is generally not available for purchase, but is occasionally found, although not in a new body.
Manufacturing technology
Before you start making a fence for the battery, you should choose a suitable design: hanging or resting on the floor in the room.
Then a drawing is made, and tools and materials are selected.
Materials and tools
For manufacturing you will need the following materials and tools:
- Chipboard sheet.
- Special edge for finishing with a thermal adhesive layer on the back side.
- Metal screws and angles.
- A stapler with staples or small nails with a hammer.
- Iron.
- Knife.
- Sandpaper.
Marking and measurements
First you need to mark the location on the wall and take the necessary measurements. We mark the mounting points for placing the panel. We make a simple schematic drawing with important dimensions.
Lattice
We make four walls for the frame from chipboard. You can purchase already manufactured parts. We connect the walls together using metal corners.
We make a lattice from the edge and fix its parts on the frame using small nails and a furniture stapler. The length of the edging material is calculated by the formula L(edge length)=(a (product length)*b(width)*1.3)/c(edge width).
The holes on the grill must be the same size; for this you need to make preliminary markings on the frame or a special template. The front side of the grate must be heated with an iron at high temperature. As a result of this procedure, the heated glue will connect the lattice elements at the intersection points and give it greater rigidity.
The same edge must be used to finish the end parts of the frame. We apply the edge to the end and smooth it with an iron. Using a knife, cut off the protruding edges of the edge. Protruding edges are sanded with sandpaper.
Consolidation
If the screen is supposed to be located close to the wall, then we simply insert it. If a hanging option is planned, then you need to perform a few more manipulations.
- We make recesses in the frame at the junction points with the heating pipes. Then the decorative fence is placed on the pipes using special grooves.
- You need to attach metal corners in the marked places.
- Then we bend the edges of the corners 10 mm upward and hang the made panel on the resulting hooks.
The enclosing screen is an excellent solution for various heating devices. If you do everything correctly and choose high-quality material, you can create a wonderful decorative element yourself.
BMW X7
photo: slashgear.com
When the BMW X7 first showed off in public, everyone was shocked by its huge “nostrils”. The shock was caused by clearly unkind thoughts. Ugh! What kind of nonsense is this?! But, as you can see, the car has stood the test of time; now the SUV’s grille looks very good.
Tree
Wooden products can be painted in any color and decorated with artistic painting. Four types of sheathing can be made from wood. For example, a diamond, circles, a cage and in the form of blinds. An interior with wooden elements looks very aesthetically pleasing and goes well with other materials.
The best types of wood for such products are beech and oak. They are durable and reliable. They can be either tinted or painted with enamel. To prevent the grilles from impeding the circulation of heat, they are mounted not on the floor, but at some distance above its surface. For better passage of warm air, certain holes are made in the upper part of the box.
Fences can be made from slatted fabric at an affordable price. This is an excellent stylish element that perfectly allows warm air to pass through and performs a protective function.
Benefits of using decorative elements
Similar decorative elements are used for batteries for several reasons:
- Improving the aesthetic properties of the room. For example, creating a beautiful accent in a room.
- Protective function against touching a hot battery. This is especially true if there are small children.
- Simplifies the maintenance of radiators.
A multifunctional screen can be made in several versions:
- Flat - protects the battery located in a niche.
- A closed box is used when it is necessary to close the entire radiator.
- The hinged cover is designed to cover the radiator protruding from the window sill.
Plastic
This is an inexpensive material with low thermal conductivity. It heats up unevenly and has little strength. Working with plastic is quite difficult. The plastic should be thick, since thin material has low strength.
May release toxic substances when heated. Products made from such raw materials are light in weight, resistant to moisture, not susceptible to corrosion and do not heat up very much.
When choosing a material for a decorative product, you should remember not only the attractive appearance, but also the microclimate in the room. Therefore, it is necessary to select a damper with a minimum surface area and leave a small space from the floor for air movement.
Aston Martin DBS GT Zagato
photo: motoringresearch.com
Another cool looking new car, the Aston Martin DBS GT Zagato is sure to leave a lasting impression wherever you see it. The design pays homage to the iconic Aston Martin DB4, but with a huge grille. This monster is also equipped with a twin-turbocharged engine capable of producing a majestic 760 horsepower. What a car!
Mounting features
Radiator grilles must be installed so that you can easily and quickly access heating appliances and pipes. From time to time, at least twice a year, the heating system elements need to be cleaned of dirt and dust, so access is necessary. In addition, emergencies arise from time to time. In this case, a quick reaction is required and there is no time to unscrew the fasteners. Therefore, try to find a mounting system that allows you to remove the screen in one motion.
Attached and mounted
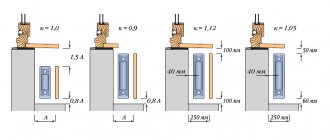
The easiest way is with hanging or hinged screens. They take off/return in seconds. But the most problematic are flat radiators that cover niches, and box screens that are attached to the wall. But here, too, everything is resolved simply. You can attach the box to the wall using two strips: one on the box, the other on the wall. The whole secret is that the boards have a beveled top edge (this can be seen in the picture). The one that is nailed to the wall has a slope towards the wall, while the one on the box has a slope towards the grate. When the box is in place, it looks like a lock.
How to repair a screen box for a wall-mounted heating radiator
Another option is to attach metal plates to one of the strips and magnets to the other. Or attach to the wall not a wooden board, but a metal corner, for example.
In the case of flat screens, the solution may be the same: metal plates and magnets. Another option is hooks and rings. It's easy to implement, but not very convenient to use - you have to suffer if you get into loops. There is also a complex but convenient installation method - making a screen like a sliding door.
Sliding screens for heating radiators
You can take sold guides for furniture doors, install them, and insert the screens into the corresponding grooves. If you do not plan to actively use the niche near the battery, then roller mechanisms cannot be installed, but it will be difficult to move them away. This method, by the way, can be applied to a lattice box. Then it can be “tightly” nailed to the wall and the front wall can be made movable.
Sources
- https://stroychik.ru/otoplenie/ekrany-na-batarei
- https://stroy-podskazka.ru/otoplenie/radiatory/reshetki/
- https://simplestroy.ru/landshaft-i-dizayn/ekran-dlya-batarei/
- https://v-teplo.ru/dekorativnie-reshetki-na-radiatori.html
Brutal mesh netting
The most common material that replaces the standard factory radiator grille is a fine-mesh chain-link grille. These can be products made of aluminum, plastic and even steel. You can find such a product in many places, and it will cost very modest money. Also, for the lattice transplant operation you will need the following equipment and tools:
- hacksaw for metal;
- file;
- needle file;
- sandpaper;
- self-tapping screws or plastic clamps;
- cold welding.
Before you make the radiator grille in accordance with your own taste, you need to remove the original one from its original places. Usually it is held in place with plastic grips that you just need to squeeze out, after which everything can be easily removed. It is very undesirable to break the fastenings and frame of the grille, since the old structure will serve as a frame for new achievements. The same applies to the chrome trim, if any. After this, all the bars of the lattice, both vertical and horizontal, are cut off “at the root” with a hacksaw or file. Don’t be alarmed if the part has noticeably lost its rigidity, because this is a natural side effect of such tuning.
All “stumps” and burrs will have to be carefully processed with a file and needle file. To seal ugly holes from removed ribs, cold welding is most often used. It dries quickly, so after 10 minutes you can continue working. The production of the frame is completed by sanding the surfaces with sandpaper with a fine abrasive fraction. Next, the mesh is cut to the size of the frame. Its fastening can be done either with small self-tapping screws or with plastic clamps (when you have something), used for twisting wires. If self-tapping screws are used, it is recommended to heat them over a fire before screwing in, so as not to cause cracking of the material. The plastic mesh can also be easily glued on.