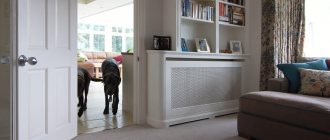
Installing a decorative screen is one way to integrate heating radiators into the interior of a room. In addition to the aesthetic function, such a product can also perform others: protect children from burns and protect radiator sections from dust and other contaminants. Also, the cover, equipped with hooks, can serve as a clothes dryer during the heating season. It’s not difficult to make a screen for the battery yourself, but you need to follow certain rules to minimize heat loss after installing the box.
Material selection
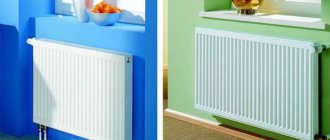
Drywall screen
To make a screen, you can use a variety of materials:
- metal;
- wood;
- drywall;
- glass.
The choice depends on personal preferences, the interior of the room in which it is planned to be installed, skills (working with some materials will require certain skills) and - most importantly - on the installation method.
There are several mounting options:
- box (usually drywall is used to create it);
- flat screen (made from a thin sheet of metal, wooden slats, glass, MDF);
- hinged cover (wood or metal is used for it).
Each option has advantages and disadvantages, so you should study them carefully to choose the best one. With the right skill, you can combine different materials and create unique products.
Metal
Among its undeniable advantages is excellent thermal conductivity. Therefore, its installation will not reduce the heat transfer of the radiator. Elegant products of various designs are created from metal: solid screens, fine-mesh or openwork grilles. For their manufacture, 2 methods can be used: stamping or welding.
A significant drawback of this material is the need to be able to work with it correctly. A person who does not have the proper skills and equipment will not be able to do this.
Wood
Decorative box made of wood
Wood is the most popular material for creating a screen: natural, aesthetic and fits into almost any interior. It is easy to work with, and you can create almost any design: lattice panels made of slats, screens, blinds, openwork boxes made of chipboard and more. With the help of tinting or painting, it is easy to fit the finished wood product into the interior of the room and extend the life of the panel.
Among the disadvantages of wooden screens is the tendency to deform and dry out. That is why it is recommended to use durable types of wood to make a decorative panel for the battery: oak or beech. A more budget-friendly and simpler option is to create a do-it-yourself screen for a heating radiator from slatted fabric. In addition to ease of manufacture, it has another significant advantage - it does not interfere with the penetration of heat into the room.
GKL
Drywall is used to construct a box in which the battery is sewn. Affordable price, ease of installation, light weight of the finished structure, functionality (you can organize storage space in a box, for example) - all this makes this material one of the most suitable.
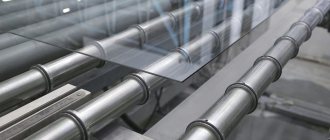
Glass
Protective screen made of glass
Glass screen is an ideal solution for rooms decorated in modern styles: pop art, hi-tech, fusion, minimalism.
For the manufacture of decorative panels, tempered glass is used - thick and impact-resistant, with carefully processed edges. It can be decorated with a sandblasting pattern, a pattern made using paste for chemical etching of glass, or a film with large-format printing. The design is also sometimes supplemented with LED lighting.
Installation of such a product can be carried out in 2 ways: by point fastening in 4 places or using a cold-rolled pipe, which will fix the sheet on both sides at four points.
Mounting features
Grilles on heating radiators must be mounted in such a way that you can easily and quickly access heating appliances and pipes. Periodically, at least twice a year, the heating system elements must be cleaned of dirt and dust, so access is necessary. In addition, emergencies arise from time to time. In this case, a quick reaction is required and there is no time to unscrew the fasteners. Therefore, try to come up with a fastening system that allows you to remove the screen in one motion.
Attached and mounted
The easiest way is with mounted or attached screens. They are removed/retracted in seconds. But flat, covering radiators in niches and box screens that are attached to the wall are the most problematic. But even here everything is solved simply. You can secure the box to the wall using two strips: one on the box, the second on the wall. The whole secret is that the top edge of the planks is beveled (you can see it in the picture). The one that is nailed to the wall has a slope towards the wall, the one on the frame has a slope towards the grating. When the box is installed in place, it turns out something like a lock.
How to fix a screen box for a heating radiator on the wall
Another option is to attach metal plates to one of the strips and magnets to the other. Or attach not a wooden plank to the wall, but a metal corner, for example.
In the case of flat screens, the solution may be the same - metal plates and magnets. Another option is hooks and loops. It is easy to implement, but not very convenient to use: while you get into loops, you have to suffer. There is also a difficult-to-install but convenient way: make a screen like a sliding door.
Sliding screens for radiators
You can take the guides that are sold for furniture doors, install them, and insert the screens into the corresponding grooves. If you do not plan to actively use the niche near the battery, you can not install roller mechanisms, but it will be difficult to move them away. This method, by the way, can also be used for the box lattice. It can then be nailed “tightly” to the wall, and the front wall can be made movable.
Preparation of materials and tools
Since it is easiest to make a battery screen from chipboard, you should choose this option. Using step-by-step instructions, you can easily and quickly make a decorative panel with your own hands.
Before starting work, you need to stock up on the following materials:
- fiberboard sheet;
- foil or metal sheet (it is fixed on the wall behind the radiator to reflect heat);
- fine or medium mesh;
- screws 4 cm;
- screws;
- nails;
- construction staples;
- metal corners;
- edge for finishing cuts on an adhesive basis;
- sandpaper.
You will also need tools:
- hacksaw for wood;
- hacksaw for cutting metal;
- drill with drills of different diameters;
- construction stapler;
- circular saw;
- countersink.
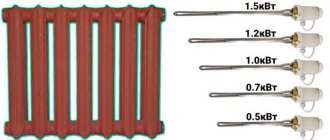
Making a heating battery from a profile pipe
A heating radiator is a device that can be manufactured not only by industrial companies, but also by home owners, including those new to this business. True, the latter will have to spend a lot of time. The easiest way is to make a battery from a profile pipe with a square or rectangular cross-section. This is because it does not spin and is easy to lock into place, allowing you to concentrate on all your welding and metal cutting work.
The design of a heating radiator made from a profile pipe is as follows:
- 3 horizontal pipes;
- 4 vertical jumpers;
- 6 plugs;
- couplings with internal threads welded to the ends of the upper and lower pipes.
Vertical bridges are placed at the ends of the pipes and allow water to flow from the top pipe to the bottom pipe.
How to do it?
MDF frame with metal grid filling
The product is a simple design in the form of a three-sided box with a lid. A metal mesh enclosed in a chipboard frame is used as the basis for the front and side panels. Such a decorative screen looks aesthetically pleasing, but does not reduce the heat transfer of the radiator.
The creation process consists of preliminary marking of the canvas, cutting out parts, subsequent assembly and fixation of the elements. If necessary, the finished product can be decorated in accordance with the design of the room in which the screen will be installed.
Before installing the box, you will need to install a metal or foil sheet on the wall to which the battery is attached to reduce heat loss.
Hide with drywall
Separately, I would like to talk about how you can hide batteries using drywall. It’s worth noting right away that the material has its drawbacks, but plasterboard construction is still very popular for repairs.
- The material is environmentally friendly and is not subject to combustion.
- You can find several varieties of this material on the market.
- This camouflage option is budget-friendly, and installation can be carried out in different ways, in a way that is convenient for you.
- Also, it is drywall that will allow the apartment owner to come up with any design, which will help not only to cover the pipes and radiator, but also to make additional decorative elements.
The downside is that drywall is afraid of external influences; if you do it carelessly, it is quite easy to break or pierce it. And if a breakdown or leak occurs, the entire finish will have to be replaced again, but this material is cheap.
Marking
Before you begin, you need to decide on the dimensions and draw up a diagram. For this:
- Radiator measurements are taken. To the resulting height value add 5 cm, width - 10. In this way, the optimal parameters of the front panel are calculated.
- Draw a diagram and transfer it to a steel mesh. Cut out the part using a hacksaw. The resulting element is the basis of the front panel, which is subsequently enclosed in a wooden frame.
- By measuring the depth of the battery and adding 2.5 cm to the result, the required width of the side elements is determined. The height of these parts is equal to the height of the front panel.
- Transfer the pattern to the mesh, cut out 2 parts.
- Start making the lid. Its length should be equal to the width of the front panel, and its width should be 1-2 cm greater than the width of the side walls.
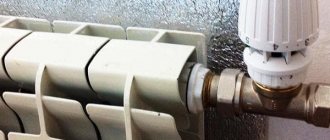
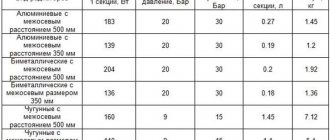
Effect on thermal output
Ideally, the screen should not affect the heat exchange between the battery and air. However, any design impedes air circulation and partially blocks the paths of thermal radiation.
Changes in the thermal power of the radiator depending on the placement and presence of a screen.
It is important to meet the following conditions:
- leave a ventilation gap of at least 60 mm from the floor across the entire width of the radiator;
- provide a hole at the top for the exit of heated air;
- maintain a distance from the sections to the front wall of the screen of at least 50 mm;
- choose a screen with a front wall, at least 50% of the area of which is filled with through holes;
- give preference to easily removable screens that can be easily dismantled on particularly cold days to improve heat transfer and also for cleaning.
It is advisable to paint the inner surface of metal screens black - this will contribute to its rapid heating and increased heat transfer by emitting infrared waves.
Cutting out the parts
Cutting with a hand hacksaw
Algorithm of actions when cutting elements of the future screen:
- 4 parts are cut out of metal mesh: front panel, side walls and lid. If you plan to use the screen cover as an additional functional surface, it is made from a sheet of chipboard, and then a part for the cover will not be needed.
- The next step is to cut the chipboard sheet. Rectangular parts are cut out of it, which will serve as a frame for the mesh. You will need 4 slats for the front panel, 8 for the sides and 4 for the lid. The width of all elements is 11 cm. For work, use a hacksaw for wood.
- The ends of the resulting parts at the junctions with each other are cut off at an angle of 45°. To avoid mistakes, all elements must first be attached to each other and the cut location must be marked with a pencil. The cuts are treated with sandpaper.
Cost of different types of products
The prices of the models offered vary greatly.
It depends on the material, size and type of screen:
- hinged made of steel with a thickness of 0.7-0.8 mm - 230-350 rubles;
- flat from HDF - 1,500 rubles;
- box made of laminated HDF - 2,300 rubles;
- hinged steel with powder paint - from 1,800 to 2,600 rubles;
- extension made of natural wood - 6,200 rubles;
- flat glass - from 8,000 rub. Find out about corrugated metal pipe by following the link.
Assembly
When all the parts are ready, begin assembly. The 4 front panel elements are joined together using wood glue. For greater reliability, it is recommended to secure them with nails. Frames for the side walls and covers of the future screen are assembled in a similar way. The cut areas are covered with an edge for finishing.
A metal mesh is attached to the underside of the frame. To do this, use a construction stapler.
The resulting elements are connected together. First, one side panel is attached to the front using metal corners and screws, then the second, and only then the cover.
The screen is assembled, now, if desired, it can be decorated: covered with paint, varnish or stain.
Installation
Dowel nail
Before installing the screen on the battery, a metal sheet or foil is attached to the wall. From the selected material, a part is cut out with a size of 1 cm on each side less than the parameters of the front panel, and glued to the wall. After this, they proceed to the installation of the box.
There are several ways to do this:
- Installing the screen on the battery using drive-in anchors. Having determined the optimal location of the screen and marking the corresponding points on the wall, drill holes in them. Using a hammer, hammer the anchor into the holes, and then screw the bolt into it. The box is secured to these bolts.
- Hook mounting. Having attached the screen to the wall, mark the points for the holes for the dowels on both sides. Drill and drive in dowels. Mounting hooks are installed in them. A box is hung on them.
- Installation on legs. The easiest way to solve the problem, for which you will need furniture (preferably adjustable) legs. They are attached to the bottom of the structure using metal corners. Afterwards, set the desired height of each leg and put it on the battery.
Alternative option
Battery Decor
If you do not have the opportunity to purchase or make a screen, you can use an alternative option - apply a design with oil paints to the battery.
Note!
For the best effect, the pattern is applied not only to the battery, but also to part of the wall near it in such a way as to create the effect of the absence of volume (that is, the front part of the battery and the surface of the wall are conditionally one plane).
Guidelines for Creating a Screen
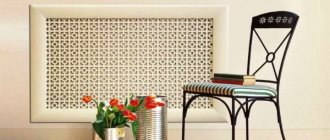
When choosing a screen model, you should pay attention to its design: it should not impede the flow of heat into the room. It is worth giving preference to panels in the form of a lattice or canvases with a sufficient number of holes for the free passage of air.
A functional, durable and aesthetically attractive screen can be made by combining various materials: wood and metal, metal and plastic, drywall and wooden slats.
Since the decorative panel reduces, but does not completely eliminate, the ingress of dust onto the radiator sections, it is recommended to choose a product that quickly provides access to the battery (for example, a gypsum plasterboard box with a door panel) or is easily removable.
Making a decorative screen yourself is not particularly difficult. If you have minimal carpentry skills and an understanding of the work technology, the task is easy to cope with.
Functions of the radiator grille
The use of decorative products for batteries gives their owners a number of advantages:
- The batteries are effectively disguised, which transforms the room, maintaining a single and unique interior style.
- Radiators are protected from dust, which makes them easier to care for and increases their service life.
- Household members are protected from the possibility of accidentally getting burned or hitting protruding parts of the radiator.
If you design and create a radiator shield yourself, you can give it additional functions:
- Proper screen design will help air flow more evenly distributed throughout the room.
- The top cover can be made in the form of a shelf for books, lamps, and interior items.
- The screen can be equipped with a folding table, where you can enjoy a cup of tea or read a book.
- By providing a cover with hooks, the owner of the shield will receive a clothes dryer during the heating season.
Armed with all the variety of materials on the market, their colors and textures, rich imagination and a little experience, you can create an exclusive screen that will fit perfectly into the interior and will perform all the functions assigned to it. Today, the openwork radiator model is quite popular.