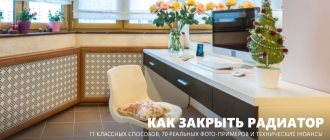
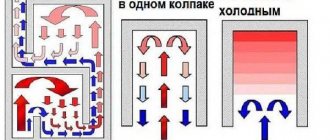
A reflector for radiators helps raise the temperature in the room by 2-6 C. There are situations when radiators do not waste heat rationally and heat the walls of the house instead of the room.
There is a solution to this problem - installing a heat shield behind the battery. This will also help to significantly reduce energy costs for heat. And the issue of saving and preserving heat in the house is in the first place for everyone.
In this article we will talk about heat reflectors behind the battery, their types, materials used during installation and customer reviews when using screens.
Why do we need screens for heating radiators?
The screen installed on the convector performs several functions:
- protective;
- decorative;
- heat-conducting;
- hygienic.
The buyer's priorities may be placed in a different order, but each item is important.
Defense tasks
The battery grill protects both the device itself and the occupants of the home:
- You can hit the edges of the sections, shut-off valves and thermostat;
- large dogs can destroy pipes, causing home flooding;
- the convector heats up to high temperatures, which can cause burns;
- The rescue service reports frequent cases where a child's arm or leg gets stuck between the sections.
When furniture is moved or objects fall, impacts sometimes occur on the heat exchanger, which can lead to damage to the appearance or cracking of sections.
How to actually choose the cheapest heating radiators on the market
Decorative functions
Unsightly radiators can be covered with curtains, but this will reduce heating efficiency.
By choosing the right screen, you can emphasize the stylistic design of your home by hiding the radiator, pipes, shut-off and control valves.
The screen is an assistant in the fight against dirt
There are tools that allow you to clean the radiator from dust in hard-to-reach places, but even with their help it is impossible to remove dust from all areas.
The heating radiator works like a convector - air flows rise from the floor along the edges of the sections. At the same time, dust and pet hair settle on hard-to-reach surfaces of the battery, which are difficult to remove due to the structure of the sections.
The screens partially “filter” air flows, and it is not difficult to remove dust from their front wall.
Mounting features
Grilles on heating radiators must be mounted in such a way that you can easily and quickly access heating appliances and pipes. Periodically, at least twice a year, the heating system elements must be cleaned of dirt and dust, so access is necessary. In addition, emergencies arise from time to time. In this case, a quick reaction is required and there is no time to unscrew the fasteners. Therefore, try to come up with a fastening system that allows you to remove the screen in one motion.
Attached and mounted
The easiest way is with mounted or attached screens. They are removed/retracted in seconds. But flat, covering radiators in niches and box screens that are attached to the wall are the most problematic. But even here everything is solved simply. You can secure the box to the wall using two strips: one on the box, the second on the wall. The whole secret is that the top edge of the planks is beveled (you can see it in the picture). The one that is nailed to the wall has a slope towards the wall, the one on the frame has a slope towards the grating. When the box is installed in place, it turns out something like a lock.
How to fix a screen box for a heating radiator on the wall
Another option is to attach metal plates to one of the strips and magnets to the other. Or attach not a wooden plank to the wall, but a metal corner, for example.
In the case of flat screens, the solution may be the same - metal plates and magnets. Another option is hooks and loops. It is easy to implement, but not very convenient to use: while you get into loops, you have to suffer. There is also a difficult-to-install but convenient way: make a screen like a sliding door.
Sliding screens for radiators
You can take the guides that are sold for furniture doors, install them, and insert the screens into the corresponding grooves. If you do not plan to actively use the niche near the battery, you can not install roller mechanisms, but it will be difficult to move them away. This method, by the way, can also be used for the box lattice. It can then be nailed “tightly” to the wall, and the front wall can be made movable.
Effect on thermal output
Ideally, the screen should not affect the heat exchange between the battery and air. However, any design impedes air circulation and partially blocks the paths of thermal radiation.
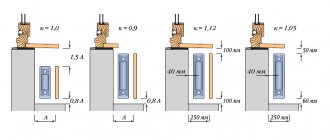
Changes in the thermal power of the radiator depending on the placement and presence of a screen.
It is important to meet the following conditions:
- leave a ventilation gap of at least 60 mm from the floor across the entire width of the radiator;
- provide a hole at the top for the exit of heated air;
- maintain a distance from the sections to the front wall of the screen of at least 50 mm;
- choose a screen with a front wall, at least 50% of the area of which is filled with through holes;
- give preference to easily removable screens that can be easily dismantled on particularly cold days to improve heat transfer and also for cleaning.
It is advisable to paint the inner surface of metal screens black - this will contribute to its rapid heating and increased heat transfer by emitting infrared waves.
DIY painting ideas
Updating the radiator decor is carried out in compliance with the interior style. Designs painted in the same color as the walls look impressive. With proper design, you can divert attention from the shortcomings of the interior. As for painting ideas, multi-colored sections are used, giving the radiator a piano look, and applying a modular pattern. The main thing is that the type of coloring fits perfectly into the overall concept of the room. To paint a radiator “to look like a piano,” you need to think through everything so that the resulting pattern resembles the keys of a popular musical instrument. You will need two colors of paint: black, white.
Screen manufacturing options
All types of screens can be classified according to several criteria:
- material of manufacture;
- installation method: built-in, wall-mounted and attached;
- design: with or without a lid, flat or boxes, etc.
The type and appearance are chosen based on the criteria of functionality, appearance and price.
Metal
Steel screens have such positive qualities as:
- variety of shapes and colors;
- unlimited service life;
- minimal thermal deformation and color fastness;
- good thermal conductivity, allowing heated screens to re-radiate heat rays;
- strength;
- ease of care.
For production use:
- solid steel sheets with holes for air circulation,
- perforated steel with a geometric or arbitrary pattern;
- perforated mesh or welded mesh;
- stainless steel;
- Forged Products.
The variety of shapes and designs will allow you to choose a model for any interior: from loft to high-tech.
Wooden
Wooden screens are typical for interiors designed in a classic style. The products are distinguished by their aesthetic appearance, reliability and durability. At the same time, natural wood conducts heat poorly, reducing the radiant component in heating. As a rule, such products are massive, with a minimum of holes, which makes convection difficult.
Products made from valuable wood species are not cheap, so they have gained little popularity. Inexpensive pine products are functional, but their ascetic appearance limits the scope of use.
Plastic
Plastic screens in the form of blinds are often used for installation in utility rooms, bathrooms, and public buildings.
The main advantages of the models:
- cheapness;
- variety of sizes and colors;
- Hygienic – the products are easy to wash after removing them from the frame.
If necessary, it is easy to dismantle.
In addition to the economy segment, products made from high-quality plastic can be of a non-standard type, their price often exceeds tens of thousands of rubles.
Glass
Glass screens look light and sophisticated. The material transmits up to 95% of radiant energy, which contributes to good heating of rooms. They are painted and decorated with colored films or designs.
There are restrictions on the use of glass. For example, in housing where there are children or large dogs, it is not advisable to install fragile screens. The glass must be tempered.
MDF and HDF boxes
Medium-density (MDF) and high-density (HDF, UHDF) fiberboards are more often used for the manufacture of box screens.
The materials are easy to process, the front panels are openwork and seem light. Such products are found in trade under the name quartek.
When purchasing, you should check the safety certificates - cheap products are more likely made from materials with a high content of formaldehyde, which is unacceptable when installed in children's and bedrooms.
Drywall
Drywall sheets are used to make a frame, the openings in which are filled with other material: plastic gratings, metal panels, MDF, HDF.
The screen itself is not made from gypsum plasterboard, since in case of leaks the structure will have to be completely destroyed.
Bamboo and rattan
Completely natural materials are safe, have an unusual appearance, suitable for oriental design style.
It is better to order inexpensive products from Chinese online stores.
Application in the interior
Below are the most interesting ideas:
- Living room. You can decorate the radiator using a decorative false fireplace or a special plasterboard box. It all depends on your imagination and the style direction of the interior.
- Kitchen. You can cover the heating element with a special screen, which is consistent with the overall interior concept. If desired, you can simply paint it in a contrasting color.
- Bedroom. A decorative grille, screen or false fireplace will fit here. You can paint the batteries with an interesting design or use the decoupage technique.
- Children's room. An interesting option would be to design it using decoupage technique. The child really likes to look at the beautiful modular pictures.
Instructions for DIY production and installation
Any of the materials considered can be used to make screens yourself. It is necessary to objectively assess your skills, take into account the availability of tools and the availability of components for sale.
The work is carried out according to a single algorithm:
- Choose a design based on a photo or sample.
- Measurements are taken of the radiator and installation location: height, width, depth of the niche.
- Make a sketch and, if possible, an accurate drawing of the screen.
- The instrument is being prepared.
- Purchase materials, including consumables (paint, fasteners).
- A frame is made and sheathed with the selected material.
- Finishing is carried out.
- Attach using the chosen method to the wall or floor.
You can inspect the model you like at a construction supermarket and then start making it yourself.
Glass or mirror screen
You will need:
- drill or screwdriver;
- hammer drill for drilling a wall for fasteners;
- glass drill bit.
- a glass cutter and a diamond block, if you are cutting the glass yourself.
Glass or mirror can be ordered according to the required sizes in stores or workshops, and the edges will be processed there. The price of glass (at least 6 mm) with a cut ranges from 1,000 to 2,000 rubles per square meter. Holders will cost from 1,000 rubles. per set.
Additionally, holder brackets can be purchased.
Holder brackets.
They can be of different designs, but must hold the panel in a vertical position.
Self-production algorithm:
- The glass is cut to the required size, taking into account gaps for air circulation.
- Treat the edge with a diamond stone or fine sandpaper.
- Using a crown of the required diameter, drill a hole for the holder. The drill is set to minimum speed, and as you work, the drilling site is watered with water.
- Make markings to install the holders on the wall or floor.
- Drill a hole and attach the brackets.
- Install the glass on the holders.
Before drilling, try to perform the operation on an unnecessary piece of glass.
Another no-drilling option involves using prefabricated brackets and nickel-plated posts. All materials can be purchased at any construction supermarket.
The surface can be covered with a tinted film of the same color or with a pattern.
Protective box made of MDF, HDF
Prepared:
- drill (screwdriver), hammer drill or impact drill for concrete walls;
- jigsaw;
- a hacksaw with fine teeth complete with a miter box;
- construction corner, ruler or tape measure;
- a set of screwdrivers of the required configuration;
Buy:
| perforated MDF or HDF panel of the required size - from 600 RUR/m2 | |
| MDF panels of the required width for the top side and side walls from 200 rub. for a 3-meter piece, the upper part can be made from a solid piece of board | |
| planed block 20x30 mm from 30 rubles/linear. meter | |
| self-tapping screws 35x25 mm from 30 kopecks/piece. | |
| 12 steel corners for assembling the frame from 5 rubles/piece. | |
| wooden or MDF corner for finishing from 50 rub./l.m. | |
| furniture hangers for attaching the frame to the wall from 2 rubles/piece. | |
| hidden nails or glue for installing decorative corners |
MDF panels can be replaced with laminate.
Sequence of work:
- Conduct final measurements of the opening.
- Make a drawing.
- The HDF panel is cut and cut to the required dimensions, it is advisable to maintain the symmetry of the pattern.
- Mark and cut off the frame bars.
- Using steel corners, assemble the frame.
- Hangers are attached for further installation.
- The top and sides are covered with MDF panels.
- Secure the perforated panel using self-tapping screws screwed into the corners.
- The box is finished with a decorative corner.
- Mark holes in the wall, drill and screw in screws on which the box will be hung.
- Place the screen in place.
If necessary, the entire structure can be removed in a few seconds.
Some of the purchased MDF screens have sufficient thickness and strength so as not to make a frame; then the panels are connected using furniture corners. You can watch the video for more details:
Steel screens are made using similar schemes.
Forged gratings
To work, in addition to the hammer drill, you will need an angle grinder, an arc welding machine, a protective mask and electrodes.
Blanks for the grating are purchased at a construction supermarket. The price depends on the part configuration and size.
To obtain the grid:
- The frame is welded from a steel angle or profile pipe.
- Monograms and racks are welded.
- Clean the weld areas with a grinder.
- Paint the finished product.
- Attach the grille to the wall or floor.
Important! Welding cannot be carried out indoors, since the gases released are toxic, and the smell does not disappear from the room for several days. Observe fire safety measures: protect flammable objects and the floor with screens, prepare a supply of water in case of fire.
Decoupage - step-by-step master class
It will help give the radiator a certain chic. Decoupage involves selecting drawings and then gluing them onto the surface to be restored. The resulting image is fixed with varnish. Today in stores you can buy special multi-layer napkins with a pattern. Step-by-step master class:
- The battery is cleaned using detergents. Areas with peeling paint are cleaned with sandpaper. The radiator is coated with paint.
- You need to start applying the drawing after the coloring composition has completely dried.
- Unroll the prepared napkins and cut out the required fragments. Excess layers of paper are completely removed. The image is coated with PVA glue and applied to the radiator sections. Gently press the napkin onto the battery. Air bubbles are removed. After the layer of paper has dried, you can complete the missing elements with your own hands.
- The completely dry image is covered with two layers of varnish.
Prices for ready-made screens for radiators
For most apartments, ready-made screens are already available for sale, which do not require adjustment, since the apartments have standard heating solutions.
The approximate cost of popular screens of different designs is collected in the table.
| Screen appearance | Material | Installation method | Price per m2, rub. |
| steel, perforated | mounted | from 500 | |
| HDF | recessed | from 600 | |
| HDF, natural wood | stationary | from 10 000 | |
| Strained glass | mounted | from 12 000 |
Large retail enterprises sell a small range of products designed for the mass consumer. It is usually limited to hanging steel products, plastic “blinds”-type grilles and “quartec” blanks.
What to consider when masking a battery
Finishing the niche for the radiator in the room will have to be done without fail, because if the radiator is covered with a frame structure, the entire area under the window sill will still not be occupied. Before performing such work, it should be taken into account that the heat transfer of the device will be reduced many times over. If you are already dissatisfied with the quality of the heating systems, then after such decoration you may experience a drop in the temperature in the room by several degrees.
If you still want to finish the heating radiator, but you are afraid that the room will not be too comfortable, you can choose design options that will not have too much of a negative impact on the comfortable conditions. These could be glass screens that leave the battery exposed on top. You can choose a design with perforation, and cover the walls behind the radiator with foil insulation, then the heat from the radiator will be partially returned back to the room.
Custom screens
For non-standard products, people turn to specialized workshops or private craftsmen.
There is no uniform pricing policy in this segment, and in each case “market” relations arise between buyer and seller. The former try to sell at a higher price, provide on-site measurements and designer services, which can significantly increase the price. The final cost is affected by screen size, material and manufacturing complexity, as well as the region.
It is necessary in each individual case to study the local market, prices for similar serial models in online stores and choose based on the data obtained.
Heat transfer from heating radiators Comparison of indicators and calculation methods
Technical rules
One of the requirements is the accessibility of the radiator. It may leak and will have to be replaced or repaired. Therefore, it is better to choose designs that are easily removable. It is advisable that they do not have a fixed mount. Overlays with a folding door and a retractable mechanism are suitable. At a minimum, valves, pipe connections, thermal head and threaded connections should remain accessible in case of breakdown.
Instagram @interior_techno
Instagram @bespokecabinets
The second important point is related to the amount of heat entering the house. Any box reduces it. Especially if it is deaf, completely closed at the top or has a tight weave. It is better to choose something more open and not place the heater too deep. To reduce heat loss, you can put a solid screen on the legs and cut a groove in the middle.
A few more tips
- Before closing the radiator, prepare it: wash it, blow it out.
- The distance between the masking structure and the heating device should be 35-50 mm.
- The minimum gap between it and the window sill, as well as the floor, is 60-70 mm.
Consider these recommendations when choosing a decorative overlay. After installing it, the temperature in the room should not drop by more than 1-1.5°C.
Screen maintenance
Protective products require maintenance as they are used. If this is not done in a timely manner, then dust and dirt can eat into the grille, changing the appearance. The cleaning method depends on the material and its finishing. It is usually sufficient to wipe the external surfaces with a damp cloth once a week.
Removal to clean the screen and radiators is carried out after the end of the heating season and always before starting the radiators in the fall - in the summer, when the windows are open, the formation of a dusty layer is especially intense, and at high temperatures the battery begins to burn.
False fireplace - master class
This option is suitable for masking a radiator located in the center of the room. Making a fireplace is as follows:
- You need to prepare a furniture panel, 1 cm thick plywood, bars of the required size, and a wooden layout.
- You should create an approximate layout of the fireplace that covers the radiator. It should be a special square with a window in the center. The design of the structure depends on the preferences of the performer.
- The box is fixed on the wall. Shelves on the fireplace, pre-made from furniture board, are screwed on. The entire structure can be decorated with special polyurethane skirting boards.
- We go through the joints with self-tapping screws with putty. We sand off the excess and paint the surface of the fireplace with acrylic paint.
You can install a lamp in the firebox that will serve as an imitation of fire. If desired, you can install a garden trellis on top of the niche. The battery should be covered with imitation stone.
Decorative panel made of decorative plaster
Panels made of decorative plaster give the room an extraordinary look, as they add texture to the surface and three-dimensionality of the image.
Modern decorative plasters make it possible to create a wide variety of color and texture variations: imitation of marble, stone, aged wall, cracked earth, wooden texture, silk or velvet. Usually these are ornaments from which entire paintings are created, with layer-by-layer application of plaster. The result is a feeling of space.
If you provide proper lighting for the walls with panels, such decor will not only attract the eye, but will also awaken the desire to touch.
Manufacturing technique
The surface for plaster panels does not require special preparation. The main thing is that it is durable, clean and treated with a special primer.
First, a sketch of the image of the decorative panel is made, which is transferred to the wall. The relief elements of the panel are sealed with paper adhesive tape. These parts are made gradually layer by layer. Then the surface is sanded and coated with protective varnish.
The end result is not only a great finish, but also a hard coating that is difficult to damage. If this happens, the panel is restored without any problems.
See all the photos to see what panels can be created from decorative plaster:
Battery heat dissipation level
Heating batteries use two methods of heat transfer during operation:
Infrared radiation. Promotes the transfer of thermal energy to nearby objects in the room. This radiation gives a feeling of warmth on the body when approaching a heating radiator.
Convection. Stimulates the rise of warm air, as a result of which it is replaced by cold air. As a result, all the air in the room warms up evenly over time.
When choosing how to cover radiators, it is important to understand one truth: if you use a screen (regardless of its design), there will certainly be a disruption in the heat exchange between the radiators and the room. The decrease in heating efficiency is directly related to the size of the continuous surface area.
Installation of factory wall panels
The soft finish is attached to a pre-prepared base. The surface must undergo plastering, sanding and primer coating. After this, the wall is marked according to level. This will help avoid distortions and shifting of decorative elements.
At the installation stage, two important factors should be taken into account:
- It is not recommended to cut panels to fit the walls. This will not affect the appearance for the better. You can sheathe the wall starting from the middle and leaving equal gaps in the corners. This will look much more aesthetically pleasing than cut material.
- It makes sense to start work from the top. If the height is trimmed, the bottom edge can be hidden with a plinth.
For gluing you will need liquid nails, acrylic glue or PVA. The latter is applied to the entire surface of the slabs; other materials are applied pointwise or in a narrow strip along the edge. Soft panels are applied according to the markings and pressed for some time to set.
The process of installing a factory product is quite simple; making soft walls and attaching them yourself will be more difficult. But the second option provides more possibilities: there are several options for creating and attaching homemade soft walls.
