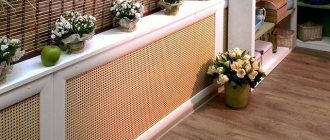
You can cover a heating radiator in different ways: with a special screen, a box, hide it under drywall, arrange a shelf, paint it in the color of the interior, cover it with furniture. The variety of methods requires a closer look at each of them, which we will now do.
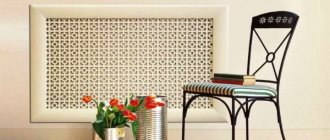
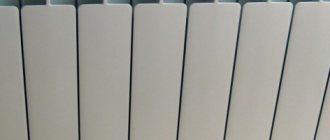
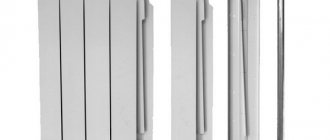
Ideas on how to hide a heating radiator Source livemaster.ru
Functions of the radiator grille
In addition to the design characteristics, which are clearly visible in the photo of radiator grilles, these items also perform other functions, such as:
- Protection against battery damage;
- Aesthetics;
- Limiting access to hot heating elements (this is especially important for rooms where children are).
Advantages
The designs have many advantages, including:
- Do not block free air circulation;
- Prevents dust accumulation;
- Allows you to complement the design in the appropriate style;
- Products made of thermally conductive material can increase heat transfer;
- Do not allow injuries from sharp or hot elements of the heating system;
- Easy to care for;
- Perfectly hide the unsightly appearance of outdated battery models;
- Acceptable price.
Flaws
Cons often relate to the material rather than the product itself. Therefore, before making a purchase, you need to study the design flaws.
- Plastic surfaces of products are often subject to deformation due to mechanical stress or temperature conditions. Ultraviolet light can cause the grille to change color. Plastic is not an environmentally friendly material, so at elevated temperatures it releases toxic substances and an unpleasant, pungent odor. Static characteristics also leave much to be desired.
- The metal grille on the heating radiator is dangerous due to its sharp parts, so it is not recommended to purchase structures made from such material or choose models with perfect processing. Also, metal products are difficult to fit to existing radiators.
There are models with incorrect location and size of ventilation holes, which makes the functionality of the product and heating system ineffective.
Underfloor heating systems
If we are talking about a water heated floor, unlike its electric counterpart, it uses metal pipes as a heating circuit, although they have recently begun to be used less and less.
The main reason for the decline in demand for water-heated floors is the gradual wear of steel pipes and a decrease in the clearance in them. In addition, the installation method also matters - not everyone can make welds, and a threaded connection threatens to leak coolant after some time. Naturally, no one will like the result of water leakage from the system in a floor with a screed - the ceiling of the lower floor or basement will be flooded, and the ceiling will gradually become unusable.
For these reasons, steel pipes in warm water floors were first replaced by metal-plastic coils, the fittings of which were attached outside the screed, and now reinforced polypropylene is preferred.
This material has a slight thermal expansion, and with proper installation and operation, they can last for decades. Alternatively, other polymer materials are used.
Please note that gaps for thermal expansion of reinforced polypropylene still need to be left, although it is small
Criterias of choice
There are many retail outlets where it is not difficult to buy radiator grilles, but when choosing, you should rely on certain criteria.
- Attractive appearance without loss of functionality.
- Free access for wet cleaning.
- Fastening strength.
- Safety during operation, which depends on the configuration and processing of the protective screen.
- The design should not interfere with the heat exchange process.
- Price for radiator grilles.
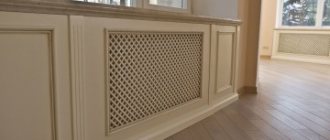
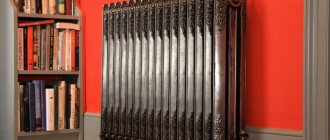
Restoration of an accordion battery
Floor wooden screen-box.
In one of the articles we talked about the decor of heating pipes. Today we’ll talk about how you can restore a radiator to its human form with little effort by restoring it:
- clean;
- paint;
- You can also paint the radiator if you have the desire and artistic talent.
On various women's forums there are topics where housewives exchange experiences on how to wash an accordion battery. Indeed, it is difficult to wash away the dirt between the ribs. The fins are very thick, a lot of dust gets clogged there. Besides the fact that it is unsightly, it is also harmful to health.
Heating is carried out by convection method. Hot streams pick up dust and carry it throughout the room. If you constantly breathe such air, asthma, allergies, and cases of respiratory diseases may become more frequent.
You should not wash the accordion battery with caustic chemicals, since you are unlikely to be able to wash it off completely. When the heating is turned on, all the chemicals will enter the air.
Unfortunately, there is only one option - to remove the dirt mechanically. That is, you need to take a stiff brush, a bowl of water, a cloth and clean it. Don't forget to place a cloth under the radiator. Also cover the walls next to the radiator. A hard brush will cause a lot of splashes.
Painting a battery consists of the following steps:
- removing old paint with a remover - available in any hardware store, cheap, sold in glass bottles;
- primer – for the paint to lay more evenly and to adhere more firmly, the heat exchanger must be primed;
- painting - it is advisable to paint when the heating is turned off.
Naturally, only the visible parts need to be painted - these are the ends and the casing. Do not paint the fins under any circumstances. Such batteries already have poor heat transfer, and a coat of paint will make it even worse.
Kinds
Battery sheathings are made in several types:
- Flat, designed for installation in niches.
- Wall mounted ones without a cover hide batteries that do not protrude beyond the edge of the window sill.
- Wall-mounted ones, which have a removable lid on top, are used for radiators that protrude beyond the window sill.
Frame, which is a box that completely hides the placement of the radiator.
✔ Emphasize the thoughtfulness of the interior
All products are coated with high-quality paint that is resistant to heat and has a wide palette of colors according to the RAL catalog. A variety of design ideas allows you to choose something that will harmoniously fit into the decor. Thus, metal models in popular beige or white colors will create a feeling of cleanliness, emphasizing the chosen style of the room.
Screens with perforation or art design style will transform even very old batteries in an instant, completely covering them. All you have to do is save on using expensive accessories and replacing the radiators themselves.
Materials
It is rare that repairs these days can be completed without lining heating radiators with decorative structures. They can be made from various materials and have different configurations, textures and colors.
Most often, gratings are made from:
- Natural wood;
- Plastic;
- Metal;
- MDF;
- Plexiglas.
Features of use
Considering the characteristics of the products and their installation locations, it is worth following some recommendations.
- It is advisable to trim the wall behind the heating source with foil, this will make heat transfer more efficient.
- It is desirable that the structure can be easily and quickly dismantled for easy access for maintenance and repair work if necessary. This is also important to avoid damage to the product and fasteners.
- In rooms it is better to install structures made from natural raw materials, for example, wooden grilles on heating radiators.
- The distance between the grille and the elements of the heating system must be more than 30mm.
- Do not block the radiator lining with furniture or other objects. As a last resort, you can install products specifically designed for installation to the battery and having ventilation passages.
It is prohibited to use the product for purposes other than its intended purpose, for example, for drying clothes.
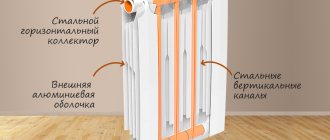
Methods for increasing heat transfer
The round shape does not at all help to increase the heat transfer of metal pipes. An even lower volume-to-surface ratio can only be found in a sphere.
Consequently, the problem of how to increase the heat transfer of a pipe undoubtedly faced the developers of the first simple heating devices.
To increase the heat transfer coefficient of a steel pipe, the following methods were previously used:
- The surface of the pipe was coated with matte black paint to enhance the infrared radiation of the heating element. This made it possible to achieve a significant increase in room temperature. It is worth noting that modern chrome plating on heated towel rails is extremely ineffective for enhancing heat transfer - it is, rather, for beauty.
- Increasing the heat transfer of the pipe by welding additional ribs onto it, which made the area of the heating element, and therefore the heat transfer, significantly larger. The most advanced use of this method can be called a convector, that is, a section of bent pipe with welded transverse ribs. Although the pipe itself in this case gives off a minimum of heat.
Any of these methods can be used if the question is how to increase the heat transfer of a heating pipe with your own hands, because they are not at all complicated and are quite feasible at home.
Manufacturing
You can make a battery grid yourself, following the step-by-step instructions.
- First you need to make markings. To do this, you need to take the battery parameters as a basis, add 50mm to the height, and 100mm to the width. This will give you the dimensions of the front panel, which can be made from metal mesh.
- The sides can be made from MDF. They will be the same in height as the front part, and the depth is equal to the thickness of the battery plus 30-35mm.
- The lid can be marked according to the obtained parameters for the width and depth of the product, but it is better to make it with 15mm protrusions on each side.
- Cut out all the parts according to the markings and smooth their edges.
- Treat the wooden blocks with an antiseptic, prime them and build a frame from them.
- Cover the front and sides of the frame with prepared parts using self-tapping screws.
- Attach the cover to the rear upper beam using a piano hinge.
- Paint the resulting structure in the desired color or varnish it.
- Cover the wall behind the battery with foil and install the product.
- For greater stability, the grille can be fixed using brackets or suitable fasteners.
- Screw the adjustable feet from the bottom.
The decorative protective radiator trim is ready!
Having received the above information, you can take a more rational approach to choosing a protective grille model suitable for a particular interior. A decorative product will help disguise the unaesthetic appearance of the battery, protect the radiator from all kinds of contaminants, and relieve parents from constant supervision of children.
Installation of a plasterboard box
To hide the battery under drywall you will need a metal profile or beam, a sheet of drywall and consumables (hardware, putty, primer, sickle and perforated corners). To do this, a sheathing is erected with a hole into which a decorative screen will later be inserted.
Battery under drywall Source i.ytimg.com
At the time of installation of the frame, you must decide on the size of the grille. You can focus on the most popular values: 600 by 1200, 600 by 900, 600 by 600 mm. or the dimensions of your radiator. Already at this stage you need to understand that if taps, threaded connections, temperature sensors or other elements are outside the opening, you will need to disassemble the entire structure to service them.
Having assembled the sub-cladding system, drywall is screwed onto it. The central doorway remains open all this time.
Important! Having attached the gypsum board, check the dimensions of the opening, or better yet, insert the screen into the hole and make sure that it fits tightly in the box and will not fall out at the first touch.
Priming and puttying are carried out depending on what type of finish will be used as a topcoat. An ideal surface is created for painting or thin wallpaper. For decorative plaster, plane differences of 2-3 mm per 1 m2 are allowed.
False wall to disguise the radiator Source gopb.ru
Despite the small amount of work ahead, puttying is carried out in compliance with all the rules:
- A special mesh is applied to the seams - serpyanka.
- The corners are leveled using plastic or galvanized perforated corners.
- Before applying each new layer of putty, the surface is primed and dried.
- Important! Any deviation from the rules may lead to a violation of the integrity of the surface.