/Accessories and decor/Decoration/
When an unsightly heating radiator spoils the interior, there are several ways to solve the problem: replace it with a designer or in-floor model, or simply cover it with a screen/box. The latter method provides several advantages:
- A screen or box not only hides a bulky structure, but often decorates the room.
- The screen/box can be used to build an additional console, a shelf for decoration, a bench, a rack, or a desktop.
- A closed battery is safer for children - there is no risk of burns or accidental impacts. However, one can argue with this argument, because it is in the children's room that heat loss is least needed.
In a children's room, the radiator should be covered with a nice grille with a large number of holes, for example, carved like in this photo
- If the house is too hot and dry, then closing the radiator will help create a comfortable microclimate for household members, their pets and plants.
- The screen prevents dust from settling in the inside of the radiator and thus simplifies cleaning.
There are also disadvantages:
- The heat transfer of a closed battery decreases on average by 10-15% or more (depending on the degree of closure);
- Screens and boxes often make it difficult to service radiators, and sometimes even block access to them.
- Often, improperly closed batteries lead to fogging of windows, and then to the appearance of harmful mold on slopes and walls.
- The screen or box, at least a little, “eats up” the space around the radiator. After all, any elements should be installed at a distance of 5-10 cm from the battery.
- Battery fencing requires additional expense and hassle.
Later in the article we will tell you how to close radiators without compromising the heat in the house and show with an example of 70 photos how to do this beautifully.
Functional purpose of the screen on the battery.
Screens, regardless of their material, are an excellent solution to several problems:
- Protection. Radiators, whether old or new, pose a health hazard to residents. The heated surface of the batteries can cause skin burns, and protruding parts that hit them can cause mechanical damage. In this regard, radiators pose a particular danger to children. Various types of screens for radiators reliably perform protective functions for the health of adults and children.
- Hygienic cleanliness. The complex accordion-shaped batteries have always been a hard-to-reach place where dust and dirt collect. Cleaning near radiators brings a lot of negative emotions, so the screen, protecting the battery from dust particles, will help ease the process.
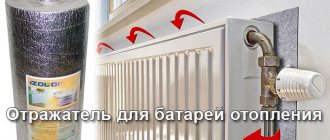
- Improving the convection qualities of radiators. Thanks to the fact that many screens designed for heating systems have cutouts, additional spaces and specially designed elements, it is possible to increase the overall convection of radiators. Often, a reflective screen is placed between the battery and the wall, and when heated, it increases heat transfer.
- Decorative solutions. Most often, screens for a heating system are installed in order to harmonize it with the interior. To hide the radiator and add missing elements to the decor, grilles are chosen of a non-standard type. Today there are an infinite number of options for making screens for radiators, differing in material, shape, decor and design, so there will be no problems with the choice.
✔ Optimize your family budget
Have you made a renovation, but the screen doesn’t suit the updated environment at all? It's time to buy a new model: changing designs at the first desire allows them to be affordable.
Why are our prices so low?
- We ourselves produce screens for batteries, the production of which has been developing since 1995.
- We do not have the markups that competitors have during transportation and wholesale and retail activities.
We offer you to save money by purchasing models with a high quality guarantee.
Advantages and disadvantages
Screens for radiators, as evidenced by the design developments in the photo, create home comfort and can become an important element of style. At the same time, decorative boxes and shields also perform a protective function, protecting radiators from the accumulation of dust and mechanical damage.
Installing a screen on cast iron batteries with high heating temperatures is an important measure to protect against burns. Enclosed niches under windows also reduce the risk of injury, especially in cases where there are children at home.
The choice of materials and designs depends not only on aesthetic taste, but also on requests for ease of maintaining cleanliness and energy saving.
Thus, respectable panels made of natural wood will inevitably lead to heat loss, while complex carved decor will make cleaning difficult. An open top and bottom will help reduce heat loss, but will make cleaning much more difficult.
Perforation is another prerequisite for the manufacture of decorative screens for batteries. Regardless of the material used, the main panel must have through cells that allow air to pass through. Design solutions can be different: lattice, wicker, blinds or cut-out patterns.
Masking box and panel structures are not airtight, and therefore it is important that they are easily removable, providing access to the batteries for cleanliness and emergency situations.
It is also possible to provide covers, as well as side and bottom panels, which can be opened or removed during the heating period in order to increase air circulation.
To reduce heat loss, the inner surface of the screens and the wall adjacent to the battery can be covered with a special rolled material - heat-reflecting polypropylene or aluminum-coated film.
Advantages of convection grilles for window sills
The presence of ventilation grilles for radiators of the heating system, installed in the window sill, has a number of undeniable advantages that ensure an optimal microclimate in the room where they are installed. In addition, the advantages of their presence include the following indicators:
- natural ventilation in the room improves;
- the issue of preventing the formation of condensation in the window opening is resolved.
The advantages of such products can also be considered:
- versatility of the installation method and ease of installation work;
- variety of shapes, designs and colors;
- ease of use and maintenance;
- affordable price for models made of plastic.
Convection grilles can be installed in different ways, depending on the materials of the enclosing structures, the design style of the room and the personal preferences of the user
Types and forms
In addition to different materials, radiator grilles come in different designs. All this together creates a huge number of options.
Flat screens. Most often used if the radiator is installed in a niche. In this case, the flat panel is attached to bars fixed around the perimeter of the niche. In addition, glass screens for batteries also have this shape, but are attached to special pins embedded in the wall. This type of decorative grille for heating radiators is also called “facades”.
Hanging screens. There are two types:
- With top cover. They are usually used on accordion-type batteries if the radiator protrudes beyond the window sill. The shape of the cover is made so that the grille holds onto the radiator without any problems.
- Without cover. Clings to the upper battery collector using hooks that are attached to the front panel.
Grate-box. From a heating point of view, this is far from the best option, since air circulation is difficult. Install if you need to cover the side parts of the radiator. These grilles can be made in the form of some kind of piece of furniture, most often a chest of drawers or a cabinet. If they can stand on their own, without support, they are also called attached.
There are also boxes that require fixing to the wall - they do not have legs. For better heat dissipation, a 3-5 cm wide gap is made under the lid and above the floor in the grille box. It is also a good idea to make a hole in the top lid.
These are only the main types of screens and grilles covering heating radiators. Fantasy is limitless, there are very interesting models, but they are most often made by craftsmen with their own hands.
Purpose of the grille above the radiator
To prevent condensation from forming on the windows, you need to install a grille in the window sill.
Heating grilles in the countertop are designed to combat condensation on the windows. The cause of this problem is the disruption of indoor air circulation and a noticeable increase in humidity levels. If there is a grille, the air heated by the radiators flows through it to the window, then cools near the opening and falls down.
Condensation also forms due to violation of standards, for example, when sealed plastic windows or window sill boards with great depth are installed, completely blocking the radiator.
The problem can be solved by installing a ventilation grille on the window sill and a supply valve for ventilation on the window itself.
Types of decorative screens
According to their design features, screens are distinguished:
- flat, covering only the front part of the battery;
- wall-mounted with or without a lid;
- hanging boxes covering the battery on all sides.
If the battery protrudes above the wall, the best option for it would be a box or a hanging screen without a cover. The latter looks lighter and more relaxed and does not clutter up the space.
Boxes or models with a lid can also be used in an original and practical way in the form of a stand or cabinet, especially in the summer. During the heating season, it is better not to place objects on the lid so that they do not heat up and interfere with the free circulation of warm air.
If the radiator is located in a window sill niche, a flat hinged or mobile panel with legs will do. This design is an excellent decorative option that does not take up usable space.
Screens can be made of different materials - metal, wood, glass, plastic. There are also combined models containing glass and HDF, metal and wood, etc.
Metal screens
Metal gratings are made from steel or aluminum sheets with various perforations, which can be in the form of openwork ornaments and patterns or a regular mesh. A standard metal screen is usually inexpensive, but designs with original stainless steel perforations can cost significant amounts.
Metal grilles have excellent heat dissipation, are easy to clean and can be installed without any hassle. Moreover, such screens are not subject to deformation from prolonged exposure to high temperatures and do not change color.
Metal grilles look great against the background of minimalism, hi-tech, industrial, rustic styles, that is, interiors where there are steel accents.
Drywall
Drywall sheets are used to make a frame, the openings in which are filled with other material: plastic gratings, metal panels, MDF, HDF.
The screen itself is not made from gypsum plasterboard, since in case of leaks the structure will have to be completely destroyed.
Forging
These grilles are beautiful, but too lacy. Forging is often combined with a contrasting background, against which the elements will look brighter. Metal sheets provide better circulation.
Wooden screens
These grids are suitable for any type of battery. They are made from natural wood of various species - from beech or oak to more expensive and valuable varieties. Rattan models are especially popular. Graceful carved designs and the ability to cover the surface of the wood with a varnish and paint substance allow you to create exquisite decorative screens.
The main advantages of wooden structures are environmental safety, naturalness, excellent heat transfer and impeccable appearance. They will fit perfectly into an interior with wooden elements - from classic to avant-garde.
But it must also be said that the price of such gratings is considerable. Wooden screens can become deformed over time and require special care using wood products.
Screens made of HDF, MDF and combined
HDF and MDF are sheet materials of high and medium density. It is made by pressing small wood under the influence of heat and pressure. Such gratings are cheaper than models made of natural wood. Usually the box itself is made from sheets, and the screen is made from rattan or wooden mesh.
It is important to understand here that a dense mesh with a small number of holes will have poor heat transfer, so special attention should be paid to the choice of mesh screen.
Glass screens
Glass screens are rarely found in interiors, although they have high aesthetic capabilities. Such structures are made from tempered glass, the thickness of which is no more than 8 mm. Thanks to special processing, the glass is resistant to scratches and damage, and the rounded corners are absolutely safe.
Most often, glass screens are produced in the form of a single panel. Stained glass models are not cheap; acrylic glass is considered a more budget-friendly option. Such designs are simply impressive with their varied decorative design. All kinds of techniques reveal a wide potential of design possibilities, allowing you to create stunning patterns, designs, textures and stained glass windows.
Glass screens are easy to clean with regular window cleaner. They have good heat transfer, but in some cases in this category they may be inferior to screens made of other materials and with perforations.
Plastic as a screen material
Plastic does not have the same thermal conductivity as aluminum or steel. To increase the strength of the material, you need to increase its thickness, which further increases heat loss.
- Plastic screens are not installed in children's institutions.
- Because when heated, they begin to emit toxic fumes.
- These designs are recommended for non-residential premises and offices.
The big advantage of plastic screens is their resistance to wet environments, resistance to corrosion, and low weight of the structure. The price of such a grill is about 200 rubles.
The grille is selected with a minimum surface area and installed at a distance from the floor, and then it will not only decorate the room, but also preserve the microclimate of the room.
Bamboo and rattan
Completely natural materials are safe, have an unusual appearance, suitable for oriental design style. It is better to order inexpensive products from Chinese online stores.
Pipe decor
If you paint walls, radiators, pipes in the same color, then visually they will merge into one plane. You can use one ornament for decoration, which will allow the latter to get lost in the background. For painting, you can use special stencils (vinyl), which can obtain the desired shape. There are a large number of finishing options: it all depends on the design style. If the interior is made in an oriental style, you can use a bamboo trunk to hide the radiator sections. You need to vertically saw the bamboo trunk, open it, and insert a pipe there. You can wrap the pipes with a beautiful rope - you get an interesting composition.
Photos in the interior of the rooms
There are several ways to hide batteries in the interior; in this section we will look at the most popular and effective ones.
Kitchen
The kitchen is the ideal room in which all ways to hide batteries will become practical and convenient. If the room is small, then you can hide the radiator with the help of a beautiful tabletop or make a folding table, which will fold out when convenient.
Factories of metal-plastic structures offer a large selection of beautiful large-sized window sills that imitate stone, wood and other materials. A modern window sill does not break under weight, is not afraid of external factors, is easy to care for, wipe clean, is not afraid of scratches, and so on. You can hide any type of battery in this way, including cast iron.
In the photo, wooden boxes are used to disguise the radiators.
Hallway
For radiators in hallways, glass screens or wooden boxes are suitable. In a small room, covering the battery is only necessary from a practicality point of view. This could be a locker for storing shoes, or the battery will become a small coffee table where keys and other necessary items will be stored.
Bathroom
You can hide the pipes in the bathroom using a louvered door, plastic grilles or a cabinet with opening doors.
We hide heating radiators using wooden, glass or plastic screens.
In the photo, the radiators in the bathroom are hidden using a wooden box.
Bedroom and children's room
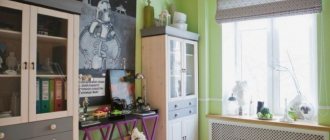
In the interior of a bedroom and children's room, batteries can be used as another place to relax, a tabletop for decorative elements or a workplace.
Living room
If the radiator is in a niche, then a wide window sill will help create a work area.
You can place souvenirs, vases or potted flowers on the constructed wooden box. You can also cover unsightly radiators in the living room with thick curtains.
The photo shows a modern living room. In order to hide the radiators, a wooden structure was installed, which also serves as a place for rest, storage and decoration.
Making a reading place above the radiator by the window
To disguise an unsightly heating radiator, a reading bench is made. It will be a stylish detail in the bedroom. The best option for decorating the battery is to install a special neat grille directly under the window. Thus, the heating element will not be visible at all: instead there will be a neat decorative grille.
The advantage of this design solution is both aesthetic and practical: thanks to the battery under the window sill, you don’t have to worry about a cold seat in winter. The radiator will warm up the place to relax, so you can comfortably spend time with a book in your hands. The grille is selected to match the overall color scheme of the interior. White color will look best.
Instructions for DIY production and installation
Any of the materials considered can be used to make screens yourself. It is necessary to objectively assess your skills, take into account the availability of tools and the availability of components for sale.
Works according to a single algorithm:
- Choose a design based on a photo or sample.
- Measurements are taken of the radiator and installation location: height, width, depth of the niche.
- Make a sketch and, if possible, an accurate drawing of the screen.
- The instrument is being prepared.
- Purchase materials, including consumables (paint, fasteners).
- A frame is made and sheathed with the selected material.
- Finishing is carried out.
- Attach using the chosen method to the wall or floor.
You can inspect the model you like at a construction supermarket and then start making it yourself.
Glass or mirror screen
You will need:
- drill or screwdriver;
- hammer drill for drilling a wall for fasteners;
- glass drill bit.
- a glass cutter and a diamond block, if you are cutting the glass yourself.
Glass or mirror can be ordered according to the required sizes in stores or workshops, and the edges will be processed there. The price of glass (at least 6 mm) with a cut ranges from 1,000 to 2,000 rubles per square meter. Holders will cost from 1,000 rubles. per set. Additionally, holder brackets can be purchased.
They can be of different designs, but must hold the panel in a vertical position.
Self-production algorithm:
- The glass is cut to the required size, taking into account gaps for air circulation.
- Treat the edge with a diamond stone or fine sandpaper.
- Using a crown of the required diameter, drill a hole for the holder. The drill is set to minimum speed, and as you work, the drilling site is watered with water.
- Make markings to install the holders on the wall or floor.
- Drill a hole and attach the brackets.
- Install the glass on the holders.
Before drilling, try to perform the operation on an unnecessary piece of glass. Another no-drilling option involves using prefabricated brackets and nickel-plated posts. All materials can be purchased at any construction supermarket.
The surface can be covered with a tinted film of the same color or with a pattern.
Protective box made of MDF, HDF
Prepared:
- drill (screwdriver), hammer drill or impact drill for concrete walls;
- jigsaw;
- a hacksaw with fine teeth complete with a miter box;
- construction corner, ruler or tape measure;
- a set of screwdrivers of the required configuration;
Buy:
|
|
|
|
|
|
|
|
MDF panels can be replaced with laminate.
Sequence of work:
- Conduct final measurements of the opening.
- Make a drawing.
- The HDF panel is cut and cut to the required dimensions, it is advisable to maintain the symmetry of the pattern.
- Mark and cut off the frame bars.
- Using steel corners, assemble the frame.
- Hangers are attached for further installation.
- The top and sides are covered with MDF panels.
- Secure the perforated panel using self-tapping screws screwed into the corners.
- The box is finished with a decorative corner.
- Mark holes in the wall, drill and screw in screws on which the box will be hung.
- Place the screen in place.
If necessary, the entire structure can be removed in a few seconds.
Some of the purchased MDF screens have sufficient thickness and strength so as not to make a frame; then the panels are connected using furniture corners.
Steel screens are made using similar schemes.
Forged gratings
To work, in addition to the hammer drill, you will need an angle grinder, an arc welding machine, a protective mask and electrodes. Blanks for the grating are purchased at a construction supermarket. The price depends on the part configuration and size.
To obtain the grid:
- The frame is welded from a steel angle or profile pipe.
- Monograms and racks are welded.
- Clean the weld areas with a grinder.
- Paint the finished product.
- Attach the grille to the wall or floor.
Welding cannot be carried out indoors, since the gases released are toxic, and the smell does not disappear from the room for several days. Observe fire safety measures: protect flammable objects and the floor with screens, prepare a supply of water in case of fire.
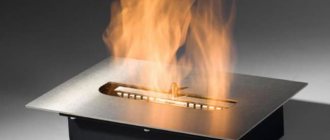
Should I buy a false fireplace or make it myself?
- plywood 9 mm thick;
- wooden layout;
- bars with a cross section of 50 mm;
- self-tapping screws;
- fragment of a garden fence;
- construction glue gun;
- decorative plastic panel depicting brickwork;
- furniture stapler;
- stain;
- polyurethane skirting boards;
- putty;
- fine sandpaper;
- acrylic paint;
- brush;
- long lamp;
- bath stones.
If it happens that there is no putty on the farm, you can replace it with sealant or liquid nails. After these soft materials have dried, you need to smooth the surface using sandpaper.
- drywall;
- metallic profile;
- self-tapping screws;
- drywall knife;
- putty;
- acrylic paint white and golden;
- sealant in a tube;
- construction gun;
- polyurethane skirting boards and glue for them.
- As in the first case, cut a hole in the drywall sheet. Make a base from a metal profile, attach a plasterboard blank to it using self-tapping screws. From the same material, make a rectangular shelf that will become the top of the false fireplace.
- In this part you need to connect the front and top elements by gluing here polyurethane skirting boards in front and two small ones on the sides. These same parts need to be attached between the floor and the sheet of drywall below.
- Put the sealant in the construction gun, feel like a real sculptor, as now you will make various monograms on the top of the fireplace. If something doesn’t work out, remove the excess before the composition hardens. The end of the extruded strip will be straight if you simply trim it with scissors.
- Allow the sealant to dry thoroughly. Now paint the fireplace portal with white acrylic paint in two layers. When it dries, take a thin brush and use it to paint the monograms with golden paint. If you want to decorate the top of the fireplace, you can use a laminate board for this.
- Of course, the battery must also be painted in a suitable color.
- thick sheet of foam rubber;
- thick fabric;
- drywall;
- polyurethane ceiling plinth;
- drywall saw;
- acrylic paints;
- metallic profile;
- self-tapping screws
- Assemble a rectangular base from a metal profile, use self-tapping screws to attach it to the sides of the wall, top to the window sill, and bottom to the floor.
- Now, again using self-tapping screws, you need to attach a sheet of drywall to this metal base; of course, you first need to cut out windows of this size or smaller ones in it. You need to glue the baseboard onto the top of the drywall, and then paint this decorative element with white acrylic paint.
- Cut a sheet of foam rubber to the size of the window sill and sew a cover of thick fabric on it. Insert a zipper on one side so that this part of the mattress can be removed and washed. You can also make rollers from foam rubber. To do this, you need to connect the small edges of the rectangle and roll it up. A pre-sewn cover is placed on top.
https://youtube.com/watch?v=PrYB-QK4a8I
Mounting features
Grilles on heating radiators must be mounted in such a way that you can easily and quickly access heating appliances and pipes. Periodically, at least twice a year, the heating system elements must be cleaned of dirt and dust, so access is necessary.
In addition, emergencies arise from time to time. In this case, a quick reaction is required and there is no time to unscrew the fasteners. Therefore, try to come up with a fastening system that allows you to remove the screen in one motion.
Attached and mounted
The easiest way is with mounted or attached screens. They are removed/retracted in seconds. But flat, covering radiators in niches and box screens that are attached to the wall are the most problematic. But even here everything is solved simply. You can secure the box to the wall using two strips: one on the box, the second on the wall. The whole secret is that the top edge of the planks is beveled (you can see it in the picture).
The one that is nailed to the wall has a slope towards the wall, the one on the frame has a slope towards the grating. When the box is installed in place, it turns out something like a lock.
Another option is to attach metal plates to one of the strips and magnets to the other. Or attach not a wooden plank to the wall, but a metal corner, for example.
In the case of flat screens, the solution may be the same - metal plates and magnets. Another option is hooks and loops. It is easy to implement, but not very convenient to use: while you get into loops, you have to suffer. There is also a difficult-to-install but convenient way: make a screen like a sliding door.
You can take the guides that are sold for furniture doors, install them, and insert the screens into the corresponding grooves. If you do not plan to actively use the niche near the battery, you can not install roller mechanisms, but it will be difficult to move them away. This method, by the way, can also be used for the box lattice. It can then be nailed “tightly” to the wall, and the front wall can be made movable.
Summarize
Such elements are a fairly convenient way to get rid of dampness and fungus on slopes and double-glazed window frames. And the fact that the cost of plastic products is low, and installation is quite simple, only adds confidence in the necessity or simply profitability of their installation.
Sources
- https://ventihome.ru/elementy/reshetki/ventilyacionnaya-reshetka-v-podokonnik-konvekcionnaya-dlya-batarey.html
- https://HomeMyHome.ru/ventilyacionnye-reshjotki-dlya-podokonnikov.html
- https://okna-comfort.ru/ventilyatsia/reshetki
- https://oventilyacii.ru/otoplenie/ventilyatsionnye-reshetki-dlya-batarej.html
- https://seti.guru/ventilyatsionnyie-reshyotki-dlya-podokonnikov
- https://stroy-podskazka.ru/furnitura/podokonniki/ventilyacionnaya-reshetka/
How do you like the article?
Sergey Vladimirovich
Ask a Question
How to close batteries correctly - technical rules and tips.
Before closing the radiator, you need to take into account several technical nuances:
- Keep in mind that the heat transfer of a closed radiator is reduced in any case, no matter what masking method you choose. The main thing is that the change is not significant. Ideally, the decrease in air temperature in the room should be about 1-1.5 degrees.
- Before closing the battery, put it in order: blow it out, wash it (this is done at the end of the heating season) and paint it.
- Keep in mind that the denser the grille weave, the better it masks the radiator, but the worse it conducts heat. Therefore, when choosing a screen for a battery, try to look for a middle ground or rely on heat saving.
- To minimize heat loss, the screen can be placed on legs and a groove can be cut in the center.
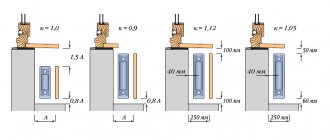
- When closing the battery, it is very important not to block convective air flows, otherwise it will blow in the room and the windows will begin to fog up, which will ultimately lead to the appearance of mold on the walls. Ideally, the window sill visor should protrude no more than 30 mm above the radiator; the top and bottom of the radiator should be as open as possible.
- There should be a distance of at least 35-50 mm between the battery and the screen. There should be a gap of about 60-70 mm from the radiator to the floor and to the window sill.
- To resolve emergency situations, it is necessary to provide free access to the radiator. For example, the box grille can be removable, folding (see photo), opening on hinges or sliding out on profiles.
At a minimum, for trouble-free maintenance, the following must remain in good accessibility: pipe connections, valves, thermal head and threaded connections.
You can increase heat transfer by 20-25% by placing a heat-reflecting screen, for example, fumisol, on the wall behind the radiator. Often this is quite enough to completely compensate for the heat loss of a closed battery.
How to make a plasterboard box to mask radiators - step-by-step instructions
Since such solutions are becoming more and more popular and universal, let us dwell in more detail on the question of how to make a screen from plasterboard with your own hands. To arrange the structure we will need the following materials and tools:
- A sheet of drywall of the required size and thickness (it is better to take no thinner than 10 mm);
- Profile UD and CD;
- Galvanized sheet or foil sheet for thermal insulation of the wall behind the radiator;
- PVA construction glue;
- Screwdriver;
- Self-tapping screws for metal;
- Pencil;
- Stationery or construction knife;
- Metal scissors;
- Fine to medium grit sandpaper;
- Construction level;
- Decorative overhead grille.
Work on installing the box begins with preparatory work. Firstly, we need to treat the plasterboard sheet itself a couple of times with PVA glue - this will make the sheet resistant to moisture and temperature changes, the gypsum will not dry out and crumble. Secondly, you need to take all the necessary measurements and mark the future box on the wall with a pencil.
Build the frame of the future box from a metal profile. Use a building level and a window sill when working so that the structure is not skewed. Cut a screen from a galvanized sheet and secure it behind the radiator - this technique will allow the heat not to escape into the wall, but to direct it inside the room.
Attention! The lower part of the box must be left open for the flow of cold air.
Sew up the sides of the box with plasterboard. In principle, you can stop there if the size of the grille matches the size of the box. But we will also sew the front part around the perimeter. Putty and paint the finished box. You can attach a beautiful radiator grille on top.
You can buy a grille for masking the radiator ready-made, or you can make it yourself from a picture frame or door frames, sawn at an angle of 45 degrees. The center of the decorative grille can be made of non-flammable fabric, rattan or metal mesh.
In general, the appearance of the box depends only on your imagination and financial capabilities.