Of all the benefits of civilization, the only one that it is impossible to do without in a garage or country house during the cold season is heating.
A potbelly stove is indispensable in these cases, since almost any man can make it, and the materials necessary for manufacturing can be easily found at the nearest landfill or scrap metal collection center.
The stove can be made from a used can, from an old metal barrel, or from sheet steel. You can also make a potbelly stove out of brick.
The resulting stove can be heated with almost anything, quickly warming up the room. But, unfortunately, the walls of the stove also cool down quickly if the fire in the firebox has already gone out.
In addition, a metal potbelly stove has several other disadvantages. It is a fire-hazardous structure; it burns out quickly, and if you accidentally touch its red-hot wall, you can get a serious burn.
Calculation of basic parameters (with drawings and dimensions)
High efficiency of a potbelly stove can only be achieved if all the main design parameters are correctly calculated.
Pipe
In this case, the diameter of this element is very important. The throughput of the chimney should be less than the productivity of the furnace firebox, which is the main distinguishing feature of a potbelly stove. This will allow warm air not to immediately leave the stove, but to linger in it and heat the surrounding air.
It is very important to make an accurate calculation for it. The diameter should be 2.7 times the volume of the firebox. In this case, the diameter is determined in millimeters, and the volume of the firebox in liters
For example, the volume of the combustion chamber is 40 liters, which means the chimney diameter should be about 106 mm
In this case, the diameter is determined in millimeters, and the volume of the firebox in liters. For example, the volume of the combustion chamber is 40 liters, which means that the chimney diameter should be about 106 mm.
If the potbelly stove provides for the installation of grates, then the height of the firebox is calculated without taking into account the volume of this part, that is, from the top of the grate.
Screen
It is very important to force the hot gases not to cool, but to burn out completely. In addition, the fuel must burn through partial pyrolysis, which requires extremely high temperatures. A metal screen located on three sides of the stove will help to achieve a similar effect.
It should be placed at a distance of 50–70 mm from the stove walls, due to which most of the heat will return to the stove. This air movement will give the necessary high temperature and protect against fire.
A metal screen located on three sides of the stove will help to achieve a similar effect. It should be placed at a distance of 50–70 mm from the stove walls, due to which most of the heat will return to the stove. This air movement will give the necessary high temperature and protect against fire.
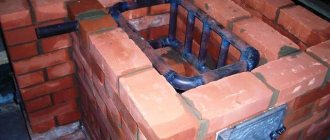
The screen of a potbelly stove made of red brick is capable of accumulating heat
Litter
It definitely has to be there. There are two reasons for this:
- some of the heat is radiated downwards;
- the floor on which the stove stands gets hot, which means there is a risk of fire.
The litter solves these two problems at once. As such, you can use a metal sheet with a projection of 350 mm (ideally 600 mm) beyond the contour of the furnace itself. There are also more modern materials that do an excellent job of this task, for example, a sheet of asbestos or kaolin cardboard, at least 6 mm thick.
You can use an asbestos sheet for bedding under a potbelly stove.
Chimney
Despite all the calculations, gases sometimes escape into the chimney not completely burned out. Therefore, it must be done in a special way. The chimney consists of:
- the vertical part (1–1.2 m), which is recommended to be wrapped in thermal insulation material;
- hog (slightly inclined part or completely horizontal), 2.5–4.5 m long, which should be 1.2 m from the ceiling, which is not protected with heat-resistant materials (1.5 m from the wooden surface), from the floor - by 2.2 m.
The chimney must be vented to the street
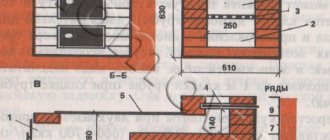
Photo gallery: diagrams of a potbelly stove for a garage
The diagram must indicate all the exact measurements. The chimney must be led out onto the street. The potbelly stove can be round or square. The volume of the firebox depends on the presence of grates. The layout of the potbelly stove depends on the material used.
Plating sequence
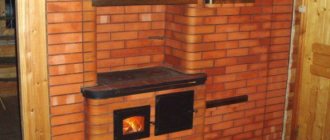
Diagram of an iron stove lined with bricks.
Before covering the stove with bricks. you need to make sure that the floor can withstand such a load. Without a foundation, stoves weighing up to 800 kg can be installed on a wooden floor. Of course, this is provided that the beams and joists are in good condition. A sheet of steel is placed on the floor, a layer of brick is placed on it, and then a stove is installed. If the floor is wooden, then a sheet of asbestos must also be placed under the metal. The steel sheet lining should protrude 30-40 cm in front of the front wall of the stove to prevent hot coals from falling onto the unprotected floor. Metal sheets with an asbestos cement backing also need to be attached to the walls of the room located next to the stove. It is necessary to take into account that a gap must be left between the stove lining and the wall of the room.
There must be a gap of 30-50 mm between the metal wall of the stove and the masonry. This must be done because metal and brick have different temperature coefficients of linear expansion. When heated, metal expands much more than brick, so if you place a potbelly stove closely, without a gap, the stove may collapse. Free space between the metal wall and the brick is also necessary for air convection.
As a rule, they line the stove with 1/2 brick. It makes no sense to make the wall thicker, since it will take too much time and fuel to warm up thick brickwork. Before you start covering the potbelly stove, you need to make markings, taking into account the gap. Mark the outer contour of the furnace. The first row is made continuous. You should try to make the thickness of the mortar between the bricks no more than 0.5 cm. In the second row, 1-2 holes are made on each side of the stove, depending on the size of the stove. The length of the holes is 1/2 of a brick. All subsequent rows are continuous, like the first row.
The front wall of the stove on the firebox side must be lined with ease of use in mind - the door must open and close freely. Here you can show your imagination and perform figured masonry. At the top of the opening above the door you need to lay a metal corner on which the top rows of bricks are laid. The upper part of the stove can be covered at your discretion, since technically it does not play a significant role, performing mainly a decorative function. The top of the oven can be made in the form of a vault or made flat.
After the lining is completed, the mortar in the joints should dry. This will take 1-2 days. After this, the surface of the masonry must be cleaned from excess mortar using a drill with a brush attachment. Then the masonry is washed with a soapy solution and a brush with stiff bristles.
Nowadays there is a large selection of metal stoves of various designs and price categories on sale. Metal stoves are used for heating private houses, temporary structures, at construction sites for heating workers, security guards and other purposes. The use of metal stoves in home baths and saunas is also increasingly gaining popularity, although in this case a brick stove is considered more traditional, but it cannot always be used for a number of reasons. The main advantages of metal stoves are their compactness (since not every room can install a brick oven), ease of installation, fast heating. The main disadvantage is that after stopping the fire, it cools down quite quickly. This drawback can be eliminated by lining a metal stove with bricks. This will greatly extend the heat transfer without increasing the size of the stove too much. If you made a metal stove yourself, then by lining such a stove with brick, you will give your stove a decorative look.
Having basic construction skills, you will be able to line an iron stove with bricks yourself; for this you will need the following materials and tools.
Advantages and disadvantages of a potbelly stove for a garage
A potbelly stove is rightfully considered the most practical way to heat in winter. This is a small structure that is practically portable and can heat any room in size, regardless of the outside temperature and other climatic conditions. This is its main advantage. However, in modern conditions, a potbelly stove is used exclusively for heating outbuildings, for example, a garage. And this comes with a lot of disadvantages:
- the stove cools down quickly, which means that in order to maintain a constant temperature in the room, it must always be burning;
- uneconomical for the same reason;
- is a fire hazard, so when installing it you need to take care to protect the nearby wall and floor.
However, its omnivorous nature allows you to save a little on the purchase of fuel, especially considering the almost 100% efficiency of such a device.
The potbelly stove has a special design, thanks to which it is possible to obtain high efficiency
Schemes of potbelly stoves
The main advantage of a rectangular stove
. unlike oval products made from pipes or gas cylinders, it consists of a larger heated surface area, so its efficiency will be much greater. The optimal size for a potbelly stove is 800x450x450 mm. A stove of this size will not take up much space and will easily fit even in a small room.
The simplest design is the “Gnome” stove, which consists of a box with a pipe welded to it
An important difference between the Loginov stove
is the presence of two plates (
reflectors
) in the upper part of the combustion chamber.
Since the path of gas movement
increases, the heat transfer of such a potbelly stove is significantly higher than that of a conventional metal stove.
Advice
. If you need to reduce the size of the Loginov oven, then it is advisable to change only its width. If the length and height of the structure changes, its efficiency may decrease significantly.
Installation of a stove-stove in a garden house
When installing a potbelly stove, fire safety regulations must be strictly observed, because the body of a steel stove and an uninsulated chimney heats up very noticeably. First of all, it is necessary to ensure minimum distances from the stove elements to the combustible structures of the garden house. If the stove is factory-made, these requirements will be indicated in the instructions, but in any case they should not be lower than those prescribed by the standards:
Protective screens are indicated in red. The screen located near the stove should not be located close to the body. It is necessary to leave an air gap of 3-5 cm to prevent overheating and unimpeded heat transfer into the room
Most modern incarnations of the factory-made potbelly stove are equipped with protective screens with a ventilated gap.
As you can see, if you have a screen made of heat-resistant materials, the potbelly stove can be moved closer to the walls, which will save space in the house. The recommended screen design is asbestos cardboard no thinner than 10 mm, covered with a metal sheet with a thickness of 0.55 mm. Today, ready-made aesthetic screens made of rigid mineral wool board or basalt cardboard and stainless steel are more often used.
Fireproof cutting of the chimney is carried out when it passes through the ceiling and roof. The empty or filled with stone wool space between the pipe and wooden structures is covered with a steel apron
Our readers often ask: “Is it worth covering a potbelly stove with bricks? We answer: under no circumstances. Taking into account the design features, this can lead to overheating and burnout of the chimney. We can only talk about a ventilated protective casing for the side and rear surfaces. If there is a desire to significantly increase the heat capacity and slightly heat transfer of a steel stove, it can actually be connected to a brick heating panel. True, only if there is sufficient traction and space for a relatively bulky brick structure.
A massive heating shield utilizes part of the heat from the exhaust flue gases and accumulates it.
In conclusion, we note that installing a stove and installing a chimney in a house require professionalism and high responsibility. You should undertake such work with your own hands only if you are completely confident in your abilities. Otherwise, it is better to entrust the work to experienced craftsmen who are well versed in fire safety regulations.
Ceiling passage
To allow the sandwich to pass through the ceiling, a rectangular hole was cut to the size of the stainless ceiling cutout. An SML slab 8 mm thick and 60x60 cm in size was laid for cutting. This entire structure was screwed with self-tapping screws to the bars in the ceiling between the floors. In the ceiling around the pipe, insulation with foil two layers thick was laid, the foil was laid towards the sandwich. I taped all the seams with aluminum self-adhesive tape and covered the top with the same LSU sheet measuring 60x60 cm. The roof passage has not yet been laid in any way, because it is planned to redo the roof next year. Masterflash was placed on top and sealed with sealant.
source
What is the best way to heat a garage?
Before building a stove, it is necessary to equip the garage with good ventilation, be sure to take care of fire safety by removing all flammable liquids and materials away from the future potbelly stove, arrange a firewood shed and design the stove structure in such a way that the combustion hole is away from the car.
Is there room for a brick stove?
Metal furnaces are cheap and compact, but due to high temperatures, the steel quickly burns out and the furnace breaks down, requiring repair. In addition, red-hot surfaces cause burns and fires. Another thing is a potbelly stove made of brick. Its advantages:
- This stove takes up much less space and weighs less than any other stone stove.
- Brick accumulates heat better, the room warms up more evenly, and after work is completed it cools down more slowly.
- The stove is energy independent.
- The efficiency of the furnace is higher than that of a similar metal one.
Preparation for masonry
Before starting construction, you need to choose a place for the potbelly stove and take care of fire safety. In order to save garage space, it is preferable to place the stove against the wall. But at the same time, its location should not interfere with the installation of a long chimney that heats the garage space. Otherwise there will be large heat losses. Behind the stove on the wall it is necessary to either attach a thick piece of sheet iron or plaster it with a thick layer.
Foundation
A brick potbelly stove in a garage is installed on a foundation. To do this, dig a small pit. The perimeter of the pit is equal to the perimeter of the furnace, plus 50-70 cm.
To build the foundation you will need:
crushed stone and sand, cement, container for mixing mortar, water, waterproofing material, shovel, building level and tape measure.
When everything is prepared, we begin work
:
- We dig a rectangular hole, half a meter deep.
- Pour a mixture of sand and fine gravel into the bottom, moisten the mixture with water, and compact it.
- We fill in a layer of crushed stone up to 15 cm thick and compact it again.
- Mix a solution of 1 part cement, the same amount of water and three parts sand. Pour the resulting mixture onto a layer of crushed stone, level it and wait a day until it dries completely.
- We cover the hardened cement with several sheets of waterproofing material, which will prevent moisture from the soil from affecting the furnace structure.
Materials and tools for laying the stove:
- fire brick;
- clay, sand, water (the clay solution should not crumble or spread, this must be checked in advance, before starting work);
- Master OK;
- lace (plumb line);
- stove hammer;
- construction level and tape measure;
- metal elements, a hacksaw (or grinder) and a welding machine (sheets of metal and rods from which doors, canopies, valves, and grate will be made).
Conclusion
A potbelly stove lined with brick retains heat longer and allows you to consume less fuel. Masonry significantly increases the aesthetic qualities of a simple stove. If desired, the efficiency of the potbelly stove can be increased by installing a sandwich mesh. It protects the chimney from burning out and accumulates heat. Often the front side and top are left open. This way the stove warms up the room faster, but due to the reduction in brick area, it releases the heat faster. Clay mortar is ideal for stoves, but is demanding on room humidity. If the logs are old, it is better to remove some of them and pour a cement foundation.
People have been wondering how to line a potbelly stove to preserve heat since the time of the revolution. The brick absorbs some of the heat, which is safer to use and reduces the risk of getting burned. You can dry things, fruits and berries on the masonry. A potbelly stove has been helping out in the cold for more than one generation; it never ceases to be in demand and loved by all summer residents. Covering a stove with brick is an affordable and quick way to improve it and keep the house warm. A budget method that does not require special skills.
The grate is in place
- On the fourth row, the combustion chamber and smoke exhaust channels begin to form. The bricks are installed at the end. Stands are installed inside the channels on which the next rows will be laid, since there must be a hole for the smoke to escape. The back wall is laid without mortar.
- Having laid out the fourth row, the combustion chamber door is installed above it. installation is carried out according to the blower type, and the door is also temporarily secured using wire, which is fixed with bricks installed on the sides.
- The fifth row is laid out according to the diagram. All bricks are laid flat, except for those that form smoke exhaust channels with the inner walls.
- On the sixth row, the brick is installed on its end, and this row is the last when the brick is placed in this way. The back wall is laid with bricks installed at the end in two rows.
- The seventh row is placed according to the diagram.
- On the eighth row, the fire door is covered with a masonry of two bricks on top. In this row, a hewn brick is installed on the back wall, which will guide the flame towards the burner.
- On the ninth row, asbestos strips are placed in the place where the hob will be laid, which will ensure a tight seal between the bricks and the metal part. The masonry proceeds according to the diagram.
- On the tenth row, the hob is laid and the formation of the chimney begins.
- On the eleventh row, a valve is installed on the smoke exhaust duct. It is laid on asbestos strips and coated with clay mortar.
Drawing of the metal component of a complex stove
Based on the drawing, all the details of the future stove are drawn on metal sheets, and then they are cut out using a grinder, gas or plasma cutting machine, or welding machine. To transfer the drawing to metal, use a ruler, square, compass and tailor's chalk.
On the sheets you need to place two side walls, a bottom plane, an upper hob, as well as the front and back walls.
The combustion and vent holes are marked and cut out on the front panel. You can also immediately cut out the shape of the legs on all walls.
A round hole is cut in the top panel for installing a chimney pipe.
Design and principle of operation
What is the difference between the Loginov Potbelly stove and other metal stoves? The point is the L-shaped blower. The ash pan door is replaced with pipes welded perpendicularly. The edge of the horizontal pipe is tightly welded, and the edge of the vertical pipe has a thread for a plug. There are holes made on the thread - by screwing the plug you can reduce the air flow, thereby regulating the combustion process.
Loginov's original potbelly stove
It is important to make a plug with a slight play, so that expansion of the metal when heated will not cause problems. A screen is welded to the sides and back on the stiffeners to increase efficiency
Without such screens, it is extremely uncomfortable to be near the stove - the temperature is too high and can cause burns. The firebox door is also threaded. A 200mm pipe serves as the firebox opening, and a plug with a handle 220mm in diameter is screwed onto this pipe.
You can see more details about Loginov’s potbelly stove in this video:
Modification
N. Pyankov’s model is distinguished by the presence of an additional combustion chamber. Unlike more complex designs of slow combustion stoves, the Pyankov potbelly stove is manufactured even faster, the model proposed by Loginov. It is enough to weld steel sheets 140-160 mm long to the back and front walls of the furnace at different distances from the top. The distance between the sheets should be 80mm. The grate is installed 80mm from the bottom. Pyankov moved Loginov’s firebox door to the top of the stove and began using it as a hob.
It will not be difficult for a good master to evaluate all the advantages and disadvantages of the two drawings. If desired, you can make a new model of a potbelly stove using only these two developments, changing the rectangular shape to a round one.
An example of a homemade design (in this photo there is a modernized Pyankov stove), but there is practically no difference in the manufacturing process.
Western European experience
If you type the phrase “garage heating” in the search and look at pictures on English-language sites, you will not find any wood-burning or oil-fired stoves in Western European garages. How do local motorists warm themselves:
- electric portable heaters;
- infrared hanging heaters;
- air heating units (heaters).
We have already discussed the first 2 options above. The third method is also far from new: water heated in the boiler passes through a radiator, blown by a powerful axial fan. Ideally, the unit is suspended from the ceiling and distributes hot air throughout the room.
The advantages of this option are compactness, heating speed and the possibility of air conditioning in the summer (cooled water is sent to the radiator instead of heated water).
Heater made from a car radiator
There is one downside - increased costs for equipment, because the coolant must be heated in the boiler and supplied through pipes to the heater. But if the garage is attached to a private house, then the problem is easily solved by connecting the radiator to the building’s water heating system.
How to make a potbelly stove with your own hands - potbelly stove device
It couldn’t be simpler - this is how you can describe a potbelly stove, the history of which goes back several centuries. To exaggerate, in order to build a primitive potbelly stove yourself, you will need a metal box and a pipe. We weld everything together, load the firewood and enjoy the warmth. Yes, it's not safe. Yes, it is inconvenient and, most importantly, not very effective - that is why a modern potbelly stove has a number of additions.
- As in any other solid fuel stove, grates are installed in it, under which an ash pan is made.
- Like all other stoves, a potbelly stove has doors for loading fuel and removing combustion products.
- A chimney, without which the stove turns into an ordinary fire pit.
- Bulkheads are also built inside, the task of which is to retain the maximum amount of heat inside the room.
You can see what homemade potbelly stoves look like in this short video.
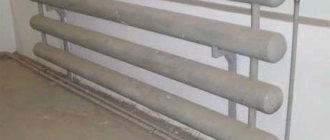
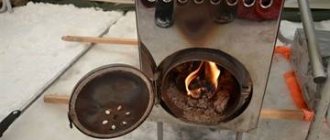
In addition, many modern potbelly stoves for dachas are equipped with convection pipes (they are needed for more efficient heating of the air in the room) and various devices for cooking. Burners on which you can warm tea and, if necessary, fry potatoes with lard and onions.
Types of structures
The above diagram may vary in different furnaces. The most common options are Dutch, Swedish, Russian and bell-shaped.
Dutch
This scheme is called channel serial. Such a stove is very simple to manufacture and its design can easily be adjusted to any room, but its maximum efficiency is only 40%.
Dutch oven
Swedish unit
A very good option for a heating and cooking stove.
Swedish oven
A very successful option for a heating and cooking stove. Its design is called a chamber design. The chamber, the walls of which are washed by hot flue gases, is used as an oven. The duct convector is located behind the stove and occupies the entire space from floor to ceiling. This scheme has a number of advantages:
- Efficiency at 60%;
- in the oven on the side you can install a heat exchanger to heat water, which will be stored in a storage tank on the roof of the oven;
- gases enter the convector relatively cold (they burn out in the chamber part), so for its construction you can use building bricks and ordinary cement-sand mortar;
- a convector with this shape heats the room to its entire height as evenly as possible;
- near the Swedish oven you can quickly warm up and dry yourself if you open the oven door.
Furnaces of this type are difficult to manufacture, require very high quality materials and require a foundation.
Bell furnace
Self-regulating scheme: flue gases enter the chimney only after complete combustion under the hood.
Bell furnace
This mechanism provides an efficiency of over 70%, but this furnace is quite complex to manufacture (the design involves high loads). Yes, and it can only be used for heating.
Russian stove-bed
The design of a Russian stove, like an English fireplace, is called flow-through. It does not have a convector.
Russian stove
The design of a Russian stove, like an English fireplace, is called flow-through. It does not have a convector. The owner of a Russian stove benefits from the following:
- Efficiency reaches 80%;
- the building has an interesting appearance;
- Dishes of our national cuisine that cannot be cooked otherwise than in a Russian oven become available for preparation.
You can fold a Russian stove yourself if you strictly follow the drawings. The slightest deviations can ruin the design.
Step-by-step instructions for making a potbelly stove for your garage with your own hands
We analyze the project of the Kabanchik stove
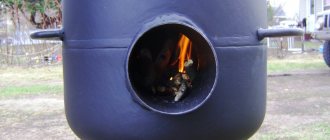
As a working project, we take the option of building a stove from a gas cylinder. The advantage of this “hog” type furnace design is its versatility - instead of a cylinder, you can use a steel can and a piece of pipe.
To work you will need:
- Tape measure, square, marker, chalk;
- Electric welding and electrodes;
- Hammer, chisel;
- Grinder with cutting and cleaning discs;
- Vise.
The basis of the design is a round body made of a 50-liter cylinder. Among other materials you will need:
- Corner 30x30;
- Steel reinforcement with a diameter of 14-16 mm;
- Strip 20 mm wide and 3-4 mm thick;
- Pipe section 100 mm;
Operating procedure:
- The remaining gas and odorant are released from the cylinder;
- Using a gas wrench, unscrew the valve in the neck of the cylinder;
- The container is filled with water and washing powder. The remaining gas and odorant are thoroughly washed away. The procedure is repeated 3-4 times.
- After this, markings are made with a marker on the body of the cutout areas for the segment for the door and vent, for the pipe insert;
- The necessary holes are cut out with a grinder;
- The legs of the future stove and the lintels of the frame are made from the corner;
- The frame and legs are welded, the structure is reinforced with jumpers;
- The doors are additionally reinforced with a strip around the perimeter;
- Door hinges are installed;
- A section of 100 mm pipe is welded at the rear wall;
- A grate made of reinforcement is installed inside the furnace;
After assembling the main structure, the structure is fine-tuned - a shut-off device is installed and adjusted, cuts are made on the chimney pipe, after which the cut is compressed so that it is possible to put a tin plate pipe with a diameter of 100 mm on it. The doors are being adjusted.
Commissioning
Before first use, it is recommended to make a trial firebox with a straight pipe 1.5-2 meters high outdoors. A small amount of fuel will be enough for this. After lighting the fire, when medium-sized wood begins to burn, you can simply close the pipe to determine the places where the tightness is lost. After the furnace has cooled, these places must be further inspected and, if necessary, strengthened.
As a result, the shortcomings will be eliminated and the stove can be installed in its regular place, as well as the rest of the equipment - spark arrester, chimney, deflector.
As you can see, making a potbelly stove for the garage with your own hands is quite simple; you just need a little time and the desire to equip the garage with a reliable source of heat.
Sheet metal potbelly stove
The most efficient stove is a pyrolysis stove, which burns the remaining flammable gases and releases a large amount of heat compared to other stoves. There is no need to think that this will be a complex unit. Making a potbelly stove of this type will take you about 20 minutes longer than a conventional unit without pyrolysis. Let's see how it is produced.
A unit welded from sheet metal with a thickness of 3 to 5 mm. Using thin iron does not make much sense - the stove will be too thin, the heat will bend it, and in the end it will be destroyed by corrosion. So find steel thick enough so that you don't have to make a new furnace every heating season.
We need to cut out seven pieces of metal (our iron thickness is 3 mm):
The main advantage of using sheet metal is that you can make a potbelly stove of any size and volume.
- Two pieces measuring 450x450 mm are the side walls;
- Four pieces measuring 450x250 mm are the front, rear, top and bottom walls;
- One piece measuring 440x240 mm will be the grate;
- Two pieces measuring 244x350 mm will be the internal partitions.
Thus, we will get a Loginov stove, which has two internal partitions to increase efficiency. These same partitions will be responsible for pyrolysis.
We make two doors in the front wall - in accordance with the instructions described above. Next, we weld all the pieces into a metal box without a top lid. The next stage is making the grate. To do this, we take a metal sheet and make many holes in it with a diameter of 10-15 mm. We fix the grate at a height of 80 mm from the bottom of the stove. Next, we weld the partitions, placing them at a height of 60 and 120 mm from the top cover.
We make a couple of small holes on the back surface and weld thin metal tubes (10-15 mm in diameter) into them. They should be located above the lower partition, extending towards the front wall. Their length is about 150 mm - secondary air will be sucked through them. The tubes are welded before securing the second partition.
We prepare the top cover - we cut a hole in it with a diameter of 100 mm for the chimney. If necessary, we supplement the wood-burning stove with a cooking hole. We weld the lid to our stove - everything is ready! Now we install the stove in its regular place and begin testing. And yes, don’t forget to attach legs to it or install it on a non-combustible base (for example, made of brick).
The height of the chimney for potbelly stoves is at least one meter. The optimal indicator is 1.5-2 meters from the horizontal outlet or top cover.
Preparation of the solution
Let's start by preparing the solution. For masonry work we use a special ready-made mixture. Sold in construction stores. It is a yellow-gray powder in 25 kg bags. All that remains is to dilute it with water in the correct ratio and mix. Detailed instructions are always indicated on the packaging; you need to follow them step by step. This solution is the best choice. It has only one drawback - its high price.
You can prepare the mortar for masonry yourself. For this we need clay and sand. First, let's determine the quality of the available clay and the content of impurities in it. We follow the following instructions:
- Roll the clay into a rope. Thickness - 10-15 mm, length - 150-200 cm.
- Take a rolling pin with a diameter of 50 mm and wrap a rope around it.
- The tourniquet should stretch smoothly and break, stretching by about 15-20%.
Expert opinion Pavel Kruglov Stove maker with 25 years of experience
If the rope stretches more, the clay is “fat”; if it breaks earlier, the clay is “skinny.” In the first option, the solution will shrink greatly under the influence of temperature, in the second it will crumble.
The next step is to prepare the sand. First, sift it through a fine sieve. The cell should not exceed 1.5x1.5 mm. Next we follow the instructions:
- using a handle and burlap, we arrange some kind of net;
- pour sand into it and begin to rinse it under running water;
- Rinse until the draining water runs clear.
Thus, we have rid the sand of impurities.
We do the same with clay. Now it should be soaked. To do this, pour the clay into a previously prepared container. Pour water so that the entire surface of the clay is covered. After 24 hours, mix thoroughly. We repeat the process until the clay has a consistency similar to toothpaste.
There is no universal proportion for a solution. Everything is installed by trial and error, depending on the characteristics of the materials used. The main thing is that the solution is convenient to work with.
To increase strength, experts recommend adding a little cement or salt.
Expert opinion Pavel Kruglov Stove maker with 25 years of experience
Here is a basic recipe for masonry mortar:
Take 2 parts of clay. Add one piece of sand to it. Using a construction mixer, mix until smooth and thick. We will need approximately 40 liters of solution.
Brickwork
Simple markings on the floor will help to make the layout evenly, along which the first row will be formed and the rest will be aligned. At the same time, do not forget about the recommendation to leave a gap between the stove and the wall.
Scheme of horizontal arrangement of brickwork for a potbelly stove
Before you start laying bricks on the mortar, you can moisten them in water - this will make the bond more reliable. All work will be reduced to the sequential construction of rows:
According to the intended markings, the first row is laid in half a brick.
The master shows an example of arranging bricks with his own hands
In the second row, gaps the size of half a brick are left, which will serve as ventilation holes.
The gaps between the bricks serve as ventilation
- The masonry is checked using a level. After this, the formation of rows continues.
- When 3-4 rows have been created, you should wipe the inside of the constructed wall with a damp cloth. This will help remove excess solution. This procedure must be repeated every few rows.
Metal potbelly stove with brickwork, where the distance between the stove and the wall is maintained
Since you need to make a potbelly stove out of brick with one open wall, you should think about the shape and width of the opening in advance and lay out the material accordingly. A metal corner can serve as a jumper.
Upon completion of laying out the base, you need to go over the seams with a wet rag one last time and remove all excess mixture. After this, the structure is left to dry for a day. Then, if there are any defects on the walls, they are cleaned.
This is what a diagram of a potbelly stove made entirely of brick might look like. All the main components and order are perfectly shown here.
An even simpler version of the stove
If the previous option seemed complicated to someone (although it is not), we can offer an extremely simplified heating design. You can lay out this oven with your own hands in literally an hour, even if your hands are far from being called golden.
Figure 4. The simplest version of a brick oven
The operating principle of the structure is simple. Solid fuel burns below, and settles here under the influence of its own mass. Temperature changes create a draft that carries hot air currents upward. In this case, the firewood burns almost without a residue - the smoke is minimal.
For masonry you will need only two dozen whole bricks and two halves. The stove consists of five rows. The design is so simple that there is no point in describing the order. The procedure is clearly shown in the illustration.
For those who want an intermediate option, we can recommend a slightly more complicated option.
Figure 9. L-shaped stove
To create this structure you will also need 20-30 bricks. This option can be completed by yourself in a couple of hours, if the skills of a mason are completely absent. A specialist will complete the construction in a matter of minutes.
Advantages of the simplest furnace designs
- very high installation speed – from a day to several minutes;
- does not require a foundation; the stove can be folded anywhere; and if you do not use a binder mixture, the stove comes out collapsible and can be easily moved;
- as fuel - everything that burns: logs, branches, cones, corn stalks, leaves, chipboard, furniture remains, etc.;
- fuel consumption is several times less than, for example, in the case of a potbelly stove;
- the simplest option - without using clay - allows you to get greater heat transfer than from a fire; therefore, such structures are a godsend for those who do not want to constantly maintain a fire while camping;
- almost complete absence of smoke - fuel burns with a minimum of waste;
- the temperature of the bricks reaches 1000 degrees – good heating and fast cooking are guaranteed.