Tell me, there is a Sira battery, there is a valve on the return line - a cap is screwed on top, and under it there is a hole for a hexagon. Question - what size hexagon? At 10 it dangles, at 12 it doesn’t fit. 11mm hex? Or what is the inch size? I can’t find it anywhere in stores, everywhere there’s a maximum of 10. Tell me where to look, preferably in the north of Moscow. And another question, how to open such a valve correctly? Nothing will leak there?
Despite the apparent complexity, repairing and modifying a heating radiator, with the proper skill and suitable tools, does not pose a problem for an experienced “home” craftsman, especially if the apartment has a fairly modern heating system. The most important tool in such work is radiator wrenches. This review examines the types of such keys, as well as the features of making their homemade versions.
Types of work with heating radiators
Currently, many apartments have modern bimetallic or aluminum heating radiators. Such units can be monolithic or sectional. The difference is that in sectional models it is possible to install and dismantle individual standard sections.
Such devices are specially designed to be as easy to disassemble as possible. Therefore, adding/removing individual sections can be done not only for the purpose of repairing and replacing damaged elements, but also to adjust the thermal balance of the room. Adding sections will increase the average temperature in the room, while removing them will decrease it.
Almost all models of old cast iron radiators, installed back in Soviet times, theoretically provide for the possibility of freely removing or adding individual modules. In practice, over many years of operation of such products, the fastening parts, under the influence of many heating/cooling cycles and as a result of reactions with the coolant, “stick” to the radiator and to each other, so it is advisable to remove sections of cast iron radiators only for the purpose of replacing them or completely dismantling them.
Heating radiators can be called the most famous equipment, since almost every person has encountered it. However, not everyone understands what is needed to install such a seemingly simple device and how its component elements work. In particular, we are talking about the radiator cap, which most likely not many people know about.
How to regulate radiators
To understand how temperature regulation occurs, let’s remember how a heating radiator works. It is a labyrinth of pipes with different types of fins to increase heat transfer. Hot water enters the radiator inlet, passing through the labyrinth, it heats the metal. This, in turn, heats the air around it. Due to the fact that modern radiators have specially shaped fins that improve air movement (convection), hot air spreads very quickly. During active heating, there is a noticeable flow of heat from the radiators.
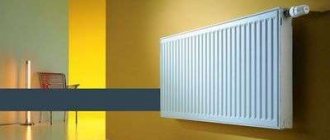
This battery is very hot. In this case, the regulator needs to be installed
From all this it follows that by changing the amount of coolant passing through the battery, you can change the temperature in the room (within certain limits). This is what the corresponding fittings do - control valves and thermostats.
Let's say right away that no regulators can increase heat transfer. They only lower it. If the room is hot, install it; if it’s cold, this is not your option.
How effectively the temperature of the batteries changes depends, firstly, on how the system is designed, whether there is a reserve power of the heating devices, and secondly, on how correctly the regulators themselves are selected and installed. The inertia of the system as a whole, and the heating devices themselves, plays a significant role. For example, aluminum heats up and cools down quickly, while cast iron, which has a large mass, changes temperature very slowly. So there is no point in changing anything with cast iron: it takes too long to wait for the result.
Options for connecting and installing control valves. But to be able to repair the radiator without stopping the system, you need to install a ball valve before the regulator (click on the picture to enlarge its size)
Basic elements for radiator installation
In most cases, radiators are sold assembled; to operate, the device only needs to be fixed on the wall and connected to the heating system. However, in addition to this, you will need to purchase additional devices. These include the following:
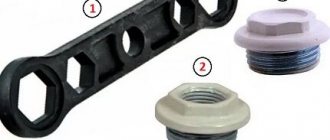
- Pass-through plug for a cast iron radiator in an amount of at least 2 pieces. The device has holes on both sides in which threads are cut.
- Plugs that are screwed into the radiator body to prevent coolant leakage.
- Mayevsky taps for bleeding air from a heating device.
- Devices for installing radiators, these can be metal anchors or special brackets.
The number of radiator sections is determined by the need for thermal energy, so the length of the heating device is increased or shortened.
Modern specialized stores offer radiators and a full set of accessories for their installation. This allows you to select elements of the same color in accordance with the color of the heating device. In addition, in this case it is possible to select the most compatible materials. For example, if the battery is made of cast iron, then the plugs should also be cast iron. It is not recommended to use a plug for a cast iron radiator on copper heating appliances.
Due to the high risk of galvanic corrosion effects, it is very important to consider the combination of materials. In addition, individual metals tend to form a galvanic couple, in this case the cast-iron radiator plug becomes a cathode, and the material from which the pipe is made turns into an anode. As a result, the service life of the heating device is significantly reduced.
4 Heating problems - we control the water temperature in the network
An equally important characteristic of the operation of the heating network is the temperature of the coolant. In two-pipe systems, the optimal temperature characteristics of the hot and cooled coolant is the ratio of 75/50 degrees or 80/60 degrees
To easily regulate the temperature, you will have to install special equipment and elements in the system.
The easiest way is to create mixing nodes in the network. A mandatory element of such units are two- and three-way valves. One pipe of the mixing unit is connected to a pipe with hot water, and the second to a pipe with cold water. The third pipe is installed on the section of the line in which it is necessary to ensure a decrease in the temperature of the liquid, if such a need arises.
To simplify the use of mixing units, they are equipped with temperature sensors and a special thermostatic control unit. The sensor can send a signal about the temperature of the coolant and, based on the temperature level, close or open the mixing valve to regulate the heating. Typically, such equipment is installed in underfloor heating manifolds. To effectively regulate the water temperature in the heating of an apartment building, it is necessary to take into account the temperature regime in the pipes; usually the temperature of the pipes in the apartment does not exceed 45 degrees.
Servo drive is a device whose design includes a drive control unit and a thermostat. To ensure that the temperature in the rooms is always maintained at the same level, you need to set the desired value on the thermostat, and the servo drive will automatically open and close the flow of coolant to the radiator. To reduce repair costs, you can simply purchase a model with only a thermostat. But in this case, the adjustment will not be as accurate.
We control the water temperature in the network
To regulate the temperature in apartments with old heating systems and cast iron radiators, it is necessary to use special thermostats. These devices, however, do not allow changing the pressure in the pipes; for this purpose, specialized means must be used.
Rules for the selection and installation of plugs
The simplest element used when installing and assembling radiators is an aluminum plug for heating radiators. But even the simplest device requires special attention, otherwise big problems may arise during operation.
The process of installing a radiator plug cannot be called complicated, since almost all of them are made of the same type; the dimensions or type of thread may be different. Such devices also work on the same principle.
When choosing a radiator cap, it is important to consider the following points:
- The materials of the radiator and plug must be combined.
- The thread of the plug must be of a certain type. For example, for installation on the left side of the battery, it is recommended to use a left-hand thread, and on the right side, install a radiator plug with a right-hand thread.
- The hole in the radiator can be closed with a blind or through plug.
- The device must have an aesthetic appearance and match the color of the heating device.
- The diameter of the threads in a cast iron battery at the inlet and outlet is of great importance; plugs can be used as transition elements.
Most often, the battery is equipped with the following devices:
- Pass-through plugs for radiators in the amount of 4 pieces.
- Brackets for installing the heating device and plastic anchors for installing the fasteners themselves. For a standard size radiator, 2 brackets and anchors are required.
- Mayevsky plug and tap. Sometimes the second element is replaced with another plug.
According to the principle of operation, plugs are divided into two types. In the first case, they simply block the path of the coolant, in other words, they act as a plug. The second type is an adapter from one diameter to another. In this case, the plug has an external thread on one side and an internal thread on the other.
Dismantling an old radiator
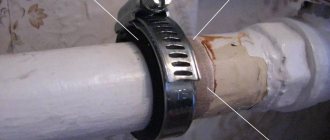
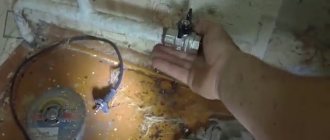
In the case of old batteries, some problems may arise - for example, the threads in such devices may become stuck, so before disassembling they will need to be heated with a blowtorch or autogen. When the joints are heated, you need to quickly tear off the nipples on both sides of the battery. Using the same method, any elements stuck to the battery are removed.
After prolonged use of the battery, the nipple may completely rust. In this case, it will be impossible to hook it with a key, so to disassemble the battery you will need a hacksaw or grinder. The remains of the nipples are unscrewed from their places, and the threads are cleaned with a brush.
If none of the described methods helps, the last resort option is to smash the battery with a sledgehammer. Before breaking a cast iron battery, it must be placed on a horizontal surface and hit along the center line with a sledgehammer until part of the section falls off. After this, the battery must be turned over and the operation repeated to break the entire section.
All that remains is to place the radiator vertically, apply several blows to the surviving sections and untwist them. Of course, in this case there is no need to talk about the integrity of the entire radiator - in most cases, half of the sections are lost.
The process of installing a plug
Before installing the plug for the aluminum radiator, you should securely fix the heater to the wall.
In general, you can follow the following instructions:
- First, individual sections are assembled into a single heating device; the number of sections is selected individually for each case. When connecting elements, use FUM tape, which allows you to achieve maximum tightness.
- Next, choose the place where the radiator will be located; most often they are installed under the window. It is very important to adhere to the recommended distances from the wall, floor and window sill.
- Then holes are made in the wall using special tools, plastic anchors are hammered into them and metal brackets are screwed in. A radiator is hung on them.
- Now you can install plugs for bimetallic radiators, especially since there is no difficulty in this process. Their body is made in the shape of a hexagon, which allows you to use any key for tightening. Do not overtighten the plug to avoid damaging the threads or body. During the twisting process, an invisible microcrack may form, into which water under pressure can leak. In addition, repairing batteries in winter is no fun for anyone.
- After the plugs are installed, you can connect the incoming and outgoing pipelines. At the same time, the Mayevsky valve is installed in the upper hole of the radiator, and the lower hole is closed with a plug. It is worth noting that the air vent device is inexpensive, and heating efficiency increases significantly. To make it easier for air to leave the system, heating devices are installed with a slight slope of a few degrees.
- Test heating devices and connections. For this purpose, liquid is poured into the system and problem areas are examined.
How to assemble an aluminum radiator
We assemble in reverse order. We place the sections on a flat surface (a suitable sized table or simply place it on the floor). If the radiator is not new, unscrew the end cap and Mayevsky tap.
Before installation, you should carefully examine the threads and grooves; they must be of high quality, without chips or changes. On the mounted section for testing, we “drive” the thread by screwing in and unscrewing the nipple
Here you need to pay attention to the fact that there may be a gasket under the layer of factory paint in front of the thread. Lightly rub the end with fine sandpaper; if it is found there, it must be carefully cut off with a knife with a sharp blade.
This is what an aluminum radiator looks like in cross section
Before adding sections of the heating radiator, be sure to clean the ends to a smooth surface. We even remove factory paint. It is not needed at the ends of radiators, but will only contribute to the early appearance of leaks. Sooner or later, coolant will begin to seep under the paint. In the case of non-freezing liquids, this will happen very quickly; if water is used in the system, then not very much, but it will definitely happen. And then coolant will begin to leak between the sections, although the gaskets are still in perfect condition. The whole point is that the paint on the ends has peeled off or been corroded, and microcracks have appeared. So we make sure to clean the ends to bare metal, but use fine sandpaper so that the surface of the metal is smooth and without scratches. This guarantees the operation of the system without leaks in the radiators.
For better tightness, the ends then need to be degreased (using gasoline). Gaskets are also degreased, but they need to be washed with ordinary soapy water. For a system that will be filled with water, degreasing is an optional procedure, but for systems that will run on antifreeze it is necessary. Antifreezes have high fluidity and seep into the smallest pores. After everything is dry, we begin to assemble the aluminum radiators.
Then tighten both nipple nuts half a turn. Heat-resistant paronite (silicone) gaskets are placed on top of the nipple to seal the joints. Now we take the section that needs to be screwed and place it tightly against the nuts, checking the tightness of their fit. Next, insert the key into the upper hole and tighten it 1-2 turns. At the same time, we do not use the lever yet. We twist our hands. Then we perform the same operation in the lower hole. We repeat several times, alternately tightening both nuts several turns.
We unscrew the sections gradually, one or two turns of the nut, either from below or from above.
Tighten as much as you can. Only after tightening by hand can the lever be used. This must be done in two stages on each nipple. It is better not to use excessive force when final tightening the nipples, since you can easily break the threads: aluminum is a soft metal, don’t forget.
If the section is completely assembled, screw a plug onto the unused holes on one side, and a Mayevsky valve on the other (to bleed air from the system). Now you know how to assemble sections of a heating radiator and, if necessary, you can add several sections.
General recommendations
Experienced craftsmen and professionals recommend taking into account the following points:
- When using a cast iron radiator plug on heating appliances, caution should be exercised. The fact is that cast iron is easily compressible, but is considered a rather fragile material. Therefore, even a slight mechanical impact or impact on a hard surface can cause the formation of microcracks. As for steel products, they are more reliable in this regard.
- When studying materials for the assembly and installation of heating devices, there are recommendations for using ordinary paint for more airtight connections. To some extent, these statements are true, but it should be noted that such connections do not have a very attractive appearance, and when disassembling them you may encounter certain difficulties. It is important to understand that modern heating devices and their additional accessories do not require painting.
Selecting and installing radiator plugs is not difficult, but you need to approach this process quite responsibly. It is very important to select matching materials, correctly determine the type of thread and size of the plug, as well as its purpose. By following the recommendations of professional technicians, you can avoid many problems during the operation of the heating system, including batteries and radiators.
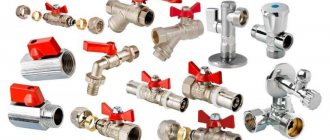
Modern taps for heating radiators are an indispensable part, without which normal operation of the battery is impossible. There are a large number of different models from Russian and foreign manufacturers on the market, so making a choice is not so easy. It is worth knowing in advance the operating principle of a standard crane, studying the available varieties and models, and understanding their functionality and mechanism.
Radiator tap function
Most modern radiators are able to perform their basic functions without the use of additional elements. But there are situations in which a radiator tap for heating is simply irreplaceable. This happens when you need to install, remove or replace the battery, check its performance, test it after installation, or carry out other work. The control mixer helps to partially shut off the heat supply during flushing or preventive diagnostics of various system elements. This allows you to significantly reduce the time spent on repair work, since you will not need to completely drain the water in the entire heating system.
The faucet also makes it possible to stop the battery in one room if that room does not need to be heated for a certain period. Using the device, you can regulate the heat supply automatically or manually, remove air pockets from the batteries, due to which the system will not function normally. Standard and ball valves for heating are necessary to regulate the temperature in the room. For example, if the heating in the central system has not yet been turned off in the spring, it will be impossible to change the temperature of the radiator without the help of a valve.
What else you should know
If you are wondering how to turn off the battery if there is no tap, then there is a solution here too. True, the option of blocking the riser is inevitable here. In this case, not only the individual battery will be blocked, but also part of the heating system. In small cities, the practice of turning off the heating independently is often used, just by shutting off the riser. It is turned off using a valve in the basement. At that point he approaches the sun lounger. Water valves are usually within sight.
You can find out which fittings are suitable for shutting off the heating in the technical documentation. Additionally, this should be known to an experienced plumber who is familiar with local utilities. In most cases, the heating system is shut off using a brass valve or a valve.
In the event that the window sill blocks the battery, there is no single solution. It all depends on the degree of overlap. So, for example, if the window sill completely blocked the battery, then this is considered unacceptable. This is explained by the concept of convection, in which warm air rises. There it replaces cold air, which goes down, after which it is heated by the battery. Thus, the room is heated. If the window sill completely blocks the radiator, then the convection process is hampered and the room does not warm up well. But there will definitely be a way out of this situation. You can make several rectangular holes in the window sill and cover them with decorative grilles.
The main thing is to do everything thoughtfully and strictly in accordance with all standards and requirements. Do not close both taps at the end of the heating season, this may cause deformation and cracks in them. Do not forget about the basic rules that will help you shut off the battery in your apartment safely and correctly.
Types of valves
Radiator taps for heating are divided into several types depending on the structure and principle of operation. They can be installed on radiators in private and apartment buildings, focusing on the type of specific batteries and the heating system as a whole. On sale you can find angle and straight valves with a ball or half-turn mechanism, made of brass, bronze or polypropylene with metal inserts. Experts most often use valves for balancing, devices for releasing air manually or automatically, as well as simple taps of a standard type.
Air
Air valves or Mayevsky taps are used to eliminate air from the heating system, which enters it with water and reduces heating efficiency. Since air usually accumulates at the top point, the valve is installed on top of the radiator. Such devices have low throughput, so they are usually mounted on modern radiators of the latest generation, made of steel or aluminum. Products of this type are easy to install and open using a screwdriver or special keys. The most convenient mechanisms are those that require a screwdriver.
A good air valve should be easy to turn counterclockwise because the air in the system needs to be vented periodically. The presence of air inside the pipes can be determined by a characteristic hissing sound. When it stops, the tap is closed. When connecting the pump, be sure to turn it off before bleeding the air.
Angular
The corner valve for radiators is of the balancing type. It closes and opens with one turn, moving a few millimeters, which makes it easy to fix it in the desired position.
An angle-type shut-off valve is installed at the outlet of the radiator, suitable for two-pipe and single-pipe heating systems. Made taking into account the design features of standard radiators and helps to carry out various operations during installation and repair work. When installing such cranes, it is imperative to use American valves and other necessary tools.
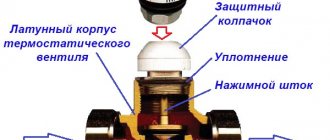
With adjustment
Adjustable valves help control the flow of water and change the temperature in the room, maintaining it at the optimal level. The thermostatic valve is a simple siphon, inside of which there is a container with gas or liquid. When the temperature rises, the gas or liquid begins to expand and puts pressure on the rod. Then it lowers and blocks the access of water inside the radiator. As the temperature decreases, the rod will begin to rise, which will provoke an increase in the flow of water in the battery. Gas-type models respond to temperature changes faster, and they do not differ much in cost from standard water valves.
Ball
The ball-type radiator valve received this name due to its mechanism, which is a small ball with a hole. The valve can be in two positions: closed and open. When the device is rotated 90 degrees, the heat supply through the pipes stops. Ball valves are considered the most popular and are made from various materials, most often brass, bronze, steel or polypropylene. They have an angular or straight design, differ in throughput - it can be standard or semi-through. To increase operating efficiency, semi-bore control valves are selected and mounted on radiators using a nut or an American nut.
The need for heating
The need to heat your own home has always existed, but the ways to achieve this goal were very different. For hundreds of years, classic Russian stoves were used in Russia, and a little later fireplaces appeared. Traditional heating structures have been replaced by modern devices and heat supply systems, which are superior in quality and efficiency to their predecessors.
Currently, the heating system is a structure that usually consists of the following main elements:
- heating boiler;
- pipeline;
- heating appliances.
There is a coolant inside the heating system. In most cases, water is used to heat private households, since in case of leakage it does not pose a danger to people and the environment from an environmental point of view. Of all types of liquid coolants, it is water that accumulates heat best and, when cooled, releases it.
In addition, it flows well and moves almost instantly within the elements of the system. Water is always available in the water pipes and can be added to the heating structure at any time.
The functioning of the system consists of moving hot coolant through it using a circulation pump. The water is first heated in the boiler and then distributed through pipes from which it flows into the radiators.
Faucet locking mechanism
The tap for the heating system has a standard locking mechanism, the structure of which depends on its type. The operation of the device is controlled using a special handle or knob on the valve itself. The handle powers the crane and helps move it around its axis. If you turn the valve towards the pipes or the inlet of the pipeline, the flow of coolant will be stopped. Typically, the valve is opened to provide maximum fluid flow to provide heat to the room. The tap can be adjusted and set to the desired level by turning it counterclockwise. For convenience, the device has special protrusions that indicate the level of restriction when opening it.
Tips for choosing a battery valve
To choose a standard or air valve for radiators, first of all pay attention to the conditions in which the radiators will be operated. If we are talking about a room with a central water supply, install brass or steel valves. In the presence of low-quality water, simple taps quickly become clogged and fail; their use causes many problems. In private houses with autonomous heating, it is better to install thermostatic valves; they help to significantly save costs on thermal energy.
For apartment buildings with individual boiler rooms, it is worth choosing high-quality ball valves that can withstand temperatures up to 200 degrees and pressures in the range of 16-40 Bar. The best option would be valves from trusted manufacturers - Bugatti, Oventrop, Danfoss and Far - resistant to various damages and corrosion. You can find out what a certain type of tap should be called from a specialist. It must be taken into account that all taps are capable of reducing the flow of water, this can lead to a decrease in heating temperature. In the absence of sufficient thermal energy, the flow is turned off using a valve.
Ball valves are divided into several types. Depending on the throughput, they can be full bore, standard or part bore. In the first case, the valves allow 90-100% of the total coolant flow to pass through, in the second case no more than 70-80%, in the third – 40-50%. The ideal option for installation would be full-bore options, since the coolant circulates as freely as possible in them. Based on the type and method of installation, valves are divided into coupling, welded, combined and flanged. Coupling options are suitable for gas and water pipelines, and are also used when installing heating systems.
They can be installed in residential premises and industrial buildings. These are standard and compact devices, simple and reliable in operation. Flange options are more suitable for large diameter pipelines. When installing them, sealing gaskets are used to improve the tightness and strength of the connections between the pipeline and the tap. Welded structures are installed by welding; for combined ones, several installation options are used. Combined valves are divided into straight-through, angle and multi-way valves; their type is selected taking into account the specific system.
To avoid problems during operation, taps must be installed on each radiator. Their selection and installation is approached as responsibly as possible, only in this case they will last a long time.
Purpose. Characteristic
Taps ensure efficient operation of water pipes. The heating system cannot operate without these devices, and in some situations, using it without them becomes downright dangerous.
When the riser leaks, it is the shut-off valves that shut off the water, which makes it possible to make repairs without stopping the entire system
An important function will also be managing the heat dissipation of the battery.
The minimum set for the normal functioning of a conventional heating system consists of several types of shut-off and control valves. When connecting to the radiator, shut-off ball valves are mounted on the supply pipes, on the outlet and on the bypass. A mechanism is installed on the supply to adjust the coolant pressure. The radiator itself must be equipped with a Mayevsky tap. to bleed air. As you can see, the number of such products is significant and this is by no means an excessive option.
Taken together, this system allows:
- turn off the radiator without shutting off the entire circuit for repair, replacement, or maintenance;
- direct all coolant through the heater with the bypass turned off;
- control the pressure power through the radiator to reduce or increase the temperature;
- drain water, bleed air;
- protect the system from hydraulic shocks and breakdowns;
- regulate the efficiency and level of heat supply, which saves heating costs.
Requirements
The criteria for the variety of types of taps placed on heating radiators are: design, principle of operation and material
It is important to know that mechanisms of this type are divided into shut-off and control valves. What are the best taps to install? It must be taken into account that they have a rather complex structure and must meet a number of requirements in order to function in difficult conditions
- coolant temperature up to 200°C;
- must withstand pressure of 16–40 bar;
- high corrosion resistance;
- resistance to mechanical loads.
For heating systems, such mechanisms are made more stable. Conventional taps and valves for cold water cannot be installed in heating radiators.
Each connection has its own characteristics: there are regular and corner (for the bottom connection) taps. This division allows you to maximize the distribution of pipes when installing a heating system. The design features of the valves allow you to hide the pipes behind the decor, in a screed, or to mount radiators in a small space under a window opening.
In everyday life, the general name is used - “faucets”. But from a technical point of view it is correct to distinguish:
Heating systems also use thermostats; it is not recommended to use dampers or valves in radiators - they quickly become inoperable. If shut-off valves are needed, then ball valves are the best for this. They have only two positions - closed/open. Valves with a cone are designed to control the pressure manually. There are also mechanisms for automatic adjustment - these are thermostats with valves or cones.
Self-installation
Before starting work, it is necessary to remove the coolant from the heating system. Owners of private houses can do this without much effort; in an apartment, the procedure will have to be agreed upon with the management company. The tap must be placed in front of the battery and behind a special jumper connecting the inlet and outlet of the coolant, so as not to interrupt the circulation process. When installing, you need to remember that there are no obstacles for the adjustment knob, which must turn freely in any position, as well as free access to the tap for any user.
Before installation you will need:
- select a suitable site for installation;
- apply a sealant, for example, FUM tape, to the tap thread;
- screw on the tap;
- Check all connection areas for leaks.
Before purchasing a faucet, you need to check that its diameter matches the diameter of the pipe, and also check the type of thread. If the tap is placed on a pipe with an open thread, the tape is wound clockwise. If the tape is enough to screw the threads, you need to apply some force. After completion of the work, small sections of the sealant may remain at the joints; this is a normal condition characteristic of high-quality sealing.
If the tap turns too easily, the sealant layer is too thin. In such a situation, add an additional amount of FUM tape and screw the tap tightly to the tube.
After completing the work, be sure to check the connection and fill the system with water if there is high pressure. If this rule is not followed, improper sealing can cause flooding of the room. Most often this happens in apartment buildings, where heating systems fill with water without warning and usually on weekdays.
The number of taps depends on the type of radiator and the needs of the room owners. A separate valve must be installed on each battery to control its operation.
The faucet helps to quickly install and maintain the radiator, change its temperature and carry out other manipulations, spending much less time on them. This is an irreplaceable part, without which the full operation of a modern radiator battery is impossible.
It would seem that nothing could be easier - to select and install taps for heating radiators in a private house or apartment. But the range of radiator fittings presented in the retail chain is unexpectedly wide, which confuses the average person who does not understand the issues of water heating. Hence the purpose of this article - to help people figure out which taps should be installed on batteries and why they are used in heating systems of various types.
Adjusting heating flow or return
In some cases, hydraulic balancing—adjustment of flow and return—will help to effectively redistribute heat throughout the heating system. In this case, the coolant is directed from places of its excess to areas experiencing a deficiency.
In apartment buildings, the procedure is carried out in accordance with the state energy saving program. In a private cottage, this is the task of the owner himself. In addition to equalizing the temperature on all branches of the system, hydraulic balancing helps reduce energy consumption and, consequently, heating costs.
The work is performed by qualified specialists. In pipes with a length of 10 meters or more, and in areas remote from the circulation pump, balancing valves are installed. It is possible to divide the system into autonomous modules with individual settings, which is appropriate for obtaining different heat transfer in each room.
Why are there taps on radiators?
Each heating device is a separate element of the system that requires adjustment and periodic maintenance. If you control the coolant flow through the batteries depending on the heat demand, you can achieve good results in terms of energy savings. That is, radiator valves and heating taps are designed to solve the following problems:
- Complete isolation of the heating device from the system.
- Restriction of coolant flow through the battery.
- Change in coolant flow depending on external conditions.
- Bleeding air from the radiator and piping network.
There are many situations in which it is difficult to do without disconnecting the battery. For example, properly working central heating in the middle of spring, when it’s already warm outside, but it’s just hot in the apartment. Another case is the need to remove a heating device for the purpose of replacement, flushing or repair. In the absence of shut-off valves, carrying out any action with the radiator becomes problematic.
Why do you need to make adjustments?
Setting the optimal temperature of the heating radiators allows you to create the most comfortable living conditions indoors. In addition, adjustment allows:
It is advisable to set up heating and adjust batteries before the start of the heating season. This is necessary so that later you do not experience discomfort in the apartment and do not adjust the heating temperature of the batteries in emergency mode. Before setting up and adjusting the radiators, initially in the summer you need to thermally insulate all windows. In addition, you need to take into account the specific location of the apartment:
After analyzing the situation, it is advisable to use energy-saving technologies to maximize heat conservation inside the apartment:
Without this work, it will be useless to regulate the temperature of the radiators, since the lion's share of the heat will heat the street.
Installation of ball valves on batteries
A conventional ball valve is designed only to switch to 2 positions: “open” and “closed”. It cannot be used to regulate the flow of coolant through the radiator, only shut it off. The figure below shows a simple connection diagram for a heating device with this type of fittings:
The proposed scheme is the best option for an unregulated connection of a radiator to the central heating risers in an apartment. You won’t have to balance it anyway, and installing a thermostatic valve is pointless due to the poor quality of the coolant. Instead of a ball valve at the outlet, it is also practiced to install a so-called shut-off valve; its difference is only in appearance.
Depending on the layout of appliances and heating pipes, you can choose an angle valve for a radiator with or without a decorative coating. Also, when choosing a product, it is recommended to pay attention to the operating pressure indicated on the product body or in its passport. It must correspond to the pressure in the heating network of the apartment building.
Advice. For installation on the radiator, choose good taps made of thick-walled brass and a connection with an American union nut. It will allow you to quickly disconnect the connections without rotating the elements. On a single-pipe riser, do not forget to install the bypass with a slight offset away from the main pipe.
Features of installation and maintenance of regulators
Thermostat installation diagram
After choosing the optimal model of thermostat or tap for regulating the heating temperature, you should install them correctly. The location of the fittings directly depends on its function and design.
Most often, the adjustment components are mounted in the trim of a specific heating radiator. They are installed on the supply pipe or on the bypass. In order to comfortably adjust the temperature of the radiators, it is recommended to adhere to the following rules:
- The device should not be covered with decorative panels or other interior items;
- The service life of thermostats largely depends on the quality of the coolant. Therefore, a mesh filter should be installed in front of it, which will protect the valve seat from limescale;
- When installing the heating temperature control valve, you must follow the installation diagram. On the body of the device, arrows indicate the direction of movement of the coolant;
- Many thermostats and servos are connected to the electrical network. Therefore, it is necessary to provide power supply to them.
Before installing and further adjusting heating batteries in an apartment, you must read the manufacturer's instructions. It specifies the installation conditions for the operation of a specific adjusting element.
One of the important indicators of apartment heating control valves is the maximum and minimum throughput. They must match the current system parameters.
Maintenance of regulators and valves
Pressure testing is carried out only after installing the control valves
After installation, preliminary adjustment of the taps on the heating radiators should be carried out. To do this, the operating temperature and pressure in the system must be normal. Then, by changing the degree of heating of the coolant, the operation of the control valves is checked. The system is tested in several modes. Alas, it will not be possible to independently adjust the heating in an apartment building using this scheme, since consumers do not have the opportunity to change the degree of heating of the coolant.
In fact, it is possible to check the performance of a specific element only when starting up the central heating supply. Those. Correct adjustment of heating radiators in the apartment is carried out during the heating season.
During the startup of the heating system, the heating system of a private house must be fully adjusted. It should include the following steps:
- Checking the functionality of taps and thermostats;
- Compliance of their actual parameters with passport data;
- If, during the control adjustment of the degree of heating of the heating batteries, a faulty element is detected, it must be replaced.
In addition, you need to remember that the operation of the system is influenced by a number of external factors: the degree of thermal insulation of the house, the climatic features of a particular region. This should also be taken into account when adjusting the temperature of the heating radiator.
The video shows an example of organizing the adjustment of heating radiators in a house:
Balancing valve
The design of a valve for regulating heating differs from a conventional ball valve in that it can smoothly close the flow area in a few turns. Moreover, after balancing, the position of the valve can be fixed so that no one accidentally violates the settings. This type of control valves is installed at the outlet of the radiator, as shown in the diagram:
Shown here is the connection to a two-pipe horizontal system, most common in private houses and apartments with individual heating. By the way, the principle of installing fittings with a single-pipe scheme remains the same. A regular ball valve is installed on the supply line, and an adjustment valve is installed on the return line. In the case when a two-story house has a system with vertical risers, the installation diagram of the accompanying fittings looks like this:
The principle of product selection is the same as in the previous section. Straight or angular design is accepted depending on the layout of the equipment and pipelines; it is also important to use American ones during assembly. Pay special attention to the quality of casting and the thickness of the brass walls of the fittings. If you have networks made of polypropylene pipes, do not rush to buy PPR taps; it is better to install adapters and reliable metal products.
Advice. Balancing valves are installed on all radiators, except for the very last one, located at the dead end of the branch. It is enough to install simple ball valves on the connections to it.
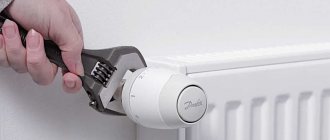
Using valves with thermal heads
These are the best taps that can be installed on radiators in the heating system of a private home. Tuned to a certain air temperature, the thermal head acts on the valve stem, forcing it to open or close its flow area. In this way, automatic quantitative regulation of the coolant passing through the heating device occurs.
The thermostatic valve is installed on the supply line to the battery, and a balancing valve is installed on the return line. It is a mistake to assume that the system will be automatically balanced by thermal heads; valves are needed in any case. Installation of conventional ball valves instead of them is allowed for centralized heating or in systems with associated coolant movement (Tichelman loop). But it is unacceptable to regulate the coolant flow using a ball valve, and it will not work.
Advice. Most models of thermal valves have a mechanical blocking mode for the flow area. If you received products without such a mode, then to service the battery you will have to install an additional cut-off device, as shown in the diagram:
How to adjust (reconfigure)
All thermostats are factory adjusted. But their settings are standard and may not match your desired parameters. If you are not satisfied with something in the work - you want it to be warmer/colder, you can reconfigure the thermostat for the heating radiator. This must be done with the heating running. You will need a thermometer. You hang it at the point where you will control the state of the atmosphere.
Adjusting the thermostat for a radiator is not difficult at all. And you can repeat this action several times, changing the settings.
Air valves and radiator fittings
Almost all modern radiators provide the possibility of installing Mayevsky manual valves for air discharge. Some manufacturers even complete their products with them. If desired, instead of a manual air vent, you can install an automatic one, but in practice it does not look very presentable.
Recently, laying heating lines below floor level and using radiators with bottom connections has become increasingly popular. Then there remains a small gap between the battery and the floor, where it is not always possible to place any fittings. For this case, there is a special connection headset with built-in taps, shown in the picture (left):
On the right is a headset for the bottom connection of a conventional radiator with side plugs; it also has valves plus the ability to connect a thermal head. Such solutions look very aesthetically pleasing, but will require maximum financial costs. More information about the headset is shown in the video: