Selection of heating radiators by area is a common method for calculating heating devices. Despite the imperfection of the method, it allows one to fairly reliably determine the required thermal power of the batteries. We want to figure out how to choose the right heating radiator according to the area of the heated room.
We determine how to calculate the radiator area for effective heating.
What is needed to calculate sections
When producing radiators, manufacturers initially calculate the power of the devices and the optimal indicator per 1 m2. For example, the norm is 100 W to heat 1 square meter of a room with a ceiling height of (up to) 3 m. But these are very approximate values, since the difference in ceilings in different rooms and possible heat loss are not taken into account. Sometimes errors without taking these factors into account reach 50%.
Thus, before calculating sections, you need to consider the following:
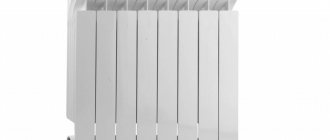
- Power of 1 radiator section. For example, the heat transfer of an aluminum battery with an interaxial distance of 500 mm will be 185 W.
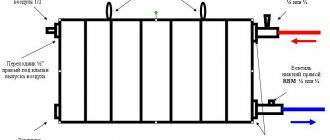
- Coolant temperature. If you are selecting a heating radiator for an autonomous system in a private home, you can take your own measurements. In the case of a centralized heating system, you can also take measurements or check the data with the management company.
- Ceiling height. It is logical that the higher they are, the greater the power should be. It is recommended to use correction factors for calculating sections. For example, if the ceiling is 3 meters, multiply the results obtained when calculating by 1.05. At a height of 3.5 the coefficient will be 1.1. And so on. Let's look at the coefficients in more detail a little further.
Painting area of cast iron radiators: how to calculate paint consumption
Heating radiators that have served for a long period require revision. If repairs have been made, then it is quite possible that the appearance of the structure needs to be slightly refreshed, that is, painted. To do this, you need to know the paint area of cast iron radiators. High-quality heat-resistant paint is not cheap, so by calculating its consumption, it is easier to save on repairs.
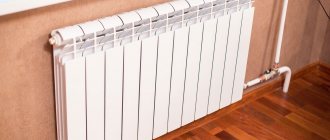
A restored and repainted cast iron radiator looks no worse than new
Why do paint cost estimates for radiators vary?
Not everyone wants to get rid of old cast iron batteries after upgrading their apartment. They are practical and reliable, and if the heating system is cleaned and rusty pipes are replaced, old radiators after painting will last at least another decade.
Advice! You should not cover yellowed, crumbling or cracked layers of paint with a new coating. This should be done only after removing old layers of paint and exposing the metal with a primer.
Calculations for paint consumption are complicated by the variety of models of heating devices, differing in many respects:
- mass (weight);
- aesthetics (design);
- format (dimensions of the section and the entire battery);
- power (heat transfer);
- volume of coolant (water);
- connection method (side, bottom, diagonal), etc.
Improved battery designs may require more paint than regular batteries
New models are also being produced that imitate old cast iron accordions. They exactly imitate the general structure of classic heating equipment. They have an improved design with artistic casting or designer soldering and comfortable legs at the bottom - for floor placement. They require a little more paint and primer, materials need to be taken in reserve.
How to independently calculate the coverage area and paint consumption
There are various ways to calculate the painting area of cast iron radiators, but there is no use in “reinventing the wheel”.
Attention! Manufacturers of thermal equipment reflect this information in the technical description for the model. This value is usually indicated as “heating area”; other options and translations are possible if these are imported models.
When calculating the paint area of a cast iron radiator MS-140 as a classic model, we take into account the area of one section or “accordion fin”. It is approximately equal to 0.244 m2. A more modern or modified section with a slightly larger center distance (300 mm) has a painting area of about 0.208 m2.
The radiator can be painted in any color that matches the overall interior
Models of cast iron batteries can vary greatly, so for calculations we take the heating area of one section from the documentation (product data sheet). Next, we multiply by the total area of all ribs with a small margin (adapters, taps, couplings, legs). For example, in the standard MS-140-500 there are 10 ribs, multiply by 10 the section area of 0.244 sq.m. We get 2.44 m2. We round up to 3 m2 - for all adjacent parts. Next we decide how many layers of painting there will be.
Innovative methods for determining the painting area of cast iron radiators - special computer programs and calculators. The following parameters are entered:
- radiator marking (according to technical documentation).
- number of sections, their length and height.
Standard battery calculation
First, let's consider the simplest (universal) calculation option. We start from the previously mentioned value of 100 W of power to heat 1 square meter of room. In our situation we have a simple formula:
K=S/U*100
TO
— the required number of heating radiator sections;
S
- area of the room;
U
— power of 1 section of the heating device.
An example of calculating sections for a room of 15 m2.
We take an aluminum radiator “Teplopribor” with an interaxial distance of 500 mm and a heat output of 185 W. We substitute the indicators into the formula and calculate:
K=15/185*100
We get 8.10 (rounded to 8).
Calculation result: 8 sections will be required.
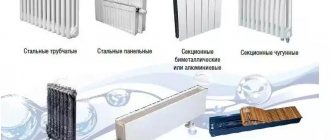
Purpose of heating radiators and their main types
The goal of any heating system is to create and maintain a comfortable temperature level in residential premises. The work of radiators is precisely aimed at creating a certain thermal balance. Radiators, due to their characteristics, quickly heat the air.
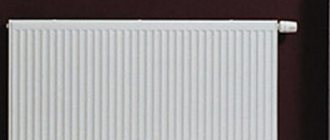
When purchasing heating radiators, many people focus primarily on their appearance. This is quite normal, considering that they are an integral part of any living space: apartment, country house. When choosing these devices, maximum attention must be paid to such an indicator as strength. Thanks to it, the radiator will be able to withstand the pressure created by the heating system. Now, among the variety of radiators, several main types can be distinguished: sectional aluminum, bimetallic and steel panel. For example, the pressure that steel radiators can withstand is 10 Atm, while for bimetallic radiators this figure is higher - 35 Atm. In order for the selected radiator to fully correspond to the parameters and room, it is necessary to calculate the area of the heating radiator.
Features of calculations for non-standard premises
If the ceilings in the room are too high or low, you will need to use a slightly different approach to calculating sections. Here we will take as a basis the statement that 41 W of thermal output can warm up 1 m2 of space.
Apply the formula A = B x 41
, wherein:
A
— required number of sections;
IN
- volume of the room (length x width x height).
For example, the volume of a room 5 m long, 4 m wide and 3 m high will be 60 m3.
We calculate the optimal thermal power by multiplying the volume of the room by the previously mentioned 41 W.
60 x 41 = 2460 W
For example, we use the same 191 W aluminum radiator AP1-500.
We count: 2460: 191 = 12.8.
With rounding, this results in 13 heating radiator sections.
Why do you need to round up? The thing is that sometimes manufacturers in technical documents indicate heat transfer that is slightly higher than actual values.
The most accurate way to calculate radiators
None of the methods mentioned above will give accurate calculation results, since they do not take into account many factors. For refined calculations, a formula with correction factors is used.
H=100 W/m2 x K1 x K2 x K3 x K4 x K5 x K6 x K7
IN
- the total amount of heat needed to heat the room;
S
- area of the room for which the calculation is being carried out.
K1, K2, K3
... - correction factors:
1. K1 - glazing features. If the room has ordinary windows with two glasses, use 1.27. For double and triple glazing the values will be 1.0 and 0.85 respectively.
2. K2 - thermal insulation of walls. Poor insulation forces the use of a coefficient of 1.27. If it's good, multiply by 1.0. For excellent thermal insulation, K will be 0.85.
3. K3 - area of windows and floor surface in the room. If the ratio is 50%, take K 1.2. For 40% - 1.1, and for 30% - 1.0. And so on.
4. K4 - average temperature outside during the coldest period. In winter the temperature drops to -35 degrees? Use a factor of 1.5. If -25 = 1.3. For an indicator up to -20 - 1.1. For every 5 degrees downward, subtract 0.2 from the coefficient.
5. K5 - number of external walls. For one surface use K 1.1. If two walls face outside, increase it by 0.1. With three - another 0.1.
6. K6 - the state of the room above. If there is a cold attic above the room, the coefficient will be 1.0. For heated - 0.9. If this is an apartment - 0.8.
7. K7 - room height. Ceilings of 2.5 m provide a coefficient of 1.0. For 3-meter ones it will be 1.05. Then, with every 0.5 meter, increase K by 0.05.
Let's imagine that we have the following conditions: a room of 15 m2 with two double-glazed windows on the windows, moderate thermal insulation of the walls, glazing area of 30%, average temperature in winter -25 degrees, two external walls, a residential apartment above and ceilings of 2.5 m.
Now let’s perform calculations taking into account correction factors:
B = 100 W/m2 x 1.0 x 1.0 x 1.0 x 1.3 x 1.2 x 0.8 x 1.0
We got 124.8. We round up and we have 125 W/m2 - no longer the standard 100 W, as we got from a simplified calculation.
It remains to multiply the result by the area of the room (125 x 15 m2 = 1875) and divide by the power of 1 section - 185 W. We get 10.1 and round to 10.
As you can see, we need not 8 sections, but 10. With a simplified calculation, the required heating power of the batteries turned out to be underestimated.
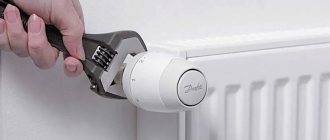
Advice: if you install temperature control equipment, then you need to further increase the calculated battery power by 15 - 20%.
Preparatory activities
They involve cleaning the battery surface from old paint and dirt:
- Wipe off the dust thoroughly with a damp cloth so that no dirt remains in the recesses. To clean hard-to-reach areas, place a rag between the ribs and move it back and forth.
- Remove the layer of old paint. When using a chemical method, Dufa, SP-6, B52, ACE products are used, but they are not able to cope with oil compositions that were produced in the mid-20th century. The physical method requires the use of a drill with a metal brush attached. You can also use a file and sandpaper.
- Apply a layer of primer mixture. It must not only withstand elevated temperatures, but also match the type of paint, it’s good if they are the same brand.
You might be interested
Heating radiator dimensions: height, width and thickness
Drywall battery box
The heating battery is leaking - what to do?
The tap on the radiator is leaking
Radiators in the floor heating in the house
The cast iron radiator is leaking - what to do?
Service life of heating radiators
Replacing heating radiators: how to avoid mistakes
Bimetallic batteries for a private home