Properly done heating is warm, comfortable and economical. There are quite a lot of radiator connection diagrams in practice:
- parallel connection (one-way circuit);
- diagonal (cross);
- single-pipe (apartment version);
- single-pipe with jumper (apartment version);
- two-pipe scheme (apartment version);
- single-pipe lower (autonomous heating);
- single-pipe bottom with jumper or tap (autonomous heating);
- two-pipe lower (saddle);
- two-pipe diagonal (autonomous heating, with or without pump).
In this article we will look at the heating radiator connection diagrams listed above.
If in an apartment with ways to connect radiators to a centralized heating system, we don’t have much choice, that is, when replacing the radiator, repeat the existing connection diagram. Then for autonomous heating (at home, cottage, cottage, etc.), we will try to decide on the most efficient and economical one.
Parallel connection of heating radiators (one-sided circuit)
Not a very efficient connection, since the radiator does not fully warm up.
This is especially true when the radiator is more than one meter in length (panel type), or more than ten sections (bimetal, aluminum). Heat losses are significant. Therefore, when installing large radiators in your apartment, use a diagonal connection. About him below.
Advantages and disadvantages of steel radiators
Stainless steel radiators have a number of advantages:
- have a long service life due to the simplicity of the design;
- have sufficient strength. High-quality models use steel with a thickness of 1.2…1.5 mm;
- allow for independent connection;
- have an attractive design.
In addition, tubular batteries, due to their ability to withstand pressure testing up to 20 atmospheres and resistance to water hammer, can be installed in “high-rise buildings” with central heating. The same cannot be said about panel batteries with low pressure testing.
The disadvantages include:
- susceptibility to corrosion under the influence of moisture and aggressive additives. It increases many times over with a long absence (2 weeks or more) of coolant in them;
- welds, especially in panel-type products, are sensitive to water hammer and may even burst during crimping;
- unstable paint coating.
However, despite the listed disadvantages, the basic performance characteristics of these products are high, and their price is very attractive.
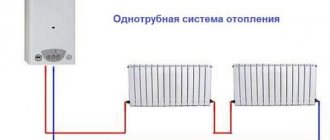
Single-pipe scheme (apartment version)
This connection scheme is very common in apartment buildings (from 9 floors and above).
One pipe (riser) descends from the technical floor, passes through all floors and enters the basement, where it enters the return pipe. In such a connection system, there will be heat in the upper apartments, since, having passed through all the floors and given off the heat to the bottom, the water in the pipe will cool down.
And if there is no technical floor (5-story buildings and below), then such a system is “ringed”. One pipe (riser) rises from the basement, passes through all floors, goes through the apartment on the top floor to the next room and descends, also through all floors, to the basement. In this case, it is not known who is lucky. On the ground floor, in one room, it may be warm where the pipe rises, but in the next room it is cold, where the same pipe descends, giving off heat to all apartments.
Her Majesty Leningrad
This is the name of the simplest and probably most popular single-pipe wiring scheme.
How did she win the sympathy of specialists?
- Extremely high fault tolerance. If two-pipe circuits can provide uneven heating of heating devices, and even be defrosted in extreme cold, then it is possible to cause some deviations in the normal operation of the Leningrad system only deliberately. The sinking of screw valves, silting or incorrect balancing will under no circumstances lead to the shutdown of the circuit or its individual sections.
- Ease of execution. Even an amateur can design and install a Leningradka: to understand the principle of its operation, a minimum of common sense and spatial imagination is enough.
- The ability to work with both forced circulation and natural circulation, due to the expansion of the heated coolant.
Let us clarify: minimal modifications to switch from forced to natural circulation will still be needed. The gravity system includes an accelerating manifold (vertical bottling section) immediately after the boiler. In addition, between the pump taps there must be a bypass with a diameter equal to the filling diameter: it will reduce the hydraulic resistance of the section to a minimum.
The simplest gravity system.
Single-pipe circuit with jumper (apartment version)
This option is slightly better than the previous one, since the goal is to heat all the radiators in the apartments, along the riser, evenly.
By reducing the resistance created by the radiators with such a jumper, the coolant passes through the entire riser, partially entering (mixing) into the radiator, thereby heating all floors evenly.
The main thing here is to make sure that none of the residents put a tap on the lintel (and close it), otherwise this whole “undertaking” of the engineers with the lintel will be covered with a “copper basin”. In some houses, knowing about such cases, they simply reduce the diameter of the lintel.
The tap on the jumper is needed in case of an accident or repair - if the radiator “leaks” (breaks), it is removed for replacement. Then the jumper serves as a bypass between the apartments so that the flow of coolant stops.
Design and design of steel radiators
Steel batteries replaced cast iron, which were previously used everywhere. At first, such batteries were much inferior to their predecessors in terms of parameters.
Now, thanks to modern technologies, they have good performance characteristics while remaining affordable. They come in panel and tubular types.
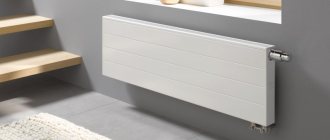
Panel
Each panel consists of two stamped profiled sheets, connected by a weld along the entire perimeter. Inside there are elongated vertical channels formed during stamping. They are designed to circulate coolant.
To improve heat transfer, sometimes ribs can be welded to the panels on the reverse side. The battery can consist of 1...3 panels, the sides of which are usually covered with casings.
According to the connection, there are universal models, as well as models connected from the side or from below, depending on the passage of the heating circuit pipes. Products with a bottom connection use a built-in thermostat, so their price is higher than the cost of other models.
Tubular
Tubular batteries, consisting of several rows of pipes connected to collectors, are used less frequently because they are more expensive than panel batteries. Pipes can be located both vertically and horizontally.
This design makes the heat transfer of radiators very efficient, allowing rapid heating of the battery, as well as its rapid cooling with automatic regulation.
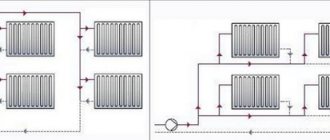
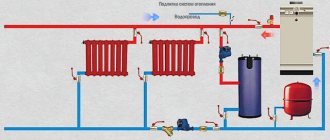
Two-pipe (apartment version)
This option is almost ideal for apartment buildings. There is a supply pipe (supply) and a “return” pipe.
The heat transfer when using such circuits is greater. The heating of the radiator and the room itself is better. There is no need to install a jumper in case of an accident.
Don’t forget to install a “Mayevsky tap” on the radiators to remove air from the heating system and remember the previous advice about diagonal connections when installing long radiators.
From apartments in multi-storey buildings we will move on to autonomous heating.
A competent approach to choosing the type of connection
The first thing you should pay special attention to is the radiator installation diagram. Often the efficiency and functionality of the battery depends on it. Also, if installed incorrectly, temperature control and the pressure in the battery increases significantly, which can lead to inevitable deterioration in operation. If you decide to carry out the installation yourself, without any skills, there is a high probability that you will encounter many problems and spoil the intended interior of the room.
Single-pipe circuit with bottom connection (autonomous heating)
This method of connecting radiators is outdated and ineffective.
How many times, in practice, have we had to redo such heating. The coolant in the pipes of such a system “flows” where it is “easier” (through a pipe that has a larger diameter). And it doesn’t want to “go” into the radiator (which has resistance).
The radiator does not warm up well, only from the bottom, and not always and not for everyone. Cannot be adjusted. Heat loss is large (up to 30%).
Pipe sizes
Forced circulation
If a constantly running circulation pump is installed in the system, the following conditional pipe passages are used when designing the circuit:
- filling - 25 mm;
- connections for a radiator length of up to 10 sections - 15 mm;
- connections for radiator lengths exceeding 10 sections - 20 mm.
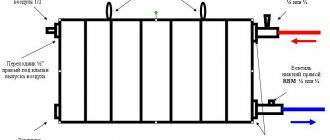
The ratio of the filling diameters and liners is clearly visible in the photo.
Please note: for a steel pipe, the nominal bore (DN) approximately corresponds to the internal diameter. Polymer and metal-polymer pipes are marked with an outer diameter; as a rule, it is one step larger than the internal one. So, for polypropylene, diameters 32, 20 and 25 should be used, respectively.
Natural circulation
If the circuit is intended to operate in natural circulation mode, the main task of the designer is to minimize its hydraulic resistance. How to achieve this?
The instructions are not complicated:
- heating pipes with minimal roughness are used - metal-plastic or polypropylene;
- The filling diameter increases to at least 40 millimeters.
Single-pipe bottom with jumper or tap (independent heating)
Bottom connection of the heating radiator with a tap on the jumper.
The same option, only slightly improved (modified). Things are already better here (you can try to regulate).
Using a jumper of a smaller diameter on the “bed” or a shut-off valve, we “drive” the coolant into the radiator, and if we also use a diagonal connection, then this option has a right to exist. You need to start regulating such a system from the boiler, using taps. Go ahead.
What is needed for installation
Installation of heating radiators of any type requires devices and consumables. The set of necessary materials is almost the same, but for cast iron batteries, for example, the plugs are large, and they do not install a Mayevsky valve, but instead, somewhere at the highest point of the system, they install an automatic air vent. But the installation of aluminum and bimetallic heating radiators is absolutely the same.
Steel panel ones also have some differences, but only in terms of hanging - they come with brackets, and on the back panel there are special arms cast from metal, with which the heater clings to the hooks of the brackets.
These are the arms that hook the hooks
Mayevsky crane or automatic air vent
This is a small device for releasing air that may accumulate in the radiator. Placed on the free upper outlet (collector). It must be on every heating device when installing aluminum and bimetallic radiators. The size of this device is significantly smaller than the diameter of the manifold, so you will also need an adapter, but Mayevsky taps usually come complete with adapters, you just need to know the diameter of the manifold (connection dimensions).
Mayevsky crane and method of its installation
In addition to the Mayevsky crane, there are also automatic air vents. They can also be installed on radiators, but they are slightly larger in size and for some reason are only available in a brass or nickel-plated case. Not in white enamel. In general, the picture is unattractive and, although they deflate automatically, they are rarely installed.
This is what a compact automatic air vent looks like (there are more bulky models)
The side-connected radiator has four outputs. Two of them are occupied by the supply and return pipelines, on the third they install a Mayevsky valve. The fourth entrance is closed with a plug. It, like most modern batteries, is most often painted with white enamel and does not spoil the appearance at all.
Where to install the Mayevsky plug and tap for different connection methods
Shut-off valves
You will need two more ball valves or shut-off valves that can be adjusted. They are placed on each battery at the input and output. If these are ordinary ball valves, they are needed so that, if necessary, you can turn off the radiator and remove it (emergency repairs, replacement during the heating season). In this case, even if something happens to the radiator, you will cut it off, and the rest of the system will work. The advantage of this solution is the low price of ball valves, the disadvantage is the impossibility of adjusting heat transfer.
Radiator taps
Almost the same tasks, but with the ability to change the intensity of the coolant flow, are performed by shut-off control valves. They are more expensive, but they also allow you to adjust the heat transfer (make it less), and they look better externally; they are available in straight and angular versions, so the piping itself is more accurate.
If desired, you can install a thermostat on the coolant supply after the ball valve. This is a relatively small device that allows you to change the heat output of a heating device. If the radiator does not heat well, you cannot install them - it will be even worse, since they can only reduce the flow. There are different thermostats for batteries - automatic electronic ones, but more often they use the simplest one - mechanical.
Related materials and tools
You will also need hooks or brackets for hanging on walls. Their number depends on the size of the batteries:
- if there are no more than 8 sections or the length of the radiator is no more than 1.2 m, two mounting points on top and one on the bottom are sufficient;
- For every next 50 cm or 5-6 sections, add one fastener at the top and bottom.
You also need fum tape or linen winding and plumbing paste to seal the joints. You will also need a drill with drills, a level (preferably a level, but a regular bubble one will do), and a number of dowels. You will also need equipment for connecting pipes and fittings, but it depends on the type of pipes. That's all.
Double-pipe bottom (saddle)
Two-pipe heating system with bottom supply.
This option is better than the previous ones, as it has a “supply” and a “return”. Works and adjusts well. But this option also has minor drawbacks and heat loss.
And now we have come, in my opinion, to the most effective radiator connection scheme.
Varieties
All heating devices with the possibility of bottom installation are divided into three types.
Bimetallic
The design of the devices is characterized by the presence of convection plates. Equipment connection points are located at four points. Simplicity and versatility of operation makes them top sellers. The heat loss rate does not exceed 15%. If the heating power decreases, you can adjust the thermostat manually.
In the production of bimetallic radiators, high-strength metals are used: steel and aluminum. Steel is in good contact with the coolant, and aluminum is needed as a heat-conducting element.
Radiators of this type are either monolithic or collapsible. The use of the former is considered rational when working with high pressure. Such structures are more reliable, which means the risk of an accident is minimized.
Panel
They can be smooth or grooved. Their design involves a bottom connection to the heating system without a diagonal or top connection. The only negative is that connecting elements for connection are purchased separately.
Tubular steel
They are considered very effective in use, as they have high heat transfer rates. Products made in Germany and Italy, which have the possibility of one-sided connection, are considered to be of the highest quality.
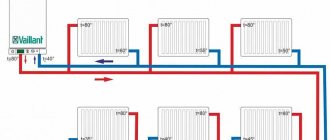
Two-pipe system - diagonal connection diagram (autonomous heating)
Two-pipe system, diagonal connection.
Over eighteen years of working as an installer, I have come to the conclusion that this scheme (see Fig. 9) is the most effective. Excellent adjustability. There is practically no heat loss. Possibility to balance and save on pipe diameter.
Conclusion - I tried to cover in detail the topic of all existing radiator connection diagrams. And I hope you will be able to evaluate all the pros and cons of each of the above, choosing the most effective and economical for yourself. Good luck.
Method for calculating and selecting a radiator model
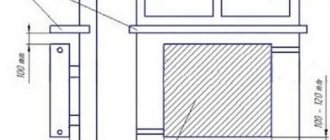
When installing the battery, the following parameters must be observed:
- the battery must occupy at least three quarters of the window opening;
- its width should be 20...30 cm less than the width of the window sill;
- The dimensions of the battery must ensure good air circulation in the heated room (during installation, distances should be maintained - 30...50 mm from the wall, 100...150 mm from the window sill, 70...100 mm from the floor).
Before purchasing a steel radiator, you should first determine its power, which depends on the heat loss of a given room.
Sectional batteries must have 1 section per 1.5 square meters. m. area. Standard heating radiators have a power of 100…120 W per square meter. meter.